Difference between revisions of "RMS Task Manager Examples"
| (10 intermediate revisions by the same user not shown) | |||
| Line 11: | Line 11: | ||
===Waking up to router connected PC=== | ===Waking up to router connected PC=== | ||
| − | Before starting RMS configurations, make sure that the router to which commands will be sent has Wake On LAN package installed and | + | '''Before starting''' RMS configurations, make sure that the router to which commands will be sent has Wake On LAN package installed and PC information configured. |
| − | If a logfile is not required | + | '''Info''': If a logfile is not required parts marked in <span style="color:#0000ff">blue</span> can be skipped or removed. |
| + | #<span style="color:#0000ff">Removing old logfile: '''''rm /tmp/etherwake_logs'''''</span> | ||
| + | #Waking up connected PC: '''''/etc/init.d/etherwake start [PC_name_used_in_router]<span style="color:#0000ff"> >> /tmp/etherwake_logs'''''</span> | ||
| + | #<span style="color:#0000ff">Downloading logfile. File path to file location: '''''/tmp/etherwake_logs'''''</span> | ||
| − | === | + | ===Configuring unique LAN IP address=== |
| + | |||
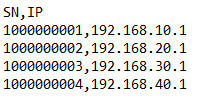
| + | '''Before starting''' prepare .csv file and upload in RMS as ''Task manager file'', which provides information as shown in image below: | ||
| + | |||
| + | [[File:rms_task_manager_sn_ip_csv_file_example.png]] | ||
| + | |||
| + | #Upload .csv from RMS to router using '''''/tmp/LAN_IP.csv''''' target file path | ||
| + | #Get device serial number: '''''mnf_info -s > /tmp/snfile''''' | ||
| + | #Get IP address from csv file: '''''SN=`cat /tmp/snfile` && grep $SN /tmp/LAN_IP.csv | grep -oE '((1?[0-9][0-9]?|2[0-4][0-9]|25[0-5])\.){3}(1?[0-9][0-9]?|2[0-4][0-9]|25[0-5])' > /tmp/ipfile''''' | ||
| + | #Set new LAN IP address: '''''IP=`cat /tmp/ipfile` && uci set network.lan.ipaddr=$IP''''' | ||
| + | #Commit changes: '''''uci commit''''' | ||
| + | #Restart interfaces: '''''/etc/init.d/network restart''''' | ||
===Installing Python=== | ===Installing Python=== | ||
| + | |||
| + | <span style="color:#d33">'''Disclaimer: before installing any 3rd party software make sure that the target device has a sufficient amount of free storage space!!!'''</span> | ||
| + | |||
| + | '''Info''': If a logfile is not required parts marked in <span style="color:#0000ff">blue</span> can be skipped or removed. | ||
| + | |||
| + | #<span style="color:#0000ff">Removing old file: '''''rm /tmp/opkg_logs''''''</span> | ||
| + | #Updating OpenWrt package manager repositories:'''''opkg update<span style="color:#0000ff"> >> /tmp/opkg_logs</span>''''' | ||
| + | #Installing Python3: '''''opkg install python3<span style="color:#0000ff"> >> /tmp/opkg_logs</span>''''' | ||
| + | #Installing Python3 PIP: '''''opkg install python3-pip<span style="color:#0000ff"> >> /tmp/opkg_logs</span>''''' | ||
| + | #<span style="color:#0000ff">Downloading logfile. File path to file location: '''''/tmp/opkg_logs'''''</span> | ||
Latest revision as of 16:12, 17 December 2021
Summary
RMS Task Manager is a tool integrated into RMS Management. It is designed in a way, where users can easily send Linux terminal commands, upload and download files to connected Teltonika Networks routers and gateways.
On this page, you will find several examples of how RMS Task Manager can be used with Teltonika Networks devices.
Examples
Waking up to router connected PC
Before starting RMS configurations, make sure that the router to which commands will be sent has Wake On LAN package installed and PC information configured.
Info: If a logfile is not required parts marked in blue can be skipped or removed.
- Removing old logfile: rm /tmp/etherwake_logs
- Waking up connected PC: /etc/init.d/etherwake start [PC_name_used_in_router] >> /tmp/etherwake_logs
- Downloading logfile. File path to file location: /tmp/etherwake_logs
Configuring unique LAN IP address
Before starting prepare .csv file and upload in RMS as Task manager file, which provides information as shown in image below:
- Upload .csv from RMS to router using /tmp/LAN_IP.csv target file path
- Get device serial number: mnf_info -s > /tmp/snfile
- Get IP address from csv file: SN=`cat /tmp/snfile` && grep $SN /tmp/LAN_IP.csv | grep -oE '((1?[0-9][0-9]?|2[0-4][0-9]|25[0-5])\.){3}(1?[0-9][0-9]?|2[0-4][0-9]|25[0-5])' > /tmp/ipfile
- Set new LAN IP address: IP=`cat /tmp/ipfile` && uci set network.lan.ipaddr=$IP
- Commit changes: uci commit
- Restart interfaces: /etc/init.d/network restart
Installing Python
Disclaimer: before installing any 3rd party software make sure that the target device has a sufficient amount of free storage space!!!
Info: If a logfile is not required parts marked in blue can be skipped or removed.
- Removing old file: rm /tmp/opkg_logs'
- Updating OpenWrt package manager repositories:opkg update >> /tmp/opkg_logs
- Installing Python3: opkg install python3 >> /tmp/opkg_logs
- Installing Python3 PIP: opkg install python3-pip >> /tmp/opkg_logs
- Downloading logfile. File path to file location: /tmp/opkg_logs
