Difference between revisions of "RUT955 Setup Wizard"
| Line 4: | Line 4: | ||
===Step 1=== | ===Step 1=== | ||
| − | + | ---- | |
The first window of Setup Wizard prompts you to change the router's '''[[RUT955 Administration#General|default password]]''' and '''[NTP|time zone]]'''. Both of these steps are not mandatory but it is '''highly recommended that you change the default password''' because if you don't the router becomes highly vulnerable to online attacks. | The first window of Setup Wizard prompts you to change the router's '''[[RUT955 Administration#General|default password]]''' and '''[NTP|time zone]]'''. Both of these steps are not mandatory but it is '''highly recommended that you change the default password''' because if you don't the router becomes highly vulnerable to online attacks. | ||
| Line 11: | Line 11: | ||
===Step 2=== | ===Step 2=== | ||
| − | + | ---- | |
The second window of Setup Wizard is used to configure your '''[[Mobile]]''' settings. Most SIM cards will work with the default settings, but some features have special requirements. For example, if your operator provides you with the Static Public IP feature, you must enter an Access Point Name (APN) for it to work, if you're planning on using PPP connection type, you must enter a dialing number in order to achieve a mobile data connection and etc. | The second window of Setup Wizard is used to configure your '''[[Mobile]]''' settings. Most SIM cards will work with the default settings, but some features have special requirements. For example, if your operator provides you with the Static Public IP feature, you must enter an Access Point Name (APN) for it to work, if you're planning on using PPP connection type, you must enter a dialing number in order to achieve a mobile data connection and etc. | ||
| Line 18: | Line 18: | ||
===Step 3=== | ===Step 3=== | ||
| − | + | ---- | |
The third window of Setup Wizard is used to configure your router's '''[[LAN|Local Area Network (LAN)]]''' settings. Like all other steps, Step 3 is optional, meaning that the router will work fine with the default LAN settings. If you have multiple routers in your network it is recommended to change your router's LAN IP address to help differentiate it from other routers in your LAN, if you plan on having more than 150 devices connecting to your router, you should also change the DHCP range, etc. | The third window of Setup Wizard is used to configure your router's '''[[LAN|Local Area Network (LAN)]]''' settings. Like all other steps, Step 3 is optional, meaning that the router will work fine with the default LAN settings. If you have multiple routers in your network it is recommended to change your router's LAN IP address to help differentiate it from other routers in your LAN, if you plan on having more than 150 devices connecting to your router, you should also change the DHCP range, etc. | ||
| Line 25: | Line 25: | ||
===Step 4=== | ===Step 4=== | ||
| − | + | ---- | |
The fourth and final window of Setup Wizard is used to configure your router's '''[[Wireless|Wi-Fi settings]]'''. If you have more than one RUT router in you home/office, it is recommended that you change the Wireless SSID, since SSIDs identical RUT routers are identical. Also, the default Wi-Fi configuration uses no encryption. It recommended that you set up a password for your Wireless Access Point to keep out unwanted devices from connecting to your Wi-Fi network. | The fourth and final window of Setup Wizard is used to configure your router's '''[[Wireless|Wi-Fi settings]]'''. If you have more than one RUT router in you home/office, it is recommended that you change the Wireless SSID, since SSIDs identical RUT routers are identical. Also, the default Wi-Fi configuration uses no encryption. It recommended that you set up a password for your Wireless Access Point to keep out unwanted devices from connecting to your Wi-Fi network. | ||
[[Image:System setup wizard step 4.PNG]] | [[Image:System setup wizard step 4.PNG]] | ||
Revision as of 16:45, 10 November 2017
Main Page > RUT Routers > RUT955 > RUT955 Manual > RUT955 WebUI > RUT955 System section > RUT955 Setup WizardSummary
The configuration wizard provides a simple way of quickly configuring the device in order to bring it up to basic functionality. The wizard is comprised out of 4 steps and they are as follows:
Step 1
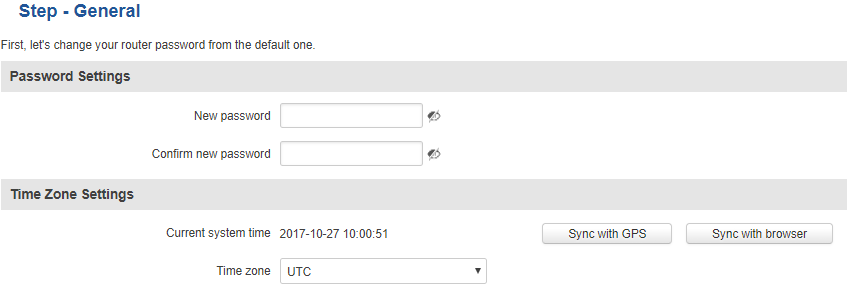
The first window of Setup Wizard prompts you to change the router's default password and [NTP|time zone]]. Both of these steps are not mandatory but it is highly recommended that you change the default password because if you don't the router becomes highly vulnerable to online attacks.
Step 2
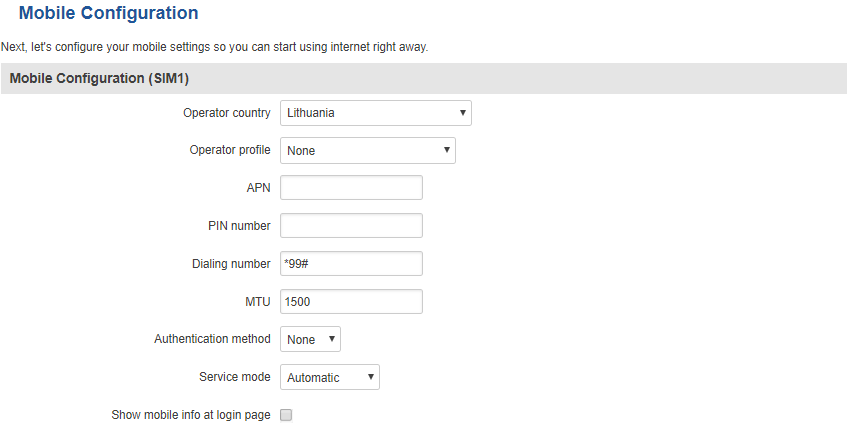
The second window of Setup Wizard is used to configure your Mobile settings. Most SIM cards will work with the default settings, but some features have special requirements. For example, if your operator provides you with the Static Public IP feature, you must enter an Access Point Name (APN) for it to work, if you're planning on using PPP connection type, you must enter a dialing number in order to achieve a mobile data connection and etc.
Step 3
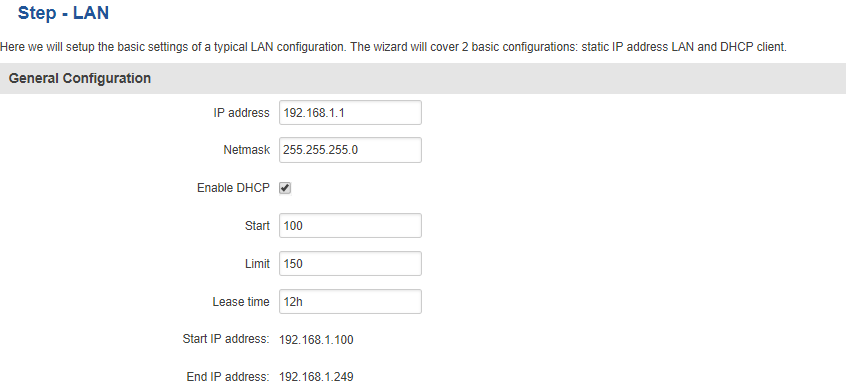
The third window of Setup Wizard is used to configure your router's Local Area Network (LAN) settings. Like all other steps, Step 3 is optional, meaning that the router will work fine with the default LAN settings. If you have multiple routers in your network it is recommended to change your router's LAN IP address to help differentiate it from other routers in your LAN, if you plan on having more than 150 devices connecting to your router, you should also change the DHCP range, etc.
Step 4
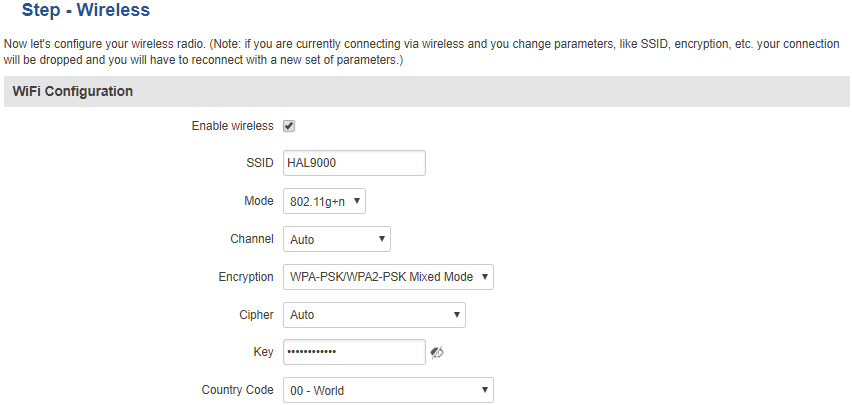
The fourth and final window of Setup Wizard is used to configure your router's Wi-Fi settings. If you have more than one RUT router in you home/office, it is recommended that you change the Wireless SSID, since SSIDs identical RUT routers are identical. Also, the default Wi-Fi configuration uses no encryption. It recommended that you set up a password for your Wireless Access Point to keep out unwanted devices from connecting to your Wi-Fi network.


