Difference between revisions of "RUTXR1 First Start"
(Created page with "{{Template: Networking_rutx_first_start | name = RUTXR1 | series = RUTX | file_device = Rutxr1_demo_placeholder_v1.png | size_device = 400p...") |
|||
| Line 10: | Line 10: | ||
| file_login_a = Networking_rutx_first_start_login_to_device_figure_a_v1.png | | file_login_a = Networking_rutx_first_start_login_to_device_figure_a_v1.png | ||
| file_login_b = Networking_rutx_first_start_login_to_device_figure_b_v1.png | | file_login_b = Networking_rutx_first_start_login_to_device_figure_b_v1.png | ||
| + | | ip = 192.168.1.1 | ||
| + | | mobile = 1 | ||
}} | }} | ||
Revision as of 11:21, 14 December 2020
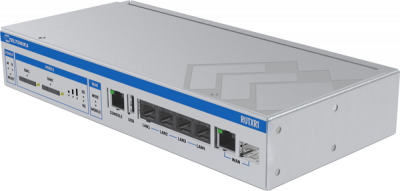
This Wiki page contains the online version of the Quick Start Guide (QSG) for the RUTXR1 router. Here you will find an overview of the various components found on the front and back sides of a RUTXR1 device, basic hardware installation, first login information and general technical information. It is highly recommended that you acquaint yourself with with the Quick Start Guide before using the device. If you own a RUTXR1 device, you can also find a printed version of the Quick Start Guide in the device's packaging.
Front view
Back view
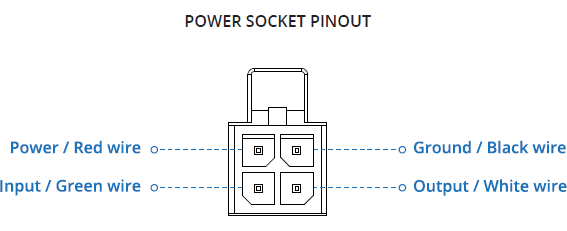
Power socket pinout
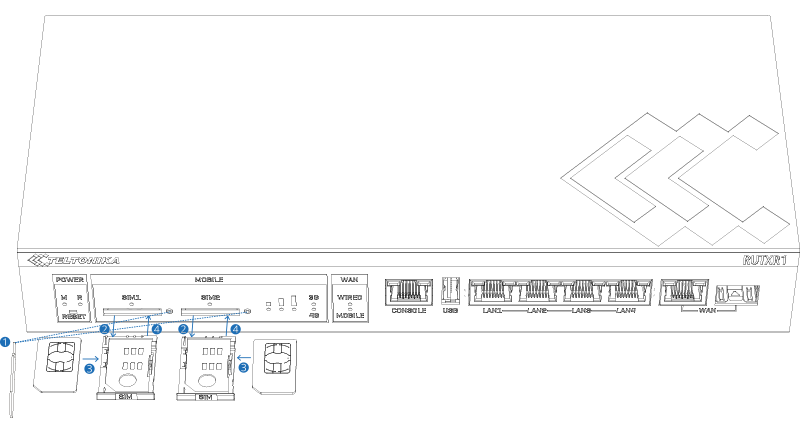
Hardware installation
- Push the SIM holder button with the SIM needle.
- Pull out the SIM holder.
- Insert your SIM card into the SIM holder.
- Slide the SIM holder back into the router.
- Attach all antennas.
- Connect the power adapter to the socket on the front of the device. Then plug the other end of the power adapter into a power outlet.
- Connect to the device wirelessly using SSID and password provided on the device information label or use an Ethernet cable connected to LAN port.
Login to device
- To enter the router's Web interface (WebUI), type http://192.168.1.1 into the URL field of your Internet browser.
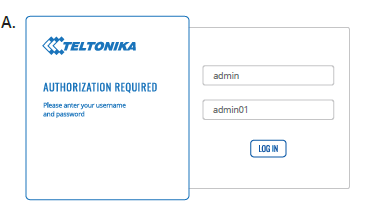
- Use login information shown in image A when prompted for authentication.
- After you log in, you will be prompted to change your password for security reasons. The new password must contain at least 8 characters, including at least one uppercase letter, one lowercase letter, and one digit. This step is mandatory, and you will not be able to interact with the router's WebUI before you change the password.
- When you change the router's password, the Configuration Wizard will start. The Configuration Wizard is a tool used to set up some of the router's main operating parameters.
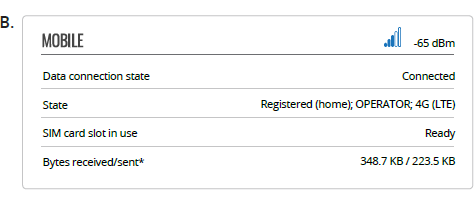
- Go to the Overview page and pay attention to the Signal Strength indication (image B). To maximize the cellular performance try adjusting the antennas or changing the location of your device to achieve the best signal conditions.
Technical information
| Radio specifications | |
|---|---|
| RF technologies | 3G, 4G, WiFi |
| Max RF power | 24 dBm@WCDMA, 23 dBm@LTE, 23 dBm@WiFi |
| Bundled accessories specifications* | |
| Power adapter | Input: 0.6 A@100-240 VAC, Output: 12 VDC, 1.5 A, 4 pin plug |
| Mobile antenna | 698~960/1710~2690 MHz, 50 Ω, VSWR<3, gain** 3 dBi, omnidirectional, SMA male connector |
| WiFi antenna | 2400~2500 MHz/4950~5850 MHz, 50 Ω, VSWR<2, gain** 3 dBi, omnidirectional, RP-SMA male connector |
* Order code dependent.
** Higher gain antenna can be connected to compensate for cable attenuation when a cable is used. The user is responsible for the compliance with the legal regulations.
Safety information
The RUTXR1 router must be used in compliance with any and all applicable national and international laws and with any special restrictions regulating the utilization of the communication module in prescribed applications and environments.
| [EN] English | Hereby, TELTONIKA declares that this RUTXR1 is in compliance with the essential requirements and other relevant provisions of Directive CE/RED. |
| [BF] Bulgarian | С настоящето, TELTONIKA декларира, че RUTXR1 е в съответствие със съществените изисквания и другитеприложими разпоредби на Директива CE/RED. |
| [CZ] Czech | TELTONIKA tímto prohlašuje, že RUTXR1 splňuje základní požadavky a všechna příslušná ustanoveni Směrnice CE/RED. |
| [DE] German | Hiermit erklärt TELTONIKA dass sich das Gerät RUTXR1 in Übereinstimmung mit den grundlegenden Anforderungen und den übrigen einschlägigen Bestimmungen der Richtlinie CE/RED befindet. |
| [DK] Danish | Undertegnede TELTONIKA erklærer herved, at følgende udstyr RUTXR1 overholder de væsentlige krav og øvrige relevante krav i direktiv CE/RED. |
| [EE] Estonian | Käesolevaga kinnitab TELTONIKA seadme RUTXR1 vastavust direktiivi CE/RED põhinõuetele ja nimetatud direktiivist tulenevatele teistele asjakohastele sätetele. |
| [ES] Spanish | Por la presente, TELTONIKA declara que este RUTXR1 cumple con los requisitos esenciales y otras exigencias relevantes de la Directiva CE/RED. |
| [FI] Finish | TELTONIKA vakuuttaa täten että RUTXR1 tyyppinen laite on direktiivin CE/RED oleellisten vaatimusten ja sitä koskevien direktiivin muiden ehtojen mukainen. |
| [FR] French | TELTONIKA déclare que cette RUTXR1 est conforme aux exigences essentielles et aux autres dispositions pertinentes de la directive CE /RED. |
| [GR] Greek | ΜΕ ΤΗΝ ΠΑΡΟΥΣΑ Ο ΚΑΤΑΣΚΕΥΑΣΤΗΣ TELTONIKA ΔΗΛΩΝΕΙ ΟΤΙ RUTXR1 ΣΥΜΜΟΡΦΩΝΕΤΑΙ ΠΡΟΣ ΤΙΣ ΟΥΣΙΩΔΕΙΣ ΑΠΑΙΤΗΣΕΙΣ ΚΑΙ ΤΙΣ ΛΟΙΠΕΣ ΣΧΕΤΙΚΕΣ ΔΙΑΤΑΞΕΙΣ ΤΗΣ ΟΔΗΓΙΑΣ CE/RED. |
| [HU] Hungarian | A TELTONIKA ezzennel kijelenti, hogy a RUTXR1 típusú berendezés teljesíti az alapvető követelményeket és más CE/RED irányelvben meghatározott vonatkozó rendelkezéseket. |
| [IT] Italian | Con la presente TELTONIKA dichiara che questo RUTXR1 è conforme ai requisiti essenziali ed alle altre disposizioni pertinenti stabilite dalla direttiva CE/RED. |
| [LT] Lithuanian | Šiuo dokumentu UAB TELTONIKA deklaruoja, kad šis RUTXR1 atitinka esminius reikalavimus ir kitas CE/RED Direktyvos nuostatas. |
| [LV] Latvian | Ar šo TELTONIKA deklarē, ka RUTXR1 atbilst Direktīvas CE/RED būtiskajām prasībām un citiem ar to saistītajiem noteikumiem. |
| [NL] Dutch | Hierbij verklaart TELTONIKA dat het toestel l RUTXR1 in overeenstemming is met de essentiële eisen en de andere relevante bepalingen van richtlijn CE/RED. |
| [NO] Norwegian | TELTONIKA Erklærer herved at RUTXR1 er i samsvar med de grunnleggende krav og øvrige relevante krav i direktiv CE/RED. |
| [PL] Polish | Niniejszym TELTONIKA deklaruje że RUTXR1 jest zgodny z zasadniczymi wymaganiami i innymi właściwymi postanowieniami Dyrektywy CE/RED. |
| [PT] Portuguese | Eu, TELTONIKA declaro que o RUTXR1 cumpre os requisitos essenciais e outras provisões relevantes da Directiva CE/RED. |
| [RO] Romanian | Prin prezenta, TELTONIKA declară că aparatul RUTXR1 este în conformitate cu cerinţele esenţiale şi cu alte prevederi pertinente ale Directivei CE/RED. |
| [SE] Swedish | Härmed intygar TELTONIKA att denna RUTXR1 är i överensstämmelse med de väsentliga egenskapskrav och övriga relevanta bestämmelser som framgår av direktiv CE/RED. |
| [SI] Slovenian | TELTONIKA izjavlja, da je ta RUTXR1 v skladu z bistvenimi zahtevami in drugimi relevantnimi določili direktive CE/RED. |
The full text of the EU declaration of conformity is available at this Wiki via the following address: https://wiki.teltonika-networks.com/view/RUTXR1_CE/RED
[EN] Instruction Manual: Connect the power adapter to turn on the device. Open 192.168.1.1 in your web browser to configure it. More information on https://wiki.teltonika-networks.com
[BG] Инструкция: Свържете адаптера на захранване, за да включите устройството. Отворете 192.168.1.1 в уеб браузър, за да настроите продукта. Повече информация в https://wiki.teltonika-networks.com
[CZ] Návod k použití: Připojte napájecí adaptér k zapnutí přístroje. Otevřete 192.168.1.1 ve webovém prohlížeči pro konfiguraci produktu. Více informací najdete v https://wiki.teltonika-networks.com
[DE] Bedienungsanleitung: Verbinden Sie das Netzteil, um das Gerät einzuschalten. Öffnen Sie 192.168.1.1 in einem Web Browser, um das Produkt zu konfigurieren. Weitere Informationen im https://wiki.teltonika-networks.com/
[DK] Instruktionsbog: Tilslut strømadapteren for at tænde for enheden. Åbn 192.168.1.1 i en webbrowser til at konfigurere produktet. Mere information i https://wiki.teltonika-networks.com
[EE] Kasutusjuhend: Ühendage toiteadapter seadme sisselülitamiseks. Avatud 192.168.1.1 in veebilehitseja seadistada toodet. Rohkem teavet https://wiki.teltonika-networks.com
[ES] Manual de instrucciones: Conecte el adaptador de alimentación para encender la unidad. Abra 192.168.1.1 en un navegador web para configurar el producto. Más información en https://wiki.teltonika-networks.com
[FI] Käyttöohje: Kytke virtalähde päälle laitteen. Avaa 192.168.1.1 in selaimen määrittää tuotteen. Lisää tietoa https://wiki.teltonika-networks.com
[FR] Mode d'emploi: Connectez l'adaptateur d'alimentation pour allumer l'appareil. Ouvrez 192.168.1.1 dans un navigateur Web pour configurer le produit. Plus d'informations dans https://wiki.teltonika-networks.com
[GR] εγχειρίδιο οδηγιών: Συνδέστε τον προσαρμογέα τροφοδοσίας για να ενεργοποιήσετε τη μονάδα. Ανοίξτε 192.168.1.1 σε ένα πρόγραμμα περιήγησης στο Web για να διαμορφώσετε το προϊόν. Περισσότερες πληροφορίες στο https://wiki.teltonika-networks.com
[HU] Használati utasítás: Csatlakoztassa a hálózati adaptert a készülék bekapcsolásához. Megnyitása 192.168.1.1 egy webböngészőben beállítani a terméket. Több információ https://wiki.teltonika-networks.com
[IT] Manuale di istruzioni: Collegare l'adattatore di alimentazione per accendere l'unità. Aprire 192.168.1.1 in un browser Web per configurare il prodotto. Maggiori informazioni in https://wiki.teltonika-networks.com
[LT] Naudojimosi instrukcija: Prijunkite maitinimo adapterį, įjunkite įrenginį. Interneto naršyklėje atidarykite adresą 192.168.1.1 - galite konfigūruoti gaminį. Daugiau informacijos rasite https://wiki.teltonika-networks.com
[LV] Lietošanas instrukcija: Pievienojiet Strāvas adapteri, lai ieslēgtu ierīci. Atvērt 192.168.1.1 ar interneta pārlūku, lai konfigurētu produktu. Plašāka informācija https://wiki.teltonika-networks.com
[NL] Handleiding: Sluit voedingsadapter aan op het apparaat in te schakelen. Open 192.168.1.1 in een webbrowser om het product te configureren. Meer informatie in https://wiki.teltonika-networks.com
[NO] Bruksanvisningen: Koble strømadapteren for å slå på enheten. Åpne 192.168.1.1 i en nettleser for å konfigurere produktet. Mer informasjon på https://wiki.teltonika-networks.com
[PL] Instrukcja obsługi: Podłącz adapter zasilania, aby włączyć urządzenie. Otwórz 192.168.1.1 w przeglądarce internetowej, aby skonfigurować urządzenie. Więcej informacji w https://wiki.teltonika-networks.com
[PT] Manual de instruções: Conecte o adaptador de alimentação para ligar o aparelho. Abra 192.168.1.1 em um navegador da web para configurar o produto. Mais informações em https://wiki.teltonika-networks.com
[RO] Instrucțiuni de utilizare: Conectați adaptorul de alimentare pentru a porni aparatul. Deschide 192.168.1.1 întrun browser web pentru a configura produsul. Mai multe informații în https://wiki.teltonika-networks.com
[SE] Instruktionsmanual: Anslut nätadap tern för att slå på enheten. Öppna 192.168.1.1 i en webbläsare för att konfigurera produkten. Mer information på https://wiki.teltonika-networks.com
[SI] Navodila: Priključite napajalnik za vklop naprave. Odprite 192.168.1.1 v spletnem brskalniku nastaviti izdelek. Več informacij v https://wiki.teltonika-networks.com
[SK] NávoZd na použitie: Pripojte napájací adaptér k zapnutiu prístroja. Otvorte 192.168.1.1 vo webovom prehliadači pre konfiguráciu produktu. Viac informácií nájdete v https://wiki.teltonika-networks.com
For more information visit www.teltonika-networks.com

This sign means that product meets the requirements of the applicable EU directives.
