Difference between revisions of "Sending emails via command line"
| Line 84: | Line 84: | ||
'''Body of text''': | '''Body of text''': | ||
<span style=color:blue>Hello, | <span style=color:blue>Hello, | ||
| + | |||
JustTesting</span> | JustTesting</span> | ||
Revision as of 16:08, 23 March 2018
Main Page > General Information > Configuration Examples > Email > Sending emails via command lineSummary
This chapter provides a guide on how to send emails via command line.
Email service provider parameters
First off, you'll need to be aware of some information about your email service (the one you'll be using to send the emails). The parameters in question are: SMTP Server, SMTP Server port, whether it uses SSL/TLS, login username and password. You can find your email service provider's SMTP Server information online. For example, Gmail's SMTP settings are:
Gmail SMTP server address        smtp.gmail.com.
Gmail SMTP username              Full Gmail address (e.g. [email protected])
Gmail SMTP password              Gmail password.
Gmail SMTP port (TLS)            587
Gmail SMTP port (SSL)            465
Gmail SMTP TLS/SSL required      yes
You probably already know your username and password and you can find the rest of the settings with a quick search. Just type "email_provider_name smtp settings" into the search field of your preferred engine.
Logging in to the router
Once you have all the necessary email information, choose your favourite method of sending command line queries or the one that is currently available to you and log in to your router accordingly. The most common methods of doing so are CLI(Command Line Interface) and SSH.
Note: in further examples of this guide we will be demonstrating how to send email using SSH. Feel free to follow the guide step by step whichever method you choose, because the commands used are identical and the only thing that is different is the GUI (Graphical User Interface).
CLI
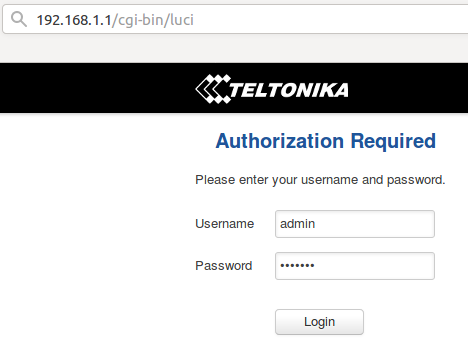
CLI can be reached through the router's WebUI. To reach the router's WebUI, simply enter the router's LAN IP address (192.168.1.1 by default) into your browser's URL bar and press "Enter". Next, type in the router's login infromation (username: admin; password: admin01 by default) and click "Login":
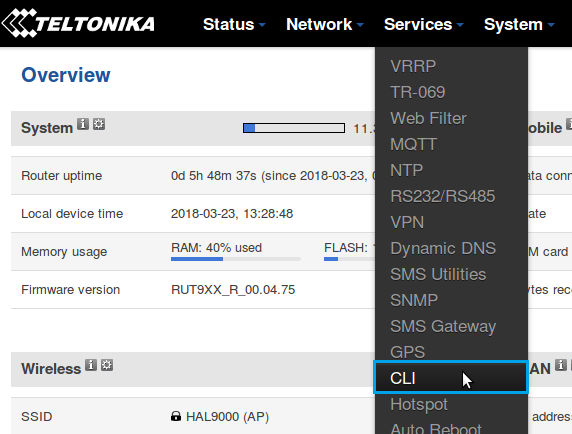
Next, navigate to the Services menu and click on the CLI option from the drop-down list:
In the next window, type in the username root and press "Enter". Then type in the router's password (same one you used for logging in to the router), press "Enter" and you should be greeted with a window such as this:
Once this is done, you will able to execute commands via CLI.
SSH
To log in to a RUT router via SSH, download the free PuTTY app if you're using Windows; if you're using a Linux based OS, just use the Terminal app. In both cases you will need to know three things: the router's LAN IP address, user name and password. The default LAN IP address for all RUT routers is 192.168.1.1; the default login information is username: root; password: admin01 (NOTE: the user name used for SSH connections (i.e., root) is not the same as the user name used to log in to the router's WebUI (i.e., admin)).
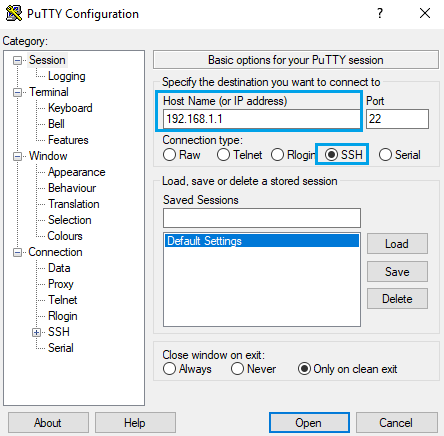
If you're using PuTTY, enter the router's LAN IP address into the Host Name (or IP address) field, select SSH Connection type and click Open:
After this you will be prompted to enter the username and password.
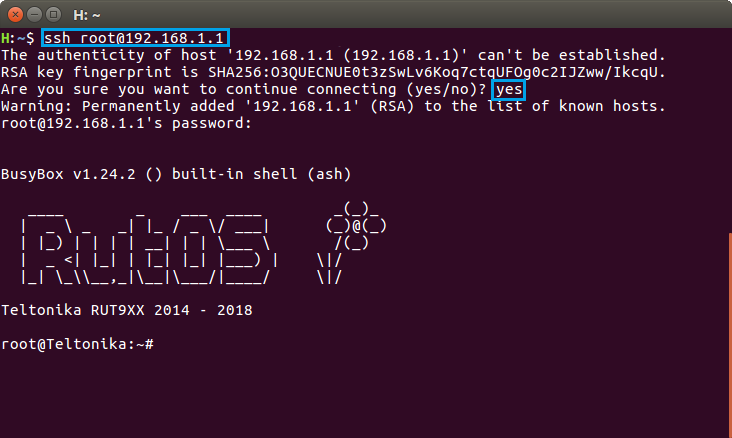
If you're using Linux, open a Terminal and type this command:
# ssh [email protected]
If you made changes to LAN IP address or log in name, replace the relevant data in the command above so that it is correct for your specific case. After executing this command you will prompted with a query that says "Are you sure you want to continue connecting (yes/no)?". Type yes, press "Enter" and type in your router's admin password. If everything went successfully, you should be greeted with a window such as this:
Once this is done, you will able to execute commands via SSH.
Sending emails
RUT routers use the sendmail program to send emails. sendmail is a very simple MTA (Mail Transfer Agent), which implements the SMTP (Simple Mail Transfer Protocol) amongst others and can be used to transmit emails, typically on Linux dedicated or virtual servers.
There is no need to install anything else, because RUT routers have sendmail implemented in their Firmware. So, if you followed the steps above, you should be ready to send emails via command line.
Method 1
For this first example, lets send an email containing the message "Hello, JustTesting", from the hypothetical address [email protected] to [email protected] using Gmail's SMTP settings:
echo -e "subject:Test\nfrom:[email protected]\nHello,\n\nJustTesting" | sendmail -v -H "exec openssl s_client -quiet -connect smtp.gmail.com:587 -tls1 -starttls smtp" -au"[email protected]" -ap"senders.email.password" [email protected]
Let's examine this command in detail. First, the echo -e "subject:Test\nfrom:[email protected]\nHello,\n\nJustTesting" part:
- echo - prints the specified arguments to stdout
- -e - makes the echo command interpret backslash escapes (\n in this case)
- \n - the end line symbol, i.e., it indicates that the following text begins in another line. The \n part itself is not interpreted as part of the text if -e is specified.
The text highlighted in blue specifies the mail's header information (excluding the recipient's address) and body. In our case it represents this:
Subject: Test
From: [email protected]
Body of text:
Hello,

JustTesting
sendmail -v -H "exec openssl s_client -quiet -connect smtp.gma il.com:587 -tls1 -starttls smtp" <mail.txt -f [email protected] -au"d [email protected]" -ap"pass" [email protected]


