Difference between revisions of "TAP 100 and TAP 200 Wireless Mesh Configuration"
| Line 1: | Line 1: | ||
| + | |||
==Introduction== | ==Introduction== | ||
| Line 35: | Line 36: | ||
[[File:Gateway1.jpg|border|class=tlt-border|center]] | [[File:Gateway1.jpg|border|class=tlt-border|center]] | ||
[[File:TAP MESH GATEWAY LAN CONFIGURATION.png|border|class=tlt-border|center]] | [[File:TAP MESH GATEWAY LAN CONFIGURATION.png|border|class=tlt-border|center]] | ||
| − | === | + | ===Wireless/Mesh Configuration for Gateway(RUTX50) and Mesh Nodes(TAP100/200) === |
| + | The following settings need to be applied to all of devices in the wireless mesh network including mesh gateway(RUTX50) and AP nodes(TAP100/200). | ||
| + | |||
| + | #Open router‘s WebUI and navigate to Network → Wireless → SSID | ||
| + | #In General Setup tab make sure Mode is selected as Access Point. | ||
| + | #Radios selected by your application requirements and availability, select 2.4GHz or 5GHz interface configuration. 2.4GHz is selected for this example. | ||
| + | #Change SSID so that it would be the same in all nodes in this case SSID: MESH_DEMO | ||
| + | #In Wireless Security tab select encryption and set Password so that it would be the same in all of the routers. | ||
| + | #In router‘s WebUI, Navigate to Network → Wireless section → SSID. Add new 2.4GHZ or 5GHz interface. This frequency band must match in all routers. | ||
| + | #In General Setup tab make sure Mode is selected as Mesh. | ||
| + | #Radios selected by your application requirements and availability, select 2.4GHz or 5GHz interface configuration. 2.4GHz is selected for this example. | ||
| + | #Set MESH ID so that it would be the same in all nodes in this case Mesh ID: Demo_1 | ||
| + | #In Wireless Security tab select Encryption WPA3 – SAE and enter the Password. The password must match in all devices. | ||
| + | #Open router‘s WebUI and navigate to Network → Wireless → Radio | ||
| + | #In General Setup tab make sure Channel is set to 11 on all nodes. | ||
| + | [[File:EDIT WIRELESS.png|border|class=tlt-border|center]] | ||
Revision as of 15:15, 10 May 2024
Introduction
Mesh networking is a revolutionary approach to wireless connectivity, offering numerous benefits that make it increasingly popular in various applications. At its core, mesh networking involves interconnected nodes that communicate with each other to create a network. Here's why it's used and why it's so valuable:
- Flexibility and Scalability: Mesh networks are adaptable and can scale easily based on requirements.
- Redundancy and Reliability: Multiple paths for data transmission enhance reliability and ensure uninterrupted connectivity.
- Coverage and Range Extension: Nodes relay signals to extend coverage over a wide area, overcoming obstacles like walls and terrain.
- Self-Healing and Self-Organizing: Mesh networks dynamically adjust routes to maintain connectivity, even if nodes go offline or new nodes join.
- Cost-Effectiveness: Mesh networks can be more cost-effective than traditional infrastructure deployments, reducing installation and maintenance costs.
- Ad Hoc and Temporary Deployments: Suitable for quick deployments in scenarios like outdoor events, disaster recovery, or construction sites.
- IoT and Smart Home Applications: Mesh networks efficiently connect and manage IoT devices and smart home systems, supporting diverse connectivity requirements without compromising performance.
Overall, mesh networking represents a versatile and robust solution for wireless connectivity, offering unparalleled flexibility, reliability, and scalability across a wide range of applications. As technology continues to evolve, mesh networks are poised to play an increasingly essential role in powering the connected world of tomorrow.
Prerequisites
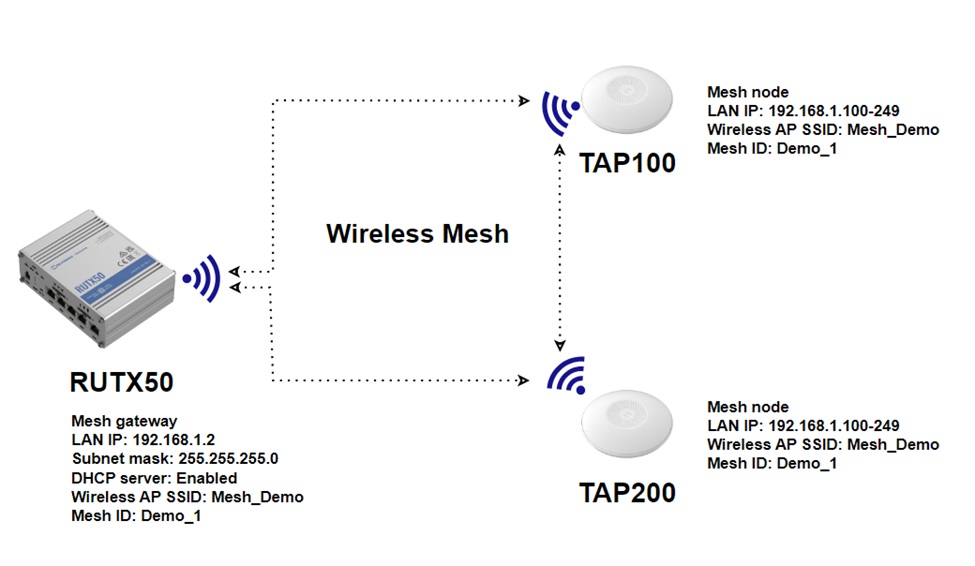
Configuring a wireless mesh network with Teltonika devices is straightforward and requires just a few steps, which can be replicated across multiple devices. The number of devices needed depends on the specific use case, but the setup provided can be effortlessly expanded to accommodate many devices. In the example below, we will utilize RUTX50 as the node with mobile internet connectivity, serving as the mesh gateway and DHCP server. The access points (TAP100 and TAP200) will function as mesh nodes.
Note: Ensure that the firmware version of the Access Points (TAP100 and TAP200) is 00.07.07.1 or later, as the TAP functionality was not available in versions prior to this.
Topology
The test configuration utilizes the RUTX50 router along with the TAP100 and TAP200 access points. The RUTX50 unit is connected to the internet via mobile internet connectivity, although other connection types are feasible. After proper setup, all mesh devices should establish communication among themselves via wireless mesh, directly or through other devices in the mesh network. This enables an expansion of the Wi-Fi coverage radius. Configration If you're having trouble finding this page or some of the parameters described here on your device's WebUI, you should turn on "Advanced WebUI" mode. You can do that by clicking the "Advanced" button, located at the top of the WebUI.
Configuration
If you're having trouble finding this page or some of the parameters described here on your device's WebUI, you should turn on "Advanced WebUI" mode. You can do that by clicking the "Advanced" button, located at the top of the WebUI.
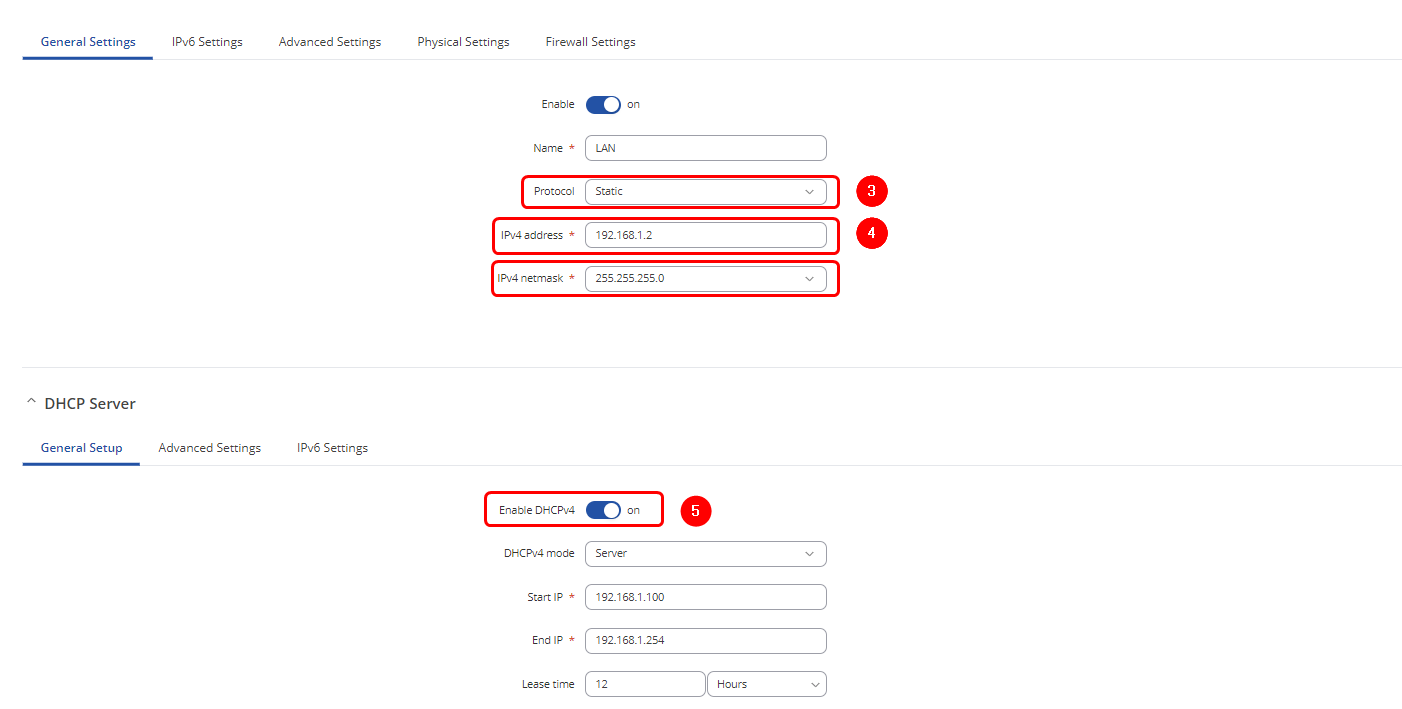
Gateway LAN Configuration
This router requires internet access. The specified settings should be activated by default.
- Open router’s WebUI → Network → LAN.
- Press the pencil icon on the LAN interface.
- In General Settings tab select Protocol as Static.
- Set IPv4 address and Subnet Mask.
- Please activate DHCP. Adjust DHCP limit and lease time according to your specifications, leaving other settings at their default values if desired.
Wireless/Mesh Configuration for Gateway(RUTX50) and Mesh Nodes(TAP100/200)
The following settings need to be applied to all of devices in the wireless mesh network including mesh gateway(RUTX50) and AP nodes(TAP100/200).
- Open router‘s WebUI and navigate to Network → Wireless → SSID
- In General Setup tab make sure Mode is selected as Access Point.
- Radios selected by your application requirements and availability, select 2.4GHz or 5GHz interface configuration. 2.4GHz is selected for this example.
- Change SSID so that it would be the same in all nodes in this case SSID: MESH_DEMO
- In Wireless Security tab select encryption and set Password so that it would be the same in all of the routers.
- In router‘s WebUI, Navigate to Network → Wireless section → SSID. Add new 2.4GHZ or 5GHz interface. This frequency band must match in all routers.
- In General Setup tab make sure Mode is selected as Mesh.
- Radios selected by your application requirements and availability, select 2.4GHz or 5GHz interface configuration. 2.4GHz is selected for this example.
- Set MESH ID so that it would be the same in all nodes in this case Mesh ID: Demo_1
- In Wireless Security tab select Encryption WPA3 – SAE and enter the Password. The password must match in all devices.
- Open router‘s WebUI and navigate to Network → Wireless → Radio
- In General Setup tab make sure Channel is set to 11 on all nodes.


