Wireless Mesh configuration example
Introduction
Wireless networks have become widely adopted in various industrial, agricultural, medical, military, scientific and many other areas, due to a widespread use of various remote sensors, monitoring and management devices as well as new, constantly emerging services. The necessity for wireless coverage has grown in both indoor and outdoor environments, as in many cases the 100 m connection limitation of ethernet cable is not sufficient to cover the required area. Wireless mesh networks basically work as a replacement of cables. The client station connects to the access point without any additional steps or requirements and without knowing if the access point connects to the wired network directly or through a mesh cloud. Mesh functionality is carried out by access points, which support additional features, functions and frame formats in order to expand wireless coverage. All stations in a mesh might send, receive and forward traffic. Mesh networks allow to transfer messages between stations that are not in direct communication through other intermediate stations. This provides a layer of robustness as, in case of a device failure, traffic can be rerouted, so, generally, mesh networks have no single points of failure. They are also relatively easy to scale, as a new device can be easily added to the mesh and underlying algorithms automatically create new links and routes between devices. The example below shows how to configure Teltonika routers for wireless mesh network functionality.
Prerequisites
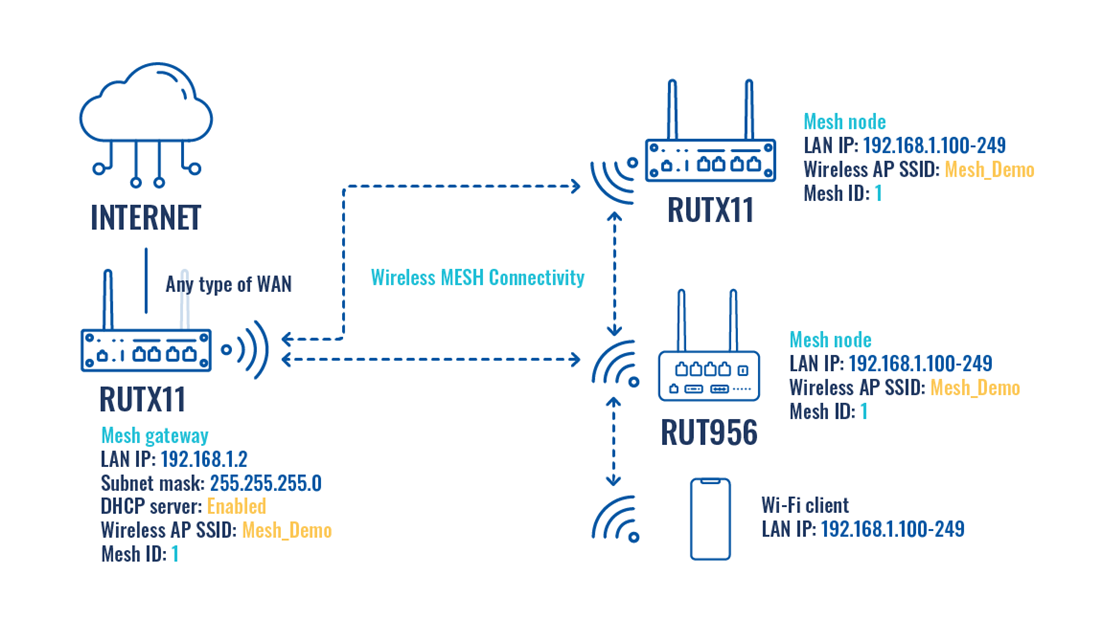
The configuration of wireless mesh with Teltonika devices is relatively simple and involves only a few steps repeated for multiple devices. The device count depends on the use case, however, the configuration provided can be easily scaled for many devices. For the following example, two RUTX11 and one RUT956 routers will be used:
- One router has to be connected to the internet. It will act as a mesh gateway and DHCP server.
- Other routers will operate as mesh nodes.
Topology
 The test setup uses two RUTX11 routers, one RUT956 router and a smartphone for testing purposes. One of the RUTX11 devices has access to the internet. Wired WAN connectivity is used, however, any type can be employed. Upon successful configuration, all mesh devices should be able to communicate with each other either directly of through other devices in the mesh, thus allowing to increase wi - fi coverage radius.
Configuration
If you're having trouble finding this page or some of the parameters described here on your device's WebUI, you should turn on "Advanced WebUI" mode. You can do that by clicking the "Advanced" button, located at the top of the WebUI.
Mesh gateway
This router must have access to the internet. The following settings should be enabled by default.
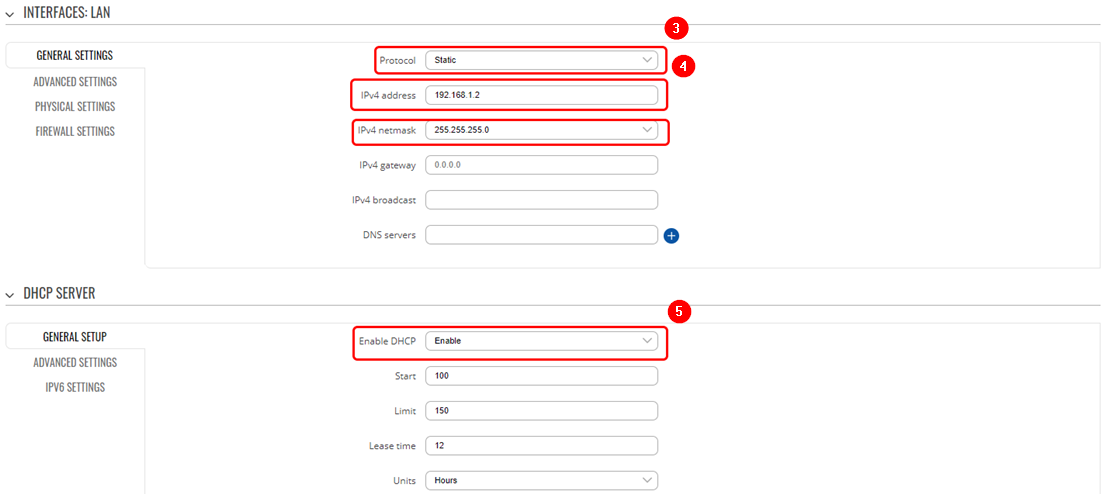
- Access router‘s WebUI. Navigate to Network → Interfaces.
- Press the pencil icon on the right of the LAN interface.
- If necessary, select Protocol in the General settings tab as Static.
- Enter IPv4 address, as well as subnet mask.
- Enable DHCP. Based on your requirements, edit DHCP limit and lease time or leave the rest of the settings as set by default.
Common settings
The following settings need to be applied to all of the routers in the wireless mesh network including mesh gateway and nodes.
- Open router‘s WebUI and navigate to Network → Wireless.
- Depending on your application requirements and availability, open 2.4GHz or 5GHz interface configuration. 2.4GHz is selected for this example.
- In General Setup tab make sure Mode is selected as Access Point.
- Change SSID so that it would be the same in all of the routers.
- In Wireless Security tab select encryption and set Password so that it would be the same in all of the routers.
- In router‘s WebUI, Navigate to Network → Wireless section. Add new 2.4GHZ or 5GHz interface. This frequency band must match in all routers.
- An interface configuration window will show up. In General Setup tab Enable interface, select Mode as Mesh, and enter Mesh ID. Mesh ID Must be identical in all devices.
- In Wireless Security tab select Encryption WPA3 – SAE and enter the Password. The password must match in all devices.
- In Advanced Settings tab enable Forward mesh peer traffic and set RSSI threshold for joining to -80. Leave the rest as set by default.
- Lastly, press Edit on general radio settings.
- Set wireless channel to use. Channel must be the same in all of the routers
Mesh nodes
In order to avoid conflicts, each node router needs to be leased their LAN IP by mesh gateway. These settings should also be set after configuring access and mesh points settings, as, otherwise, access to the router will be lost. The configuration is as follows:
- Access router‘s WebUI. Navigate to Network → Interfaces.
- Press pencil icon on the right of the LAN interface.
- Change Protocol to DHCP.
Testing the configuration
There are several ways to check the connection.
- Access mesh gateway's WebUI.
- Navigate to Network → Wireless. The mesh interface, in this case "1", shows the number of connected mesh nodes, which is 2 and indicates the cpnfigures RUTX11 and RUT956.
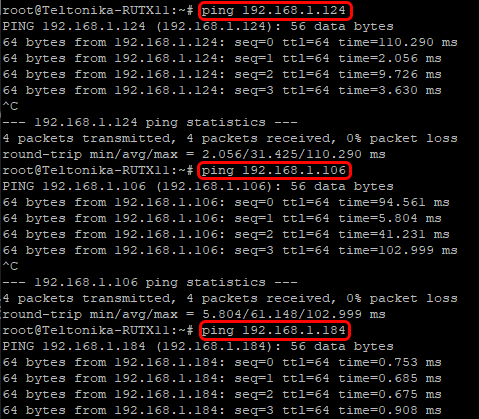
- A list of IP addresses leased by mesh gateway can be viewed by going to Status → Network → LAN. In the screenshot, IP addresses can be seen provided to the two RUT routers as well as a device, connected to the access point, which is a smartphone in this case.
- Those IPs can be pinged from the mesh gateway despite the fact that there is no wired or mobile connection between the mesh nodes.
- One more test to perform is to physically displace mesh nodes, move around the coverage area with the device connected to the Wireless AP SSID and see if wi - fi access to the internet remains outside of the initial router coverage radius.


