DNP3 TCP Client Configuration example
Summary
Distributed Network Protocol 3 (DNP3) is a set of communications protocols used between components in process automation systems. It is primarily used for communications between a “Client station” and Remote Terminal Units (RTUs) or Intelligent Electronic Devices (IEDs).
This example provides an Step by Step instructions on how to configure DNP3 functionality in RUTX11 device. In this RUTX11 is configured as the TCP Client and DNP3 outstation to send data to a remote HTTPS server.
Installing DNP3 package
DNP3 can be installed using the package manager.
Go to your devices WebUI → System → Package Manager and install the DNP3 package.
DNP3 TCP Client
TCP Client requests specific information from DNP3 outstation through the communication channel.
After the installation of DNP3 package, navigate to Services → DNP3 → DNP3 TCP Client and click on Add button to add a new DNP3 instance.
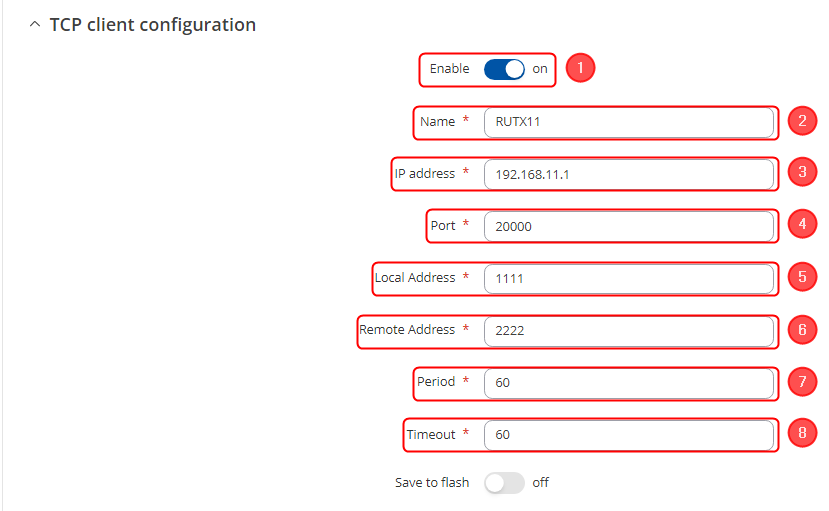
TCP Configuration
On this section we configure the parameters of the DNP3 Outstation that the Client will be querying with requests:
- Enable the instance;
- Choose your desired Name;
- Choose the IP address - in this case we used routers LAN IP address;
- Choose the Port via which the communication will be done;
- Choose the Local Address;
- Choose the Remote Address;
- Choose the Period;
- Choose the Timeout;
Requests Configuration
To obtain data from DNP3 Outstation, we will need to configure a DNP3 instance. The DNP3 Client will send a request to the DNP3 outstation specifying the function codes to be sent. The outstation then sends the requested data back to the DNP3 Client.
Refer to DNP3 Parameters for which parameters you want to read.
On the ADD NEW INSTANCE SECTION type the name of the instance. In this example, we want to read the serial number, so we will use the name Serial:
- Specify the name of request;
- Click on Add button;
- Write the Start Index value;
- Write the End Index value;
- Choose the Data type;
- Enable the request;
- Click on Save & Apply button once you are done configuring;
DNP3 outstation
A DNP3 Outstation component communicates with a single Client via a communication channel.
To configure the DNP3 Outstation Go to Services → DNP3 → DNP3 OUTSTATION
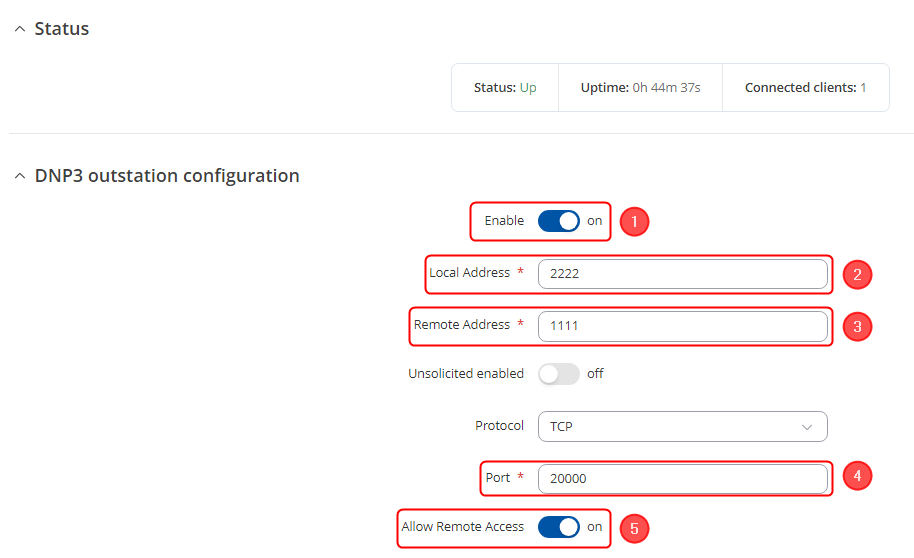
DNP3 Outstation Configuration
- Enable the instance;
- Write the Local Address;
- Write the Remote Address;
- Write the Port via which the communication should be done;
- Enable Allow Remote Access if you wish to communicate externally;
NOTE: The Local Address and the Remote Address configuration in TCP Client and DNP3 Outstation are configured in reverse such that the Local address in TCP Client is the Remote address in the DNP3 Outstation and vice versa.
Testing DNP3
To test DNP3 protocol, we can go to Services → DNP3 → DNP3 TCP Client and edit the TCP client that we had set up:
Then scroll down to the Request configuration testing section and choose the request you want to test and click on Test button. It should show you the output of your request:


