Template:Networking rutos manual snmp
Template:Networking rutos manual fw disclosure
Summary
Simple Network Management Protocol (SNMP) is a network management protocol used for collecting information and configuring network devices. This page is an overview of the SNMP function in {{{name}}} devices.
Note: SNMP is additional software that can be installed from the Services → [[{{{name}}} Package Manager|Package Manager]] page.
If you're having trouble finding this page or some of the parameters described here on your device's WebUI, you should turn on "Advanced WebUI" mode. You can do that by clicking the "Advanced" button, located at the top of the WebUI.
SNMP settings
The SNMP settings page is used to configure SNMP accessibility and general SNMP information for your device.
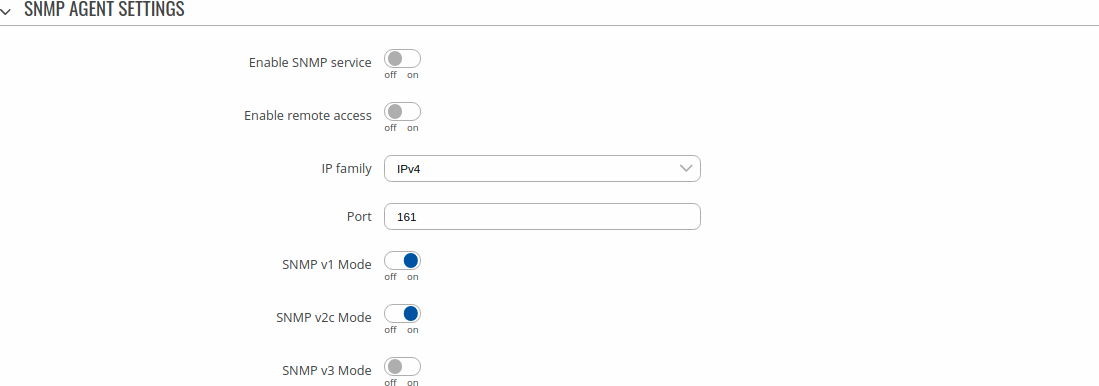
SNMP agent settings
| Field | Value | Description |
|---|---|---|
| Enable SNMP service | off | on; default: off | Run SNMP service on system's startup. |
| Enable remote access | off | on; default: off | Open port in firewall so that SNMP service may be reached from WAN. |
| IP family | IPv4 | IPv6 | IPv4v6; default: IPv4 | IP family used by SNMP. |
| Port | integer [0..65535]; default: 161 | SNMP service's port. |
| SNMP v1 Mode | off | on; default: on | Enable/disable SNMP v1 Mode. |
| SNMP v2c Mode | off | on; default: on | Enable/disable SNMP v2c Mode. |
| SNMP v3 Mode | off | on; default: off | Enable/disable SNMP v3 Mode. |
SNMP System Summary
The SNMP System Summary section contains general information about SNMP on this device. You can also download this device's MIB file from this section.
| Field | Value | Description |
|---|---|---|
| MIB file | -(interactive button) | Downloads the device's MIB file. |
| System OID | 1.3.6.1.4.1.48690 | OID or Object Identifier, is an identifier used to name and point to an object in the MIB hierarchy. |
| Location | string; default: location | Trap named sysLocation. |
| Contact | string; default: [email protected] | Trap named sysContact. |
| Name | string; default: name | Trap named sysName. |
SNMP v3 users
The SNMP v3 users page is used to create and manage users, who can be authenticated using SNMP v3. To configure an SNMP user, you must first create it:
- Enter a custom name for the new user in the 'Name' field.
- Click the 'Add' button.
- Click the 'Edit' button next to the newly created user.
The SNMP user configuration window should look similar to this:
Note: this table has coloring scheme to indicate which fields can be seen with different configuration.
| Field | Value | Description |
|---|---|---|
| Enable | off | on; default: off | Turns this SNMP user on or off. |
| Username | string; default: none | Set username to access SNMP. |
| Security level | No authentication, no privacy | Authentication, no privacy | Authentication and privacy; default: No authentication, no privacy | A security level is an authentication strategy that is set up for the user.
No authentication, no privacy - authenticates with a username. Authentication - provides MD5 or SHA algorithms for authentication. Privacy - Provides DES or AES encryption. |
| Authentication, no privacy | Authentication and privacy: Authentication type | SHA | MD5; default: SHA | Set authentication type to use with SNMP v3. |
| Authentication, no privacy | Authentication and privacy: Authentication passphrase | string; default: none | Set authentication passpharse to generate key for SNMP v3. |
| Authentication and privacy: Privacy type | DES | AES; default: DES | Set privacy type to use with SNMP v3. |
| Authentication and privacy: Privacy passphrase | string; default: none | Set privacy passpharse to generate key for SNMP v3. |
| Access Mode | Read-Only | Read-Write; default: Read-Only | The access mode specifies the access the hosts in the community are allowed with respect to retrieving and modifying the MIB variables from a specific SNMP agent. |
| MIB subtree | string; default: none | Leave empty to access full MIB tree. |
Communities
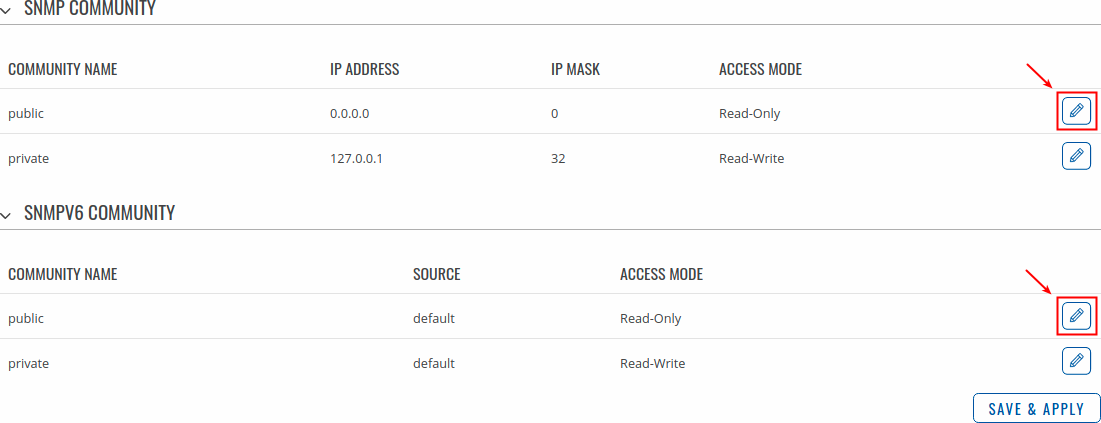
The SNMP Community section is used to manage access rights. You can edit an SNMP community by clicking the 'Edit' button next to it:
This will redirect you to the community's configuration page.
| Field | Value | Description |
|---|---|---|
| Community name | string; default: none | Name of the community. |
| IP Address | ip; default: none | IP address of the community. |
| IP Mask | ip; default: none | Netmask for IP of the community. |
| Access Mode | Read-Only | Read-Write; default: Read-Only | Access mode for current community. |
SNMPv6 community configuration page:
| Field | Value | Description |
|---|---|---|
| Community name | string; default: none | Name of the community. |
| Source | ip6 | domain name; default: default | Source of the community. |
| Access Mode | Read-Only | Read-Write; default: Read-Only | Access mode for current community. |
Trap Settings
SNMP Traps are used to send alert messages to a central collector, the “SNMP manager” when an important event happens. A benefit of using Traps for reporting alarms is that they trigger instantaneously, rather than waiting for a status request from the manager.
Trap settings page is divided in two sections - Trap service settings and Trap rules. Trap service settings lets you manage hosts which will get configured alert messages, Trap rules lets you manage rules which when triggered will send alerts.
Trap Service Settings
The Trap Service Settings is used to manage hosts which will be alerted when an SNMP trap is triggered.
| Field | Value | Description |
|---|---|---|
| Host/IP | url | ip; default: none | Hostname or IP address to transfer SNMP traffic to. |
| Port | integer [0..65535]; default: 162 | Trap host's port number. |
| Community | string; default: Public | Name of the community to which the trap belongs. |
| off/on slider | off | on; default: on | Turns the host on or off. SNMP traffic is only sent to enabled hosts. |
| Delete | - (interactive button) | Deletes the host next to the button. |
Trap Rules
SNMP Trap Rules are alerts that trigger when certain user-specified events occur. When the trigger event happens, the trap will notify known SNMP hosts.
You can create a new trap rule by clicking the 'Add' button.
You should be redirected to the rule's configuration page which should look something like this:
[[File:Networking_rutos_manual_snmp_trap_settings_trap_rules_modify_trap_rule_mobile_{{{mobile}}}.png|border|class=tlt-border]]
Above is an example of what rule configuration window looks like. Below is a table with detailed explanations on how to configure the rule and what each of the fields mean.
To avoid redundancy, screenshots for the other rules will not be provided, since the structures, syntax and the overall look of the configuration windows for each rule are very similar. Instead, only tables containing information on how to edit each rule will be provided.
Input/Output
| field name | value1 | description |
|---|---|---|
| Enable | off | on; default: on | Enable or disable this rule. |
| Action | Input/Output trap | Rule will be triggered when specified input or output state will change. |
SNMP variables list
| Name | OID | Description |
|---|---|---|
| Device | ||
| serial | .1.3.6.1.4.1.48690.1.1.0 | Device serial number |
| routerName.0 | .1.3.6.1.4.1.48690.1.2.0 | Device name |
| productCode | .1.3.6.1.4.1.48690.1.3.0 | Device product (ordering) code |
| batchNumber | .1.3.6.1.4.1.48690.1.4.0 | Device batch number |
| hardwareRevision | .1.3.6.1.4.1.48690.1.5.0 | Device hardware revision |
| fwVersion | .1.3.6.1.4.1.48690.1.6.0 | Device RutOS firmware version |
[[Category:{{{name}}} Services section]]


