RMS Quick Connect: Difference between revisions
(Created page with "==Summary== Quick connect is a feature, which lets you quickly set up an OpenVPN network. It is a hybrid between Remote Access and VPN Hubs|RMS V...") |
No edit summary |
||
| (10 intermediate revisions by the same user not shown) | |||
| Line 1: | Line 1: | ||
==Summary== | ==Summary== | ||
Quick connect | Quick connect lets you quickly set up an OpenVPN network. It is a hybrid between [[RMS Remote Access|Remote Access]] and [[RMS VPN Hubs|RMS VPN hubs]]. The main advantages compared to Remote Access - you can add more third-party devices by using .ovpn files, and compared to RMS VPN hubs - it can be set up much faster. | ||
==Overview== | ==Overview== | ||
[[File:Quickconnect1.png|border|class=tlt-border|1100x700px]] | [[File:Quickconnect1.png|border|class=tlt-border|1100x700px]] | ||
In this screen, you can: | In this screen, you can: | ||
#Create a new Quick Connect configuration. | |||
#Search and filter through existing configurations by Name/Description/Tags/Companies/Status. | |||
#Start chosen Quick Connect network, and download its OpenVPN configuration. | |||
#Change how the list is displayed. | |||
==Creating an endpoint== | ==Creating an endpoint== | ||
[[File:Quickconnect2.gif|thumb|right|600px|Connecting using auto mode]] | [[File:Quickconnect2.gif|thumb|right|600px|Connecting using auto mode]] | ||
By clicking on '''Add new endpoint''' a menu will pop up. There you'll have to: | By clicking on '''Add new endpoint''' a menu will pop up. There you'll have to: | ||
#Type in the name. | |||
#Add a device through which the endpoint will be reached. | |||
##Here you'll have two options, similar to Remote Access, where you can choose '''Auto''' mode, and RMS will scan the device's network for potential endpoints, or '''Manual''' mode, where you'll configure it yourself. | |||
#Select Quick Connect's VPN server location. | |||
*Optional: | |||
**Description - type in more information you'd like to see when looking at this configuration. | |||
**Tags - add tags to more easily identify and manage. | |||
[[File:Quickconnect3.png|border|center|class=tlt-border|1100x500px]] | [[File:Quickconnect3.png|border|center|class=tlt-border|1100x500px]] | ||
==Quick Connect hub overview== | ==Quick Connect hub overview== | ||
Clicking on any hub in the Quick Connect list will open up its information: | Clicking on any hub in the Quick Connect list will open up its information: | ||
*General | *[[RMS Quick Connect#General|General]] | ||
*Clients | *[[RMS Quick Connect#Clients|Clients]] | ||
*Data Usage | *[[RMS Quick Connect#Data Usage|Data Usage]] | ||
*Connection Logs | *[[RMS Quick Connect#Connection Logs|Connection Logs]] | ||
===General=== | ===General=== | ||
[[File:Quickconnect4.png|border|class=tlt-border|1100x700px]] | [[File:Quickconnect4.png|border|class=tlt-border|1100x700px]] | ||
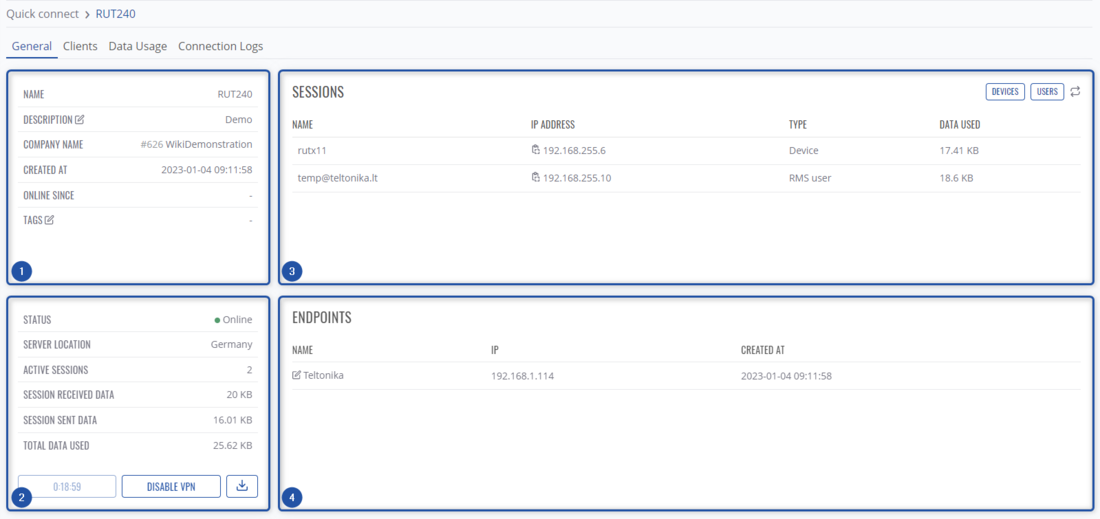
#Shows general information about this hub | |||
#Shows data usage, server location, and no. of active sessions. Also, here are the buttons to control this hub, '''Start''' (time left if active), '''Disable VPN''' and '''Download .ovpn configuration''' buttons. | |||
#Shows active sessions, which clients are currently connected to this VPN hub. | |||
#Shows endpoints that are set up on this configuration. | |||
===Clients=== | ===Clients=== | ||
[[File:Quickconnect5.png|border|class=tlt-border|1100x700px]] | [[File:Quickconnect5.png|border|class=tlt-border|1100x700px]] | ||
*Here, you can see, and search which clients are connected to this hub. | |||
===Data Usage=== | ===Data Usage=== | ||
[[File:Quickconnect6.png|border|class=tlt-border| | [[File:Quickconnect6.png|border|class=tlt-border|1100x600px]] | ||
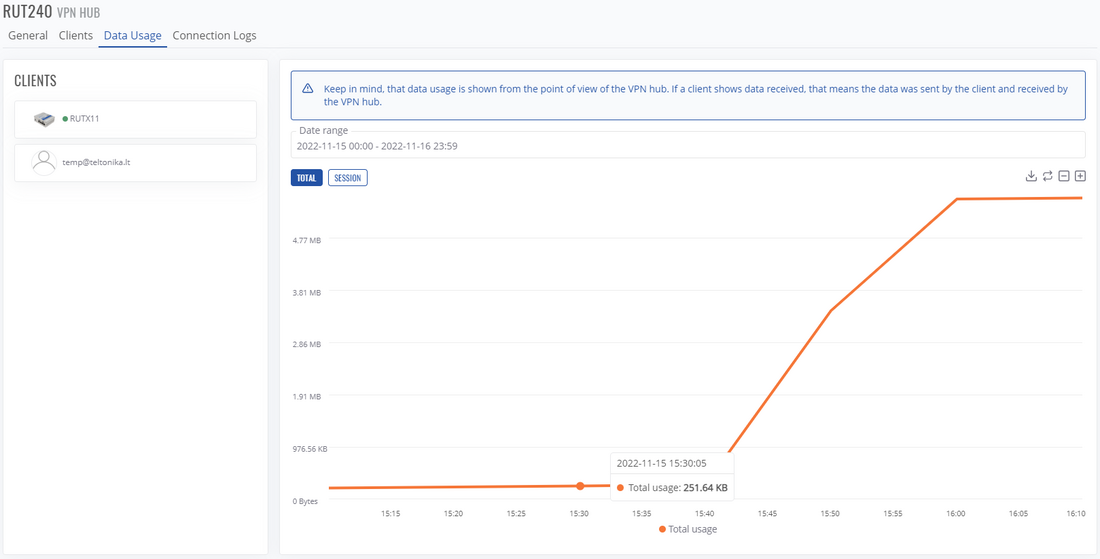
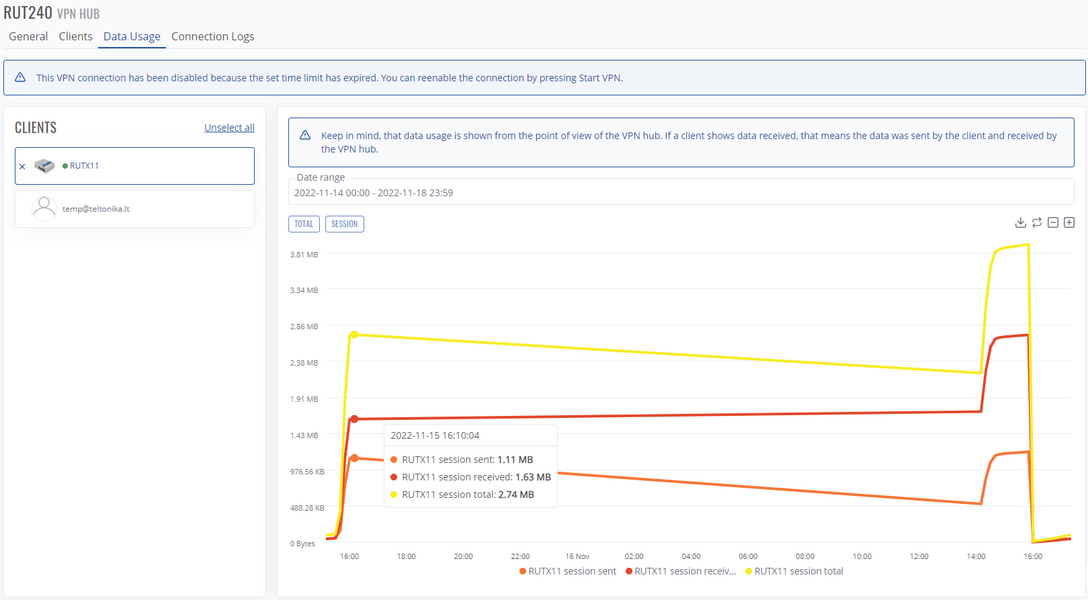
*In this tab, you can look at VPN hub data usage at specific date range: | |||
**Total usage of this hub. | |||
**Session data usage. | |||
**Each client's data usage - sent, received, total. | |||
**Additionally, you can export this graph. | |||
[[File:Quickconnect8.png|border|class=tlt-border|1100x600px]] | |||
===Connection Logs=== | ===Connection Logs=== | ||
[[File:Quickconnect7.png|border|class=tlt-border|1100x700px]] | [[File:Quickconnect7.png|border|class=tlt-border|1100x700px]] | ||
*Here, you can look at client connection logs - which clients have connected to this hub, when they have connected and minor info about the said clients, depending on the date range. | |||
[[Category:RMS_VPN]] | |||
Latest revision as of 15:10, 11 January 2023
Main Page > IoT Platforms > RMS > RMS Manual > RMS VPN > RMS Quick ConnectSummary
Quick connect lets you quickly set up an OpenVPN network. It is a hybrid between Remote Access and RMS VPN hubs. The main advantages compared to Remote Access - you can add more third-party devices by using .ovpn files, and compared to RMS VPN hubs - it can be set up much faster.
Overview
- Create a new Quick Connect configuration.
- Search and filter through existing configurations by Name/Description/Tags/Companies/Status.
- Start chosen Quick Connect network, and download its OpenVPN configuration.
- Change how the list is displayed.
Creating an endpoint
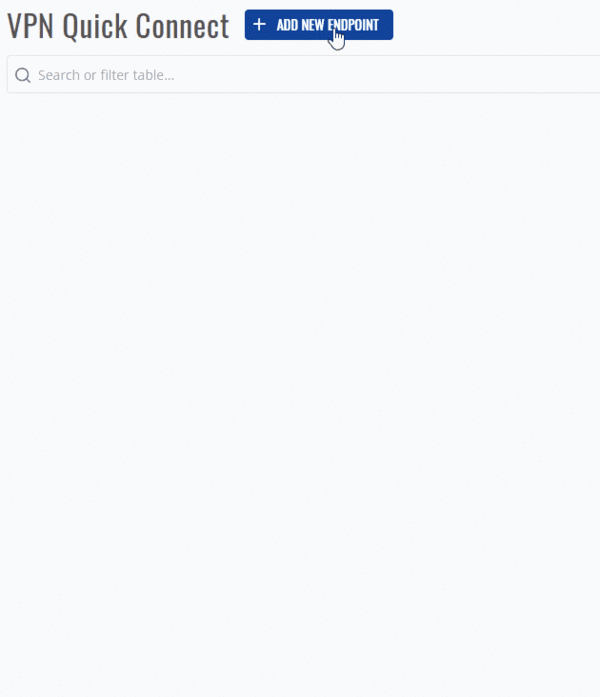
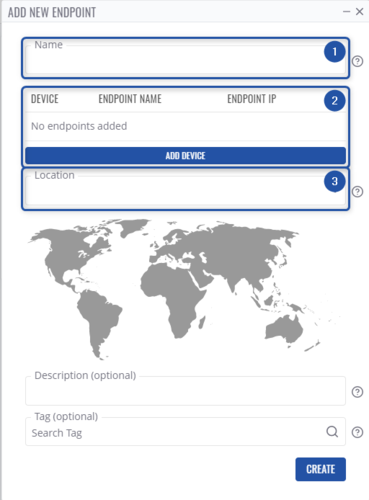
By clicking on Add new endpoint a menu will pop up. There you'll have to:
- Type in the name.
- Add a device through which the endpoint will be reached.
- Here you'll have two options, similar to Remote Access, where you can choose Auto mode, and RMS will scan the device's network for potential endpoints, or Manual mode, where you'll configure it yourself.
- Select Quick Connect's VPN server location.
- Optional:
- Description - type in more information you'd like to see when looking at this configuration.
- Tags - add tags to more easily identify and manage.
Quick Connect hub overview
Clicking on any hub in the Quick Connect list will open up its information:
General
- Shows general information about this hub
- Shows data usage, server location, and no. of active sessions. Also, here are the buttons to control this hub, Start (time left if active), Disable VPN and Download .ovpn configuration buttons.
- Shows active sessions, which clients are currently connected to this VPN hub.
- Shows endpoints that are set up on this configuration.
Clients
- Here, you can see, and search which clients are connected to this hub.
Data Usage
- In this tab, you can look at VPN hub data usage at specific date range:
- Total usage of this hub.
- Session data usage.
- Each client's data usage - sent, received, total.
- Additionally, you can export this graph.
Connection Logs
- Here, you can look at client connection logs - which clients have connected to this hub, when they have connected and minor info about the said clients, depending on the date range.


