Difference between revisions of "Template:Rms manual management device submenu add device list"
From Teltonika Networks Wiki
| (46 intermediate revisions by 2 users not shown) | |||
| Line 1: | Line 1: | ||
| − | |||
| − | + | The '''Add device list''' function is used to add multiple RUT devices to your device table at once. | |
| + | ---- | ||
| + | * To add multiple devices at once you must first compile a list of your devices. The list must be comprised of devices' serial numbers and LAN MAC addresses and it must be stored in a '''CSV''' file. CSV is a simple file format used to store tabular data. You can create CSV files with programs like Microsoft's Excel or OpenOffice Calc or a simple Notepad type of program, which we'll be using for this example. <br> Create a new text file and list your devices. An entry for a single device should be comprised of the router's serial number and LAN MAC address separated by a '''comma''' (''',''') symbol. Different entries for different devices should be separated by '''line breaks''': | ||
| − | [[File: | + | [[File:Add device list to rms part 1 v1.PNG]] |
| − | |||
| − | |||
---- | ---- | ||
| − | + | * When you're done, do not save the file as is. Instead click click the "Save As" option. Then next to "Save as type" choose "All Files" and add the '''.csv''' extension next to the file name (if you're using Linux, you can just add the same extension to the file name after saving the file the regular way): | |
| − | + | [[File:How to save as csv.PNG]] | |
| − | |||
| − | |||
| − | |||
| − | |||
| − | |||
---- | ---- | ||
| − | + | * Once you have the list file in order, scroll your mouse pointer to the Device submenu ('''Management → Device''') and click "Add device list": | |
| − | |||
| − | |||
| − | |||
| − | |||
| − | |||
| − | |||
| − | |||
| − | |||
| − | |||
| − | |||
| − | |||
| − | + | [[File:Add device list to rms part 2 v1.png]] | |
---- | ---- | ||
| − | * | + | * In the pop-up box select the desired profile, upload the list file and click "Add device list": |
| − | |||
| − | |||
| − | |||
| − | [[File: | + | [[File:Add device list to rms part 3 v1.png]] |
| − | |||
| − | |||
| − | |||
| − | |||
---- | ---- | ||
| − | + | * A new pop-up box signifying the number of new devices that have been added should appear. You can close it: | |
| − | |||
| − | |||
| − | |||
| − | |||
| − | |||
| − | |||
| − | [[File: | + | [[File:Add device list to rms part 4 v1.png]] |
| − | |||
| − | |||
| − | |||
| − | |||
| − | |||
| − | |||
| − | |||
| − | |||
---- | ---- | ||
| − | + | * Don't forget to '''enable remote monitoring''' on the devices that you are trying to add. To do so, go to the router's WebUI and navigate to '''System → Administration → RMS''' and place a check mark next to the "Enable remote monitoring" field (detailed instructions provided '''[[How to enable remote access for RMS on the router?|here]]'''). This can be done either before or after clicking "Add device list" and '''must''' be done for each device that you are trying to add: | |
| − | |||
| − | [[ | ||
| − | + | [[File:Add device to rms part 1 v4.png]] | |
---- | ---- | ||
| − | + | * The devices should appear in the device table immediately, but at first they will be shown as being offline. When the power button symbol turns green next to each device, then the system will have finished connecting all of the specified devices to RMS: | |
| − | |||
| − | |||
| − | |||
| − | |||
| − | |||
| − | |||
| − | |||
| − | |||
| − | |||
| − | |||
| − | |||
| − | |||
| − | |||
| − | + | [[File:Add device list to rms part 5 v1.png]] | |
| − | + | '''NOTE''': the time that it takes for all devices to be registered on the system may vary depending on the number of devices. | |
| − | |||
Revision as of 14:53, 10 May 2018
The Add device list function is used to add multiple RUT devices to your device table at once.
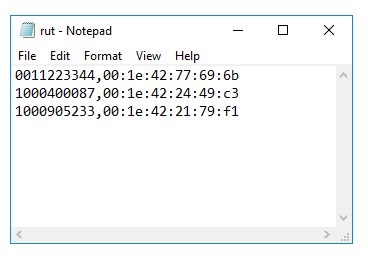
- To add multiple devices at once you must first compile a list of your devices. The list must be comprised of devices' serial numbers and LAN MAC addresses and it must be stored in a CSV file. CSV is a simple file format used to store tabular data. You can create CSV files with programs like Microsoft's Excel or OpenOffice Calc or a simple Notepad type of program, which we'll be using for this example.
Create a new text file and list your devices. An entry for a single device should be comprised of the router's serial number and LAN MAC address separated by a comma (,) symbol. Different entries for different devices should be separated by line breaks:
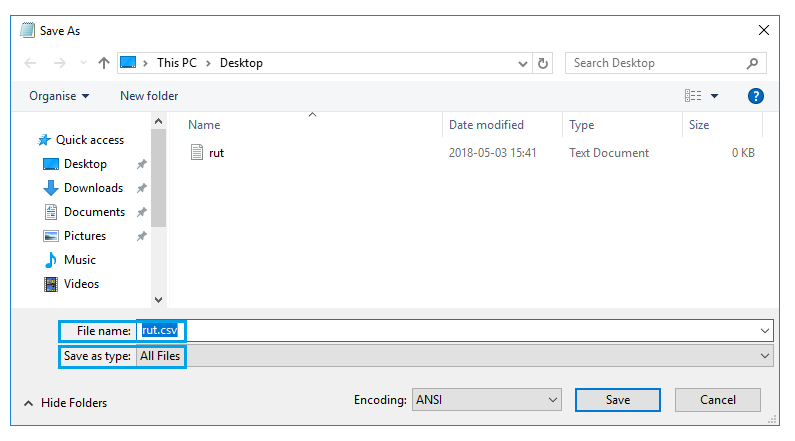
- When you're done, do not save the file as is. Instead click click the "Save As" option. Then next to "Save as type" choose "All Files" and add the .csv extension next to the file name (if you're using Linux, you can just add the same extension to the file name after saving the file the regular way):
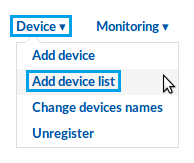
- Once you have the list file in order, scroll your mouse pointer to the Device submenu (Management → Device) and click "Add device list":
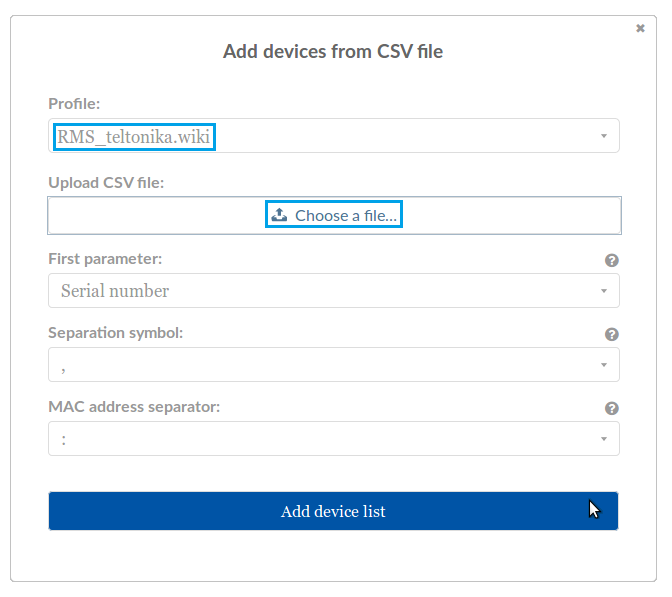
- In the pop-up box select the desired profile, upload the list file and click "Add device list":
- A new pop-up box signifying the number of new devices that have been added should appear. You can close it:
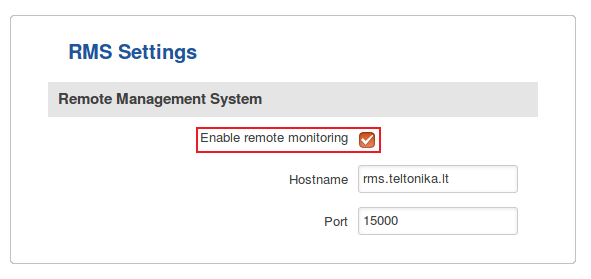
- Don't forget to enable remote monitoring on the devices that you are trying to add. To do so, go to the router's WebUI and navigate to System → Administration → RMS and place a check mark next to the "Enable remote monitoring" field (detailed instructions provided here). This can be done either before or after clicking "Add device list" and must be done for each device that you are trying to add:
- The devices should appear in the device table immediately, but at first they will be shown as being offline. When the power button symbol turns green next to each device, then the system will have finished connecting all of the specified devices to RMS:
NOTE: the time that it takes for all devices to be registered on the system may vary depending on the number of devices.
