L2 LAN bridging over internet using L2TPv2+EoIP: Difference between revisions
No edit summary |
PauliusRug (talk | contribs) No edit summary |
||
| (3 intermediate revisions by 2 users not shown) | |||
| Line 7: | Line 7: | ||
==Topology== | ==Topology== | ||
[[File:Networking rutxxx configuration examples l2tp+ eoip rut configuration topology | [[File:Networking rutxxx configuration examples l2tp+ eoip rut configuration topology v2.png|border|class=tlt-border|1100px]] | ||
==Prerequisites== | ==Prerequisites== | ||
| Line 145: | Line 145: | ||
Next we will configure EoIP on the MikroTik side, for that navigate to '''Interfaces → EoIP tunnel''' Add New interface and configure accordingly: | Next we will configure EoIP on the MikroTik side, for that navigate to '''Interfaces → EoIP tunnel''' Add New interface and configure accordingly: | ||
[[File:Networking rutxxx configuration examples EoIP MikroTik | [[File:Networking rutxxx configuration examples EoIP MikroTik v2.png|border|class=tlt-border]] | ||
# Enable the interface | # Enable the interface | ||
| Line 204: | Line 204: | ||
[https://wiki.mikrotik.com/wiki/Manual:Interface/EoIP MikroTik EoIP] | [https://wiki.mikrotik.com/wiki/Manual:Interface/EoIP MikroTik EoIP] | ||
[[Category:VPN]] | |||
Latest revision as of 13:57, 2 August 2023
Main Page > General Information > Configuration Examples > VPN > L2 LAN bridging over internet using L2TPv2+EoIPThe information on this page is updated in accordance with 00.07.03 firmware version.
Introduction
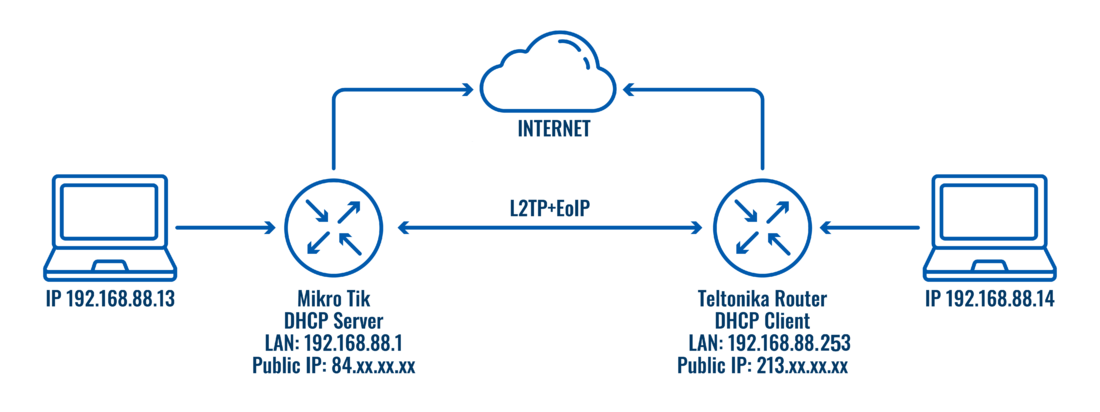
In this configuration example we will use L2TP with Ethernet over IP (EoIP) to bridge LAN interfaces between MikroTik and Teltonika devices. EoIP is a MikroTik RouterOS protocol based on GRE RFC 1701 that creates an Ethernet tunnel between two routers on top of an IP connection. The EoIP tunnel may run over the IPIP tunnel, PPTP tunnel, or any other connection capable of transporting IP.
Topology
Prerequisites
- MikroTik device(with L2TP and EoIP support) with Public IP (in this example we use hAP lite TC)
- Teltonika router or Gateway with Public IP (in this example we use RUTX11)
- Firmware with EoIP for Teltonika device
- A computer for testing and configuring the setup
Configuration of the Teltonika Device
From the Teltonika router, we will configure L2TP Client, EoIP, and firewall rules in order to achieve a working setup.
L2TP configuration
We will start by configuring the L2TP client. Open your device's WebUI and navigate to Services → VPN → L2TP, add a new L2TP client, once the configuration window opens, configure the client accordingly:
- Enable the configuration
- Server - input the MikroTik Public IP here
- Username - username configurated on MikroTik server
- Password - password configurated on MikroTik server 5.
- Save the configuration
Firewall configuration
In order for our configuration to work, we will need to update the Firewall. Navigate to the Network → Firewall → General Settings in the Zones section and change the L2TP zone settings to INPUT: Accept; OUTPUT: Accept; FORWARD: Accept; and disable the Masquerading. Upon changing these settings the configuration window should look like this:
For the next part we will need access to the SSH/CLI of the device, we can reach device's CLI via System → CLI login with root username and password of your device.
Now we will add a new Firewall rule GRE Accept, for that you will need to execute these commands each one at a time(keep in mind that each command has to be executed in the order that has been provided below):
uci add firewall rule
uci set firewall.@rule[-1].name=GRE
uci set firewall.@rule[-1].target=ACCEPT
uci set firewall.@rule[-1].priority=14
uci set firewall.@rule[-1].src=l2tp
uci set firewall.@rule[-1].enabled=1
uci set firewall.@rule[-1].proto=47
uci set firewall.@rule[-1].utc_time=0
uci commit firewall && service firewall restart
Each command executed on the device should look like this:
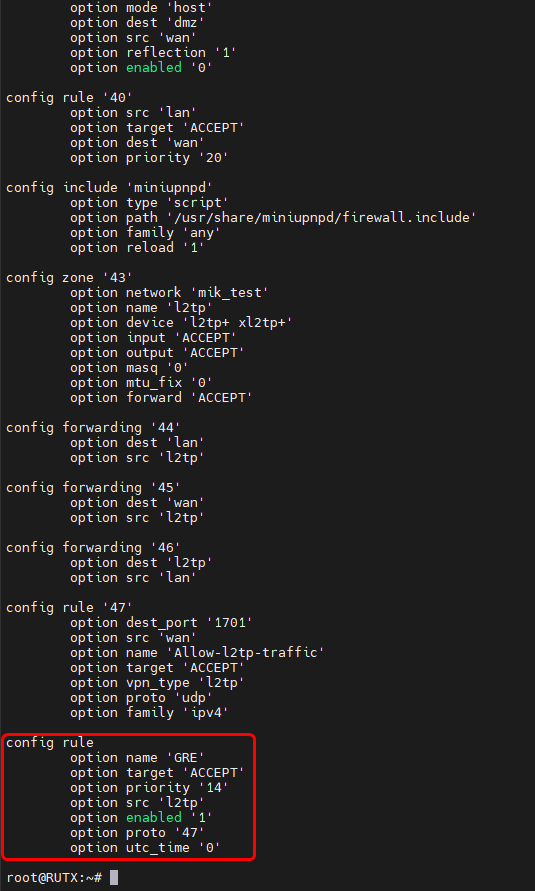
You can confirm if the new rule was added with the command cat/etc/config/firewall the output should look like this:
EoIP configuration
On the same CLI page we will execute additional UCI commands to configure, execute these commands each one at a time(keep in mind that each command has to be executed in the order that has been provided below):
uci add eoip eoip
uci set eoip.@eoip[-1].enabled=1
uci set eoip.@eoip[-1].name=0
uci set eoip.@eoip[-1].idtun=123
uci set eoip.@eoip[-1].dst=10.0.0.1
uci set eoip.@eoip[-1].dynamic=1
uci commit eoip
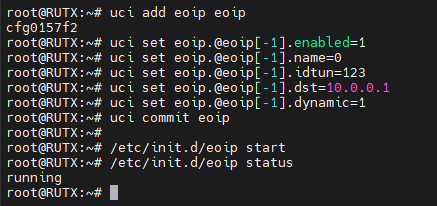
After that execute the command to start the EoIP service and check the status of it to confirm it is running with these commands:
/etc/init.d/eoip start
/etc/init.d/eoip status
The results of all of those commands should look similar to:
Bridging the EoIP to LAN
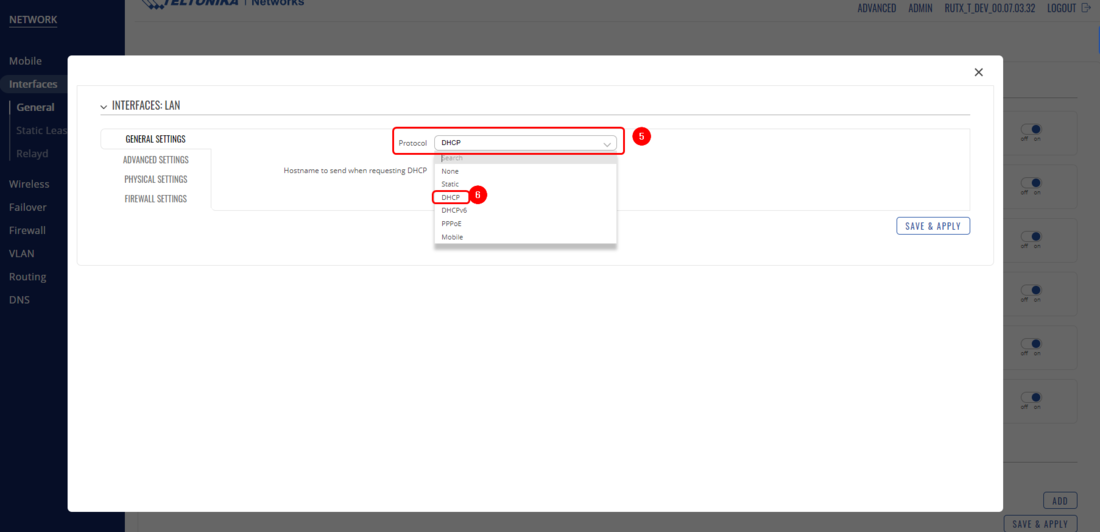
Last step for Teltonika device is to bridge LAN interface with EoIP interface and changing the LAN interface to the DHCP Client, so the LAN would receive the IP from MikroTik device. Once again we will need to open the WebUI of the Teltonika device and navigate to the Network → Interfaces → General Edit your LAN interface and change Protocol to DHCP.
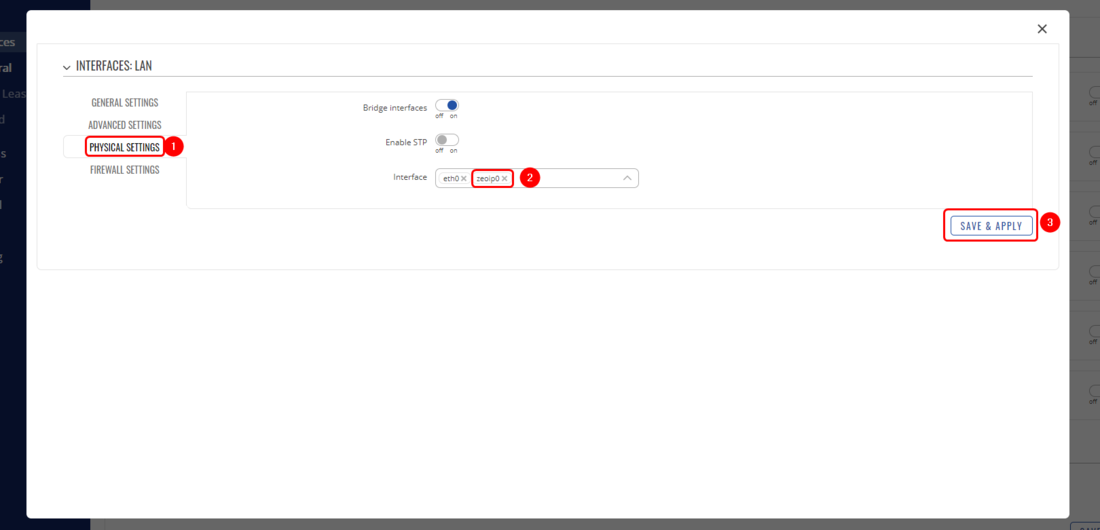
Now navigate to Physical Settings and in the Interface, section add 'zeoip0', you might require to type it manually if that doesn't show up from the drop-down menu. After that Save the configuration.
Configuration of the MikroTik Device
L2TP configuration
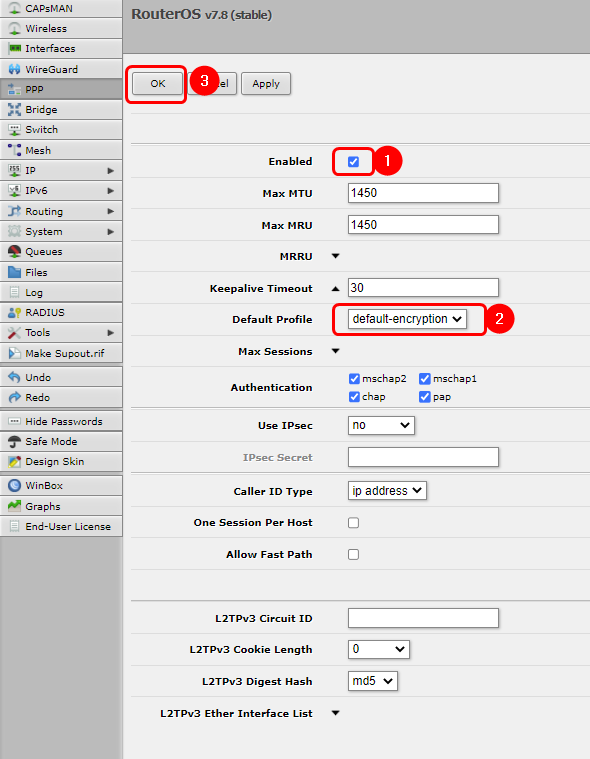
Now we will configure the L2TP Server on the MikroTik device. Open your device's WebUI and navigate to PPP → Interface → L2TP Server.
- Enable the L2TP Server
- Select profile default-encryption
- Save the configuration
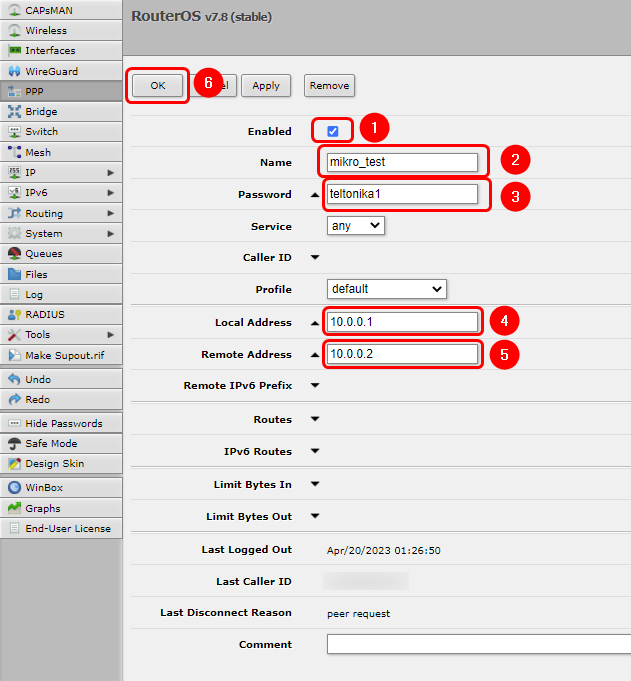
Now we will configure L2TP client's username and password, addressing & profile information at PPP → Secrets:
- Enable the client
- Create a name for the L2TP client
- Create a password for the L2TP client
- Create a Local Address for the L2TP Server (for this example we use 10.0.0.1)
- Create a Remote Address for the L2TP Client (for this example we use 10.0.0.2)
- Save the Configuration
EoIP configuration
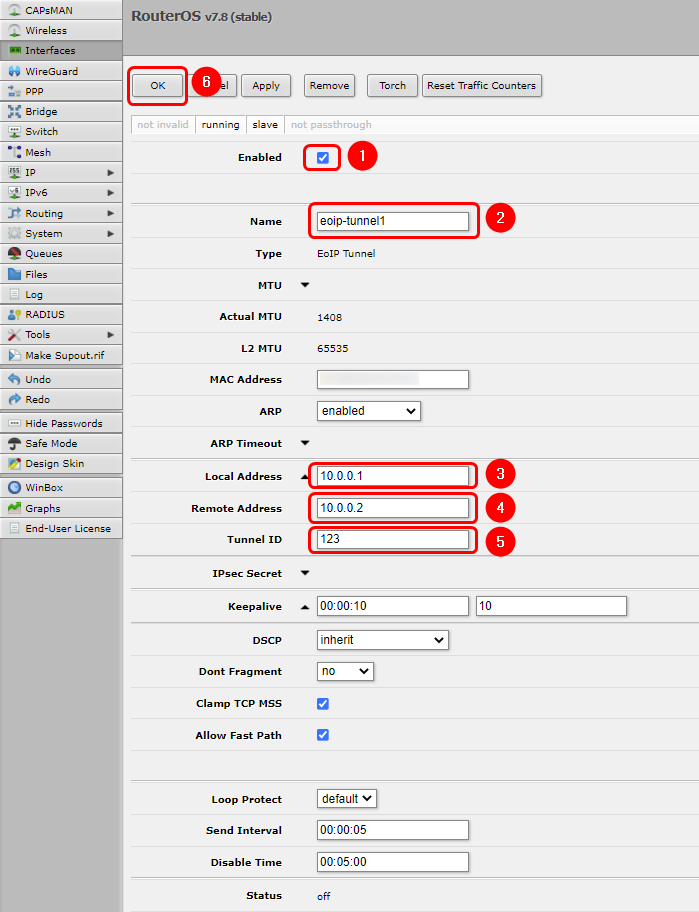
Next we will configure EoIP on the MikroTik side, for that navigate to Interfaces → EoIP tunnel Add New interface and configure accordingly:
- Enable the interface
- Create a name for the interface
- Input local address of the L2TP (in this example 10.0.0.1)
- Input remote address of the L2TP (in this example 10.0.0.2)
- Create a tunnel ID (it has to mach the ID configurated on the Teltonika device)
- Save the configuration
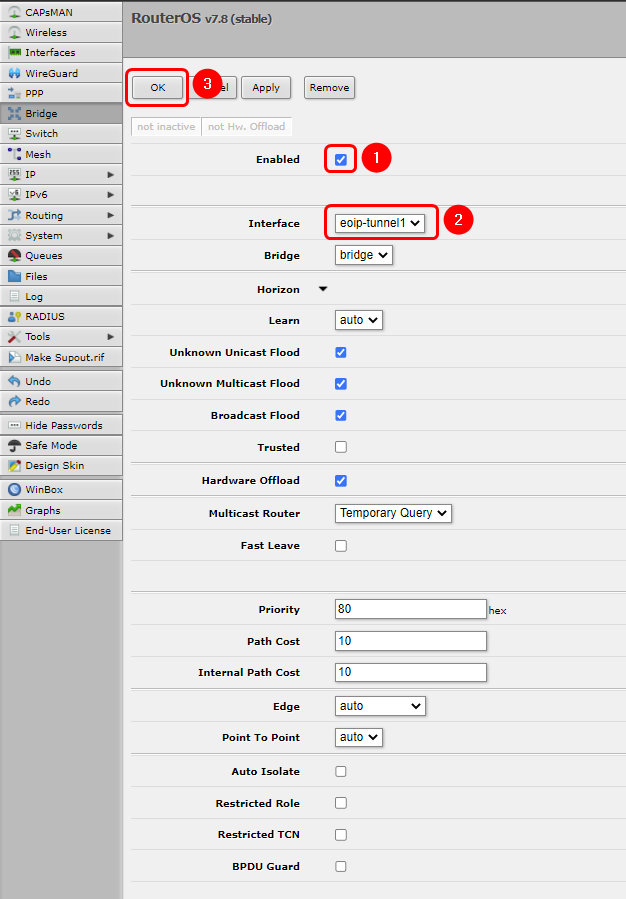
Now we will add EoIP to the Bridge, for that navigate to Bridge → Ports press the Add New button and configure the device accordingly:
- Enable the Bridge
- Select the EoIP Interface
- Save the configuration
Firewall configuration
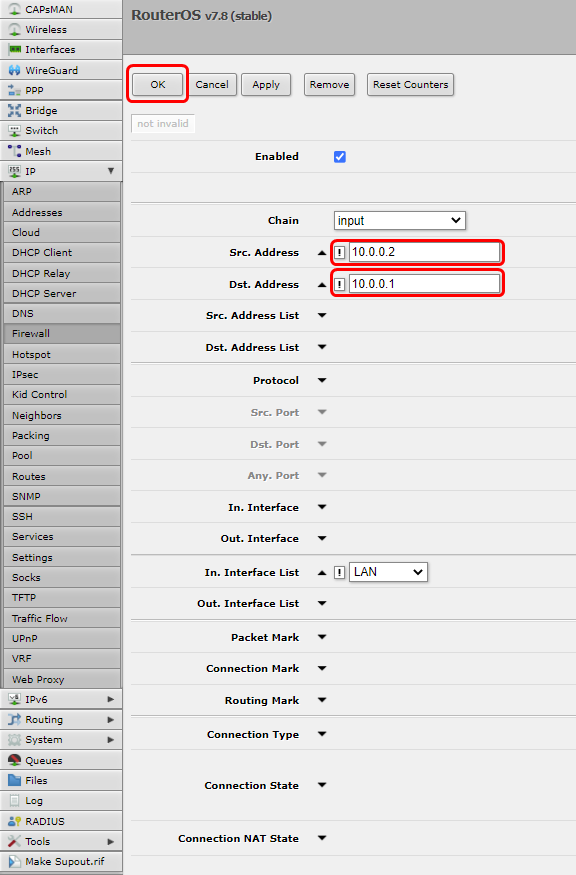
Lastly we will need to configure Firewall correctly for EoIP and L2TP, firs navigate to IP → Firewall and edit rule called: drop all not coming through LAN, make an exception for Src. Address: 10.0.0.2 and Dst Address 10.0.0.1 and Save the configuration. The configuration should look like this:
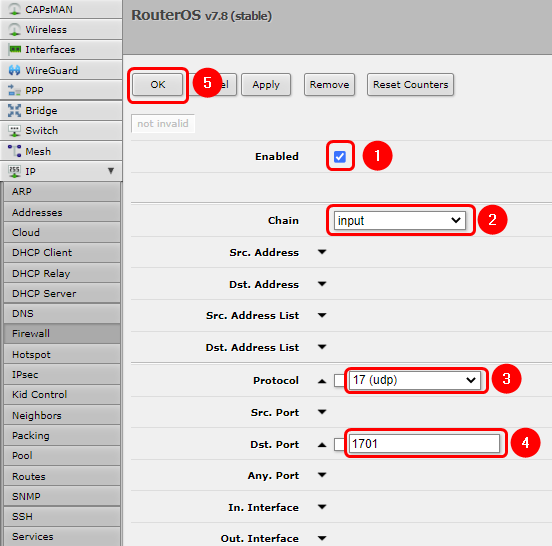
Now we will create a rule for 1701 UDP port for L2TP tunnel, on the same page press the Add New button and configure new Firewall rule accordingly:
- Enable the rule
- Select the input
- Protocol: 17(udp)
- Dst. Port: 1701(L2TP port)
- Save the configuration
After that new Firewall rule will appear, move it to the top of the page by dragging it with the mouse cursor so it will have the highest priority.
Testing the configuration
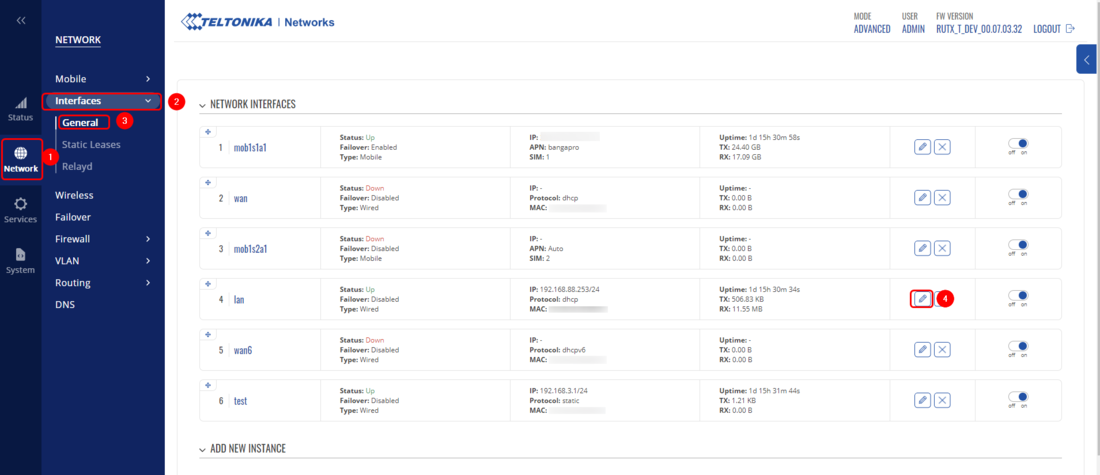
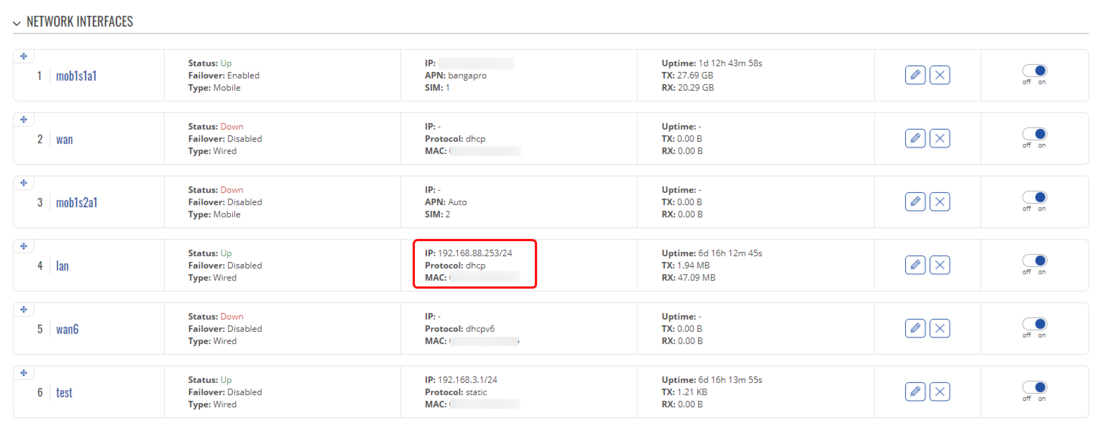
If everything was configurated correctly Teltonnika and MikroTik devices will be connected via L2TP+EoIP and the Teltonika device should receive the LAN IP address of the MikroTik. To confirm this on the Teltonika router's WebUI navigate to Network → Interfaces → General on the LAN interface you should see MikroTik IP(in this example 192.168.88.x):
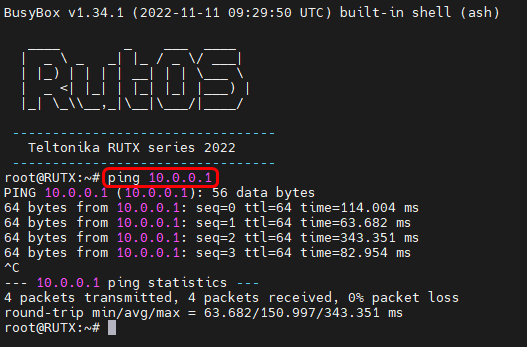
Additionally, we can check if we can reach MikroTik router through L2TP IP(10.0.0.1) or a device behind the MikroTik. Once again open your device's CLI/SSH and execute the command ping 10.0.0.1 you should be able to reach the MikroTik virtual IP:
See also
L2TP configuration examples RutOS

