Removing of HTTPS security warning: Difference between revisions
No edit summary |
PauliusRug (talk | contribs) No edit summary |
||
| (13 intermediate revisions by one other user not shown) | |||
| Line 1: | Line 1: | ||
== <big>Summary</big> == | == <big>Summary</big> == | ||
One of the main benefits of HTTPS is that it adds security and trust. It protects users against man-in-the-middle (MitM) attacks that can be launched from compromised or insecure networks. Hackers can use such techniques to steal your sensitive information. | One of the main benefits of HTTPS is that it adds security and trust. It protects users against man-in-the-middle (MitM) attacks that can be launched from compromised or insecure networks. Hackers can use such techniques to steal your sensitive information. | ||
Implementing SSL secures any data transmitted between server and browser during a user's session interacting with your device. | |||
This article will help you get a good idea about how to implement security into your network while using '''Teltonika''' devices.<br> | |||
----This page contains links with description all WebUI windows. If you're having trouble seeing all the pages listed here on your WebUI, you may need to '''turn on "Advanced WebUI" mode'''. You can do that by clicking the "Basic" button under "Mode", which is located at the top-right corner of the WebUI. | ----This page contains links with description all WebUI windows. If you're having trouble seeing all the pages listed here on your WebUI, you may need to '''turn on "Advanced WebUI" mode'''. You can do that by clicking the "Basic" button under "Mode", which is located at the top-right corner of the WebUI. | ||
<br> | |||
[[File:Networking_rut9_manual_webui_basic_advanced_mode.gif|alt=|center|border]] | [[File:Networking_rut9_manual_webui_basic_advanced_mode.gif|alt=|center|border]] | ||
<br> | |||
For accessing the device WebaUI using HTTPS it requires a certificate, else it will show the below error:<br> | |||
For accessing the device WebaUI using HTTPS it requires a certificate, else it will show the below error: | |||
[[File:16.png|left|alt=|border]] | [[File:16.png|left|alt=|border]] | ||
| Line 22: | Line 14: | ||
In this example, we will be able to access the device webpage using HTTPS, with a free certificate from a free CA. | In this example, we will be able to access the device webpage using HTTPS, with a free certificate from a free CA. | ||
== | == <big>Certificate creation and trust</big> == | ||
1. You must have a DNS record linked to the IP of the router; in my case, I’m using a Windows server to act as a DNS server. | 1. You must have a DNS record linked to the IP of the router; in my case, I’m using a Windows server to act as a DNS server. | ||
As shown, I choose | As shown, I choose the hostname '''rut955.teltonika.uae''' and it's linked with '''172.16.16.1''' the LAN IP of the router. | ||
This hostname will be used for creating the certificate later. | This hostname will be used for creating the certificate later. | ||
| Line 40: | Line 32: | ||
5. The final page: | 5. The final page: | ||
[[File:Getacert3.png|center|alt=|border|1102x1102px]] | [[File:Getacert3.png|center|alt=|border|1102x1102px]] | ||
<br> | |||
6. Click on (+) beside '''Open Private Key''': | 6. Click on (+) beside '''Open Private Key''': | ||
[[File:Getacert4.png|center|alt=|border|1102x1102px]] | [[File:Getacert4.png|center|alt=|border|1102x1102px]] | ||
| Line 47: | Line 38: | ||
Copy the text to a new Notepad file, and rename it to '''name.crt''' in my case I used a simple name '''cer.crt''' | Copy the text to a new Notepad file, and rename it to '''name.crt''' in my case I used a simple name '''cer.crt''' | ||
<br> | |||
7. Click on (+) beside Open Public Key: | 7. Click on (+) beside Open Public Key: | ||
[[File:Getacert5.png|center|alt=|border|1102x1102px]] | [[File:Getacert5.png|center|alt=|border|1102x1102px]] | ||
| Line 53: | Line 44: | ||
Copy the text to a new Notepad file, and rename it to '''name.key''' in my case I used a simple name '''key.key''' | Copy the text to a new Notepad file, and rename it to '''name.key''' in my case I used a simple name '''key.key''' | ||
<br> | |||
8. Click on the [.p12] file, and it will be downloaded: | 8. Click on the [.p12] file, and it will be downloaded: | ||
[[File:Getacert6.png|center|alt=|border|1102x1102px]] | [[File:Getacert6.png|center|alt=|border|1102x1102px]] | ||
| Line 64: | Line 56: | ||
<br> | <br> | ||
11. Right-click and highlight '''All Tasks''', click '''Import…'''[[File:Windows3.png|center|alt=|border|1102x1102px]] | 11. Right-click and highlight '''All Tasks''', click '''Import…'''[[File:Windows3.png|center|alt=|border|1102x1102px]] | ||
<br> | |||
12. Choose the ".p12" file downloaded before: | 12. Choose the ".p12" file downloaded before: | ||
| Line 70: | Line 62: | ||
[[File:Windows4.png|center|alt=|border]] | [[File:Windows4.png|center|alt=|border]] | ||
Then '''Next''', | Then '''Next''', '''Next''', then '''Finish'''. | ||
== | == <big>Device configuration</big> == | ||
Go to '''System''' → '''Access Control''' → '''WEBUI''' | Go to '''System''' → '''Access Control''' → '''WEBUI''' | ||
1) Turn off '''Certificate files from device'''. | 1) Turn off '''Certificate files from device'''. | ||
[[File:RUT1.png|center|alt=|border|1102x1102px]] | [[File:RUT1.png|center|alt=|border|1102x1102px]] | ||
2) Click browse in '''Server certificate''' and choose the [.crt] file created. | 2) Click browse in '''Server certificate''' and choose the [.crt] file created. | ||
| Line 91: | Line 81: | ||
5) Open the WebUI again using the DNS record:</big></sup> | 5) Open the WebUI again using the DNS record:</big></sup> | ||
[[File:Windows done.png|center|alt=|border|1102x1102px]] | [[File:Windows done.png|center|alt=|border|1102x1102px]] | ||
Now we can access the WebUI securely, and we can turn off the HTTP access. | |||
=< | == <big>See Also</big> == | ||
* [[Remote WebUI Access]] | * [[Remote WebUI Access]] | ||
* [[Unblocking WebUI Access]] | * [[Unblocking WebUI Access]] | ||
[[Category:Router control and monitoring]] | |||
Revision as of 15:53, 3 August 2023
Main Page > General Information > Configuration Examples > Router control and monitoring > Removing of HTTPS security warningSummary
One of the main benefits of HTTPS is that it adds security and trust. It protects users against man-in-the-middle (MitM) attacks that can be launched from compromised or insecure networks. Hackers can use such techniques to steal your sensitive information.
Implementing SSL secures any data transmitted between server and browser during a user's session interacting with your device.
This article will help you get a good idea about how to implement security into your network while using Teltonika devices.
This page contains links with description all WebUI windows. If you're having trouble seeing all the pages listed here on your WebUI, you may need to turn on "Advanced WebUI" mode. You can do that by clicking the "Basic" button under "Mode", which is located at the top-right corner of the WebUI.

For accessing the device WebaUI using HTTPS it requires a certificate, else it will show the below error:

In this example, we will be able to access the device webpage using HTTPS, with a free certificate from a free CA.
Certificate creation and trust
1. You must have a DNS record linked to the IP of the router; in my case, I’m using a Windows server to act as a DNS server.
   As shown, I choose the hostname rut955.teltonika.uae and it's linked with 172.16.16.1 the LAN IP of the router.
   This hostname will be used for creating the certificate later.
2. Go to: GetAcert website.
3. Fill in the information regarding your requirements:

   NOTE: 1,2 and 3 are the names you will use in the browser.
   Other information isn’t mandatory. Click Next Page.
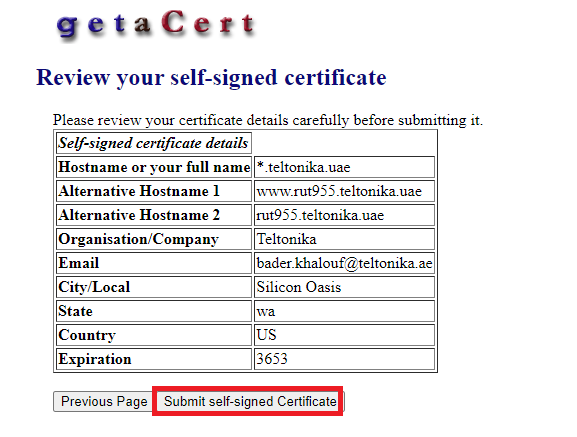
4. Check the data once again, if everything is okay click Submit self-signed Certificate:
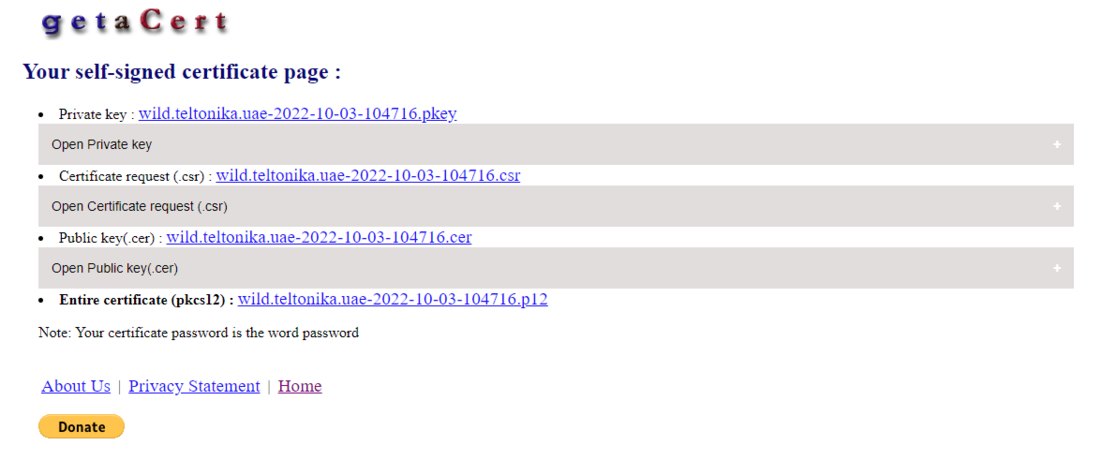
5. The final page:
6. Click on (+) beside Open Private Key:
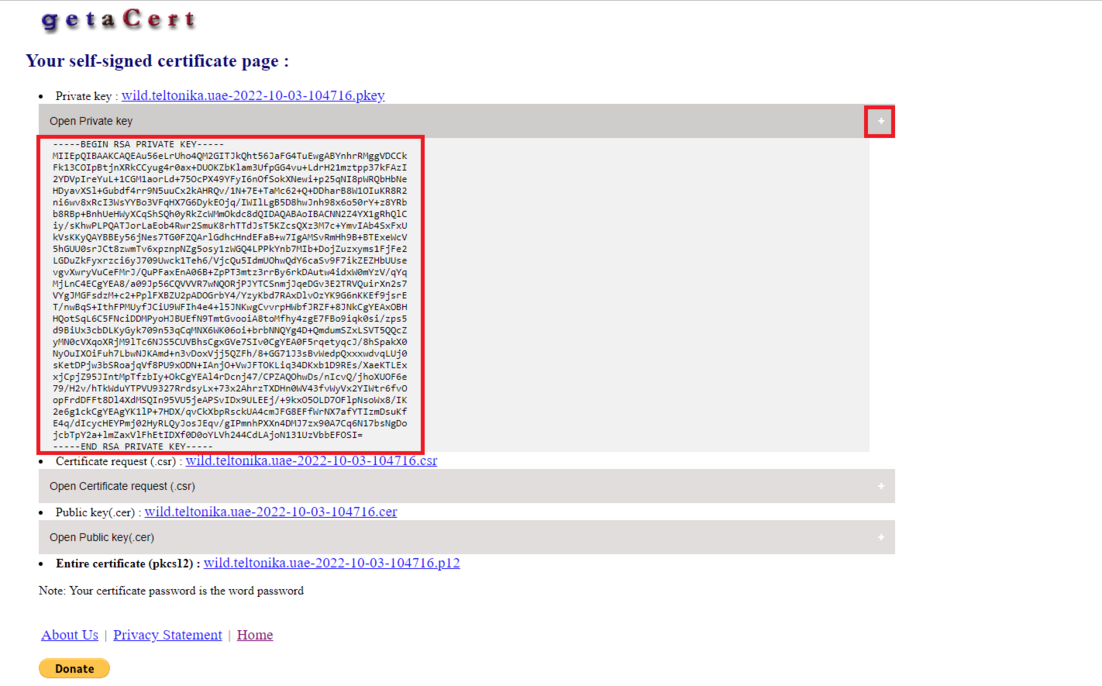
Copy the text to a new Notepad file, and rename it to name.crt in my case I used a simple name cer.crt
7. Click on (+) beside Open Public Key:
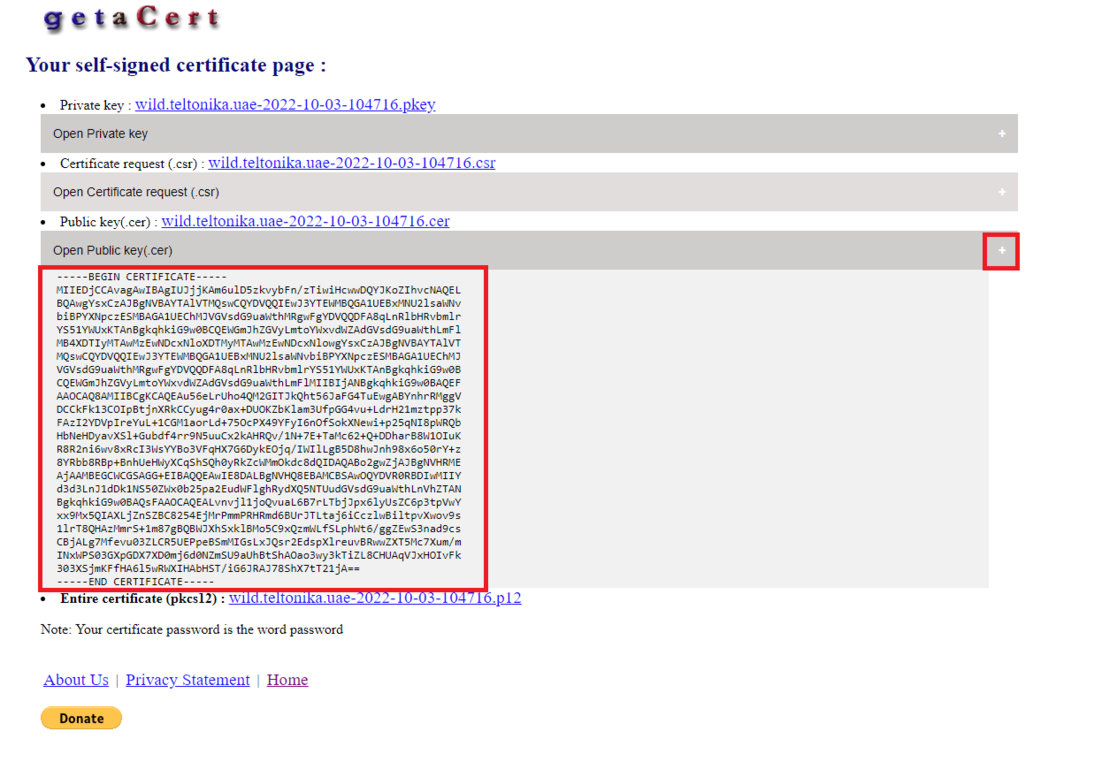
Copy the text to a new Notepad file, and rename it to name.key in my case I used a simple name key.key
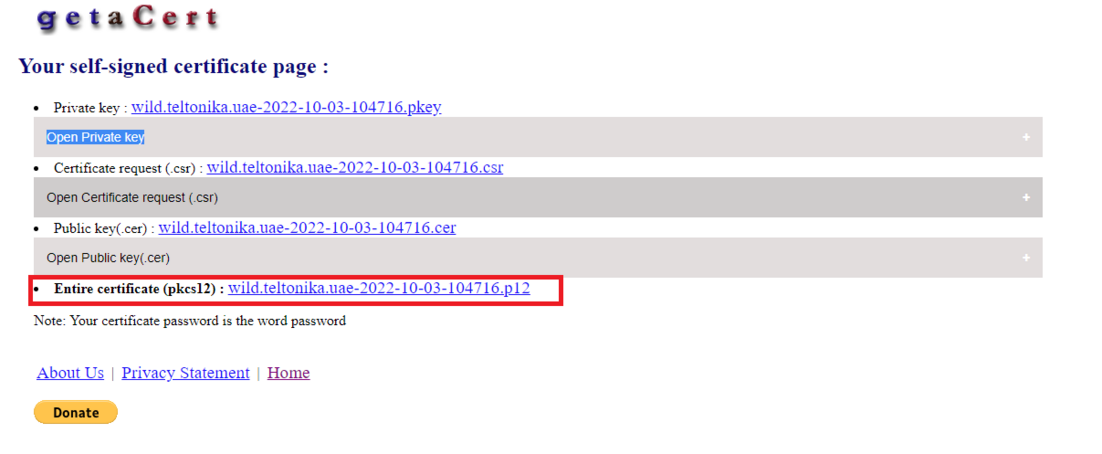
8. Click on the [.p12] file, and it will be downloaded:
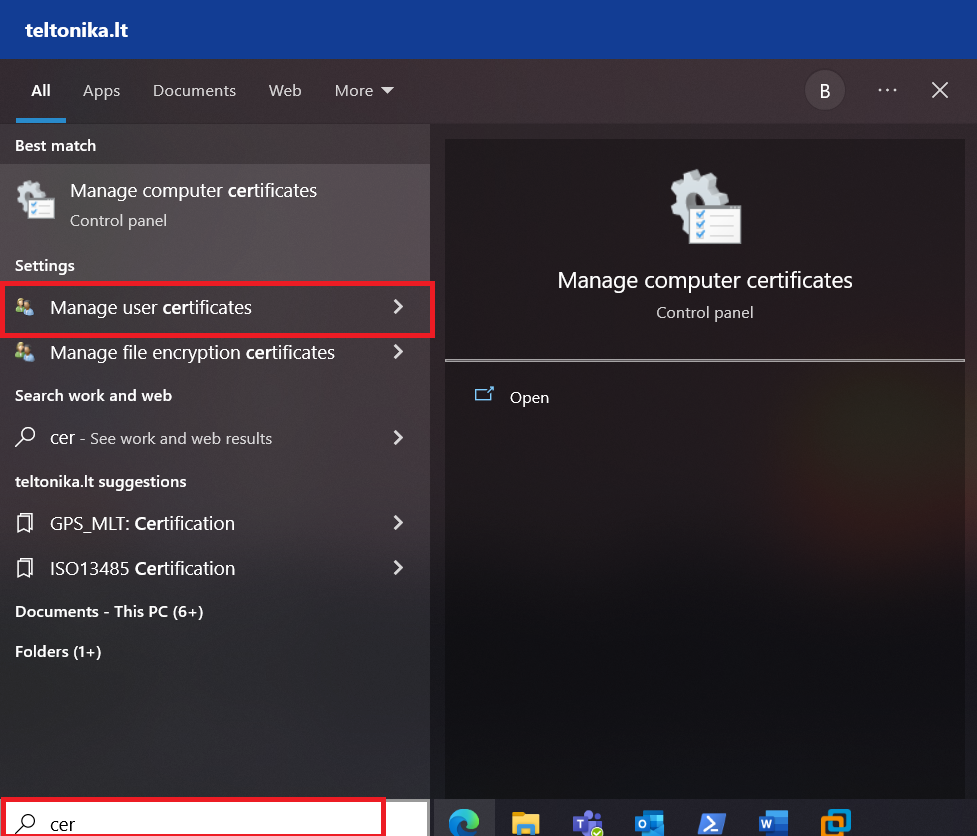
9. Go to the Microsoft search bar and type: cer then choose Manage user certificates:
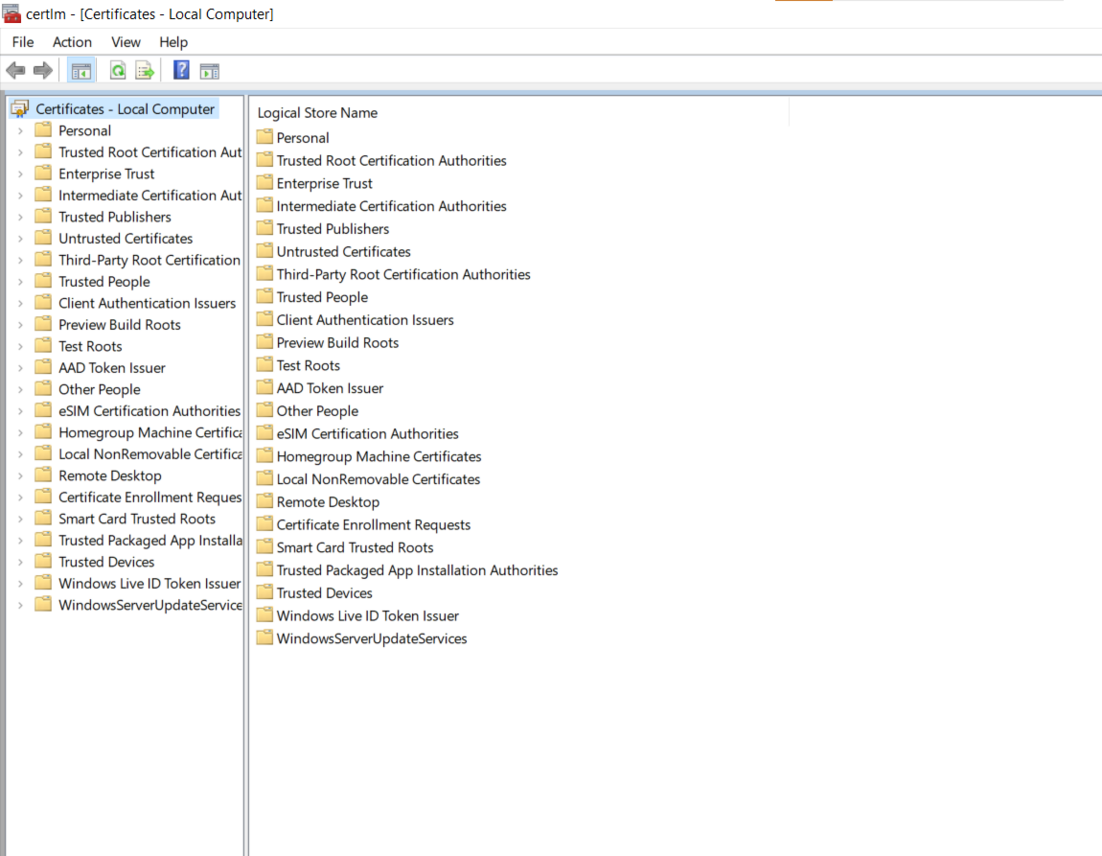
10. Go to Trusted Root Certification Authorities:
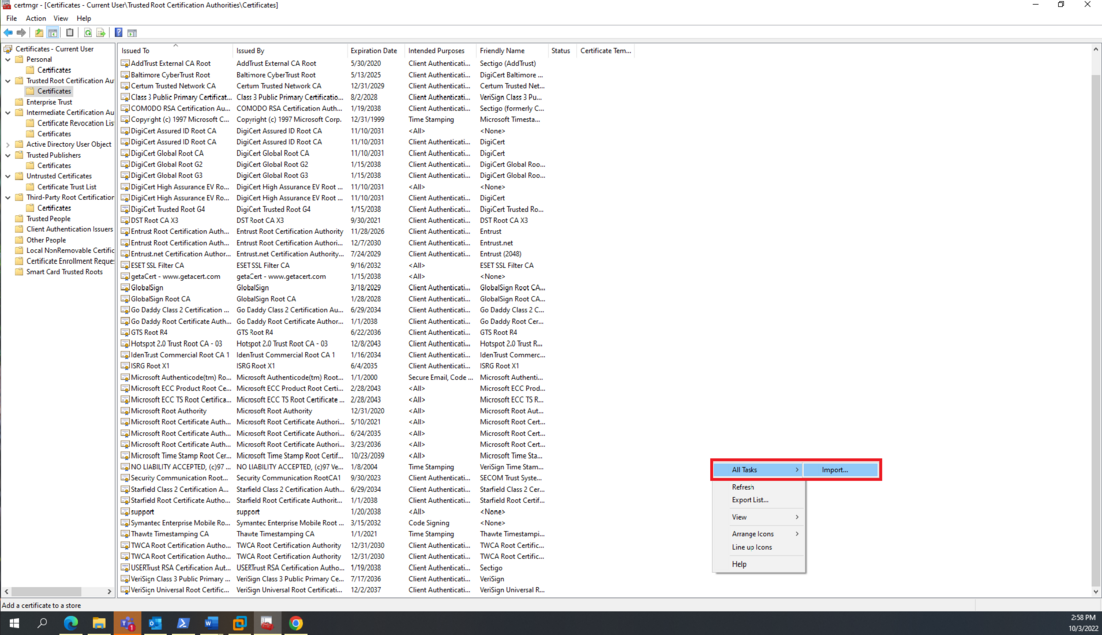
11. Right-click and highlight All Tasks, click Import…
12. Choose the ".p12" file downloaded before:
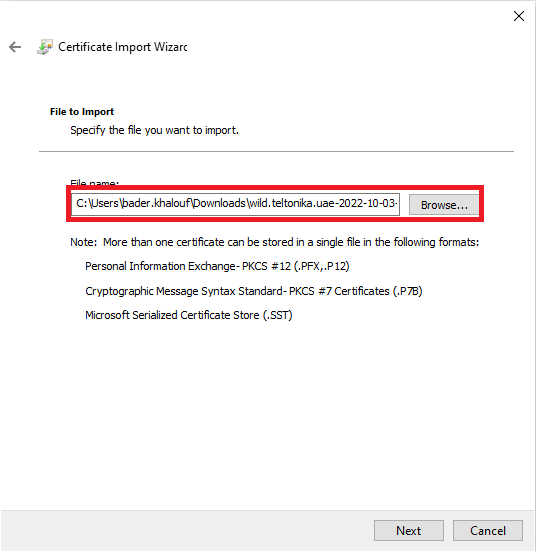
Then Next, Next, then Finish.
Device configuration
Go to System → Access Control → WEBUI
1) Turn off Certificate files from device.
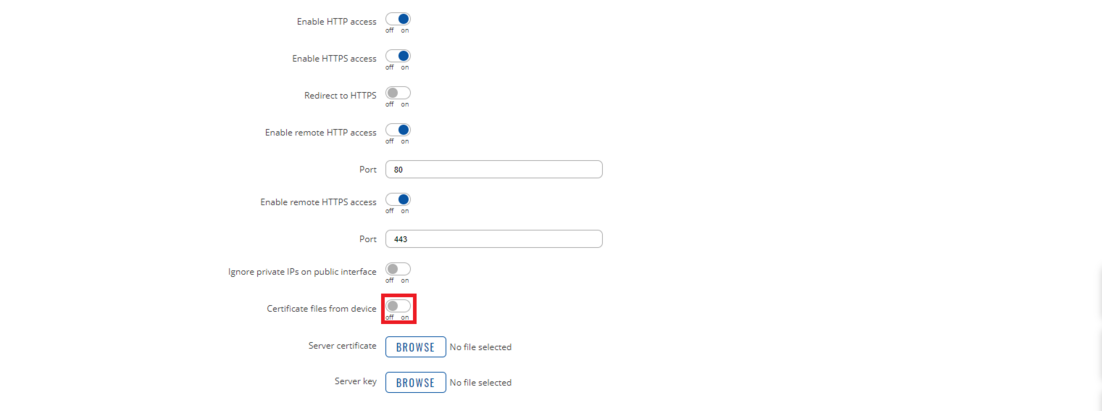
2) Click browse in Server certificate and choose the [.crt] file created.
3) Click browse in Server key and choose the [.key] file created.
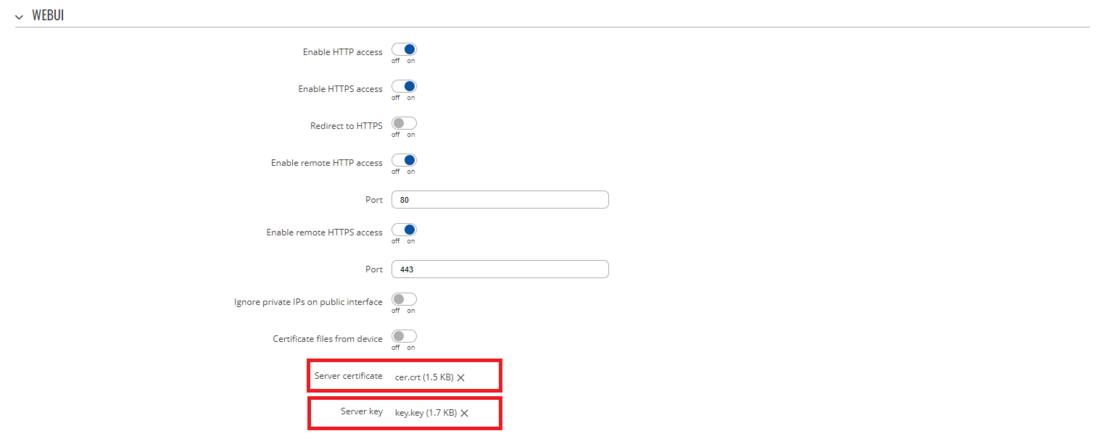
4) Click SAVE & APPLY.
5) Open the WebUI again using the DNS record:
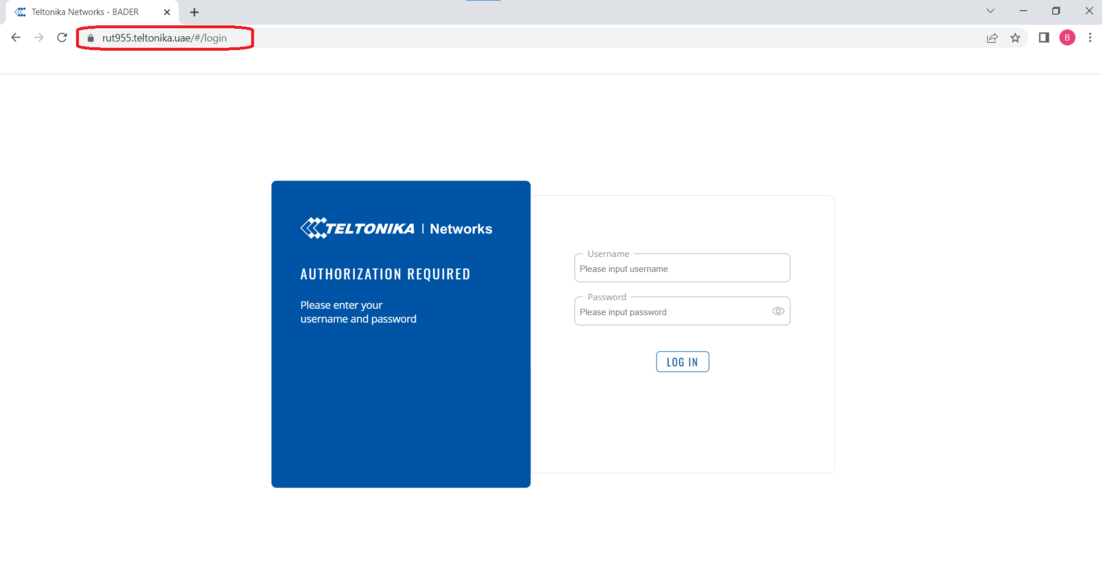
Now we can access the WebUI securely, and we can turn off the HTTP access.
