Reaching Cisco router console port remotely RutOS: Difference between revisions
No edit summary |
PauliusRug (talk | contribs) No edit summary |
||
| Line 1: | Line 1: | ||
__TOC__ | __TOC__ | ||
==Introduction== | ==Introduction== | ||
| Line 9: | Line 9: | ||
You will need: | You will need: | ||
<ul> | <ul> | ||
<li>A router/gateway with USB or RS232 Serial/li> | <li>A router/gateway with USB or RS232 Serial</li> | ||
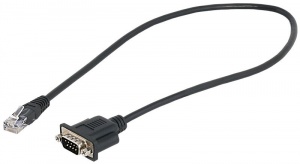
<li>An <b>RS232 (male) - RJ45</b> cable (to connect to a Cisco AUX port): <br> [[File:Cisco rj45 rs232 cable.jpg|300px]]</li> | <li>An <b>RS232 (male) - RJ45</b> cable (to connect to a Cisco AUX port): <br> [[File:Cisco rj45 rs232 cable.jpg|300px]]</li> | ||
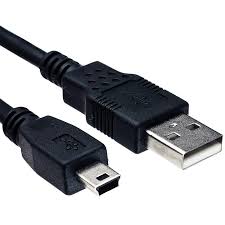
<li>Or a <b>USB type Mini - USB type A</b> cable (to connect to a USB type mini console port): <br> [[File:Cisco usb cable.jpg]]</li> | <li>Or a <b>USB type Mini - USB type A</b> cable (to connect to a USB type mini console port): <br> [[File:Cisco usb cable.jpg]]</li> | ||
</ul> | |||
==Configuration== | ==Configuration== | ||
| Line 18: | Line 19: | ||
===RS232 - RJ45=== | ===RS232 - RJ45=== | ||
---- | ---- | ||
RS232 can be configured from the Services → | RS232 can be configured from the Services → RS232/RS485 → <b>[[RUT955_RS232/RS485#RS232|RS232 Configuration]]</b> page. The following RS232 configuration should be used: | ||
*'''Enable''' RS232. | |||
*Select '''baud rate''' ('''9600'''). | |||
*Select '''Serial type''' ('''Over IP'''). | |||
*Select '''Protocol''' ('''TCP'''). | |||
*Leave mode as '''Server'''. | |||
[[ | *Type in '''port''' ('''15026''') | ||
*Save configuration | |||
[[File:Cisco rs config update.png|border|class=tlt-border|1100x700px]] | |||
* | |||
* | |||
* | |||
===USB=== | ===USB=== | ||
---- | ---- | ||
| Line 55: | Line 39: | ||
[[File:Cisco usb config update1.png|border|class=tlt-border|1100x700px]] | [[File:Cisco usb config update1.png|border|class=tlt-border|1100x700px]] | ||
Then, we'll need to configure this instance: | Then, we'll need to configure this instance: | ||
*Enable | *Enable | ||
| Line 74: | Line 51: | ||
*Type in '''port''' ('''43223''') | *Type in '''port''' ('''43223''') | ||
*Save configuration | *Save configuration | ||
[[File:Cisco usb config update2.png|border|class=tlt-border]] | |||
===PuTTY configuration=== | ===PuTTY configuration=== | ||
Revision as of 16:36, 3 August 2023
Main Page > General Information > Configuration Examples > RS232/485 > Reaching Cisco router console port remotely RutOSIntroduction
This article describes how to connect to a console of another device (e.g., a Cisco router, Fortigate firewall, etc.)
Prerequisites
You will need:
- A router/gateway with USB or RS232 Serial
- An RS232 (male) - RJ45 cable (to connect to a Cisco AUX port):
- Or a USB type Mini - USB type A cable (to connect to a USB type mini console port):
Configuration
There are multiple ways to connect to a console port, which are described in the sections below:
RS232 - RJ45
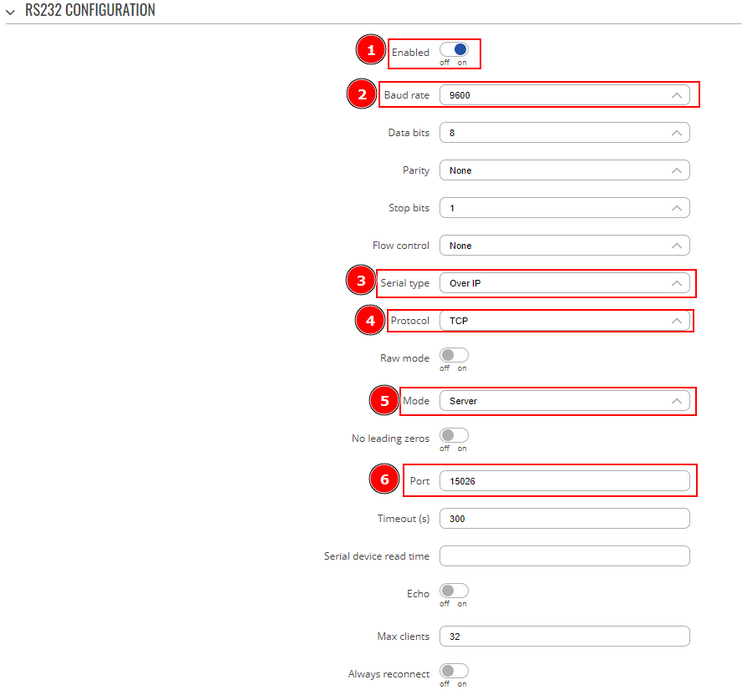
RS232 can be configured from the Services → RS232/RS485 → RS232 Configuration page. The following RS232 configuration should be used:
- Enable RS232.
- Select baud rate (9600).
- Select Serial type (Over IP).
- Select Protocol (TCP).
- Leave mode as Server.
- Type in port (15026)
- Save configuration
USB
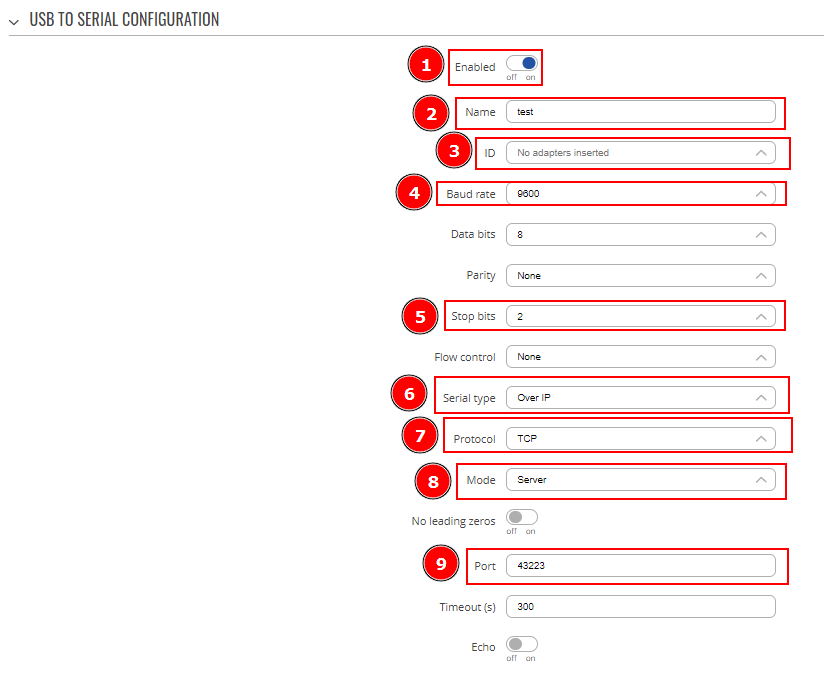
Using Mini USB – USB type A configuration. Configured from the WebUI, Services → USB Tools → USB to Serial page:
Firstly, we'll need to add a new USB to Serial instance:
- Type name.
- Press Add.
Then, we'll need to configure this instance:
- Enable
- Name should be already written
- Select device ID
- Select baud rate
- Choose two Stop bits
- Select Serial type (Over IP)
- Choose TCP protocol
- Leave mode as Server
- Type in port (43223)
- Save configuration
PuTTY configuration
The console can be accessed by using software such as PuTTY (can be downloaded from here.
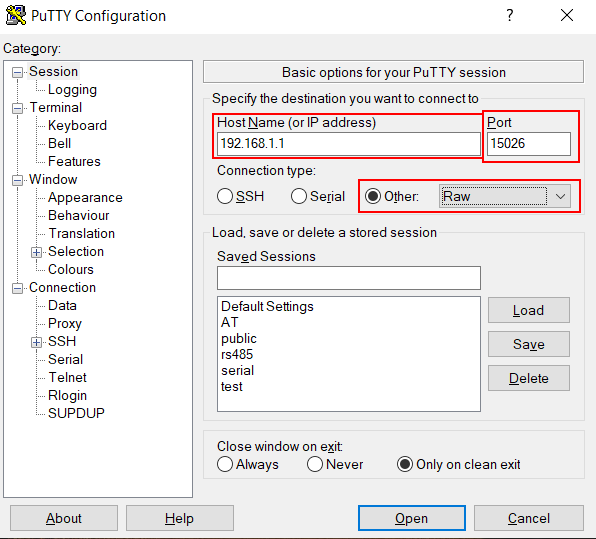
The PuTTY configuration should look like this:
- Type in routers/gateways IP
- Select port you've configured in RS232/USB to Serial.
- Select RAW connection type
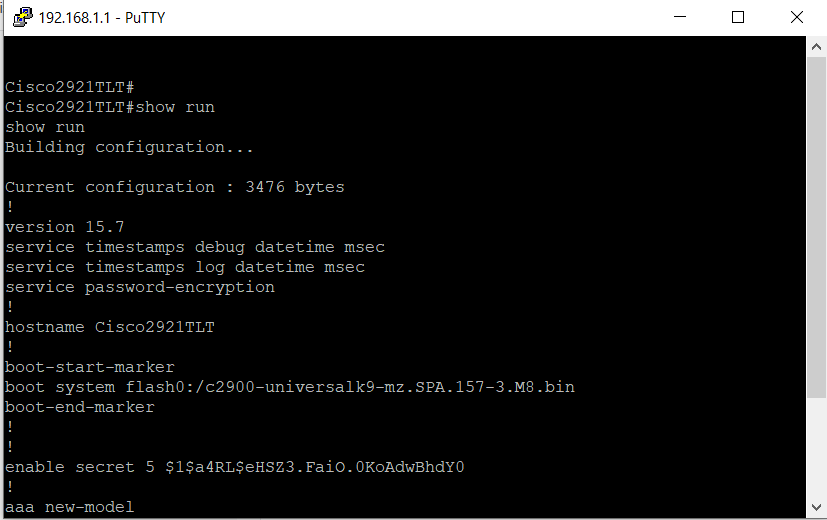
Then you should successfully connect to Cisco device:
If you do encounter any issues with PuTTY, you can try connecting from Teltonika's device directly to Cisco's:
- Connect to router's/gateway's CLI
- Type in this command "microcom -s 9600 /dev/rs232"
This way you'd know if Teltonika's device is even able to see whats on the other side of RS232.
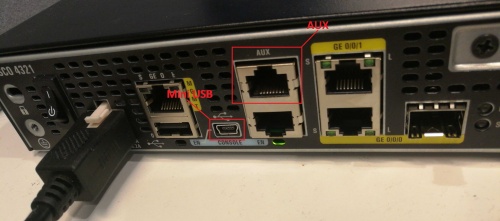
Console port
Example of console ports:

