Difference between revisions of "Template:Rms manual management commands update fw"
From Teltonika Networks Wiki
| (19 intermediate revisions by 3 users not shown) | |||
| Line 1: | Line 1: | ||
| − | + | The '''Update FW''' function is used to update the firmware(s) of devices selected from your device table. | |
| + | ---- | ||
| + | * Firmware files can be uploaded to RMS via the RMS Files tab for later use (more information '''[[RMS Files: FW files|here]]''') or they can be selected from your computer. Either way, before you upgrade, you'll need to obtain a firmware file. You can download firmwares for different RUT devices from these links: | ||
| + | ** [[RUT2xx Firmware]] | ||
| + | ** [[RUT8xx Firmware]] | ||
| + | ** [[RUT9xx Firmware]] | ||
| + | ---- | ||
| + | * Select the device(s) that you wish to update: | ||
| + | |||
| + | [[File:How to update fw from rms part 1 v3.png]] | ||
| + | ---- | ||
| + | * Scroll your mouse pointer to the Commands submenu ('''Management → Commands''') and click "Update FW": | ||
| − | + | [[File:How to update fw from rms part 2 v5.png]] | |
| + | ---- | ||
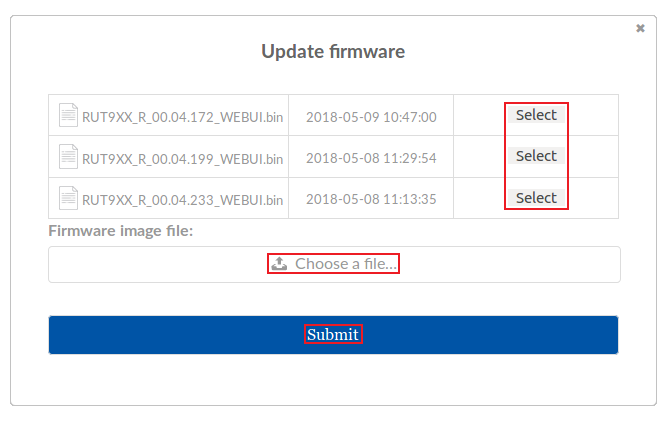
| + | * Choose a firmware that was previously uploaded to RMS ('''[[RMS Files: FW files]]''') or click the "[[File:Choose file icon.png|16px]] Choose a file..." button to upload a firmware file from your computer and click "Submit": | ||
| − | [[File: | + | [[File:How to update fw from rms part 3 v1.png]] |
| + | ---- | ||
| + | * You will be prompted to confirm the firmware update. Click "Yes" if you wish to proceed: | ||
| − | + | [[File:How to update fw from rms part 4 v1.png]] | |
| − | |||
---- | ---- | ||
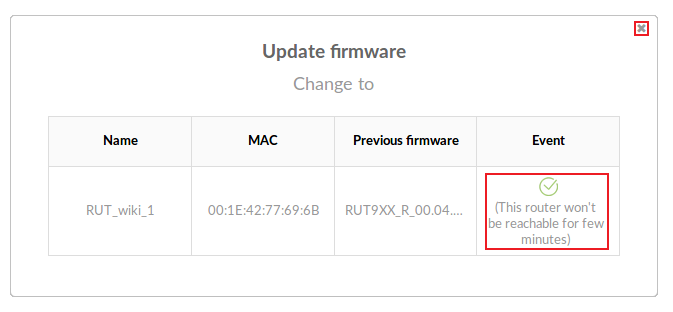
| − | + | * Allow some time for the firmware to be uploaded into the router (progress will be shown under the "Event" field) until a green check mark shows up with the text "This router won't be reachable for few minutes" next to it. You can then close the pop-up box: | |
| − | |||
| − | |||
| − | |||
| − | |||
| − | |||
| − | |||
| − | |||
| − | |||
| − | |||
| − | |||
| − | |||
| − | |||
| − | |||
| − | + | [[File:How to update fw from rms part 5 v1.png]] | |
---- | ---- | ||
| − | + | * Your router(s) will be unreachable for a few minutes and will thus be shown as "Offline". The power button symbols located next to each device in the device table indicate the monitoring status of these devices. When it turns green, the firmware updates will have finished and the router(s) will be seen as "Online" in RMS: | |
| − | [[File: | + | [[File:How to update fw from rms part 6 v2.png]] |
Revision as of 15:28, 14 May 2018
The Update FW function is used to update the firmware(s) of devices selected from your device table.
- Firmware files can be uploaded to RMS via the RMS Files tab for later use (more information here) or they can be selected from your computer. Either way, before you upgrade, you'll need to obtain a firmware file. You can download firmwares for different RUT devices from these links:
- Select the device(s) that you wish to update:
- Scroll your mouse pointer to the Commands submenu (Management → Commands) and click "Update FW":
- Choose a firmware that was previously uploaded to RMS (RMS Files: FW files) or click the "
 Choose a file..." button to upload a firmware file from your computer and click "Submit":
- You will be prompted to confirm the firmware update. Click "Yes" if you wish to proceed:
- Allow some time for the firmware to be uploaded into the router (progress will be shown under the "Event" field) until a green check mark shows up with the text "This router won't be reachable for few minutes" next to it. You can then close the pop-up box:
- Your router(s) will be unreachable for a few minutes and will thus be shown as "Offline". The power button symbols located next to each device in the device table indicate the monitoring status of these devices. When it turns green, the firmware updates will have finished and the router(s) will be seen as "Online" in RMS:


