OPC UA Configuration Example: Difference between revisions
mNo edit summary |
Kristijonasb (talk | contribs) No edit summary |
||
| (13 intermediate revisions by 2 users not shown) | |||
| Line 8: | Line 8: | ||
This article will contain an example on how you can configure a Teltonika-Networks device as an OPC UA Client, that will gather and forward data from an UPC UA Server. | This article will contain an example on how you can configure a Teltonika-Networks device as an OPC UA Client, that will gather and forward data from an UPC UA Server. | ||
'''Note:''' OPC UA is additional software that can be installed from the '''System → Package Manager''' page. | |||
| Line 13: | Line 15: | ||
For this example we will need: | For this example we will need: | ||
*RUT or TRB series device (RUTX11 will be used in this example) | *'''RUT or TRB series device''' (RUTX11 will be used in this example) | ||
*OPC UA server | *'''OPC UA server''' | ||
Note: If you're having trouble finding any page or some of the parameters described here on your device's WebUI, you should turn on "Advanced WebUI" mode. You can do that by clicking the "Basic" button under "Mode, | '''Note:''' If you're having trouble finding any page or some of the parameters described here on your device's WebUI, you should turn on '''"Advanced WebUI"''' mode. You can do that by clicking the '''"Basic"''' button under '''"Mode",''' which is located at the top-right corner of the WebUI. | ||
A visual GIF on how to change from Basic to Advanced: | A visual GIF on how to change from Basic to Advanced: | ||
| Line 22: | Line 24: | ||
==Configuration== | ==Configuration== | ||
'''Note:''' In this example, we will use a '''OPC UA C++ demo server''', which has some predefined values simulated for us to request. | |||
Required configurations are done inside '''Services → OPC UA''' | |||
===Defining Server and Nodes=== | |||
-------------- | |||
<br> | |||
1. In the '''OPC UA Servers block''', insert the name of the server<br> | |||
2. Click '''Add''' to create new instance<br> | |||
[[File:OPC UA Configuration example adding server v1.png|border|class=tlt-border|1067x1067px]]<br> | |||
3. Toggle '''Enable''' option to on<br> | |||
4. Insert the '''URL''' of the OPC UA Server<br> | |||
5. '''Add''' new server node<br> | |||
[[File:OPC UA Configuration example adding server node v1.png|border|class=tlt-border|1067x1067px]]<br> | |||
6. Enter the '''ID Namespace''' of the node<br> | |||
7. Select ID type as '''String'''<br> | |||
8. Enter '''ID''' of the node<br> | |||
9. '''Save & Apply''' settings<br> | |||
[[File:OPC UA Configuration example configuring server node v1.png|border|class=tlt-border|1060x1060px]]<br> | |||
10. Optionally, add another node analogously<br> | |||
[[File:OPC UA Configuration example adding server node second v1.png|border|class=tlt-border|1073x1073px]] | |||
=== Defining Value Groups and Values=== | |||
-------------- | |||
1. Insert the name of the '''Value Group'''<br> | |||
2. Press '''Add''' to add new value group<br> | |||
[[File:OPC UA Configuration example adding value group v1.png|border|class=tlt-border|1056x1056px]]<br> | |||
3. Enable the group and leave the rest of the settings as default<br> | |||
[[File:OPC UA Configuration example configuring value group v1.png|border|class=tlt-border|901x901px]]<br> | |||
4. Inside the '''OPC UA Group Values''', add new instance with your preferred name<br> | |||
[[File:OPC UA Configuration example adding value v1.png|border|class=tlt-border|1053x1053px]]<br> | |||
5. '''Enable''' the instance<br> | |||
6. Assign a '''server node''' from which the data will be retrieved<br> | |||
7. '''Save and apply''' settings<br> | |||
[[File:OPC UA Configuration example configuring value v1.png|border|class=tlt-border|1049x1049px]]<br> | |||
<br> | |||
Optionally configure the second value:<br> | |||
[[File:OPC UA Configuration example configuring value second v1.png|border|class=tlt-border|1091x1091px]]<br> | |||
===Testing Data Retrieval=== | |||
------------ | |||
Once we have our configuration finished, we can run some integrated tests in order to make sure we are able to retrieve the data from OPC UA server. | |||
In order to do so, we can press the '''"Test"''' button under '''OPC UA Value Groups''':<br> | |||
[[File:OPC UA Configuration example test button v1.png|border|class=tlt-border|1092x1092px]]<br> | |||
The output should show requested data like so:<br> | |||
[[File:OPC UA Configuration example test response v1.png|border|class=tlt-border|670x670px]]<br> | |||
===Sending Data to a Server=== | |||
---------- | |||
Once we made sure we are able to read the values correctly using the test we did before, let us use "Data to server" to send this data to an HTTP server. | |||
For testing purposes, we will listen on defined port locally using Hercules software. | |||
In order to do so navigate to '''Services → Data to Server''' and create a new data sender: | |||
#'''Enable''' the instance | |||
# Select Data source: '''OPC UA''' | |||
#Select Protocol: '''HTTP(S)''' | |||
# Adjust the JSON format to include the data | |||
#Define HTTP server IP | |||
[[File:OPC UA Configuration example DatatoServer config v1.png|border|class=tlt-border|751x751px]] | |||
After saving these settings, we can start listening on "555" port using Hercules and see the data flow:<br> | |||
[[File:OPC UA Configuration example test hercules v1.png|784x784px]] | |||
In conclusion, we have successfully configured an RUT device as an OPC UA client, requested data from an OPC UA demo server and forwarded that data using "Data to Server" functionality. By acting as an OPC UA client, RUT devices can seamlessly collect and transmit real-time data from various OPC UA servers to central monitoring systems. | |||
Additionally, this integration demonstrates the flexibility and versatility of Teltonika-Networks devices in various industrial IoT applications and is a significant step forward in the development of a robust and scalable industrial IoT infrastructure. | |||
==See Also== | |||
*[https://wiki.teltonika-networks.com/view/RUT956_OPC_UA OPC UA Manual] | |||
*[https://www.unified-automation.com/downloads/opc-ua-servers OPC UA C++ Demo Server] | |||
*[https://www.hw-group.com/software/hercules-setup-utility Hercules] | |||
[[Category:Router control and monitoring]] | |||
Latest revision as of 14:16, 3 October 2023
Main Page > General Information > Configuration Examples > Router control and monitoring > OPC UA Configuration ExampleThe information in this page is updated in accordance with 00.07.03.3 firmware version. .
Introduction
OPC UA (OPC Unified Architecture) is an industrial communication protocol for secure and reliable transfer of real-time data and events between devices and applications in industrial automation and the Internet of Things (IoT).
This article will contain an example on how you can configure a Teltonika-Networks device as an OPC UA Client, that will gather and forward data from an UPC UA Server.
Note: OPC UA is additional software that can be installed from the System → Package Manager page.
Configuration overview and prerequisites
For this example we will need:
- RUT or TRB series device (RUTX11 will be used in this example)
- OPC UA server
Note: If you're having trouble finding any page or some of the parameters described here on your device's WebUI, you should turn on "Advanced WebUI" mode. You can do that by clicking the "Basic" button under "Mode", which is located at the top-right corner of the WebUI.
A visual GIF on how to change from Basic to Advanced:

Configuration
Note: In this example, we will use a OPC UA C++ demo server, which has some predefined values simulated for us to request.
Required configurations are done inside Services → OPC UA
Defining Server and Nodes
1. In the OPC UA Servers block, insert the name of the server
2. Click Add to create new instance

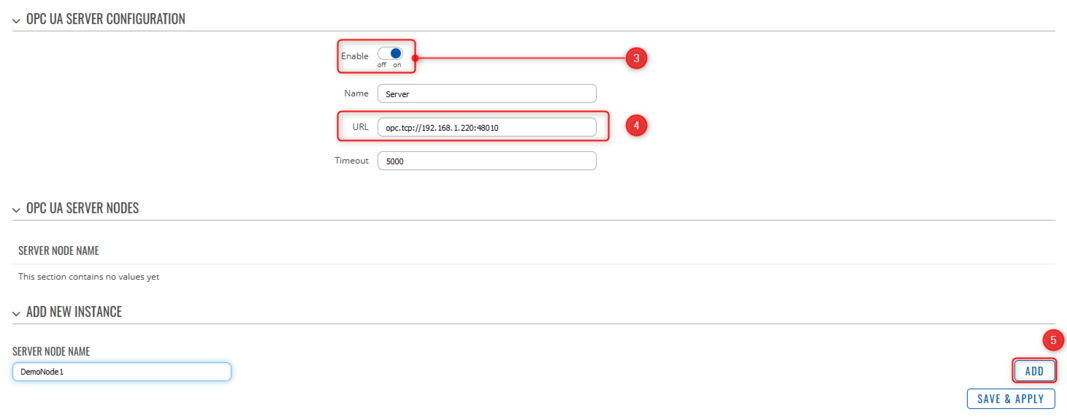
3. Toggle Enable option to on
4. Insert the URL of the OPC UA Server
5. Add new server node

6. Enter the ID Namespace of the node
7. Select ID type as String
8. Enter ID of the node
9. Save & Apply settings

10. Optionally, add another node analogously
Defining Value Groups and Values
1. Insert the name of the Value Group
2. Press Add to add new value group

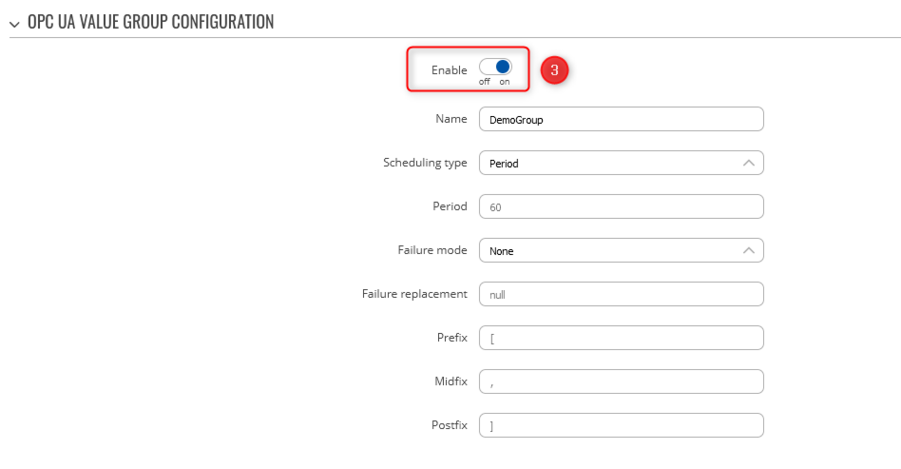
3. Enable the group and leave the rest of the settings as default

4. Inside the OPC UA Group Values, add new instance with your preferred name

5. Enable the instance
6. Assign a server node from which the data will be retrieved
7. Save and apply settings

Optionally configure the second value:

Testing Data Retrieval
Once we have our configuration finished, we can run some integrated tests in order to make sure we are able to retrieve the data from OPC UA server.
In order to do so, we can press the "Test" button under OPC UA Value Groups:
The output should show requested data like so:
Sending Data to a Server
Once we made sure we are able to read the values correctly using the test we did before, let us use "Data to server" to send this data to an HTTP server. For testing purposes, we will listen on defined port locally using Hercules software.
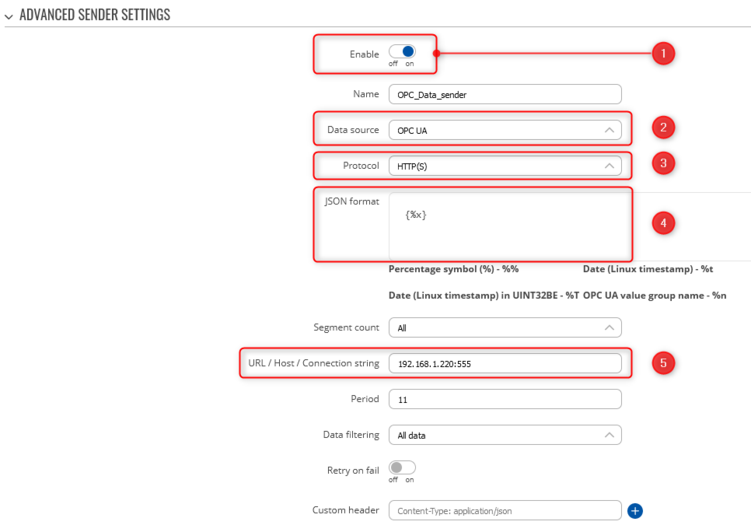
In order to do so navigate to Services → Data to Server and create a new data sender:
- Enable the instance
- Select Data source: OPC UA
- Select Protocol: HTTP(S)
- Adjust the JSON format to include the data
- Define HTTP server IP
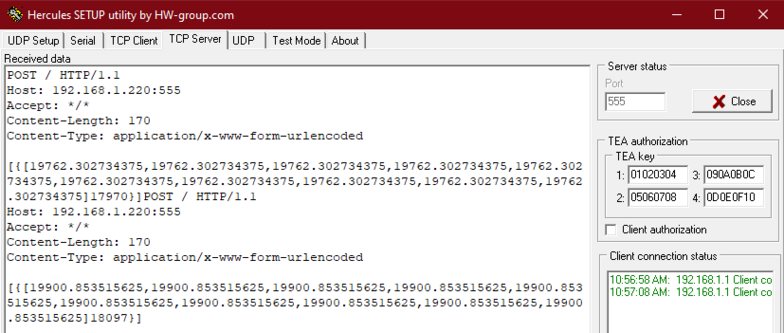
After saving these settings, we can start listening on "555" port using Hercules and see the data flow:
In conclusion, we have successfully configured an RUT device as an OPC UA client, requested data from an OPC UA demo server and forwarded that data using "Data to Server" functionality. By acting as an OPC UA client, RUT devices can seamlessly collect and transmit real-time data from various OPC UA servers to central monitoring systems.
Additionally, this integration demonstrates the flexibility and versatility of Teltonika-Networks devices in various industrial IoT applications and is a significant step forward in the development of a robust and scalable industrial IoT infrastructure.


