Difference between revisions of "Setting up a Site-to-Site IPsec Tunnel between Teltonika Networks and Microsoft Azure"
| Line 14: | Line 14: | ||
Log into the Azure portal, search for "Virtual Network Gateways" and click on "Create". | Log into the Azure portal, search for "Virtual Network Gateways" and click on "Create". | ||
<br> </br> | <br> </br> | ||
| − | |||
[[File:VNGW_01.png|450px|center]] | [[File:VNGW_01.png|450px|center]] | ||
<br> </br> | <br> </br> | ||
| − | |||
Use the information and images below as reference to complete the settings: | Use the information and images below as reference to complete the settings: | ||
<br> </br> | <br> </br> | ||
| − | |||
'''Projects details''' | '''Projects details''' | ||
| − | * '''Suscription:''' Your suscription | + | * '''Suscription:''' Your suscription. |
* '''Resource Group:''' Your resource group. | * '''Resource Group:''' Your resource group. | ||
| − | + | ||
'''Instance details''' | '''Instance details''' | ||
| − | * '''Name:''' VNet1GW | + | * '''Name:''' VNet1GW. |
| − | * '''Region:''' Your prefered Region | + | * '''Region:''' Your prefered Region. |
| − | * '''Gateway type:''' VPN | + | * '''Gateway type:''' VPN. |
| − | * '''SKU:''' VpnGW2AZ | + | * '''SKU:''' VpnGW2AZ. |
| − | * '''Generation:''' Generation2 (mandatory) | + | * '''Generation:''' Generation2 (mandatory). |
* '''Virtual Network:''' Select or create a new one. | * '''Virtual Network:''' Select or create a new one. | ||
'''Public IP address''' | '''Public IP address''' | ||
* '''Public IP address:''' Create new one. | * '''Public IP address:''' Create new one. | ||
| − | * '''Public IP address name:''' | + | * '''Public IP address name:''' Vnet1GWpip. |
| − | * '''Assigment:''' Static | + | * '''Assigment:''' Static. |
| − | * '''Enable active-active mode:''' Disabled | + | * '''Enable active-active mode:''' Disabled. |
| − | * '''Configure BGP:''' Disabled | + | * '''Configure BGP:''' Disabled. |
| + | |||
<br> </br> | <br> </br> | ||
[[File:VNGW_02.png|600px|center]] | [[File:VNGW_02.png|600px|center]] | ||
| Line 52: | Line 50: | ||
[[File:VNGW_06.png|600px|center]] | [[File:VNGW_06.png|600px|center]] | ||
| − | ===Finish the VPN gateway configuration=== | + | ====Finish the VPN gateway configuration==== |
| + | ---- | ||
After finishing the previous configuration, you can continue with the tags. This section is not mandatory; therefore, we’ll leave it as default. | After finishing the previous configuration, you can continue with the tags. This section is not mandatory; therefore, we’ll leave it as default. | ||
<br> </br> | <br> </br> | ||
| − | [[File:VNGW_07.png|600px|center]] | + | [[File:VNGW_07.png|600px|center]] |
| + | |||
| + | Click on "Review + create", check that the network gateway has the parameters as shown below, and click on the "Create" button to finish. | ||
| + | <br> </br> | ||
| + | [[File:VNGW_08.png|600px|center]] | ||
===Create a local network Gateway=== | ===Create a local network Gateway=== | ||
| + | ---- | ||
| + | In the search bar, look for "Local Network Gateways" and click on "Create". | ||
| + | <br> </br> | ||
| + | [[File:VNGW_09.png|600px|center]] | ||
| + | <br> </br> | ||
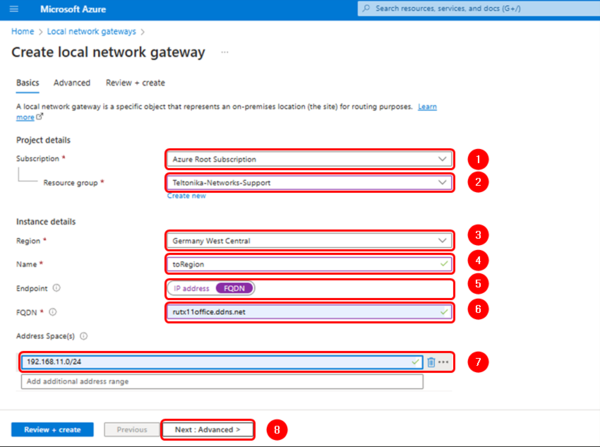
| + | Fill in the configuration fields accordingly and add the remote router address space (LAN network) and the FQDN if the router does not have a public IP address on its WAN interface. | ||
| + | |||
| + | '''Projects details''' | ||
| + | * '''Suscription:''' Your suscription. | ||
| + | * '''Resource Group:''' Your resource group. | ||
| − | + | '''Instance details''' | |
| + | * '''Region:''' Your prefered Region. | ||
| + | * '''Name:''' toRegion. | ||
| + | * '''Endpoint:''' FQDN. | ||
| + | * '''FQDN:''' the fully qualified domain name of the router's remote connection. | ||
| + | * '''Address Space:''' The router's LAN network(s) | ||
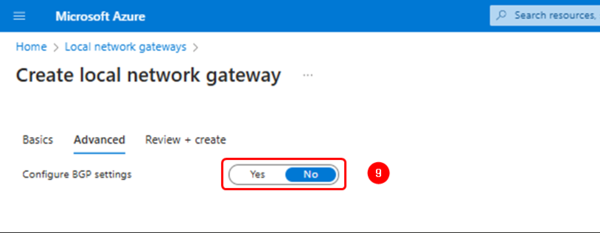
| + | * '''Configure BGP settings:''' No. | ||
| + | |||
| + | <br> </br> | ||
| + | [[File:VNGW_100.png|600px|center]] | ||
<br> </br> | <br> </br> | ||
| + | [[File:VNGW_110.png|600px|center]] | ||
| − | [[File: | + | Verify the configuration and click on "Create" to finish. |
| + | [[File:VNGW_12.png|600px|center]] | ||
===Create a connection=== | ===Create a connection=== | ||
| + | ---- | ||
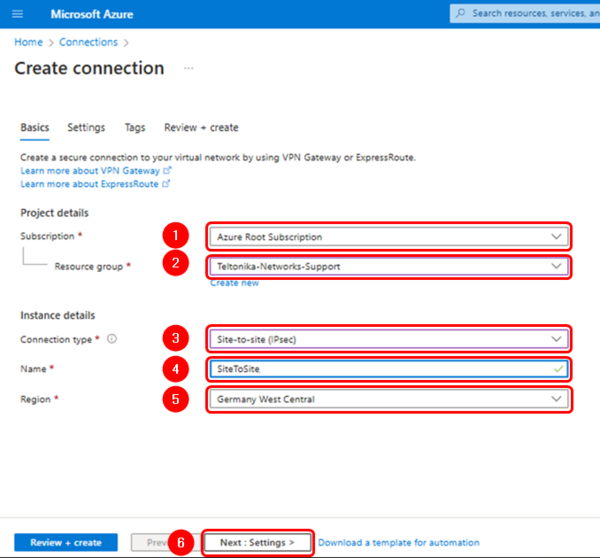
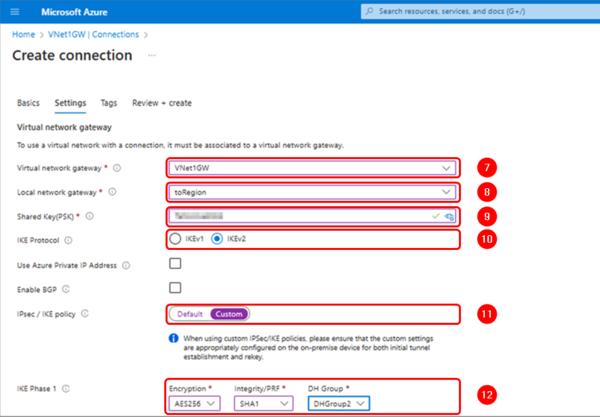
| + | Search for "Connections" and create a new one: | ||
| + | <br> </br> | ||
| + | [[File:VNGW_13.png|600px|center]] | ||
==Teltonika device configuration== | ==Teltonika device configuration== | ||
Revision as of 20:44, 27 May 2024
Summary
This article will guide you through configuring a Site-to-Site IPsec Tunnel between Teltonika routers/gateways and Microsodt Azure VPN gateway.
Prerequisite
The user needs an Azure account with an active subscription.
Azure Platform
Create a VPN Gateway on the Azure Platform
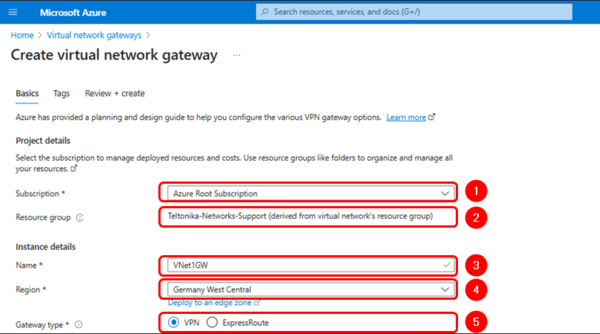
Log into the Azure portal, search for "Virtual Network Gateways" and click on "Create".
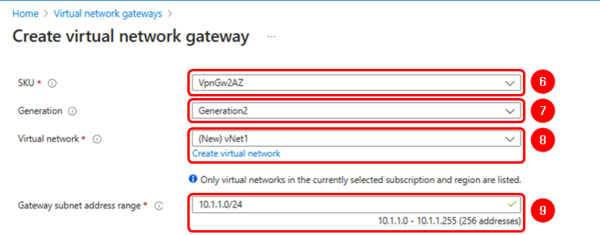
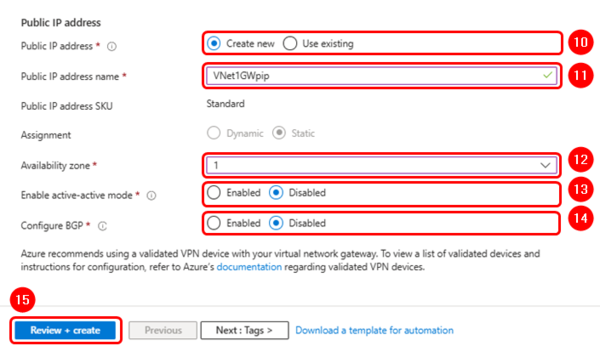
Use the information and images below as reference to complete the settings:
Projects details
- Suscription: Your suscription.
- Resource Group: Your resource group.
Instance details
- Name: VNet1GW.
- Region: Your prefered Region.
- Gateway type: VPN.
- SKU: VpnGW2AZ.
- Generation: Generation2 (mandatory).
- Virtual Network: Select or create a new one.
Public IP address
- Public IP address: Create new one.
- Public IP address name: Vnet1GWpip.
- Assigment: Static.
- Enable active-active mode: Disabled.
- Configure BGP: Disabled.
Create a Virtual Network
In case you do not have a previously created virtual network, click on the blue URL link to create one:
Finish the VPN gateway configuration
After finishing the previous configuration, you can continue with the tags. This section is not mandatory; therefore, we’ll leave it as default.
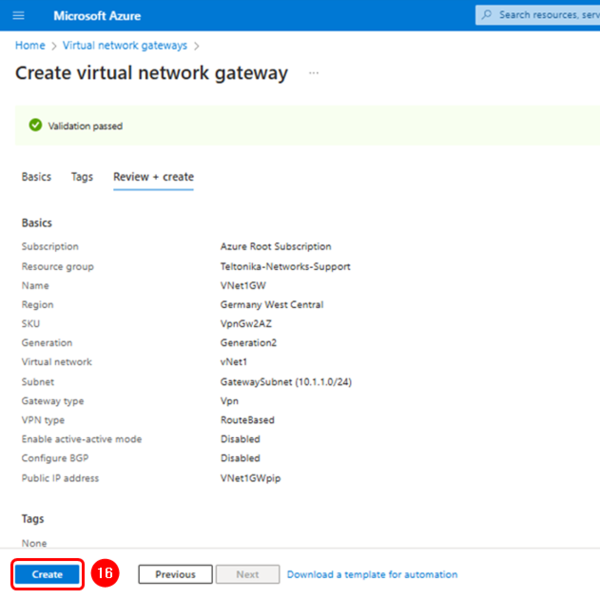
Click on "Review + create", check that the network gateway has the parameters as shown below, and click on the "Create" button to finish.
Create a local network Gateway
In the search bar, look for "Local Network Gateways" and click on "Create".
Fill in the configuration fields accordingly and add the remote router address space (LAN network) and the FQDN if the router does not have a public IP address on its WAN interface.
Projects details
- Suscription: Your suscription.
- Resource Group: Your resource group.
Instance details
- Region: Your prefered Region.
- Name: toRegion.
- Endpoint: FQDN.
- FQDN: the fully qualified domain name of the router's remote connection.
- Address Space: The router's LAN network(s)
- Configure BGP settings: No.
Verify the configuration and click on "Create" to finish.
Create a connection
Search for "Connections" and create a new one:

