RutOS and TSWOS firmware update: Difference between revisions
m JuliusSkuolevicius moved page RutOS and WitchOS firmware update to RutOS and TSWOS firmware update without leaving a redirect: WitchOS was changed to TSWOS |
m JuliusSkuolevicius moved page RutOS and TSWOS firmware update to RutOS and WitchOS firmware update: Bad name of the page |
(No difference)
| |
Revision as of 08:14, 12 July 2024
Main Page > FAQ > Other Topics > RutOS and TSWOS firmware updateIntroduction
We continuously enhance our security, functionality, and performance through new firmware releases. Staying up-to-date with the latest firmware on your networking devices offers several key benefits.
- Keeping your networking device's firmware up-to-date is crucial, especially for security. Updates include patches for known vulnerabilities, safeguarding your network from potential breaches, thus increasing your whole fleet security.
- Performance is another crucial reason to update your firmware. Updates bring optimizations that improve data transfer speeds, network traffic handling, and overall network performance.
- Firmware updates address stability and functionality issues in networking devices, resolving connectivity problems, compatibility issues, and operational disruptions that could affect network performance.
- New features and capabilities are added through firmware updates, enhancing networking device's functionality and improving network management and overall user experience.
This article outlines the process of updating the firmware on Teltonika Networks routers, gateways, and managed switches.
Prerequisites
There is not much preparation needed. If you have a Teltonika Networks device running on RutOS or TSWOS and an end device with internet access, you are fully prepared to update the firmware.
Firmware update
When it's time to update the firmware, it's important to know how to do it. There are a few different ways to update the firmware. In this article, we will describe three widely used methods:
- Firmware update through the WebUI
- Firmware update through the RMS
- Firmware update through the command line interface (CLI)
All three methods can be applied to all our manageable networking devices, including RUTs, TRBs, and managed switches.
It's important to note that you have the option to initiate the firmware update by either manually uploading the firmware file or downloading it from the server. If you choose to upload the firmware file manually, you can find all the latest and mass production firmware files here. It's best to regularly check this page if you want to always have the latest firmware available.
Additionally, each device has its own firmware page, where you can find all the available firmware files specific to that device, along with a changelog that describes details what was added, fixed, or improved in each firmware version. For example, you can find all available firmware versions and the changelog for the RUT956 here.
Lastly, starting from the RutOS 7.7 firmware version, firmware update notifications have been added to the router's WebUI, making it easier for you to know when the latest firmware is available.
Firmware update through the WebUI
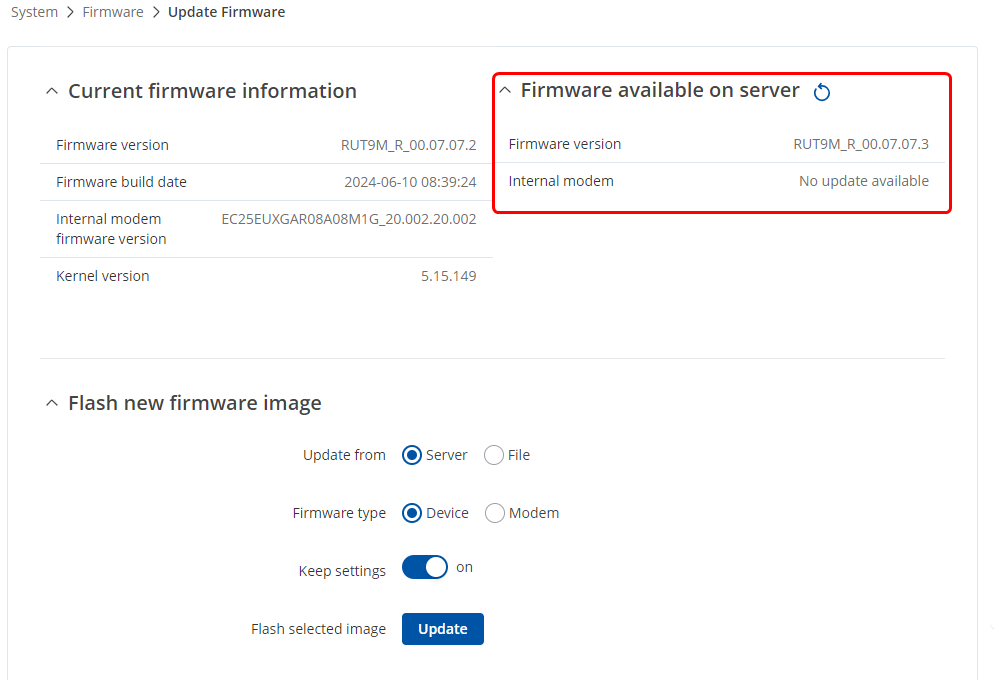
The WebUI is the user-friendly graphical interface of the device. To update the firmware through the WebUI, navigate to the System -> Firmware -> Update Firmware page. This page allows you to check the current firmware version of the device and update the firmware either from a local file or directly from the server. If you wish to update the firmware from the server, your RUT, TRB, or TSW device must have internet access. If you choose to manually upload a firmware file, internet access on the router is not required.
If your networking device has internet access, you will always be able to see the newest firmware available in the "firmware available on the server" section of the firmware update page.
To initiate the firmware update, simply choose whether to upload the firmware file manually or retrieve it from the server. Additionally, select whether you wish to retain all settings after the firmware update.
When you upload a firmware image, the device will have to verify the validity of that image. If the verification was successful, you will be redirected to window with a message such as this:
This means that the uploaded firmware image is compatible with your device. The indication also displays the file's Checksum. A checksum is a sequence of hexadecimal symbols generated after running an algorithm called a cryptographic hash function on a file. Calculating a checksum and comparing it with the one provided by the file source can be used as a file authenticity check method.
If everything is in order, you can click the Proceed button to begin the update or click Cancel to abort.
On the other hand, if the uploaded a firmware file that is incompatible with your device, you will see an indication such as this:

Once the update process begins, ensure that you do not power off the device. Wait until the device reboots and becomes accessible again.
Firmware update through the RMS
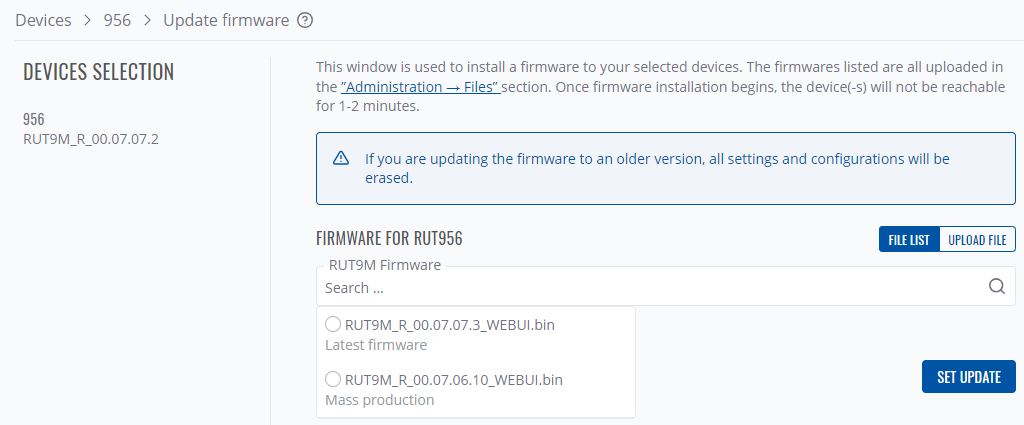
The Teltonika RMS platform can also be used to update the device's firmware. To update the firmware for device(s) selected from your device table, go to the RMS web page. In the left sidebar panel, navigate to Management → Devices and click on the Devices submenu. Then, move your mouse pointer to the top control Actions menu and select Update firmware (Actions → Update firmware).
After clicking the "Update firmware" button, you will be redirected to another page where you can choose to either upload the firmware file manually or download it from the server, similar to the WebUI.
During the update process, your device will appear offline in RMS because it will be rebooting. The device may be unreachable for up to 1-2 minutes.
Firmware update through the command line interface
To update the firmware file, you first need to upload the firmware file to your networking device. You can do this using any application designed for this purpose. For example, if you are using a Windows computer, you can use WinSCP. You can download WinSCP from here, launch it, select SCP as the File protocol and login to the networking device (the login process is basically the same as when using PuTTY). Then locate the tmp directory and drag the firmware file inside it (just like you copy/move any other file using Windows).
To upload it using the scp command on a Linux computer, follow these steps: Open a Terminal in the directory where the file is located (right-click any blank space in the directory and choose 'Open in Terminal'). Then, enter the following command:
scp RUT9M_R_00.07.07.3_WEBUI.bin [email protected]:/tmp/
Where:
RUT9M_R_00.07.07.3_WEBUI.bin is the firmware file's name. Replace it with your firmware's name.
192.168.1.1 is the router's IP address. Replace with your own router's IP.
/tmp/ is the directory where the file will be copied to. These methods do not require your networking device to have internet access; you only need to have the firmware file on your end-device. Once the firmware file is uploaded to your networking device, execute the following command:
sysupgrade /tmp/RUT9M_R_00.07.07.3_WEBUI.bin
sysupgrade is the command used to upgrade the router's firmware.
RUT9M_R_00.07.07.3_WEBUI.bin is the firmware file's name. Replace the firmware file's name that you are using.
References
All available firmware versions, both latest and for mass production
Details of all available firmware versions and their respective changelogs for the specific device


