|
|
| (38 intermediate revisions by the same user not shown) |
| Line 1: |
Line 1: |
| − | <p style="color:red">The information in this page is updated in accordance with [https://wiki.teltonika-networks.com/view/FW_%26_SDK_Downloads'''00.07.03.4'''] firmware version .</p> | + | <p style="color:red">The information on this page is updated in accordance with the [https://wiki.teltonika-networks.com/view/FW_%26_SDK_Downloads'''00.07.08'''] firmware version .</p> |
| − | ==Introduction== | + | __TOC__ |
| − | This article contains instructions on how to set up BACnet on Teltonika Networks devices. | + | ==Summary== |
| − | | + | This article contains instructions on how to send M-Bus data to the server using various protocols. |
| − | BACnet provides a standardized way for devices from different manufacturers to communicate with each other and integrate seamlessly into a building automation system. This allows building managers and operators to monitor and control various building systems from a central location, optimizing energy efficiency, reducing operating costs, and improving occupant comfort and safety.
| |
| − | ==Configuration overview and prerequisites==
| |
| | | | |
| | + | ==Configuration overview & prerequisites== |
| | Before we begin, let's take a look at the configuration that we are attempting to achieve and the prerequisites that make it possible. | | Before we begin, let's take a look at the configuration that we are attempting to achieve and the prerequisites that make it possible. |
| | | | |
| | '''Prerequisites''': | | '''Prerequisites''': |
| − | * Two RUT955; | + | * TRB143; |
| − | * Controller; | + | * M-Bus device; |
| − | * BACnet Server; | + | * Server; |
| − | * An end device (PC, Laptop) for configuration; | + | * An end device (PC, Laptop, Tablet, Smartphone) for configuration; |
| − | | |
| − | If you're having trouble finding any page or some of the parameters described here on your device's WebUI, you should turn on '''"Advanced WebUI"''' mode. You can do that by '''clicking''' the '''"Basic"''' button '''under''' '''"Mode,"''' which is located at the top-right corner of the WebUI.
| |
| − | [[File:Networking rut9 manual webui basic advanced mode.gif|border|center|class=tlt-border|1102x52px]]
| |
| − | | |
| − | '''Note''': This is additional software that can be installed from the '''Services → [[RUT955_Package_Manager|Package Manager]]''' page.
| |
| − | | |
| − | == BACnet/Ethernet configuration==
| |
| − | | |
| − | [[File:BACnet Topology 1.png|border|center|class=tlt-border|800x260px|]]
| |
| − | | |
| − | The controller is directly connected to RUT955 via RS485; The router forwards the data from the controller to the BACnet server to the PC.
| |
| − | === BACnet ===
| |
| − | ----
| |
| − | Install the BACnet package on RUT955 and navigate to '''Services → BACnet''' and '''enable''' the '''instance'''. Everything else can be left as is or changed to suit your needs.
| |
| − | | |
| − | [[File:BACnet enable instance.png|border|center|class=tlt-border|818x210px]]
| |
| | | | |
| − | === Server ===
| |
| − | ----
| |
| − | For the server, Yet Another BACnet Explorer (YABE) is used. YABE is an open-source BACnet Explorer that is designed to be lightweight, fast, and easy to use.
| |
| | | | |
| − | Open the software and '''click''' on the '''green plus sign (top left)''' to add a new device. Then a new window will pop up; there, select the '''local endpoint IP address '''and click '''Start'''. Everything else can be left as is or changed to suit your needs.
| + | {{Template:Networking_rutos_manual_basic_advanced_webui_disclaimer |
| | + | | series = RUTX |
| | + | }} |
| | | | |
| − | [[File:Yabe configuration add device fixed.png|border|center|class=tlt-border|639x203px]]
| |
| | | | |
| − | Select the newly created communication node and right-click on it to '''send''' '''WhoIs''' request (application might send these automatically).
| + | ==Adding M-Bus devices== |
| | + | To add a new device to the configuration press [[File:Add Button.png|60x90px]] button which is shown below. |
| | | | |
| − | [[File:Yabe whois.png|border|center|class=tlt-border|364x126px]] | + | [[File:Mbus adding new device.png||border|class=tlt-border]] |
| | | | |
| − | === Results === | + | ===Device configuration=== |
| | ---- | | ---- |
| − | In cases of success, you see the connected BACnet device and its parameters.
| + | You will be granted to a new window. Configure your M-Bus device accordingly: |
| | | | |
| − | [[File:Yabe successful connection.png|border|center|class=tlt-border|914x530px]]
| + | # '''Name''': Enter the desired name of the M-Bus device |
| | + | # '''Address type''': select which M-Bus address will be used |
| | + | # '''Primary/Secondary address''': specify M-Bus address |
| | | | |
| − | == BACnet/IP via LTE configuration ==
| + | [[File:Mbus adding new device configuration v3.png|border|class=tlt-border]] |
| − | Bacnet BBMD – stands for "BACnet Broadcast Management Device." A BBMD is a device that manages the routing of BACnet broadcast messages across different IP subnets. When a BACnet device sends a broadcast message, it is typically sent to all devices on the same subnet, but not to devices on other subnets. However, sometimes it is necessary for broadcast messages to be sent to devices on multiple subnets. This is where a BBMD comes in.
| |
| | | | |
| − | [[File:BACnet Topology 2.png|border|center|class=tlt-border|876x321px]] | + | Test if the M-Bus device is reachable by a specified primary/secondary address. To do so click on [[File:Ping_device_option_mbus.png|110x110px]]. You might get on of two outputs: |
| | | | |
| − | In this topology, there are two RUT955 routers - RUT1 and RUT2. RUT1 is connected to the server via LAN, and RUT2 is connected to the controller via RS485. RUT2 transmits data to RUT1, which then forwards it to the BACnet server.
| + | * If you have specified correct primary/secondary address, you will receive: |
| | + | [[File:Mbus device pingable v2.png|border|class=tlt-border|300px]] |
| | | | |
| − | For this configuration, you must have a public IP address. You can read more on this in our article on '''[[Private and Public IP Addresses]]'''.
| + | * If you have specified incorrect primary/secondary address, you will receive (if you do not know what address should be used, refer to the Scanning for available M-Bus devices (PRIDET URL) secion: |
| | + | [[File:Mbus device not pingable v2.png|border|class=tlt-border|300px]] |
| | | | |
| − | === Router 1 ===
| + | Once finished, save the configuration by clicking [[File:Savenapply button.png|Savenapply button.png]]. |
| − | ----
| |
| | | | |
| − | ==== BACnet ==== | + | ===Scanning for available M-Bus devices=== |
| | ---- | | ---- |
| | | | |
| − | Navigate to '''Services → BACnet''' and '''enable''' the '''instance'''.
| + | If you are not sure what address your M-Bus devices have, you can try scanning for the available M-Bus devices. To do so click on [[File:Scan button.png]] button. |
| | | | |
| − | [[File:BACnet enable instance.png|border|center|class=tlt-border|746x222px]]
| + | ====Scan settings==== |
| − | | |
| − | Also, under the '''BIP''' configuration change the '''BIP port to a port of Yabe'''. There are two ways of finding the port of YABE, one way is to look through the traffic with '''Wireshark''' on your PC or '''TCP dump on RUT1 or RUT2'''.
| |
| − | | |
| − | [[File:BACnet BIP.png|border|center|class=tlt-border|754x88px]]
| |
| − | | |
| − | '''Bacnet BIP''' - Bacnet devices can use BIP to communicate with each other over local area networks (LANs), wide area networks (WANs), and the internet. BIP defines how BACnet messages are encapsulated within IP packets and transmitted between BACnet devices over IP networks.
| |
| − | | |
| − | '''Note''': If you restart the YABE software or delete and recreate a new communication device, YABE may use a different port number, in which case you must change the port forward configuration in the router connected to your PC.
| |
| − | | |
| − | ==== Firewall ==== | |
| | ---- | | ---- |
| − | By enabling the port forward in the BACnet configuration, you created the port forward rule. Nevertheless, the rule requires some modification. To do that, open the RUT1 WebUI and navigate to '''Network → Firewall → Port Forwards'''. Create a port forward rule to forward UDP packets from RUT2 WAN to the RUT1 LAN address port.
| + | You will be granted to a new window. Configure scan settings accordingly: |
| − | | |
| − | [[File:Router1 firewall port forward.png|border|center|class=tlt-border|797x617px]]
| |
| − | | |
| − | # '''Enable''' instance
| |
| − | # '''Name''' - enter desired name
| |
| − | # '''Protocol''' - UDP
| |
| − | # '''Source zone''' - WAN
| |
| − | # '''External port''' - YABE port
| |
| − | # '''Internal zone''' - LAN
| |
| − | # '''Internal IP address''' - PC LAN IP
| |
| − | # '''Internal port''' - YABE port
| |
| | | | |
| − | '''Note''': When YABE sends registration packets you will need to find out which port YABE is using (One way is to look through the traffic with wireshark on your PC or TCP dump on RUT1 or RUT2) | + | # '''Scan type''': select which M-Bus address will be scanned |
| | + | # '''Scan range''': From what M-Bus address scanning will start and M-Bus address until scanning will be performed. |
| | + | [[File:Mbus scan.png|border|class=tlt-border]] |
| | | | |
| − | If you restart the YABE software or delete and recreate a new communication device, YABE may use a different port number, in which case you must change the port forward configuration in the router connected to your PC.
| + | To start the scan click on [[File:Start scan button.png]] button. |
| | | | |
| − | === Router 2 === | + | ====Found devices==== |
| | ---- | | ---- |
| | + | Once the scan is finished you should see the list of M-Bus devices that TRB143 were able to find: |
| | | | |
| − | ==== BACnet ==== | + | [[File:Mbus scanned devices add.png|border|class=tlt-border]] |
| − | ----
| |
| − | '''Bacnet BBMD''' – stands for "BACnet Broadcast Management Device." A BBMD is a device that manages the routing of BACnet broadcast messages across different IP subnets. When a BACnet device sends a broadcast message, it is typically sent to all devices on the same subnet, but not to devices on other subnets. However, sometimes it is necessary for broadcast messages to be sent to devices on multiple subnets. This is where a BBMD comes in.
| |
| − | Navigate to '''Services → BACnet''', there:
| |
| | | | |
| − | # '''Enable''' BACnet
| + | You can either [[File:Pencil2.png]] '''(1)''' M-Bus devices primary address or [[File:Add Button.png|60x90px]] '''(2)''' to the M-Bus devices list. |
| − | # '''Enable''' BBMD
| |
| − | # '''BBMD interface''' - select the interface with Public IP.
| |
| − | # '''Enable Port forward''' - this will automatically create a port forward rule.
| |
| | | | |
| − | [[File:BACnet_enabled_BBMD_fixed.png|border|center|class=tlt-border|797x234px]]
| + | ==Gathering M-Bus data== |
| | | | |
| − | Everything else can be left as default or changed according to your needs.
| + | If the device successfully added to the list, under the General settings you should see that the Status changes to <span style="color:green">Active</span>. |
| | | | |
| − | ==== Firewall ==== | + | [[File:Mbus status active v2.png|border|class=tlt-border]] |
| − | ----
| |
| − | If you would like manually creating a port forward rule, navigate to '''Network → Firewall → Port Forwards'''.
| |
| | | | |
| − | [[File:BACnet firewall router2.png|border|center|class=tlt-border|864x620px]]
| + | ===Data collecting groups=== |
| − | | |
| − | # '''Enable''' instance
| |
| − | # '''Name''' - enter desired name
| |
| − | # '''Protocol''' - UDP
| |
| − | # '''Source zone''' - WAN
| |
| − | # '''External port''' - 47808
| |
| − | # '''Internal zone''' - LAN
| |
| − | # '''Internal IP address''' - Router LAN IP
| |
| − | # '''Internal port''' - 47808
| |
| − | | |
| − | === Server === | |
| | ---- | | ---- |
| − | Open the software and '''click''' on the '''green plus sign (top left)''' to add a new device. Then a new window will pop up; there, select the '''local endpoint IP address ''' and click '''start'''. Everything else cane be left as default or changed according to your needs.
| + | To reach data collecting groups configuration press [[File:Pencil2.png]] button. [[File:Add Button.png|60x90px]] button lets you to create a new instance. |
| | | | |
| − | [[File:Yabe configuration add device fixed.png|border|center|class=tlt-border|639x203px]] | + | [[File:Mbus data collect overview.png|border|class=tlt-border]] |
| | | | |
| − | Then select the node and go to '''Meniu → Functions → IP services → Foreign device registration''' and enter the public IP address of RUT2 (the one connected to controller).
| + | ====Data collecting group instance==== |
| − | | |
| − | [[File:Yabe IP services.png|border|center|class=tlt-border|414x163px]]
| |
| − | | |
| − | === Results === | |
| | ---- | | ---- |
| − | In case of success, you see the device connected via gateway.
| |
| − |
| |
| − | [[File:Yabe 2 successful.png|border|center|class=tlt-border|925x501px]]
| |
| − |
| |
| − | ==BACnet/IP via RMS VPN configuration==
| |
| − | If having a public IP is not an option, RMS VPN could be used as an alternative to access your device over the internet. [https://teltonika-networks.com/lt/about-us/introducing-rms-vpn-service/ RMS VPN] is a service designed for remote efficient, low-cost management of large-scale networks. In contrast to point-to-point VPN services, RMS VPN enables the instant creation of encrypted VPN tunnels for secure access to multiple endpoints.
| |
| | | | |
| − | ===RMS VPN===
| + | Each data collection group contains the following information. Configure device accordingly: |
| − | ----
| |
| − | A guide on how to set up an RMS VPN hub can be found [https://youtu.be/dfAudZR2wPY here].
| |
| | | | |
| − | [[File:RMS VPN BACnet fixed.png|border|center|class=tlt-border|995x500px]]
| + | # '''Enabled''': on |
| | + | # '''Name''': desired name of the instance |
| | + | # '''Period''': desired time duration between data retrievals |
| | + | # '''Data type''': desired data type to process the received data. You can choose from JSON, XML, ASCII, Hexadecimal and Binary formats. |
| | | | |
| − | Both RUT1 and RUT2 have to be added to the RMS VPN Hub.
| + | You can check if your configuration works accordingly by pressing the [[File:Mbus test button.png]] button. You should see the data in a pop-up field. |
| | | | |
| − | === RUT1 & RUT2 ===
| + | [[File:Mbus data collect group v2.png|border|class=tlt-border]] |
| − | ----
| |
| − | Once RMS VPN Hub is set up, follow the RUT1 and RUT2 configuration described above.
| |
| − | == See also ==
| |
| − | [[RUT955_BACnet|BACnet]] on RUT955 | |
| | | | |
| − | [[RUT955 Firewall#Port Forwards|Port-forward]] on RUT955
| |
| | | | |
| − | == External links == | + | ==See Also== |
| − | [https://sourceforge.net/projects/yetanotherbacnetexplorer/ Yabe]
| |
| | | | |
| − | [https://rms.teltonika-networks.com/|Teltonika RMS] | + | ==External links== |
| | + | [https://flespi.io/#/ Flespi.io] |
The information on this page is updated in accordance with the 00.07.08 firmware version .
Summary
This article contains instructions on how to send M-Bus data to the server using various protocols.
Configuration overview & prerequisites
Before we begin, let's take a look at the configuration that we are attempting to achieve and the prerequisites that make it possible.
Prerequisites:
- TRB143;
- M-Bus device;
- Server;
- An end device (PC, Laptop, Tablet, Smartphone) for configuration;
If you're having trouble finding this page or some of the parameters described here on your device's WebUI, you should turn on "Advanced WebUI" mode. You can do that by clicking the "Advanced" button, located at the top of the WebUI.

Adding M-Bus devices
To add a new device to the configuration press  button which is shown below.

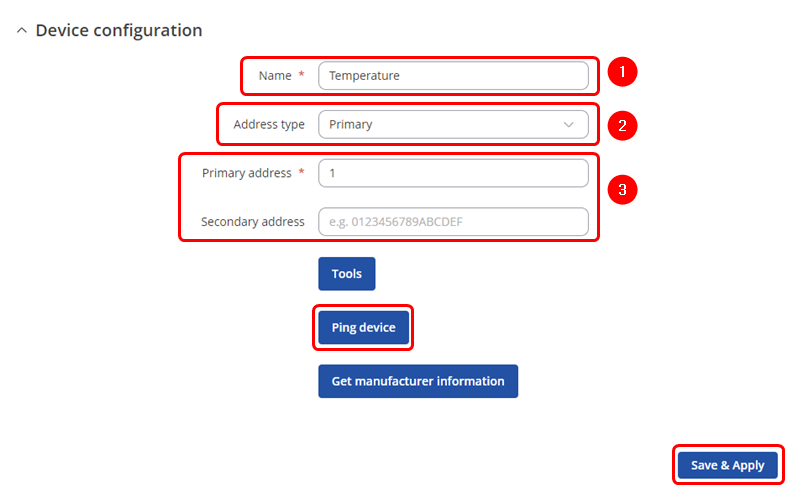
Device configuration
You will be granted to a new window. Configure your M-Bus device accordingly:
- Name: Enter the desired name of the M-Bus device
- Address type: select which M-Bus address will be used
- Primary/Secondary address: specify M-Bus address
Test if the M-Bus device is reachable by a specified primary/secondary address. To do so click on 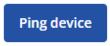 . You might get on of two outputs:
- If you have specified correct primary/secondary address, you will receive:
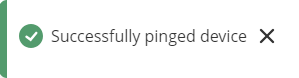
- If you have specified incorrect primary/secondary address, you will receive (if you do not know what address should be used, refer to the Scanning for available M-Bus devices (PRIDET URL) secion:
Once finished, save the configuration by clicking  .
.
Scanning for available M-Bus devices
If you are not sure what address your M-Bus devices have, you can try scanning for the available M-Bus devices. To do so click on  button.
Scan settings
You will be granted to a new window. Configure scan settings accordingly:
- Scan type: select which M-Bus address will be scanned
- Scan range: From what M-Bus address scanning will start and M-Bus address until scanning will be performed.
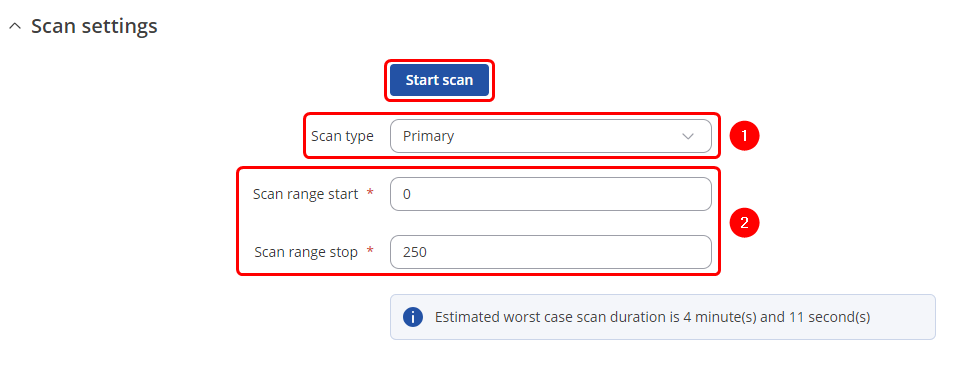
To start the scan click on  button.
Found devices
Once the scan is finished you should see the list of M-Bus devices that TRB143 were able to find:

You can either  (1) M-Bus devices primary address or (2) to the M-Bus devices list.
Gathering M-Bus data
If the device successfully added to the list, under the General settings you should see that the Status changes to Active.
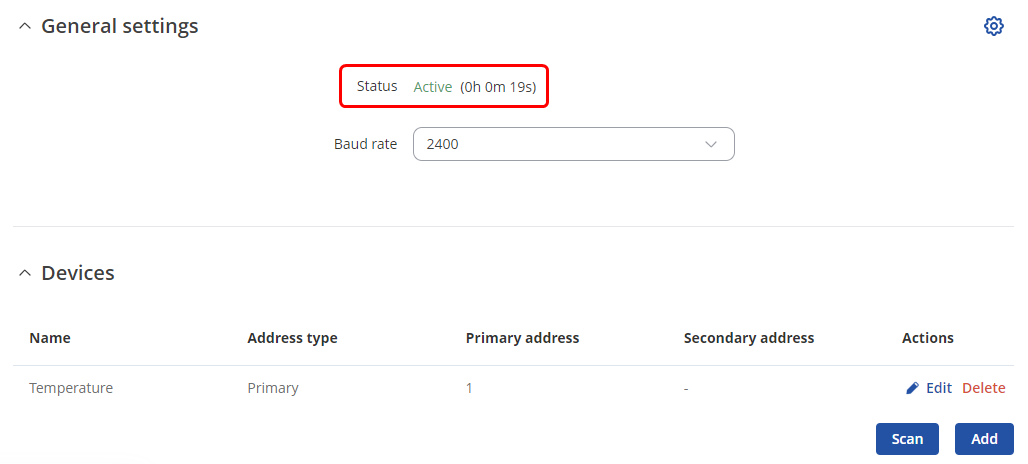
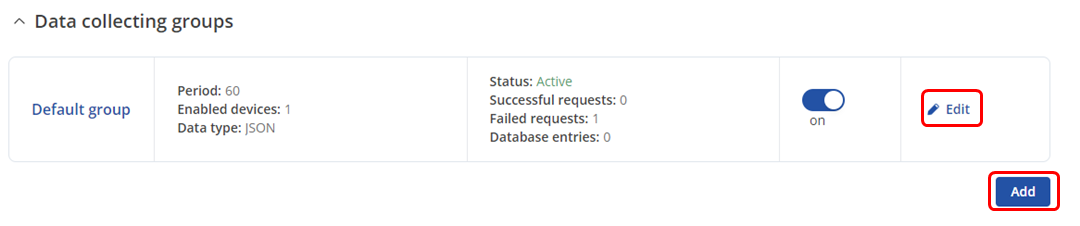
Data collecting groups
To reach data collecting groups configuration press button. button lets you to create a new instance.
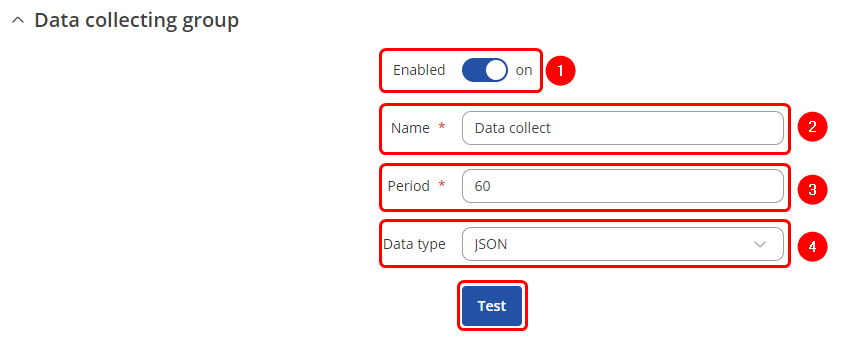
Data collecting group instance
Each data collection group contains the following information. Configure device accordingly:
- Enabled: on
- Name: desired name of the instance
- Period: desired time duration between data retrievals
- Data type: desired data type to process the received data. You can choose from JSON, XML, ASCII, Hexadecimal and Binary formats.
You can check if your configuration works accordingly by pressing the  button. You should see the data in a pop-up field.
See Also
External links
Flespi.io


