DHCP Relay configuration example new: Difference between revisions
| (32 intermediate revisions by the same user not shown) | |||
| Line 7: | Line 7: | ||
---- | ---- | ||
====Prerequisites==== | ====Prerequisites==== | ||
#For this configuration you will need 2 routers. One as a DHCP Server and the other as a DHCP Relay. | #For this configuration you will need 2 routers. One as a DHCP Server and the other as a DHCP Relay. | ||
#DHCP Relay device WAN port needs to be connected to DHCP server LAN port. | #DHCP Relay device WAN port needs to be connected to DHCP server LAN port. | ||
| Line 13: | Line 12: | ||
====Topology==== | ====Topology==== | ||
---- | ---- | ||
DHCP server network settings: | |||
LAN IP/subnet: 192.168.4.1/24 | |||
DHCP Relay network settings: | DHCP Relay network settings: | ||
| Line 19: | Line 20: | ||
WAN IP: 192.168.4.194 | WAN IP: 192.168.4.194 | ||
DHCP server network | The DHCP relay service enables the forwarding of DHCP broadcast messages to network segments that a client computer is not directly connected to. It allows a single DHCP server to be shared across different logical network segments separated by a firewall. Unlike handling IP addresses, the DHCP relay service sends unicast messages rather than broadcast messages. | ||
When a client needs a DHCP-assigned IP address, it broadcasts a request to the network attached to its interface. The DHCP relay service on the firewall intercepts this request on an interface connected to the same network, such as LAN 192.168.2.0/24. The relay service then unicasts the request to all configured DHCP servers in the LAN and receives an IP address offer from a DHCP server (e.g., 192.168.4.1) that has a range of addresses configured for the client's network segment (e.g., 192.168.2.0/24). This offer is forwarded to the client. If the client accepts the offer, it acknowledges the DHCP address and assigns it to its interface immediately. | |||
[[File: | [[File:708576_Topo.png|border|class=tlt-border| center|1000px]] | ||
===Configuration=== | ===Configuration=== | ||
| Line 31: | Line 32: | ||
}} | }} | ||
====DHCP Server | ====DHCP Server Configuration==== | ||
---- | ---- | ||
===== | =====LAN Configuration===== | ||
Open router’s '''WebUI → Network → LAN''' click [[File:Pencil2.png]]on current available LAN interface configuration: | Open router’s '''WebUI → Network → LAN''' click [[File:Pencil2.png]]on current available LAN interface configuration: | ||
| Line 45: | Line 44: | ||
[[File:DHCP_RELAY_1_1.png|border|class=tlt-border|center]] | [[File:DHCP_RELAY_1_1.png|border|class=tlt-border|center]] | ||
===== | =====Lease Configuration===== | ||
---- | ---- | ||
Open router’s '''WebUI → System → Mantenance → CLI''' | Open router’s '''WebUI → System → Mantenance → CLI''' | ||
| Line 55: | Line 54: | ||
[[File:DHCP_RELAY_2.png|border|class=tlt-border|center|1100px]] | [[File:DHCP_RELAY_2.png|border|class=tlt-border|center|1100px]] | ||
===== | =====Static Route Configuration===== | ||
---- | ---- | ||
Open '''WebUI → Network → Routing → Static routes''' | Open '''WebUI → Network → Routing → Static routes''' | ||
====== | ======Static IPv4 Routes====== | ||
---- | ---- | ||
click [[File:Add Button.png|40x70px]] and apply this to the route: | click [[File:Add Button.png|40x70px]] and apply this to the route: | ||
#Select Interface: '''lan''' | Enter Target: '''192.168.2.0''' | Enter IPv4-Netmask: '''255.255.255.0''' | Enter IPv4-Gateway: '''192.168.4.194''' | #Select Interface: ''' lan''' | Enter Target: '''192.168.2.0''' | Enter IPv4-Netmask: '''255.255.255.0''' | Enter IPv4-Gateway: '''192.168.4.194''' | ||
[[File:DHCP_RELAY_3.png|border|class=tlt-border|center|1100px]] | [[File:DHCP_RELAY_3.png|border|class=tlt-border|center|1100px]] | ||
| Line 68: | Line 67: | ||
====DHCP Relay Configuration==== | ====DHCP Relay Configuration==== | ||
---- | ---- | ||
=====Relay WAN Confiuration===== | |||
---- | |||
Open router’s '''WebUI → Network → WAN → WAN interfaces''' click [[File:Pencil2.png]]current available WAN interface configuration: | |||
======General Settings====== | |||
---- | |||
Make the following changes: | |||
# Select Protocol: '''Static''' | |||
# Enter IPv4 address: '''192.168.4.194''' | |||
[[File:DHCP_RELAY_7.png|border|class=tlt-border|center|1000px]] | |||
=====Relay LAN Confiuration===== | =====Relay LAN Confiuration===== | ||
Open '''WebUI → Network → | Open router’s '''WebUI → Network → LAN''' click [[File:Pencil2.png]]current available LAN interface configuration: | ||
======General Settings====== | |||
---- | |||
Make the following changes: | |||
# Enter IPv4 address: '''192.168.2.1''' | |||
[[File:DHCP_RELAY_4.png|border|class=tlt-border|center]] | |||
=====Firewall Rule Configuration===== | |||
Open router’s '''WebUI → Network → Firewall → Traffic Rules''' click [[File:Pencil2.png]] on Allow-DHCP-Renew rule: | |||
======Firewall - Traffic Rules - Allow-DHCP-Renew====== | |||
---- | |||
# Enter Destination Port: '''67''' | |||
[[File:DHCP_RELAY_8.png|border|class=tlt-border|center]] | |||
=====DHCP Replay Configuration===== | |||
---- | |||
Open router’s '''WebUI → Network → DHCP → Server Settings → IPv4 → DHCPv4 servers''' click [[File:Pencil2.png]]current available server interface configuration: | |||
======DHCPv4: lan====== | |||
---- | |||
Make the following changes: | |||
# Enable: '''on''' | |||
# Select DHCPv4 mode: '''Relay''' | |||
# Enter DHCP server address: '''192.168.4.1''' | |||
[[File:DHCP_RELAY_5.png|border|class=tlt-border|center|1000px]] | |||
===Testing the configuration=== | |||
---- | |||
Navigate to the Open DHCP server's '''WebUI -> Status -> Network -> LAN'''. If the configuration is successful, the lease for the 192.168.2.0/24 network should be displayed in the WebUI DHCP lease list. | |||
[[File:DHCP_RELAY_11.png|border|class=tlt-border|center|1000px]] | |||
===Additional notes=== | |||
---- | ---- | ||
'''Note:''' It's strongly recommended to use static IP configuration for DHCP Relay WAN interface otherwise there might be cases when WAN interface will receive new IP address which will cause static route to stop working. | |||
[[Category:Router control and monitoring]] | |||
Latest revision as of 13:31, 5 August 2024
Main Page > General Information > Configuration Examples > Router control and monitoring > DHCP Relay configuration example newThe information on this page is updated in accordance with the 00.07.08 firmware version .
firmware version .
Introduction
DHCP Relay is a router that forwards IP addresses from the DHCP Server to the user devices, even if the server is on a different network. The main benefit of this approach is that a single DHCP Server can distribute IP addresses to multiple networks. Bellow you will find an example of how to configure a basic DHCP Relay configuration.
Prerequisites & Topology
Prerequisites
- For this configuration you will need 2 routers. One as a DHCP Server and the other as a DHCP Relay.
- DHCP Relay device WAN port needs to be connected to DHCP server LAN port.
Topology
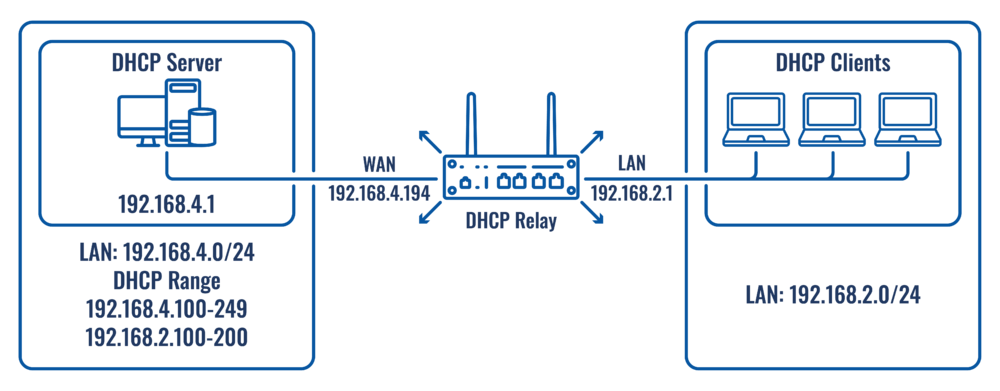
DHCP server network settings:
LAN IP/subnet: 192.168.4.1/24
DHCP Relay network settings:
LAN IP/subnet: 192.168.2.1/24
WAN IP: 192.168.4.194
The DHCP relay service enables the forwarding of DHCP broadcast messages to network segments that a client computer is not directly connected to. It allows a single DHCP server to be shared across different logical network segments separated by a firewall. Unlike handling IP addresses, the DHCP relay service sends unicast messages rather than broadcast messages.
When a client needs a DHCP-assigned IP address, it broadcasts a request to the network attached to its interface. The DHCP relay service on the firewall intercepts this request on an interface connected to the same network, such as LAN 192.168.2.0/24. The relay service then unicasts the request to all configured DHCP servers in the LAN and receives an IP address offer from a DHCP server (e.g., 192.168.4.1) that has a range of addresses configured for the client's network segment (e.g., 192.168.2.0/24). This offer is forwarded to the client. If the client accepts the offer, it acknowledges the DHCP address and assigns it to its interface immediately.
Configuration
If you're having trouble finding this page or some of the parameters described here on your device's WebUI, you should turn on "Advanced WebUI" mode. You can do that by clicking the "Advanced" button, located at the top of the WebUI.
DHCP Server Configuration
LAN Configuration
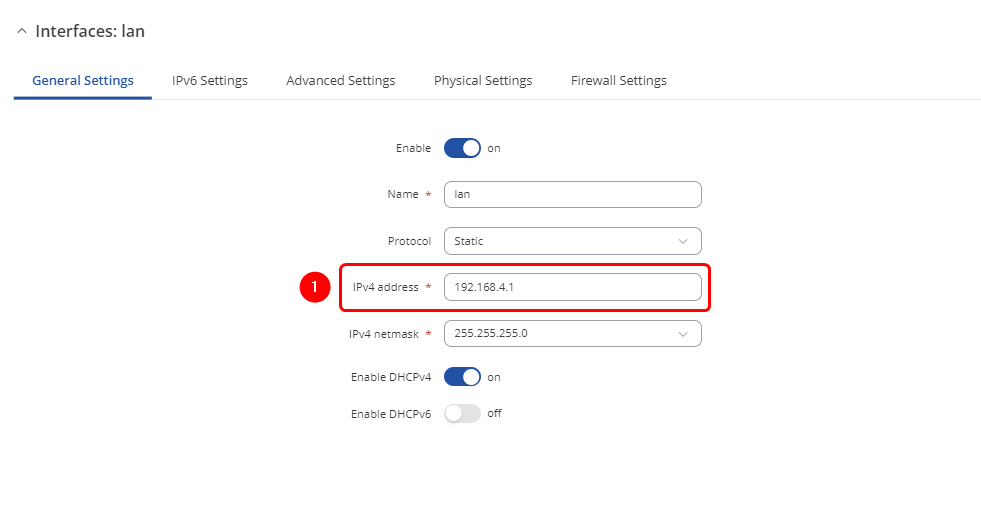
Open router’s WebUI → Network → LAN click ![]() on current available LAN interface configuration:
on current available LAN interface configuration:
General Settings
Make the following changes:
- Enter IPv4 address: 192.168.4.1
Lease Configuration
Open router’s WebUI → System → Mantenance → CLI
Enter this command to CLI:
echo "dhcp-range=192.168.2.100,192.168.2.200,12h" >> /etc/dnsmasq.conf

Static Route Configuration
Open WebUI → Network → Routing → Static routes
Static IPv4 Routes
click ![]() and apply this to the route:
and apply this to the route:
- Select Interface: lan | Enter Target: 192.168.2.0 | Enter IPv4-Netmask: 255.255.255.0 | Enter IPv4-Gateway: 192.168.4.194

DHCP Relay Configuration
Relay WAN Confiuration
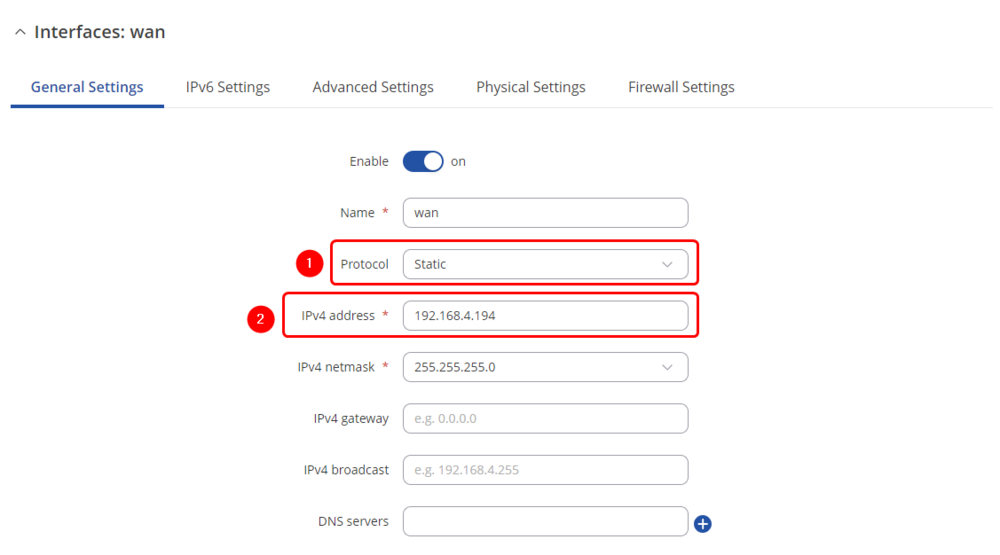
Open router’s WebUI → Network → WAN → WAN interfaces click ![]() current available WAN interface configuration:
current available WAN interface configuration:
General Settings
Make the following changes:
- Select Protocol: Static
- Enter IPv4 address: 192.168.4.194
Relay LAN Confiuration
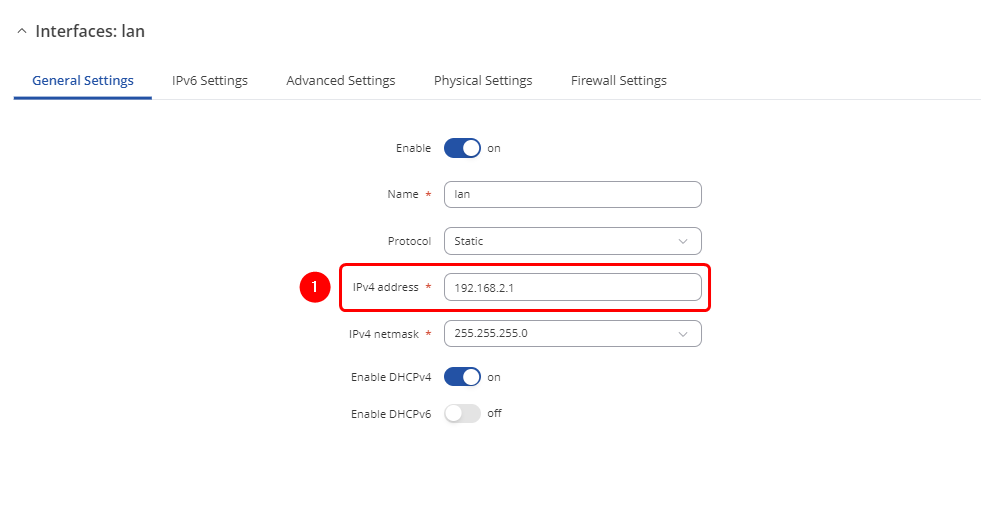
Open router’s WebUI → Network → LAN click ![]() current available LAN interface configuration:
current available LAN interface configuration:
General Settings
Make the following changes:
- Enter IPv4 address: 192.168.2.1
Firewall Rule Configuration
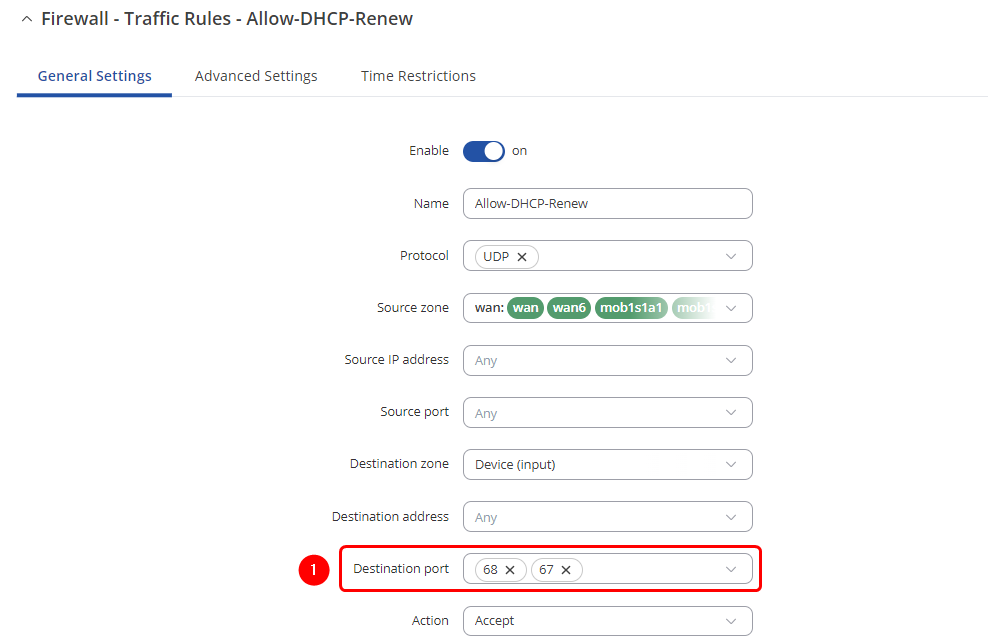
Open router’s WebUI → Network → Firewall → Traffic Rules click ![]() on Allow-DHCP-Renew rule:
on Allow-DHCP-Renew rule:
Firewall - Traffic Rules - Allow-DHCP-Renew
- Enter Destination Port: 67
DHCP Replay Configuration
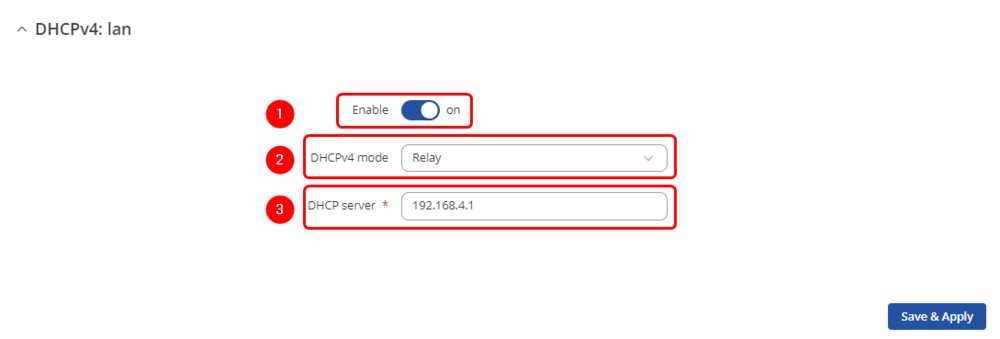
Open router’s WebUI → Network → DHCP → Server Settings → IPv4 → DHCPv4 servers click ![]() current available server interface configuration:
current available server interface configuration:
DHCPv4: lan
Make the following changes:
- Enable: on
- Select DHCPv4 mode: Relay
- Enter DHCP server address: 192.168.4.1
Testing the configuration
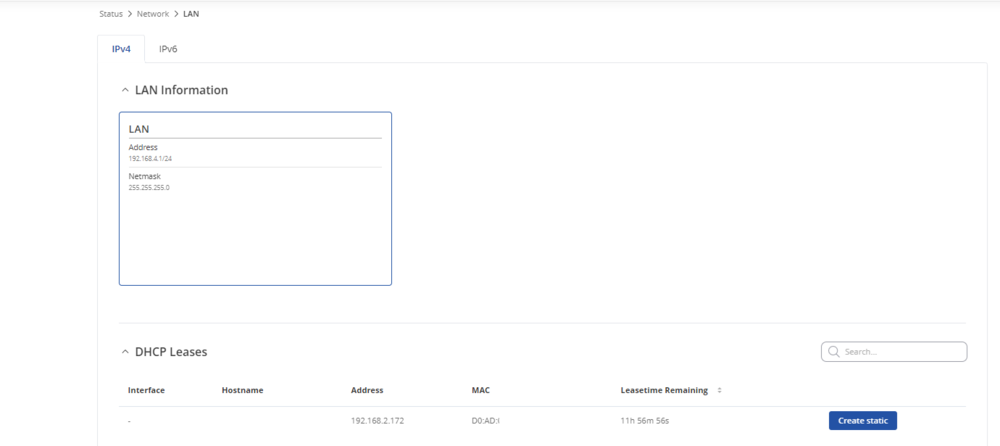
Navigate to the Open DHCP server's WebUI -> Status -> Network -> LAN. If the configuration is successful, the lease for the 192.168.2.0/24 network should be displayed in the WebUI DHCP lease list.
Additional notes
Note: It's strongly recommended to use static IP configuration for DHCP Relay WAN interface otherwise there might be cases when WAN interface will receive new IP address which will cause static route to stop working.

