Modbus TCP Server Send SMS example: Difference between revisions
PauliusRug (talk | contribs) No edit summary |
m (Dziugas.Syminas moved page Modbus TCP Slave Send SMS example to Modbus TCP Server Send SMS example) |
||
| (2 intermediate revisions by 2 users not shown) | |||
| Line 1: | Line 1: | ||
<p style="color:red">The information on this page is updated in accordance with [https://wiki.teltonika-networks.com/view/FW_%26_SDK_Downloads'''00.07. | <p style="color:red">The information on this page is updated in accordance with [https://wiki.teltonika-networks.com/view/FW_%26_SDK_Downloads'''00.07.08'''] firmware version.</p> | ||
==Introduction== | ==Introduction== | ||
| Line 5: | Line 5: | ||
'''Modbus''' is a serial communications protocol. Simple and robust, it has become a de facto standard communication protocol and is now a commonly available means of connecting industrial electronic devices. | '''Modbus''' is a serial communications protocol. Simple and robust, it has become a de facto standard communication protocol and is now a commonly available means of connecting industrial electronic devices. | ||
In this configuration example, we will configure Modbus TCP Slave and Modbus TCP | In this configuration example, we will configure Modbus TCP Slave and Modbus TCP Client. We will send a Set Parameters request from Modbus TCP Client to Modbus TCP Slave, which will send an SMS message provided in the Modbus TCP Client Set Parameter request. | ||
If you're having trouble finding this page or some of the parameters described here on your device's WebUI, you should ''' | If you're having trouble finding this page or some of the parameters described here on your device's WebUI, you should turn on '''"Advanced WebUI" mode.''' You can do that by clicking the "Advanced" button, located at the top of the WebUI. | ||
[[File:Networking_rutos_manual_webui_basic_advanced_mode_75.gif|border|center|class=tlt-border|1102x93px]] | |||
[[File: | |||
== Prerequisites == | == Prerequisites == | ||
| Line 17: | Line 16: | ||
* One Mobile Phone in order to test the configuration | * One Mobile Phone in order to test the configuration | ||
== Configuring Modbus TCP | == Configuring Modbus TCP Server and Modbus TCP Client == | ||
Firstly, we will configure '''Modbus TCP | Firstly, we will configure '''Modbus TCP Server''' on the router and then on the same device we will configure '''Modbus TCP Client''' in order to send Modbus requests to the same device. | ||
---- | ---- | ||
===Configuring Modbus TCP | ===Configuring Modbus TCP Server=== | ||
In order to start our configuration you will need to open your device's WebUI (by entering the device's IP address of your device), then navigate to '''Services → Modbus → Modbus TCP | In order to start our configuration you will need to open your device's WebUI (by entering the device's IP address of your device), then navigate to '''Services → Modbus → Modbus TCP Server'''. | ||
In order to configure Modbus TCP | In order to configure Modbus TCP Server follow the steps provided below: | ||
[[File: | [[File:Modbus_TCP_Server_send_sms_example_7.8_1.png|border|class=tlt-border|1100px]] | ||
'''Explanation:''' | '''Explanation:''' | ||
# Enable the Modbus TCP | # Enable the Modbus TCP Server | ||
# Select the port on which Modbus TCP | # Select the port on which Modbus TCP Server will communicate with the Modbus TCP Client (for this example: 502) | ||
# Enable persistent connection (not mandatory) | # Enable persistent connection (not mandatory) | ||
# Save the configuration | # Save the configuration | ||
---- | ---- | ||
===Configuring Modbus TCP | ===Configuring Modbus TCP Client=== | ||
Lets continue with the configuration, now we will configure Modbus TCP | Lets continue with the configuration, now we will configure Modbus TCP Client on the same device. Navigate to '''Services → Modbus → Modbus TCP Client'''. Press the button '''ADD''' and follow the steps provided below: | ||
[[File: | [[File:Modbus_TCP_Server_send_sms_example_7.8_5.png|border|class=tlt-border|1100px]] | ||
'''Explanation:''' | '''Explanation:''' | ||
# Enable the instance | # Enable the instance | ||
# Create a name for Modbus TCP | # Create a name for Modbus TCP Client | ||
# Provide the | # Provide the Server ID (in this case: 1) | ||
# Provide IP address of the | # Provide IP address of the Server ID, in this case, this router's IP (192.168.1.1) | ||
# Provide Modbus TCP | # Provide Modbus TCP Server ID (in this case 502) | ||
---- | ---- | ||
===Configuring Modbus TCP | ===Configuring Modbus TCP Client Request Configuration=== | ||
Now that we have '''Modbus TCP | Now that we have '''Modbus TCP Client''' and '''Modbus TCP Server''' configurated, we will need to create '''Request Configuration'''. The Request configuration will be used to store the SMS message and the number of the recipient. Lastly, we will send the SMS message to the recipient with the set Command. | ||
To store Phone numbers and SMS messages we will use '''ASCII''' and/or '''HEX''' Data Types, you can configure either one of them, and both of them will work. | To store Phone numbers and SMS messages we will use '''ASCII''' and/or '''HEX''' Data Types, you can configure either one of them, and both of them will work. | ||
---- | ---- | ||
So first of all, we will create a Request in which we will store the Recipient number and SMS message, we will use '''ASCII Data Type''', '''Set Multiple holding registers(16) Function''' and '''398 Register'''. | So first of all, we will create a Request in which we will store the Recipient number and SMS message, we will use '''ASCII Data Type''', '''Set Multiple holding registers(16) Function''' and '''398 Register'''. | ||
[[File: | [[File:Modbus_TCP_Server_send_sms_example_7.8_2.png|border|class=tlt-border|1100px]] | ||
| Line 112: | Line 109: | ||
Lastly we will need a Request which would send the text message that we loaded previausly, to do so you will need to create a send Request. The Send Request should look like this: | Lastly we will need a Request which would send the text message that we loaded previausly, to do so you will need to create a send Request. The Send Request should look like this: | ||
[[File: | [[File:Modbus_TCP_Server_send_sms_example_7.8_3.png|border|class=tlt-border|1100px]] | ||
'''Explanation:''' | '''Explanation:''' | ||
| Line 126: | Line 123: | ||
Execute the first request, if everything was configurated correctly you should receive the confirmation message after that execute the '''Test_send''' request which will send the message to your phone number. | Execute the first request, if everything was configurated correctly you should receive the confirmation message after that execute the '''Test_send''' request which will send the message to your phone number. | ||
[[File: | [[File:Modbus_TCP_Server_send_sms_example_7.8_4.png|border|class=tlt-border|1100px]] | ||
| Line 138: | Line 135: | ||
* '''https://wiki.teltonika-networks.com/view/RUT955_Modbus#Set_Parameters''' Modbus Set Parameters manual | * '''https://wiki.teltonika-networks.com/view/RUT955_Modbus#Set_Parameters''' Modbus Set Parameters manual | ||
* '''https://www.utilities-online.info/ascii-to-hex''' ASCII to HEX converter | * '''https://www.utilities-online.info/ascii-to-hex''' ASCII to HEX converter | ||
[[Category: | [[Category:Modbus]] | ||
Latest revision as of 07:20, 21 August 2024
Main Page > General Information > Configuration Examples > Modbus > Modbus TCP Server Send SMS exampleThe information on this page is updated in accordance with 00.07.08 firmware version.
Introduction
Modbus is a serial communications protocol. Simple and robust, it has become a de facto standard communication protocol and is now a commonly available means of connecting industrial electronic devices.
In this configuration example, we will configure Modbus TCP Slave and Modbus TCP Client. We will send a Set Parameters request from Modbus TCP Client to Modbus TCP Slave, which will send an SMS message provided in the Modbus TCP Client Set Parameter request.
If you're having trouble finding this page or some of the parameters described here on your device's WebUI, you should turn on "Advanced WebUI" mode. You can do that by clicking the "Advanced" button, located at the top of the WebUI.

Prerequisites
- At least one TRB/RUT device with the SIM card, for this example we will be using one device
- One end device (PC, Laptop, Tablet, Smartphone) to configure the router
- One Mobile Phone in order to test the configuration
Configuring Modbus TCP Server and Modbus TCP Client
Firstly, we will configure Modbus TCP Server on the router and then on the same device we will configure Modbus TCP Client in order to send Modbus requests to the same device.
Configuring Modbus TCP Server
In order to start our configuration you will need to open your device's WebUI (by entering the device's IP address of your device), then navigate to Services → Modbus → Modbus TCP Server.
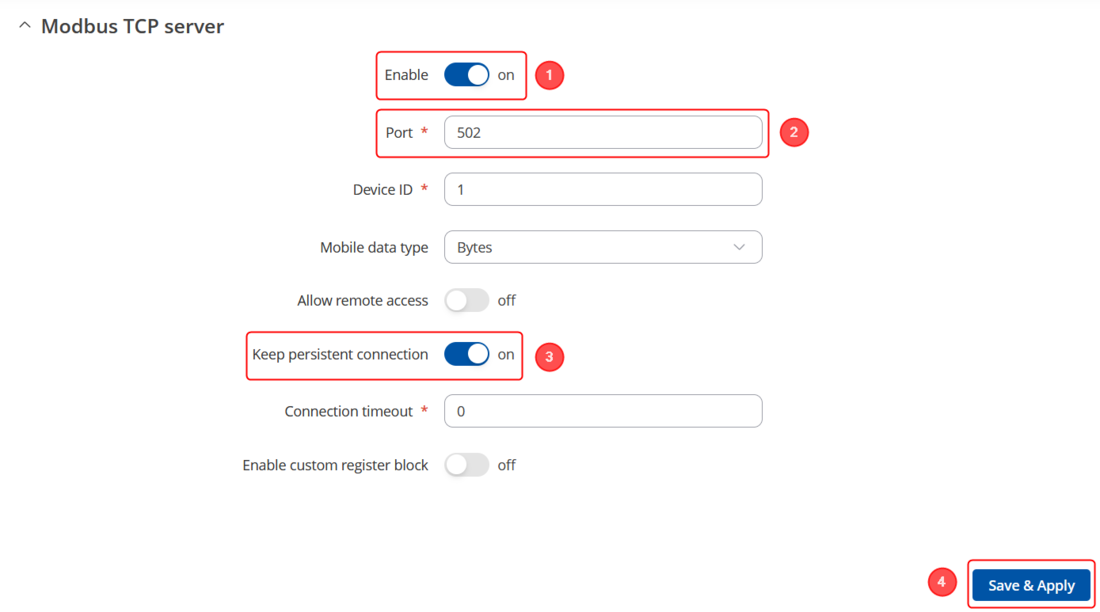
In order to configure Modbus TCP Server follow the steps provided below:
Explanation:
- Enable the Modbus TCP Server
- Select the port on which Modbus TCP Server will communicate with the Modbus TCP Client (for this example: 502)
- Enable persistent connection (not mandatory)
- Save the configuration
Configuring Modbus TCP Client
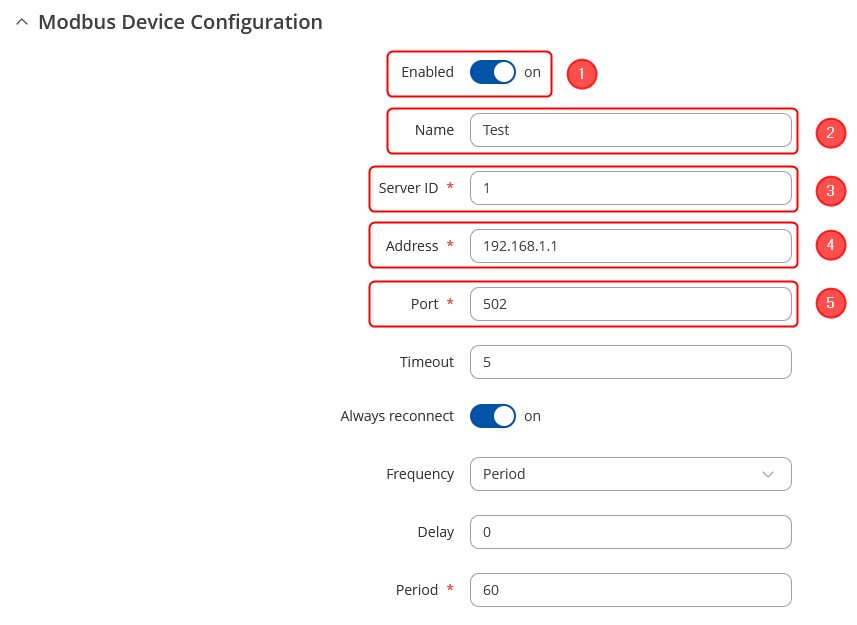
Lets continue with the configuration, now we will configure Modbus TCP Client on the same device. Navigate to Services → Modbus → Modbus TCP Client. Press the button ADD and follow the steps provided below:
Explanation:
- Enable the instance
- Create a name for Modbus TCP Client
- Provide the Server ID (in this case: 1)
- Provide IP address of the Server ID, in this case, this router's IP (192.168.1.1)
- Provide Modbus TCP Server ID (in this case 502)
Configuring Modbus TCP Client Request Configuration
Now that we have Modbus TCP Client and Modbus TCP Server configurated, we will need to create Request Configuration. The Request configuration will be used to store the SMS message and the number of the recipient. Lastly, we will send the SMS message to the recipient with the set Command. To store Phone numbers and SMS messages we will use ASCII and/or HEX Data Types, you can configure either one of them, and both of them will work.
So first of all, we will create a Request in which we will store the Recipient number and SMS message, we will use ASCII Data Type, Set Multiple holding registers(16) Function and 398 Register.
In the Register Count / Values field we will be written the ASCII format (human-readable format) and in the Data Type we will select ASCII format, so there will be no data conversion that it is why we will be writing in the human-readable format.
The first 10 registers are reserved for the phone number (1 register = 2 symbols) additionally you will require to put in front '+' which is equal to 00 here. If your number (together with 00) does not take 10 registers we will require you to fill out the left registers with 0 values, that's why we use the \u0000 symbol, which means 0 value.
Here we will explore two examples, one for the ASCII data type and one for the HEX.
Example Message request for ASCII:
003706xxx1594\u0000\u0000\u0000\u0000\u0000\u0000\u0000test
Explanation:
- 00 - + symbol
- 3706xxx1594 - phone number
- \u0000\u0000\u0000\u0000\u0000\u0000\u0000 - our number only takes up to 6 and a half registers(2 symbols = 1 register), all other registers will be filled with 0 value
- test - the message that will be sent
Second example Message request for HEX:
30 30 33 37 30 36 78 78 78 31 35 39 34 00 00 00 00 00 00 00 74 65 73 74
Explanation:
- 30 30 - equals to 00(+ symbol)
- 33 37 30 36 78 78 78 31 35 39 34 - equals to 3706xxx1594 number (keep in mind that 78 in hex equals x symbol, this whole part has to be changed in accordance to your phone number)
- 00 00 00 00 00 00 00 - our number only takes up to 3 registers(4 symbols = 1 register), all other registers will be filled with 0 value
- 74 65 73 74 - equals to 'test' in HEX
For this example you will need to use ASCII to HEX converter which will convert your number and message to HEX format, the one used in this example was: https://www.utilities-online.info/ascii-to-hex
Example of the conversion:
Finishing the configuration
Lastly we will need a Request which would send the text message that we loaded previausly, to do so you will need to create a send Request. The Send Request should look like this:
Explanation:
Firstly, we select Set single holding register, then we select Register 397 and value to 1 which will send the loaded message.
Testing the configuration
Now that we have everything configurated, we need to test the configuration.
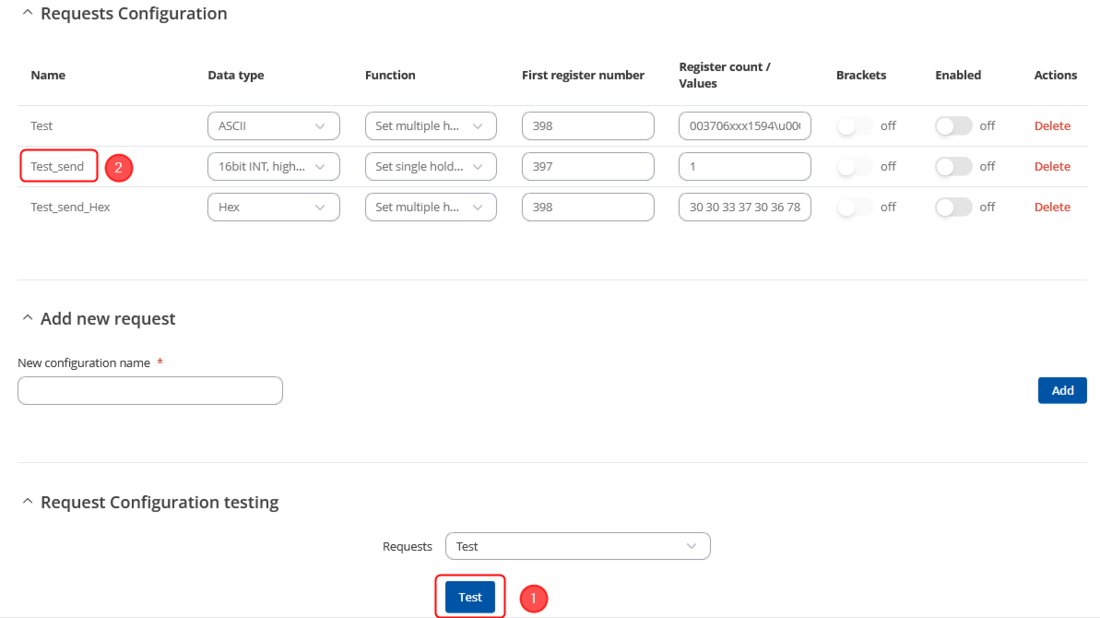
First of all, we will execute Test Request, which will store the phone number and message "test" into the registers and then we will send the message to provided phone number with Test_send Request.
Execute the first request, if everything was configurated correctly you should receive the confirmation message after that execute the Test_send request which will send the message to your phone number.
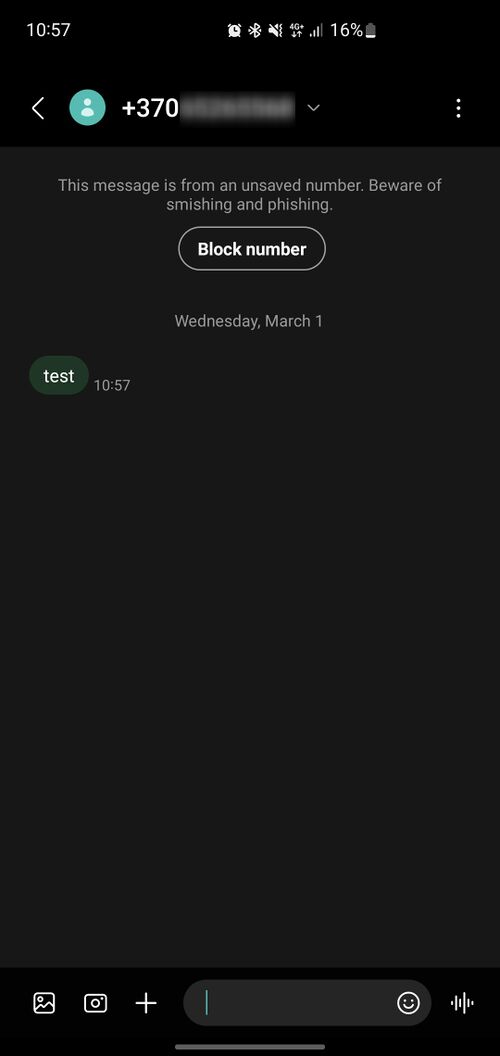
The example of message received:
References
- https://wiki.teltonika-networks.com/view/RUT955_Modbus#Set_Parameters Modbus Set Parameters manual
- https://www.utilities-online.info/ascii-to-hex ASCII to HEX converter


