Hikvision: remote camera access: Difference between revisions
mNo edit summary |
No edit summary |
||
| (4 intermediate revisions by 3 users not shown) | |||
| Line 10: | Line 10: | ||
'''Prerequisites''': | '''Prerequisites''': | ||
* A router from the RUT series (except RUT850) or | * A router from the RUT series (except RUT850) or TRB series gateway; | ||
* A single Hikvision DS-2CD2332-I camera | * A single Hikvision DS-2CD2332-I camera | ||
* A PC, Laptop, tablet or smartphone | * A PC, Laptop, tablet or a smartphone | ||
* An Ethernet cable for connecting the camera to one of the router's LAN ports | * An Ethernet cable for connecting the camera to one of the router's LAN ports | ||
* The router must have a SIM card with a Public Static or Public Dynamic IP address (more on IP address types '''[[Private and Public IP Addresses|here]]''') to make remote access possible | * The router must have a SIM card with a Public Static or Public Dynamic IP address (more on IP address types '''[[Private and Public IP Addresses|here]]''') to make remote access possible | ||
| Line 38: | Line 38: | ||
---- | ---- | ||
As mentioned earlier, since the camera's IP address is in the first subnet, you will need to modify the router's IP address ('''only if you've made changes to router's default IP address before!''') so that it is also in the same subnet (at least temporarily; later you can change the camera's IP address to correspond with your router's). | As mentioned earlier, since the camera's IP address is in the first subnet, you will need to modify the router's IP address ('''only if you've made changes to router's default IP address before!''') so that it is also in the same subnet (at least temporarily; later you can change the camera's IP address to correspond with your router's). | ||
====Connecting the camera to a PC==== | ====Connecting the camera to a PC==== | ||
---- | ---- | ||
Even though this guide focuses on setup that involves the camera being connected to one of the router's LAN ports, we recognize that some users may be configuring their camera separately by connecting it to a PC. Therefore, this section will provide a short guide on how to do this. | Even though this guide focuses on a setup that involves the camera being connected to one of the router's LAN ports, we recognize that some users may be configuring their camera separately by connecting it to a PC. Therefore, this section will provide a short guide on how to do this. | ||
If you are connecting the camera straight to your PC's Ethernet board, you will need to configure a Static IP address on your computer. Since the camera's IP address (192.168.1.64), the computer's IP address must be in the first subnet as well. Presented below are links to two short guides on how to configure a Static IP address on a PC - one for Windows, the other for Linux. | If you are connecting the camera straight to your PC's Ethernet board, you will need to configure a Static IP address on your computer. Since the camera's IP address (192.168.1.64), the computer's IP address must be in the first subnet as well. Presented below are links to two short guides on how to configure a Static IP address on a PC - one for Windows, the other for Linux. | ||
| Line 80: | Line 58: | ||
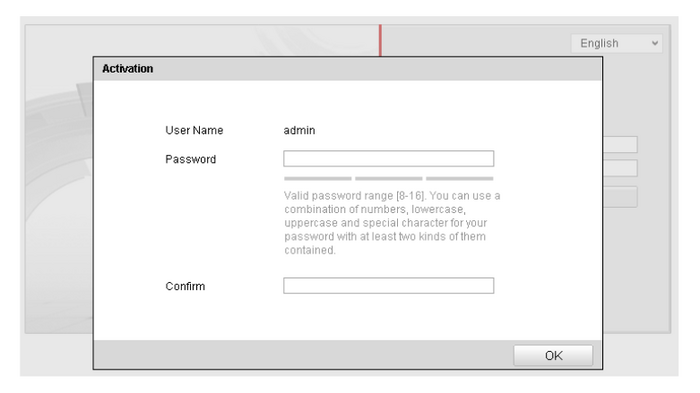
* If you are logging in for the first time, you will be greeted with a window such as this: | * If you are logging in for the first time, you will be greeted with a window such as this: | ||
[[File:Hikvision camera activation window.png| | [[File:Hikvision camera activation window.png|700x700px|alt=]] | ||
Abide to the provided description and choose a valid password for the camera. If you've logged in to the camera before, you probably already have a password. In that case, just type in the user name (default: '''admin'''), the password (the one you chose during first log in) and click "'''Login'''". | Abide to the provided description and choose a valid password for the camera. If you've logged in to the camera before, you probably already have a password. In that case, just type in the user name (default: '''admin'''), the password (the one you chose during first log in) and click "'''Login'''". | ||
| Line 86: | Line 64: | ||
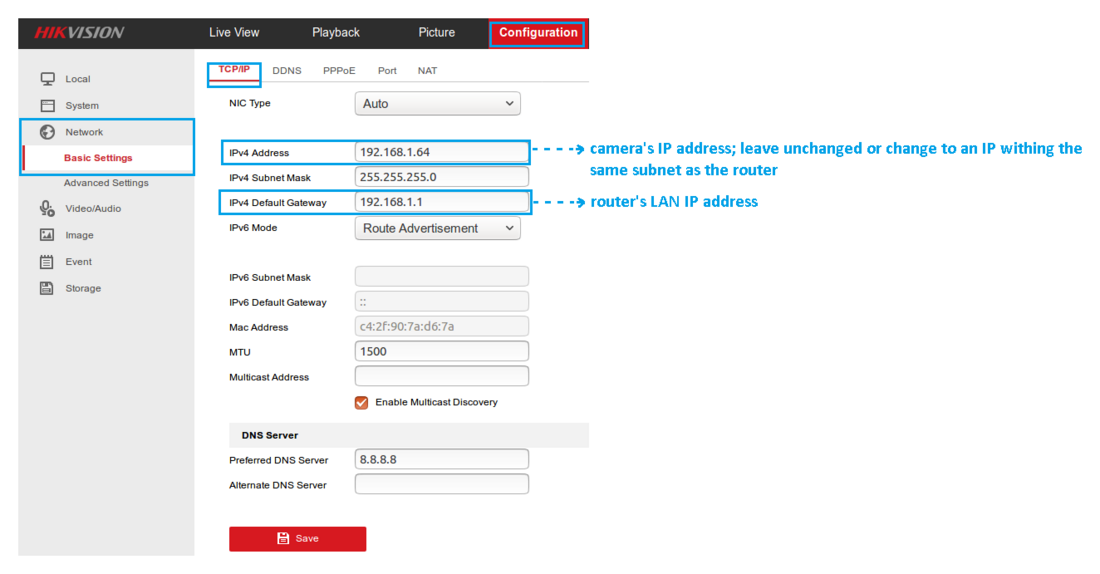
* Next, navigate to the '''Configuration''' section, under '''Network''' choose '''Basic Settings''' and '''TCP/IP'''. Change the '''IPv4 Default Gateway''' value to your router's LAN IP address and change (optional) the camera's IP address to the one you prefer (just make sure the camera and the router are in the same subnet): | * Next, navigate to the '''Configuration''' section, under '''Network''' choose '''Basic Settings''' and '''TCP/IP'''. Change the '''IPv4 Default Gateway''' value to your router's LAN IP address and change (optional) the camera's IP address to the one you prefer (just make sure the camera and the router are in the same subnet): | ||
[[File:Hikvision configuration network tcp ip.png| | [[File:Hikvision configuration network tcp ip.png|1100x1100px|alt=]] | ||
'''NOTE''': once you apply these changes it may be necessary to log in to the camera again (with new settings). | '''NOTE''': once you apply these changes it may be necessary to log in to the camera again (with new settings). | ||
| Line 92: | Line 70: | ||
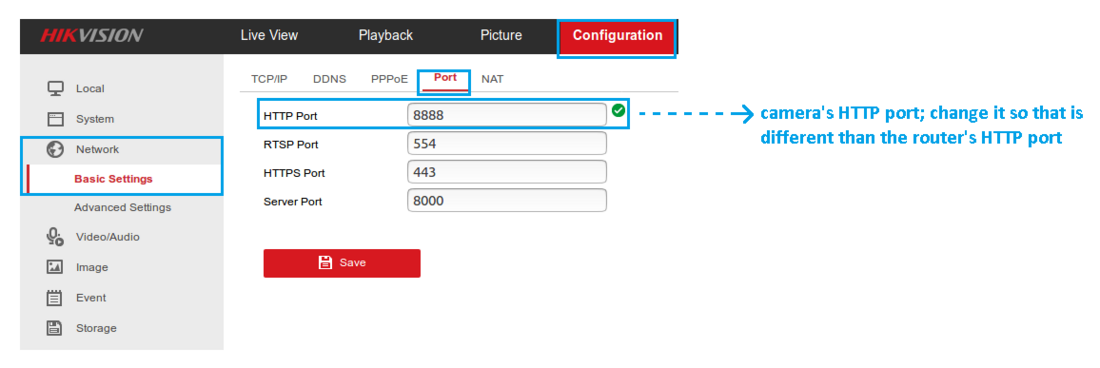
* Next, navigate to the '''Configuration''' section, under '''Network''' choose '''Basic Settings''' and '''Port'''. Change the '''HTTP Port''' value to one that is different than your router's (the default value is '''80'''). For this example we'll be using '''port 8888'''. This done because we're trying to achieve a configuration that will allow remote access to the camera and because later we'll be using Port Forwarding to redirect all connections to a specific port, it is best that this port be different from the default one in order to avoid any problems (for example, so that the router's WebUI will also be reachable with our configuration). | * Next, navigate to the '''Configuration''' section, under '''Network''' choose '''Basic Settings''' and '''Port'''. Change the '''HTTP Port''' value to one that is different than your router's (the default value is '''80'''). For this example we'll be using '''port 8888'''. This done because we're trying to achieve a configuration that will allow remote access to the camera and because later we'll be using Port Forwarding to redirect all connections to a specific port, it is best that this port be different from the default one in order to avoid any problems (for example, so that the router's WebUI will also be reachable with our configuration). | ||
[[File:Hikvision configuration network port.png| | [[File:Hikvision configuration network port.png|1100x1100px|alt=]] | ||
---- | ---- | ||
* The camera configuration part is done as of the last step. But keep in mind that if you have changed the HTTP Port value, you'll need to specify the port next time that you connect to the camera's WebUI. When connecting to a device through a specific port, the port number is specified by adding a '''colon''' (''':''') and the port number after the device IP address/hostname, as such: | * The camera configuration part is done as of the last step. But keep in mind that if you have changed the HTTP Port value, you'll need to specify the port next time that you connect to the camera's WebUI. When connecting to a device through a specific port, the port number is specified by adding a '''colon''' (''':''') and the port number after the device IP address/hostname, as such: | ||
| Line 112: | Line 90: | ||
[[File: | [[File:RutOS_remote_camera_access_7.8_1.png|border|class=tlt-border|alt=|1000px]] | ||
---- | ---- | ||
| Line 118: | Line 96: | ||
====Step 2: Set an APN==== | ====Step 2: Set an APN==== | ||
---- | ---- | ||
* To set the APN, while in the router's WebUI, navigate to the | '''Note:''' ''If you have a Public IP address already, you can skip this step.'' | ||
---- | |||
* To set the APN, while in the router's WebUI, navigate to the '''Network → WAN''': | |||
[[File: | [[File:RutOS_remote_camera_access_7.8_2.png|border|class=tlt-border|alt=|1000x1000px]] | ||
---- | ---- | ||
* Once in the ''' | * Once in the '''WAN''' window, edit your mobile interface, find the '''APN''' field and enter you Internet Service Provider's APN: | ||
# '''Disable the Auto APN option''' | |||
# Choose the correct '''APN''', which gives out a public IP address (for more information about that contact your Internet Service Provider) | |||
[[File:RutOS_remote_camera_access_7.8_3.png|border|class=tlt-border]] | |||
[[File: | |||
* Additional notes on APN: | * Additional notes on APN: | ||
| Line 132: | Line 113: | ||
** '''NOTE 2''': furthermore, it should be noted that not all SIM cards support this functionality. Static or Dynamic Public IP addresses (obtained through APN) are a paid service and setting any APN value for a SIM card that doesn't support this service will most likely result in losing your data connection. If this is the case, it can be fixed by simply deleting the APN, but it also means that remote access through WAN IP will most likely not work on your SIM card. | ** '''NOTE 2''': furthermore, it should be noted that not all SIM cards support this functionality. Static or Dynamic Public IP addresses (obtained through APN) are a paid service and setting any APN value for a SIM card that doesn't support this service will most likely result in losing your data connection. If this is the case, it can be fixed by simply deleting the APN, but it also means that remote access through WAN IP will most likely not work on your SIM card. | ||
** '''NOTE 3''': in some cases the SIM card doesn't require an APN in order to obtain a Public IP address. If that is the case for you, simply check what your router's WAN IP address is - if it's already a Public IP address, then you don't need to set an APN. The easiest way to find what your WAN IP address is to log in to the router's WebUI and check the '''WAN''' widget in the '''Overview''' page. The WAN widget will be on the right side of the page, second widget from the top: | ** '''NOTE 3''': in some cases the SIM card doesn't require an APN in order to obtain a Public IP address. If that is the case for you, simply check what your router's WAN IP address is - if it's already a Public IP address, then you don't need to set an APN. The easiest way to find what your WAN IP address is to log in to the router's WebUI and check the '''WAN''' widget in the '''Overview''' page. The WAN widget will be on the right side of the page, second widget from the top: | ||
[[File:WANpublic.png|alt=|border|center|frameless|660x660px]] | |||
[[File: | |||
===Step 3: Configure Port Forwarding=== | ===Step 3: Configure Port Forwarding=== | ||
---- | ---- | ||
* Navigate to the '''Firewall''' page | * Navigate to the '''Port Forwards''' tab by going to '''Network → Firewall → Port Forwards''': | ||
* Scroll down to the bottom of the page and locate the '''New Port Forward Rule''' section. Set the following parameters: | |||
# Custom name for the port forward. | |||
# External port(s): '''8888''' (camera's HTTP port as set in the [[Hikvision:_remote_camera_access#Camera.27s_Web_User_Interface_.28WebUI.29|3.2]] section of this article) | |||
# Internal IP: '''192.168.1.64''' (camera's IP as set in the [[Hikvision:_remote_camera_access#Camera.27s_Web_User_Interface_.28WebUI.29|3.2]] section of this article) | |||
# Internal port(s): '''8888''' | |||
# Click on '''Add''' button. | |||
[[File:RutOS_remote_camera_access_7.8_4.png|border|class=tlt-border|alt=|1000px]] | |||
[[File: | |||
---- | ---- | ||
* If you plan viewing the camera's live stream via some sort of media player (for example, VLC), you should configure an additional Port Forwarding rule. Media players like VLC use the '''RTSP''' protocol. You can check the RTSP port in the camera's WebUI (as discussed in the [[Hikvision:_remote_camera_access#Camera.27s_Web_User_Interface_.28WebUI.29|3.2]] section of this article), but the RTSP default port is always '''554''' and there is no need to change it since by default the router doesn't use this port for any of its services (unless you use for some custom configuration. In that case, change the default RTSP port). So, once again make up a custom name for a new rule and set the following parameters: | * If you plan viewing the camera's live stream via some sort of media player (for example, VLC), you should configure an additional Port Forwarding rule. Media players like VLC use the '''RTSP''' protocol. You can check the RTSP port in the camera's WebUI (as discussed in the [[Hikvision:_remote_camera_access#Camera.27s_Web_User_Interface_.28WebUI.29|3.2]] section of this article), but the RTSP default port is always '''554''' and there is no need to change it since by default the router doesn't use this port for any of its services (unless you use for some custom configuration. In that case, change the default RTSP port). So, once again make up a custom name for a new rule and set the following parameters: | ||
# Custom name for the port forward. | |||
# External port(s): '''554''' (camera's RTSP port) | |||
# Internal IP: '''192.168.1.64''' (camera's IP as set in the [[Hikvision:_remote_camera_access#Camera.27s_Web_User_Interface_.28WebUI.29|3.2]] section of this article) | |||
# Internal port(s): '''554''' | |||
# Click on '''Add''' button. | |||
[[File: | [[File:RutOS_remote_camera_access_7.8_5.png|border|class=tlt-border|alt=|1000px]] | ||
---- | ---- | ||
* Don't forget to click ''' | * Don't forget to click '''Save & Apply''' after you've made the changes. After you have added the new rule, you will redirected to that rule's configuration window. Everything should already be in order so just click '''Save & Apply''' and your rule will be created. The new rule will appear at the bottom of the '''Port Forwarding Rules''' list, where you can check its status and make additional configurations if need be: | ||
[[File: | [[File:RutOS_remote_camera_access_7.8_6.png|border|class=tlt-border|alt=|1000px]] | ||
'''FINAL NOTE''': as you can see, once you add the new rule, it is already enabled and ready for use. From this point no more additional configurations are required, as your remote camera monitoring configuration is fully set up. Unless you want to set up Dynamic DNS for your router, you can skip to the '''[[#Testing_the_set_up|Testing the set up]]''' part of this guide. | '''FINAL NOTE''': as you can see, once you add the new rule, it is already enabled and ready for use. From this point no more additional configurations are required, as your remote camera monitoring configuration is fully set up. Unless you want to set up Dynamic DNS for your router, you can skip to the '''[[#Testing_the_set_up|Testing the set up]]''' part of this guide. | ||
| Line 247: | Line 226: | ||
https://www.videolan.org/vlc/download-windows.html - VLC player download | https://www.videolan.org/vlc/download-windows.html - VLC player download | ||
[[Category:Camera]] | |||
Latest revision as of 09:32, 22 August 2024
Main Page > General Information > Configuration Examples > Camera > Hikvision: remote camera accessA guide to using RUT routers in conjunction with Hikvision DS-2DC2332-I, a 3MP Outdoor Network Turret Camera.
Introduction
This article is aimed at providing configuration examples for using RUT routers and Hikvision cameras in tandem. All examples provided in this article are intended to be used with any RUT routers (with the exception of RUT850) and Hikvision's DS-2CD2332-I cameras. Although this guide was created with these specific products in mind, the examples from this chapter can still be applied to other Hikvision cameras as well as other cameras in general, although there may be differences in the user interfaces of these other products, the principles should remain the same.
Configuration overview and prerequisites
Before we begin, let's overview the configuration that we are attempting to achieve and the prerequisites that make it possible.
Prerequisites:
- A router from the RUT series (except RUT850) or TRB series gateway;
- A single Hikvision DS-2CD2332-I camera
- A PC, Laptop, tablet or a smartphone
- An Ethernet cable for connecting the camera to one of the router's LAN ports
- The router must have a SIM card with a Public Static or Public Dynamic IP address (more on IP address types here) to make remote access possible
- (Optional) If the router's SIM card has a Public Dynamic IP address, you may want to additionally configure a Dynamic DNS hostname
Configuration scheme:
The scheme describes a remote device (PC, laptop, smartphone, etc.) that is connecting to a RUT router via the Internet whose Public (WAN) IP is 84.15.186.115, through the port 8888. Then the RUT router redirects that device's query to it's LAN, specifically to the camera that is connected via LAN cable and has the IP address 192.168.1.64, through port 8888, with the help of a pre-configured Port Forwarding rule.
Camera configuration
This section provides the necessary information on how to configure the camera in order to make the configuration scheme described in the section above to work.
Camera's IP address
You can configure the camera by connecting to it's Web User Interface (WebUI) via a web browser. To reach the camera's WebUI, you'll need to be aware of and able to reach the camera's IP address. The Hikvision DS-2CD2332-I camera has a Static IP address (a fact that is also true for most IP cameras), which means that it will not "ask" for a DHCP lease when connected to a device that has an operational DHCP Server. Therefore, whether you connect it to your PC or RUT router, the PC or the router will have to be in the same Subnetwork (subnet) as the camera for you to be able to reach it from your local network.
This particular camera has the IP address 192.168.1.64 (if you are using a different camera model, check your camera's packaging box or user manual for its IP address). The third segment of an IP address indicates its subnet, which means that this camera is in the first (1) subnet of the 192.168.0.0 network. Because the default IP address (192.168.1.1) for all RUT routers is also in the first subnet, the camera will be reachable by any device connected to the router's LAN network if no changes to the router's LAN IP address have been made prior to that.
Otherwise, if you have made changes to the router's LAN IP address or if you are simply trying to reach the camera by connecting it directly to your PCs Ethernet board, you will need to make some changes to the router's or PC's network settings.
Connecting the camera to a RUT router
As mentioned earlier, since the camera's IP address is in the first subnet, you will need to modify the router's IP address (only if you've made changes to router's default IP address before!) so that it is also in the same subnet (at least temporarily; later you can change the camera's IP address to correspond with your router's).
Connecting the camera to a PC
Even though this guide focuses on a setup that involves the camera being connected to one of the router's LAN ports, we recognize that some users may be configuring their camera separately by connecting it to a PC. Therefore, this section will provide a short guide on how to do this.
If you are connecting the camera straight to your PC's Ethernet board, you will need to configure a Static IP address on your computer. Since the camera's IP address (192.168.1.64), the computer's IP address must be in the first subnet as well. Presented below are links to two short guides on how to configure a Static IP address on a PC - one for Windows, the other for Linux.
- For Windows users: Setting up a Static IP address on a Windows 10 PC
- Fox Linux users: Setting up a Static IP address on a Ubuntu 16.04 PC
NOTE: in the guides provided above, the default gateway is specified as 192.168.1.1, which is a RUT router's default IP address. If you're using the guides in order to learn how to reach the camera, specify the default gateway as the camera's IP address (192.168.1.64).
Camera's Web User Interface (WebUI)
- Once you have all of the above in order, type in the camera's IP address into the URL field of your web browser and press "Enter".
- If you are logging in for the first time, you will be greeted with a window such as this:
Abide to the provided description and choose a valid password for the camera. If you've logged in to the camera before, you probably already have a password. In that case, just type in the user name (default: admin), the password (the one you chose during first log in) and click "Login".
- Next, navigate to the Configuration section, under Network choose Basic Settings and TCP/IP. Change the IPv4 Default Gateway value to your router's LAN IP address and change (optional) the camera's IP address to the one you prefer (just make sure the camera and the router are in the same subnet):
NOTE: once you apply these changes it may be necessary to log in to the camera again (with new settings).
- Next, navigate to the Configuration section, under Network choose Basic Settings and Port. Change the HTTP Port value to one that is different than your router's (the default value is 80). For this example we'll be using port 8888. This done because we're trying to achieve a configuration that will allow remote access to the camera and because later we'll be using Port Forwarding to redirect all connections to a specific port, it is best that this port be different from the default one in order to avoid any problems (for example, so that the router's WebUI will also be reachable with our configuration).
- The camera configuration part is done as of the last step. But keep in mind that if you have changed the HTTP Port value, you'll need to specify the port next time that you connect to the camera's WebUI. When connecting to a device through a specific port, the port number is specified by adding a colon (:) and the port number after the device IP address/hostname, as such:
Router configuration
If you're done with the camera's configuration, it's time to configure the router. First, let's overview what configurations we'll be needing to set up:
- Enable remote HTTP access, so that the router can be reached from a remote location
- Specify an Access Point Name (APN) for the SIM card in use, so that the router will obtain a Public IP address
- Configure a Port Forwarding rule that redirects all connections from one Port to the camera's IP address:Port
- (Optional) Configure Dynamic DNS hostname
Step 1: Enable remote HTTP access
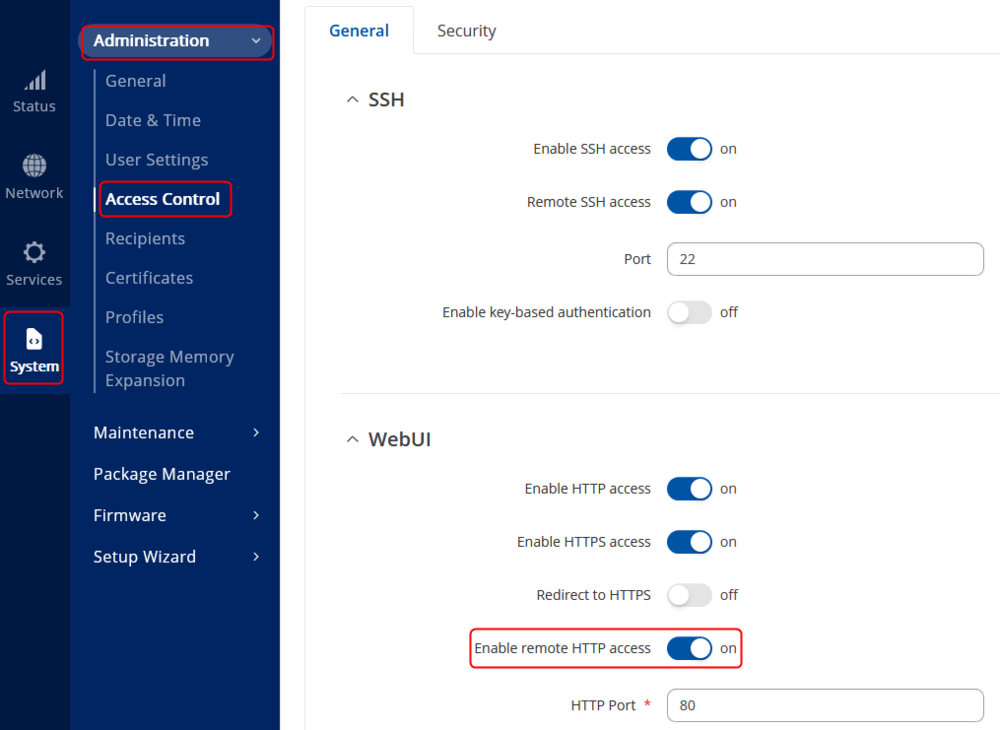
- To enable remote HTTP access, log in to the router's WebUI and navigate to the System → Administration → Access Control tab. Once in the Administration-Access Control, find the Enable remote HTTP access field and put a check mark next to it:
WARNING: once you set up any type of remote access, your router becomes vulnerable to malicious attacks from unknown hosts throughout the Internet. It is highly recommended that once you enable remote access, you also change the router's default password to a string, custom password. You can change the router's password in System → Administration → General → Administrator Password
Step 2: Set an APN
Note: If you have a Public IP address already, you can skip this step.
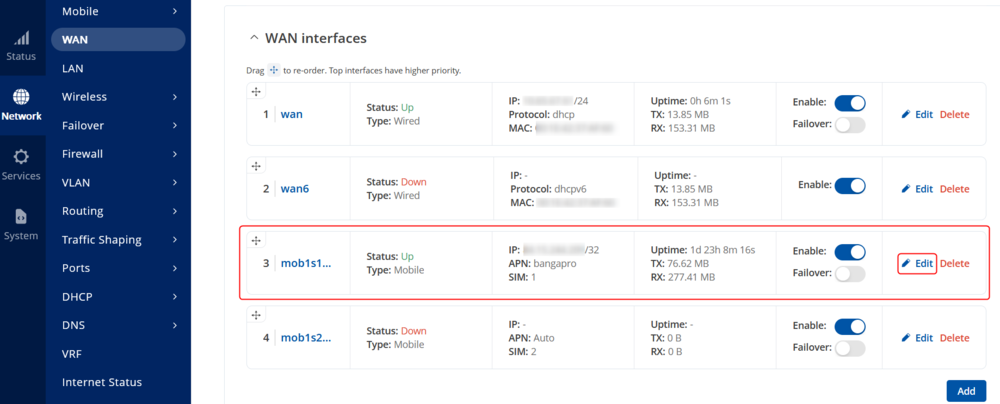
- To set the APN, while in the router's WebUI, navigate to the Network → WAN:
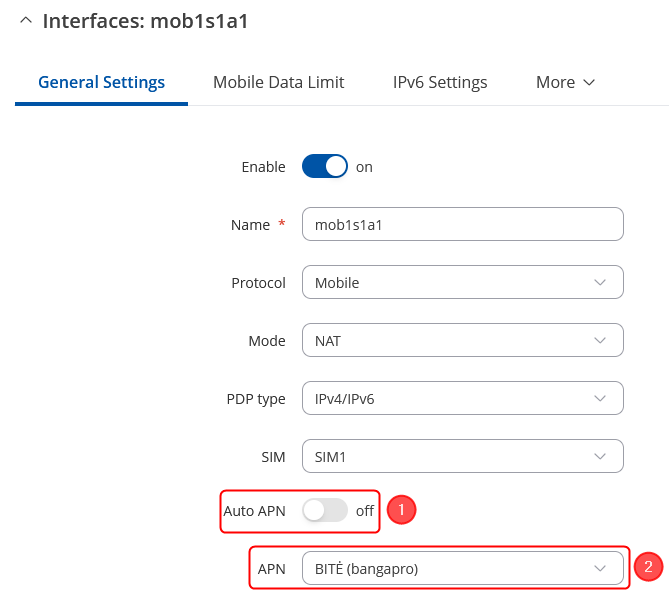
- Once in the WAN window, edit your mobile interface, find the APN field and enter you Internet Service Provider's APN:
- Disable the Auto APN option
- Choose the correct APN, which gives out a public IP address (for more information about that contact your Internet Service Provider)
- Additional notes on APN:
- NOTE 1: don't use the exact APN value as seen in the example above as it will not work with your SIM card. APN depends on your Internet Service Provider (ISP), therefore, your ISP should provide you with their APN or, in many case, you can find your ISP's APN with an online search.
- NOTE 2: furthermore, it should be noted that not all SIM cards support this functionality. Static or Dynamic Public IP addresses (obtained through APN) are a paid service and setting any APN value for a SIM card that doesn't support this service will most likely result in losing your data connection. If this is the case, it can be fixed by simply deleting the APN, but it also means that remote access through WAN IP will most likely not work on your SIM card.
- NOTE 3: in some cases the SIM card doesn't require an APN in order to obtain a Public IP address. If that is the case for you, simply check what your router's WAN IP address is - if it's already a Public IP address, then you don't need to set an APN. The easiest way to find what your WAN IP address is to log in to the router's WebUI and check the WAN widget in the Overview page. The WAN widget will be on the right side of the page, second widget from the top:

Step 3: Configure Port Forwarding
- Navigate to the Port Forwards tab by going to Network → Firewall → Port Forwards:
- Scroll down to the bottom of the page and locate the New Port Forward Rule section. Set the following parameters:
- Custom name for the port forward.
- External port(s): 8888 (camera's HTTP port as set in the 3.2 section of this article)
- Internal IP: 192.168.1.64 (camera's IP as set in the 3.2 section of this article)
- Internal port(s): 8888
- Click on Add button.
- If you plan viewing the camera's live stream via some sort of media player (for example, VLC), you should configure an additional Port Forwarding rule. Media players like VLC use the RTSP protocol. You can check the RTSP port in the camera's WebUI (as discussed in the 3.2 section of this article), but the RTSP default port is always 554 and there is no need to change it since by default the router doesn't use this port for any of its services (unless you use for some custom configuration. In that case, change the default RTSP port). So, once again make up a custom name for a new rule and set the following parameters:
- Custom name for the port forward.
- External port(s): 554 (camera's RTSP port)
- Internal IP: 192.168.1.64 (camera's IP as set in the 3.2 section of this article)
- Internal port(s): 554
- Click on Add button.
- Don't forget to click Save & Apply after you've made the changes. After you have added the new rule, you will redirected to that rule's configuration window. Everything should already be in order so just click Save & Apply and your rule will be created. The new rule will appear at the bottom of the Port Forwarding Rules list, where you can check its status and make additional configurations if need be:
FINAL NOTE: as you can see, once you add the new rule, it is already enabled and ready for use. From this point no more additional configurations are required, as your remote camera monitoring configuration is fully set up. Unless you want to set up Dynamic DNS for your router, you can skip to the Testing the set up part of this guide.
(Optional) Step 4: Configure Dynamic DNS
Dynamic DNS (DDNS or DynDNS) is a method of automatically updating a name server in the Domain Name System (DNS), often in real time, with the active DDNS configuration of its configured hostnames, addresses or other information.
Dynamic DNS configuration is optional here, but it is recommended if your SIM card has a Dynamic Public IP address. You can find more information on what a Dynamic Public IP address is here, but in short it means that your WAN IP address is Dynamic and, therefore, it may change over time (usually when disconnecting/reconnecting or re-registering to a network). Dynamic DNS assigns a hostname to your IP address and constantly updates that hostname, which means that even if your IP address changes, DDNS will assign the same hostname to your new IP, making your router reachable via the same hostname at any time.
You must use an external DDNS service to create a hostname and assign it to your IP. RUT routers support many such services. You can find a complete list of supported DDNS services in the Services → Dynamic DNS section of the router's WebUI. You can also find guides on how to configure some of these services in our wiki:
The guides contain information on how to configure both the router and the third party service. Choose one according to your liking.
Testing the set up
Now that you are done configuring your devices, you should probably test out if the configuration is working properly. We'll describe two common ways of doing so:
- via a media player
- via a web browser
VLC player
You can view the live stream from your camera using the VideoLAN Client (VLC) player. VLC works on all systems and can be download from here.
- Download and install the VLC player on your computer.
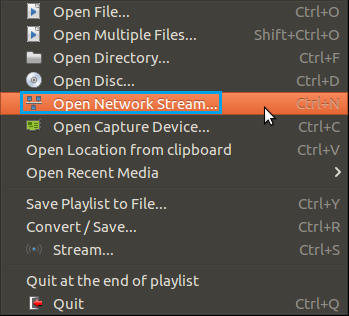
- Open the player. Go to Media → Open Network Stream... (at the top left corner of the window) or simply press Crtl+N on your keyboard:
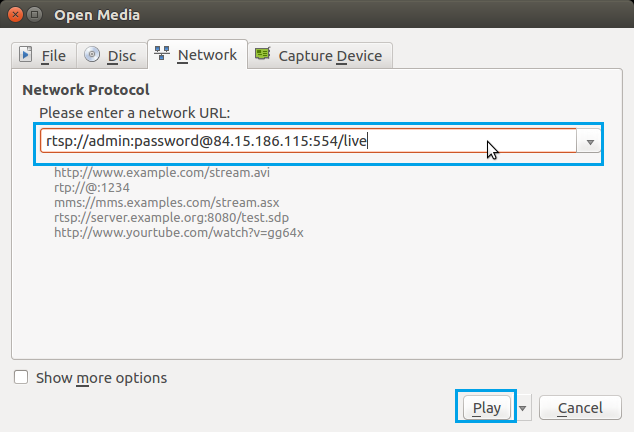
- In the Network stream window, you'll need to enter the camera's Real Time Streaming Protocol (RTSP) address (you can find an online RTPS link generator for Hikvision cameras here). It should look something like this:
rtsp://admin:[email protected]:554/live
Replace the relevant data with your own parameters and click Play:
NOTE: make sure that you have configured the necessary RTSP Port Forwarding rule as described in section 4.2 of this article. And don't forget to specify the correct RTSP port, which can be viewed and changed in the camera's WebUI as described in the 3.2 section of this article (if you haven't made changes to the RTSP port, it will be 554 by default).
Web browser
To test the configuration via web browser, simply enter the router's WAN IP address into the URL field of the browser but add a colon (:) and the HTTP port number at the end like so:
Don't forget to replace the parameters with those relevant to your own configuration.
Doing this will will redirect to camera's WebUI. While you can reach the camera's WebUI using any web browser, you will only be able to view the video stream when using Internet Explorer. This is because Hikvision cameras (like most) use a Netscape Plugin Application Programming Interface (NPAPI) for streaming video via HTTP. Unfortunately, many browsers like Google Chrome or Mozilla Firefox have discontinued the support for NPAPI type plug-ins. While there are workarounds, like using older browser versions or making certain configurations to the browser, they are not foolproof and may cause the browser to stop working properly, therefore, they will not be described in this article.
To find out how to view the camera's live stream, use Microsoft's Internet Explorer (instructions provided below) or use media player, like VLC (instructions provided above).
Internet Explorer
The browser we'll be using for this example is Microsoft's Internet Explorer. To reach the cameras WebUI, enter the router's WAN IP address into the URL field of the browser but add a colon (:) and the HTTP port number at the end like so:
Don't forget to replace the parameters with those relevant to your own configuration.
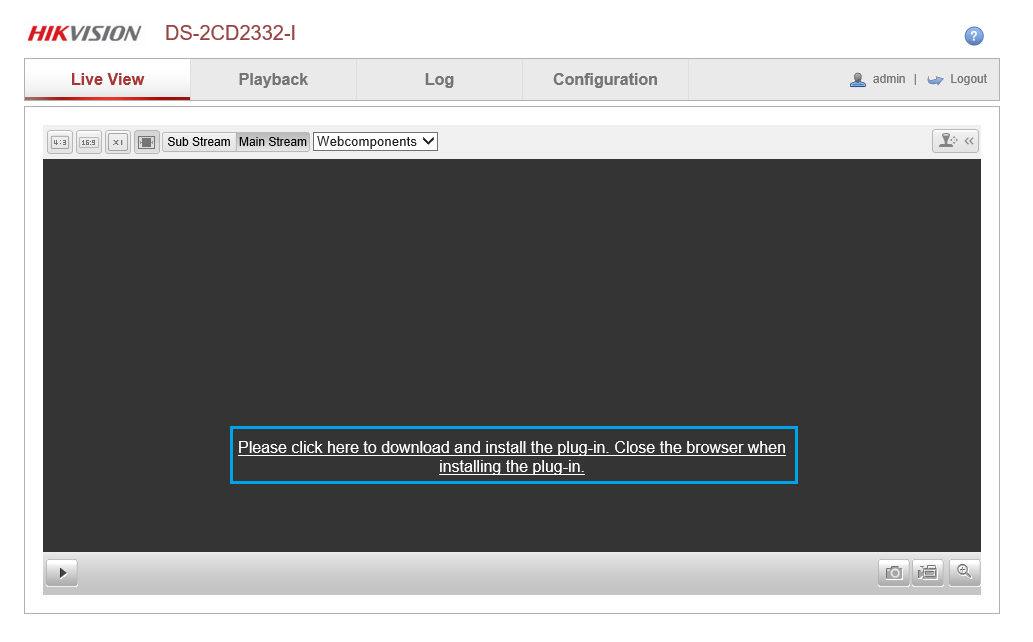
Once you've logged in, you should be greeted with a window such as this:
Click on the link in the Live view window. Doing this will download the necessary plug-in installation file. Close Internet Explorer and run this installation file from your computer.
Once you are done with the installation, launch Internet Explorer and log in to the camera again. You may be prompted to allow access for the plug-in to be used with the browser. If so, click "Yes" and proceed. After this you should be able to view the camera's live stream.
Other cameras
As mentioned in the introduction to this article, the configurations described here apply to the Hikvision DS-2CD2332-I camera. While that is true, the basic principles used to achieve this configuration should still apply to other products as well. For example, in order to achieve remote access, the configuration from the router's side will be practically identical and only things like IP addresses and port number should differ. From the camera's side, the User Interface may be different but the configuration parameters should remain the same.
External links
http://www.hikvision.com/us/Products_1_10508_i7705.html#prettyPhoto
https://teltonika-networks.com/products/products-and-solutions/networking/
https://www.videolan.org/vlc/download-windows.html - VLC player download


