Setting up a Static IP address on a Windows 10 PC
Introduction
This article provides a short guide on how to configure a Static IP address on a PC that uses a Windows 10 Operating System (OS). A Static IP configuration on a PC may be required when:
- Upgrading the router's Bootloader version (Bootloader upgrade guide)
- Upgrading the router's Firmware via the Bootloader menu (Firmware upgrade via the Bootloader menu guide)
- You lose access to your router's LAN] network (for example, when configuring Mobile Passthrough mode, Mobile Bridge mode, when you accidentally disable the router's DHCP server, etc.)
- You're trying to connect to another device that has a Static IP address (for example, an IP camera)
Or any other case that you may think of.
Set up
The instruction below are aimed to be applied and used with the Windows 10 Operating System (OS), although the configuration is quite similar on other versions of Windows.
Step 1: Search
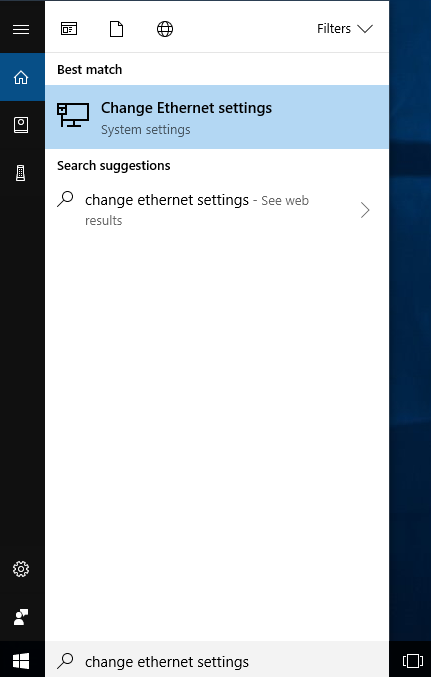
To set up a static IP address on your PC, you must first go to the Ethernet Settings menu. In order to reach the Ethernet Settings menu, enter "Change Ethernet Settings" in the Windows search field located next to "Start" in the bottom left corner of the screen and press Enter:
Step 2: Change Ethernet Settings
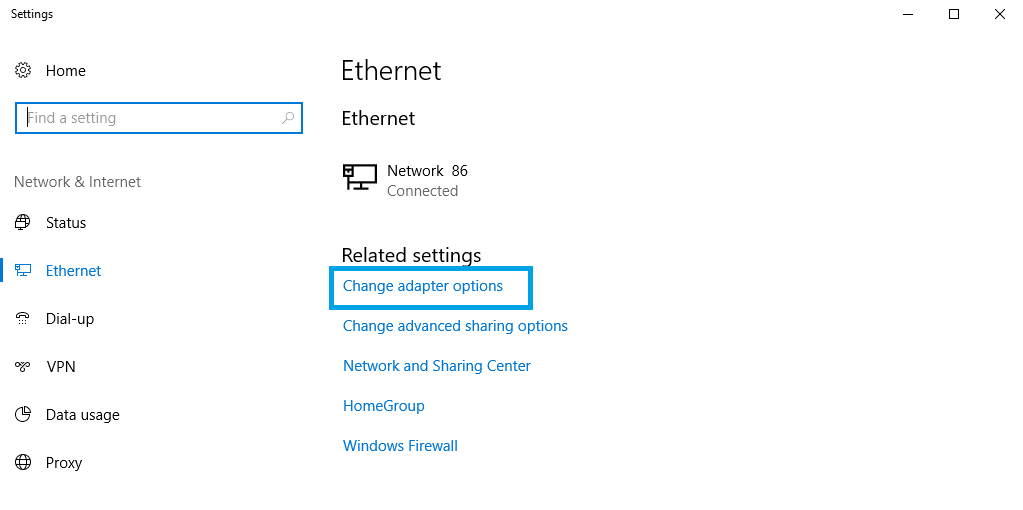
When in the Ethernet Settings window, click Change adapter options located under "Related Settings":
Step 3: Network Connections
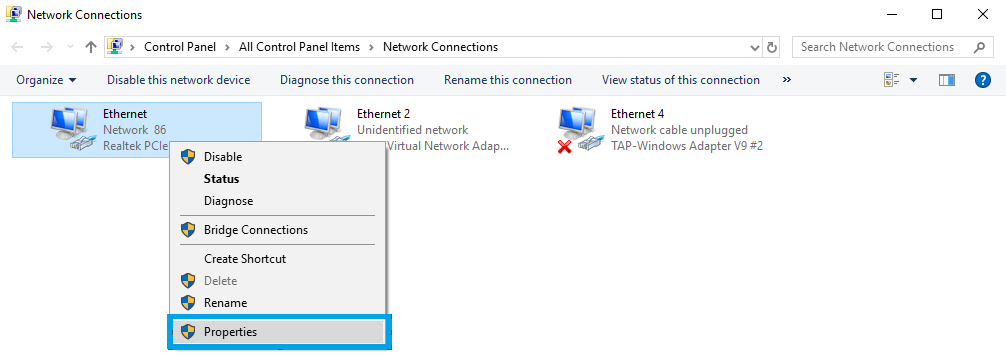
Next, in the Network Connections window, right-click on the Network connection associated with your Ethernet adapter and click Properties:
Step 4: Ethernet Properties
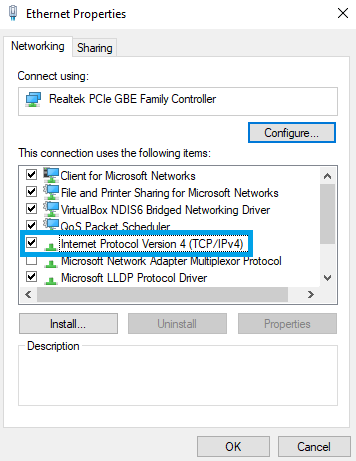
Next, click on Internet Protocol Version 4 (TCP/IPv4):
Step 5: Internet Protocol Version 4 (TCP/IPv4)
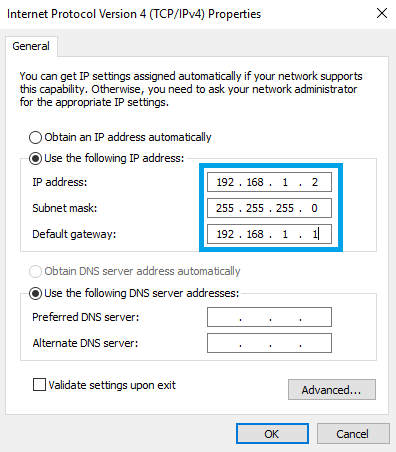
Finally, check Use the following IP address and enter a static IP for your PC (e.g., 192.168.1.2); Subnet mask - 255.255.255.0; Default gateway - 192.168.1.1 (router's default IP address):
Step 6: additional notes
- Note 1: once you are done with your configurations (the reason you needed a Static IP), you should undo the changes that you made to the computer's IPv4 configuration, because otherwise you might not have an Internet connection. To undo these changes, go back to the Internet Protocol Version 4 (TCP/IPv4) window and check Obtain an IP address automatically
- Note 2: if you are planning on using this configuration permanently and will require access to the Internet, add some DNS Servers in to the IPv4 configuration in Step 5
- Note 3: if at some point your router's LAN IP address was changed from its default value (192.168.1.1) or if you are using this set up in order to connect to another device (an IP camera, for example), make sure to specify a different Default Gateway in Step 5 accordingly. i.e., if the router's address was changed, make sure to specify the current LAN IP address of the router. If you're connecting to another device (e.g., camera), specify that device's IP address.
See also
If your PC runs on a Linux based OS, you may want check out our guide on setting up a Static IP address on a Ubuntu 16.04 system.

