Difference between revisions of "802.11r WiFi roaming configuration example"
From Teltonika Networks Wiki
m (Domnev moved page Draft:802.11r WiFi roaming configuration example to 802.11r WiFi roaming configuration example) |
|||
| (32 intermediate revisions by one other user not shown) | |||
| Line 1: | Line 1: | ||
| + | __TOC__ | ||
| + | |||
==Introduction== | ==Introduction== | ||
| − | This article provides a basic configuration example of 802.11r WiFi roaming | + | This article provides a basic configuration example of 802.11r WiFi roaming. |
| − | == | + | ==Firmwware== |
<p style="color:red">The information in this page is updated in accordance with [https://wiki.teltonika-networks.com/view/FW_%26_SDK_Downloads'''00.07.09'''] firmware version. .</p> | <p style="color:red">The information in this page is updated in accordance with [https://wiki.teltonika-networks.com/view/FW_%26_SDK_Downloads'''00.07.09'''] firmware version. .</p> | ||
| − | |||
| − | |||
==Prerequisites== | ==Prerequisites== | ||
* Main gateway with WAN access (Any RUTOS router. RUTX50 is used in this example) | * Main gateway with WAN access (Any RUTOS router. RUTX50 is used in this example) | ||
| − | * Access Points (Any WiFi-capable RUTOS device. RUTX11 ( | + | * Access Points (Any WiFi-capable RUTOS device. RUTX11 (Router 1) and RUTX11 (Router 2) are used in this example) |
| + | |||
| + | Before you start configuring the router <b>turn on "Advanced WebUI" mode</b>. You can do that by clicking the "Basic" button under "Mode", which is located at the top-right corner of the WebUI. | ||
| + | |||
| − | + | [[File:Networking_rutx_manual_webui_basic_advanced_mode_v1.gif|border|class=tlt-border]] | |
| − | | | ||
| − | |||
==Configuration== | ==Configuration== | ||
| − | [[File:Networking rutos configuration | + | [[File:Networking rutos configuration examples wifi roaming configuration scheme v2.png|border|class=tlt-border]] |
===Gateway router=== | ===Gateway router=== | ||
| − | |||
| − | |||
---- | ---- | ||
Login to the router's WebUI, navigate to the '''Network → Interfaces → Edit LAN''' page. Enter main gateway's IP address and save. We will leave it default (192.168.1.1) for this example. Enter IP address on the same subnet as main gateway. We will use 192.168.1.2 for Router 1 and 192.168.1.3 for Router 2 in this example. | Login to the router's WebUI, navigate to the '''Network → Interfaces → Edit LAN''' page. Enter main gateway's IP address and save. We will leave it default (192.168.1.1) for this example. Enter IP address on the same subnet as main gateway. We will use 192.168.1.2 for Router 1 and 192.168.1.3 for Router 2 in this example. | ||
| Line 30: | Line 29: | ||
</ol> | </ol> | ||
</ol> | </ol> | ||
| − | [[File:Networking rutx50 webui lan configuration v2.png | + | [[File:Networking rutx50 webui lan configuration v2.png|border|class=tlt-border]] |
| − | |||
| − | |||
Navigate to the '''Network → Wireless → SSIDs''' page. Configures as follows: | Navigate to the '''Network → Wireless → SSIDs''' page. Configures as follows: | ||
<ol> | <ol> | ||
| Line 40: | Line 37: | ||
<li>Enter '''Password'''</li> | <li>Enter '''Password'''</li> | ||
<li>Enable '''802.11r Fast Transition'''</li> | <li>Enable '''802.11r Fast Transition'''</li> | ||
| − | + | [[File:Networking rutx50 webui wirless ssid configuration v1.png|border|class=tlt-border]] | |
| − | [[File:Networking rutx50 webui wirless ssid configuration v1.png | ||
Navigate to the '''Fast Transition''' section | Navigate to the '''Fast Transition''' section | ||
| − | |||
<ol> | <ol> | ||
| − | <li>Enter ''' | + | <li>Enter '''NASID''': 1 (Nas ID of each device must be unique)</li> |
| − | + | <li>Enter '''Mobile Domain''': 4f57 ()</li> | |
| − | < | + | [[File:Networking rutx50 webui wireless ssid 802.11r FT configuration v1.png|border|class=tlt-border]] |
| − | |||
| − | [[File:Networking rutx50 webui wireless ssid 802.11r FT configuration v1.png | ||
| − | To reduce the posbility of interference between 2 AP/WiFi Router, Highly recommend that set radio channel manually. | + | To reduce the posbility of interference between 2 AP/WiFi Router, Highly recommend that set radio channel manually. |
Navigate to the '''Network → Wireless → Radio → Edit 2.4GHz'''. Configures as follows: | Navigate to the '''Network → Wireless → Radio → Edit 2.4GHz'''. Configures as follows: | ||
<ol> | <ol> | ||
| − | <li>Select '''Channel''': 11< | + | <li>Select '''Channel''': 11<li> |
| − | + | [[File:Networking rutx50 webui wireless radio channel configuration v1.png|border|class=tlt-border]] | |
| − | |||
| − | [[File:Networking rutx50 webui wireless radio channel configuration v1.png | ||
| − | |||
| − | |||
| − | |||
| − | |||
| − | |||
| − | |||
| − | |||
| − | |||
| − | |||
| − | |||
| − | |||
| − | |||
| − | |||
| − | |||
| − | |||
| − | |||
| − | |||
| − | |||
| − | |||
| − | |||
| − | |||
| − | |||
| − | |||
| − | |||
| − | |||
| − | |||
| − | |||
| − | |||
| − | |||
| − | |||
| − | |||
| − | |||
| − | |||
| − | |||
| − | |||
| − | |||
| − | |||
| − | |||
| − | |||
| − | |||
| − | |||
| − | |||
| − | |||
| − | |||
| − | |||
| − | |||
| − | |||
| − | |||
| − | |||
| − | |||
| − | |||
| − | |||
| − | |||
| − | |||
| − | |||
| − | |||
| − | |||
| − | |||
| − | |||
| − | |||
| − | |||
| − | |||
| − | |||
| − | |||
| − | |||
| − | |||
| − | |||
| − | |||
Revision as of 07:58, 26 September 2024
Introduction
This article provides a basic configuration example of 802.11r WiFi roaming.
Firmwware
The information in this page is updated in accordance with 00.07.09 firmware version. .
Prerequisites
- Main gateway with WAN access (Any RUTOS router. RUTX50 is used in this example)
- Access Points (Any WiFi-capable RUTOS device. RUTX11 (Router 1) and RUTX11 (Router 2) are used in this example)
Before you start configuring the router turn on "Advanced WebUI" mode. You can do that by clicking the "Basic" button under "Mode", which is located at the top-right corner of the WebUI.

Configuration

Gateway router
Login to the router's WebUI, navigate to the Network → Interfaces → Edit LAN page. Enter main gateway's IP address and save. We will leave it default (192.168.1.1) for this example. Enter IP address on the same subnet as main gateway. We will use 192.168.1.2 for Router 1 and 192.168.1.3 for Router 2 in this example.
- Connect your AP/WiFi router to the gateway router using LAN to LAN connection.
- Login to the router's WebUI, navigate to the Network → Interfaces → Edit LAN page. Configure as follows:
- Enter IPv4 address. We will use our gateway router's IP - 192.168.1.1.

Navigate to the Network → Wireless → SSIDs page. Configures as follows:
- Select radios to 2.4Ghz
- Enter SSID: WiFi_Roaming
- Enter Password
- Enable 802.11r Fast Transition
- Enter NASID: 1 (Nas ID of each device must be unique)
- Enter Mobile Domain: 4f57 ()
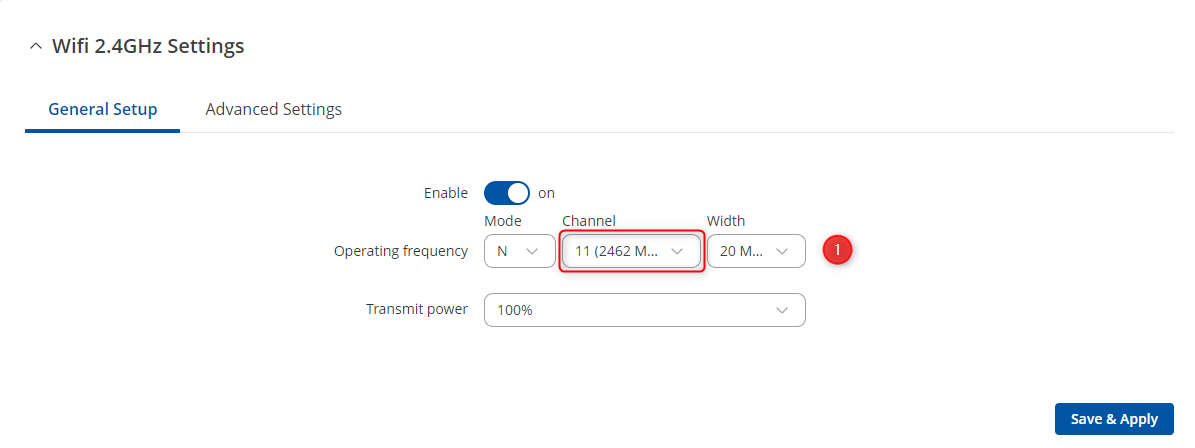
- Select Channel: 11
-
 Navigate to the Fast Transition section
 To reduce the posbility of interference between 2 AP/WiFi Router, Highly recommend that set radio channel manually.
Navigate to the Network → Wireless → Radio → Edit 2.4GHz. Configures as follows:
To reduce the posbility of interference between 2 AP/WiFi Router, Highly recommend that set radio channel manually.
Navigate to the Network → Wireless → Radio → Edit 2.4GHz. Configures as follows:


