|
|
| (2 intermediate revisions by the same user not shown) |
| Line 1: |
Line 1: |
| [[IPSec Tunnel w/CA Certs Configuration]] | | <p style="color:red">The information on this page is updated in accordance with the [https://wiki.teltonika-networks.com/view/FW_%26_SDK_Downloads'''00.07.09'''] firmware version .</p> |
|
| |
|
| ==Introduction== | | ==Introduction== |
|
| |
|
| In computing, '''Internet Protocol Security''' ('''IPsec''') is a secure network protocol suite of IPv4 that authenticates and encrypts the packets of data sent over an IPv4 network. IPsec includes protocols for establishing mutual authentication between agents at the beginning of the session and negotiation of cryptographic keys to use during the session. IPsec can protect data flows between a pair of hosts (host-to-host), between a pair of security gateways (network-to-network), or between a security gateway and a host (network-to-host). Internet Protocol security (IPsec) uses cryptographic security services to protect communications over Internet Protocol (IP) networks. IPsec supports network-level peer authentication, data-origin authentication, data integrity, data confidentiality (encryption), and replay protection.
| | This article contains step-by-step instructions on how to set up bidirectional communication between two serial RS232 devices over TCP/IP. |
|
| |
|
| This article provides an extensive configuration example with details on how to create a tunnel connection authenticating with X.509 Certs between two IPsec instances, both of which configured on RUTxxx routers.
| | ==Configuration overview & prerequisites== |
|
| |
|
| ==Configuration overview and prerequisites==
| | End devices are connected to separate RUT956 routers through RS232 connection, and client connects to the server through its Public IP address. |
|
| |
|
| Before we begin, let's overview the configuration that we are attempting to achieve and the prerequisites that make it possible.
| | [[File:OverIP Client Server network topology.png|border|class=tlt-border|1005px]] |
|
| |
|
| '''Prerequisites''': | | '''Prerequisites''': |
| * Two RUTxxx routers of any type
| |
| * Both RUTxxx routers must be accessible from each other's WAN connection
| |
| * Firmware for the devices must be 00.07.xx.x or above. This is in part to make sure the StrongSwan service is U5.9.6 or >
| |
| * An end device (PC, Laptop) for configuration
| |
| * (Optional) A second end device to test remote LAN access
| |
| ----
| |
|
| |
| [Image Here showing RUT1 & RUT2 connected via Wan connection]
| |
| [RUT1 Wan IP: 192.168.1.3 Lan IP: 192.168.3.1]
| |
| [RUT2 Wan IP: 192.168.1.14 Lan IP: 192.168.14.1]
| |
|
| |
| The figure above depicts two RUTxxx routers (RUT1 and RUT2) connected by an IPsec tunnel via their WAN interfaces.
| |
|
| |
|
| ==Router configuration== | | *Two devices with RS232 support |
| | *Two end devices (PCs or RS232 devices able to send and receive data, here we will be using PCs with serial simulators) |
| | *Over IP Server must have a SIM card with a Public Static or Public Dynamic IP address (more on IP address types here) to make remote access possible |
| | {{Template:Networking_rutos_manual_basic_advanced_webui_disclaimer |
| | | series = RUTX |
| | }} |
|
| |
|
| We will start our configuration with RUT1.
| | ==Over IP Server== |
|
| |
|
| This configuration guide will generate our own CA cert that will be used to self-sign our own keys and local certs for both devices.
| | ====Obtaining Public IP: Set an APN==== |
| | |
| ===Generating Certs=== | |
| ---- | | ---- |
| | In this example we are using Public IPs, it also works with Private IPs if routers are in same LAN |
|
| |
|
| | '''Note:''' If you have a Public IP address already, you can skip this step. |
|
| |
|
| ====Generating CA Cert====
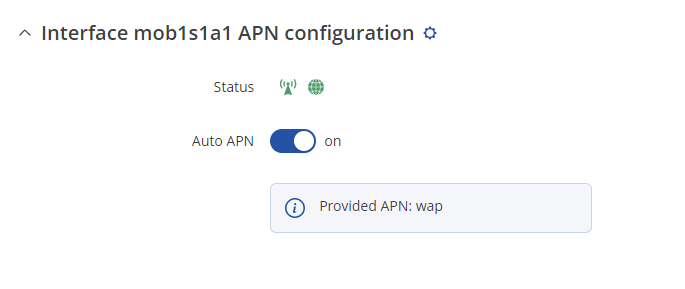
| | To set the APN, while in the router's WebUI, navigate to the '''Network → Mobile → General → Interface mob1s1a1 APN configuration''': |
| ----
| |
| | |
| First we will generate our CA cert.
| |
| | |
| * Login to the router's WebUI and go to '''System → Administration → Certificates'''.
| |
| The following are the settings used for this example, but values should be changed depending on your specific needs:
| |
| | |
| - File Type: '''''CA'''''
| |
| | |
| - Key Size: '''''1024'''''
| |
| | |
| - Name (CN): '''''CAIPSec''''' // This can be whatever name you choose.
| |
| | |
| - Subject Information: '''''Toggled On''''' // It is recommended to fill out at least Country Code, State/Province and Organization Name.
| |
| | |
| - Country Code (CC): '''''US''''' // Fill your country code
| |
| | |
| - State or Province Name (ST): '''''TX''''' // Fill your State/Province name
| |
| | |
| - Locality Name (L): '''''CAIPSec''''' // Fill your locality name, or at least a recognizable name for your CA
| |
| | |
| - Organization Name (O): '''''CAIPSec''''' // Fill your Organization name
| |
| | |
| - Organizational Unit Name (OU): '''''CAIPSEC''''' // Fill your specific Unit Name
| |
|
| |
|
| - '''''Generate''''' Certificate | | [[File:Set APN PF.png|border|class=tlt-border|alt=]] |
| <br>
| |
|
| |
|
| [[File:IPSec CA Cert Generating.png|frame|none]]
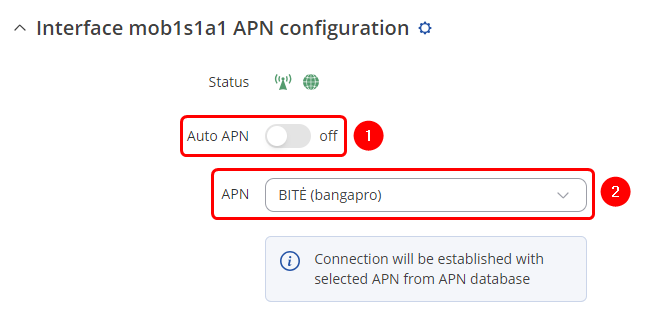
| | Once in the '''Interface mob1s1a1 APN configuration''' window, edit your mobile interface, find the '''APN''' field and enter you Internet Service Provider's APN: |
| | # '''Disable the Auto APN option''' |
| | # Choose the correct '''APN''', which gives out a public IP address (for more information about that contact your Internet Service Provider) |
|
| |
|
| <br>
| | [[File:Set APN PF APN selected.png|border|class=tlt-border]] |
| After you hit Generate the CA cert you should see a confirmation notification pop-up near the top right, and if you select Certificates Manager you should see a CAIPSec.key.pem under *Keys* and a CAIPSec.req.pem under *Certificate requests*.
| |
| <br>
| |
|
| |
|
| [[File:IPSec CA Cert Generating Confirmation.png|frame|none]]
| | Additional notes on APN: |
| [[File:IPSec CA Cert Generating Manager Check.png|frame|none]]
| | * '''NOTE 1''': don't use the exact APN value as seen in the example above as it will not work with your SIM card. APN depends on your Internet Service Provider (ISP), therefore, your ISP should provide you with their APN or, in many case, you can find your ISP's APN with an online search. |
| | * '''NOTE 2''': furthermore, it should be noted that not all SIM cards support this functionality. Static or Dynamic Public IP addresses (obtained through APN) are a paid service and setting any APN value for a SIM card that doesn't support this service will most likely result in losing your data connection. If this is the case, it can be fixed by simply deleting the APN, but it also means that remote access through mobile WAN IP will most likely not work on your SIM card. |
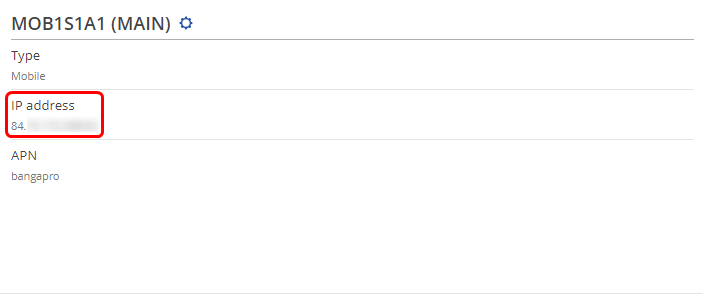
| | * '''NOTE 3''': in some cases the SIM card doesn't require an APN in order to obtain a Public IP address. If that is the case for you, simply check what your router's mobile WAN IP address is - if it's already a Public IP address, then you don't need to set an APN. The easiest way to find what your mobile WAN IP address is to log in to the router's WebUI and check the '''MOB1S1A1''' widget in the '''Overview''' page: |
|
| |
|
| <br>
| | [[File:Where public IP.png|border|class=tlt-border]] |
| Next we need to sign the CAIPSec CA. We will be Self-Signing our own CA.
| |
| Under the '''Certificate signing''' configure as follows:
| |
|
| |
|
| - Signed Certificate Name: '''''CAIPSec'''''
| |
|
| |
|
| - Type of Certificate to Sign: '''''Certificate Authority'''''
| | ===Over IP Server RS232 configuration=== |
| | |
| - Certificate Request File: '''''CAIPSec.req.pem'''''
| |
| | |
| - Days Valid: '''''3650''''' // For this example we will use 3650 days, but you can configure this to be longer if needed. I would caution against too long of a CA.
| |
| | |
| - Certificate Authority Key: '''''CAIPSec.key.pem'''''
| |
| | |
| - Leave the rest of the configuration default
| |
| | |
| - '''''Sign'''''
| |
| <br>
| |
| | |
| [[File:IPSec CA Cert Signing.png|frame|none]]
| |
| | |
| <br>
| |
| After you hit *Sign* the CA cert you should see a notification pop-up near the top right, and if you select Certificates Manager you should see a CAIPSec.cert.pem under *Certificates*.
| |
| <br>
| |
| | |
| [[File:IPSec CA Cert Generating Confirmation2.png|frame|none]]
| |
| <br>
| |
| | |
| ====Generating Rut1 Client Cert==== | |
| ---- | | ---- |
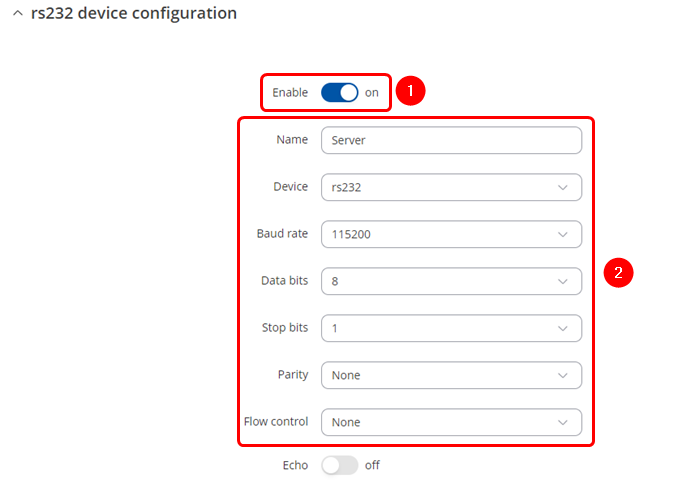
| | Navigate to the Over IP tab by going to '''Services → Serial Utilities → Over IP''' . Insert desired name and select RS232. Make sure to '''enable the instance''' '''(1)''' and '''configure Serial port in accordance''' '''(2)''' to connected device, these should match on both routers to avoid miscommunication. |
|
| |
|
| * Login to the router's WebUI and go to '''System → Administration → Certificates'''.
| | [[File:OverIP Sever serial config.png|border|class=tlt-border]] |
| The following are the settings used for this example, but values should be changed depending on your specific needs:
| |
|
| |
|
| - File Type: '''''Client'''''
| |
|
| |
|
| - Key Size: '''''1024'''''
| | ===Over IP Server configuration=== |
| | |
| - Name (CN): '''''RUT1''''' // This can be whatever name you choose.
| |
| | |
| - Subject Information: '''''Toggled On''''' // It is recommended to fill out at least Country Code, State/Province and Organization Name.
| |
| | |
| - Country Code (CC): '''''US''''' // Fill your country code
| |
| | |
| - State or Province Name (ST): '''''TX''''' // Fill your State/Province name
| |
| | |
| - Locality Name (L): '''''RUT1''''' // Fill your locality name, or at least a recognizable name for your CA
| |
| | |
| - Organization Name (O): '''''RUT1''''' // Fill your Organization name
| |
| | |
| - Organizational Unit Name (OU): '''''RUT1''''' // Fill your specific Unit Name
| |
| | |
| - '''''Generate''''' Certificate
| |
| <br>
| |
| | |
| [[File:IPSec RUT1 Cert Generating.png|frame|none]]
| |
| | |
| <br>
| |
| After you hit Generate the Client cert you should see a notification pop-up near the top right, and if you select Certificates Manager you should see a RUT1.key.pem under *Keys* and a RUT1.req.pem under *Certificate requests*.
| |
| <br>
| |
| | |
| [[File:IPSec RUT1 Cert Generating Confirmation.png|frame|none]]
| |
| | |
| <br>
| |
| | |
| Next we need to sign the RUT1 cert.
| |
| Under the `Certificate signing` configure as follows:
| |
| | |
| - Signed Certificate Name: '''''RUT1'''''
| |
| | |
| - Type of Certificate to Sign: '''''Client Certificate'''''
| |
| | |
| - Certificate Request File: '''''RUT1.req.pem'''''
| |
| | |
| - Days Valid: '''''3650'''''
| |
| | |
| - Certificate Authority File: '''''CAIPSec.cert.pem'''''
| |
| | |
| - Certificate Authority Key: '''''CAIPSec.key.pem'''''
| |
| | |
| - Leave the rest of the configuration alone
| |
| | |
| - '''''Sign'''''
| |
| <br>
| |
| | |
| [[File:IPSec RUT1 Cert Signing.png|frame|none]]
| |
| | |
| <br>
| |
| After you hit *Sign* the Client cert you should see a notification pop-up near the top right, and if you select Certificates Manager you should see a RUT1.cert.pem under *Certificates*.
| |
| <br>
| |
| | |
| [[File:IPSec RUT1 Cert Manager Check.png|frame|none]]
| |
| | |
| <br>
| |
| | |
| ====Generating Rut2 Client Cert==== | |
| ---- | | ---- |
| | After applying RS232 configuration scroll down and configure Over IP Server: |
|
| |
|
| We will still generate RUT2 certs on the RUT1 device, so that we can sign our certs with the CA created earlier.
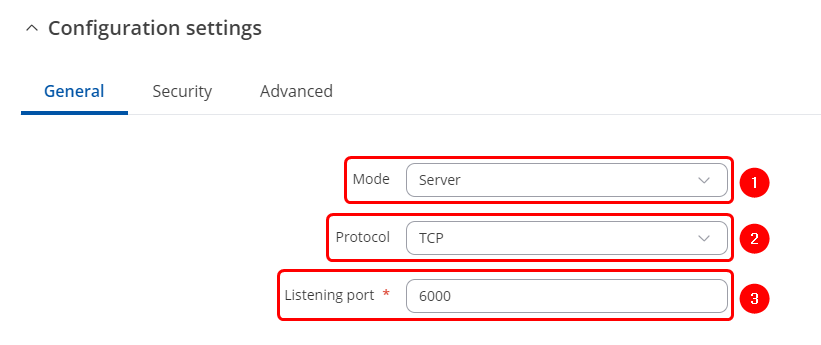
| | # Mode '''Server'''- the device waits for incoming connections. |
| Later we will download the certs required for RUT2 and import them there.
| | # Select a desired protocol, '''TCP or UDP'''. |
| | # '''TCP/UDP port''' - specify desired port. |
|
| |
|
| * Login to the router's WebUI and go to '''System → Administration → Certificates'''.
| | [[File:OverIP TCP server configuration port.png|border|class=tlt-border]] |
| The following are the settings used for this example, but values should be changed depending on your specific needs:
| |
|
| |
|
| - File Type: '''''Client'''''
| |
|
| |
|
| - Key Size: '''''1024'''''
| | ===IP Filter=== |
| | |
| - Name (CN): '''''RUT2''''' // This can be whatever name you choose.
| |
| | |
| - Subject Information: '''''Toggled On''''' // It is recommended to fill out at least Country Code, State/Province and Organization Name.
| |
| | |
| - Country Code (CC): '''''US''''' // Fill your country code
| |
| | |
| - State or Province Name (ST): '''''TX''''' // Fill your State/Province name
| |
| | |
| - Locality Name (L): '''''RUT2''''' // Fill your locality name, or at least a recognizable name for your CA
| |
| | |
| - Organization Name (O): '''''RUT2''''' // Fill your Organization name
| |
| | |
| - Organizational Unit Name (OU): '''''RUT2''''' // Fill your specific Unit Name
| |
| | |
| - '''''Generate''''' Certificate
| |
| <br>
| |
| | |
| [[File:IPSec RUT2 Cert Generating.png|frame|none]]
| |
| | |
| <br>
| |
| After you hit Generate the Client cert you should see a notification pop-up near the top right, and if you select Certificates Manager you should see a RUT2.key.pem under *Keys* and a RUT2.req.pem under *Certificate requests*.
| |
| <br>
| |
| | |
| [[File:IPSec RUT2 Cert Generating Confirmation.png|frame|none]]
| |
| | |
| <br>
| |
| Next we need to sign the RUT2 cert.
| |
| Under the `Certificate signing` configure as follows:
| |
| | |
| - Signed Certificate Name: '''''RUT2'''''
| |
| | |
| - Type of Certificate to Sign: '''''Client Certificate'''''
| |
| | |
| - Certificate Request File: '''''RUT2.req.pem'''''
| |
| | |
| - Days Valid: '''''3650'''''
| |
| | |
| - Certificate Authority File: '''''CAIPSec.cert.pem'''''
| |
| | |
| - Certificate Authority Key: '''''CAIPSec.key.pem'''''
| |
| | |
| - Leave the rest of the configuration alone
| |
| | |
| - '''''Sign'''''
| |
| <br>
| |
| | |
| [[File:IPSec RUT2 Cert Signing.png|frame|none]]
| |
| | |
| <br>
| |
| After you hit *Sign* the Client cert you should see a notification pop-up near the top right, and if you select Certificates Manager you should see a RUT2.cert.pem under *Certificates*.
| |
| <br>
| |
| | |
| [[File:IPSec RUT2 Cert Manager Check.png|frame|none]]
| |
| | |
| <br>
| |
| ====Download/Import Certs==== | |
| ---- | | ---- |
|
| |
|
| Starting with RUT1
| | Once finished the above configuration, add interfaces through which routers will be communicating, You can add IP address that will be allowed to connect or enter 0.0.0.0 to allow all connections coming through correct port. |
|
| |
|
| * Login to the router's WebUI and go to '''System → Administration → Certificates -> Certificates Manager'''
| | [[File:OverIP TPC Server IP filter.png|border|class=tlt-border]] |
| * Download CAIPSec.cert.pem, RUT1.cert.pem, RUT1.key.pem, RUT2.cert.pem & RUT2.key.pem
| |
| * Go to '''System → Administration → Certificates -> Root CA'''. Toggle '''On'''. Select '''CAIPSec.cert.pem''' -> '''Upload''' & then '''Save'''
| |
|
| |
|
| Next moving to RUT2
| |
|
| |
|
| * Login to the router's WebUI and go to '''System → Administration → Certificates -> Certificates Manager'''
| | ==OverIP Client== |
| * Import Certificate File *Browse* and import CAIPSec.cert.pem, RUT1.cert.pem, RUT2.cert.pem & RUT2.key.pem
| |
| * Go to '''System → Administration → Certificates -> Root CA'''. Toggle '''On'''. Select '''CAIPSec.cert.pem''' -> '''Upload''' & then '''Save'''
| |
|
| |
|
| ===IPSec RUT1 Config=== | | ===OverIP Server RS232 configuration=== |
| ---- | | ---- |
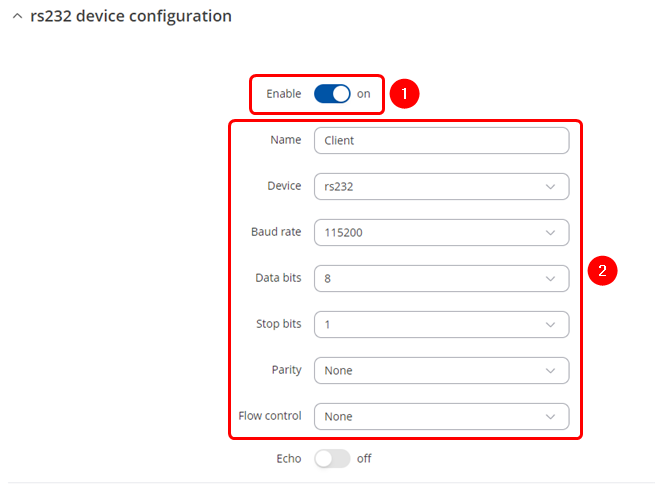
| | Navigate to the OverIP tab by going to '''Services → Serial Utilities → OverIP''' . Insert desired name and select RS232. Make sure to '''enable the instance''' '''(1)''' and '''configure Serial port in accordance''' '''(2)''' to connected device, these should match on both routers to avoid miscommunication. |
|
| |
|
| * Login to the router's WebUI and go to '''System → Services → VPN -> IPsec'''
| | [[File:OverIP Client serial config.png|border|class=tlt-border]] |
| * Add a new instance called '''CA_EX'''
| |
| <br>
| |
| | |
| [[File:IPSec RUT1 Config Add CA EX.png|frame|none]] | |
| | |
| <br>
| |
| * IPsec Instance General settings configuration as follows:
| |
|
| |
| - Remote endpoint: '''''192.168.1.14''''' // This should be RUT2 WAN IP. You should be able to ping this IP from RUT1 WAN IP.
| |
| | |
| - Authentication method: '''''X.509'''''
| |
| | |
| - Key: '''''RUT1.key.pem''''' // Browse and import the RUT1.key.pem we created & downloaded earlier.
| |
| | |
| - Key decryption passphrase: Leave blank // This is only needed if an additional password was added to the cert, which we did not do in our earlier steps.
| |
| | |
| - Local certificate: '''''RUT1.cert.pem''''' // Browse and import the RUT1.cert.pem we created & downloaded earlier.
| |
| | |
| - CA certificate: '''''CAIPSec.cert.pem''''' // Browse and import the CAIPSec.cert.pem we created & downloaded earlier.
| |
| | |
| - Local identifier: '''''192.168.3.1''''' // We will use the LAN IP of RUT1 for the Identifier
| |
| | |
| - Remote identifier: '''''192.168.14.1''''' // We will use the LAN IP of RUT2 for the Identifier
| |
| <br>
| |
| | |
| [[File:RUT1 IPSec Instance General Settings Configuration.png|frame|none]]
| |
| | |
| <br>
| |
| | |
| * IPsec Instance Advanced settings configuration as follows:
| |
|
| |
| - Remote certificate: '''''RUT2.cert.pem''''' // Upload RUT2 cert we created earlier.
| |
| <br>
| |
| | |
| [[File:RUT1 IPSec Instance Advanced Settings Configuration.png|frame|none]]
| |
| | |
| <br>
| |
| | |
| * Connection settings General settings configuration as follows:
| |
| | |
| - Mode: '''''Start''''' // start loads a connection and brings it up immediately. For more configuration information please reference *auto* here (https://wiki.strongswan.org/projects/strongswan/wiki/Connsection)
| |
| | |
| - Type: '''''Tunnel'''''
| |
| | |
| - Default route: '''''off''''' // Only use this if you want your default route to be out this tunnel.
| |
| | |
| - Local subnet: '''''192.168.3.0/24''''' // RUT1 LAN subnet we want access to through the tunnel
| |
| | |
| - Remote subnet: '''''192.168.14.0/24''''' // RUT2 LAN subnet we want access to through the tunnel
| |
| | |
| - Key exchange: '''''IKEv2'''''
| |
| <br>
| |
| | |
| [[File:RUT1 IPSec Connection Settings General Settings Configuration.png|frame|none]]
| |
| | |
| <br>
| |
| | |
| * Connection settings Advanced settings configuration as follows:
| |
| | |
| - Force encapsulation: '''''On'''''
| |
| | |
| - Local Firewall: '''''On'''''
| |
| | |
| - Remote Firewall: '''''On'''''
| |
| | |
| - Inactivity: '''''3600''''' // This is in seconds. Can be changed depending on how often you want the tunnel to be checked for data passing.
| |
| | |
| - Dead peer detection: '''''On'''''
| |
| | |
| - DPD action: '''''Restart'''''
| |
| | |
| - DPD delay: '''''30''''' // This is in seconds.
| |
| | |
| - DPD Timeout: '''''150''''' // This is in seconds.
| |
| | |
| - The rest of the configuration leave as default
| |
| | |
| <br>
| |
| | |
| [[File:RUT1 IPSec Connection Settings Advanced Settings Configuration.png|frame|none]]
| |
| | |
| <br>
| |
| | |
| * Connection settings Proposal settings configuration as follows:
| |
| | |
| * Phase 1
| |
| - Proposals // It is VERY important that these settings match between both RUT1 & RUT2
| |
| - Encryption: '''''AES 128'''''
| |
| | |
| - Authentication: '''''SHA1'''''
| |
| | |
| - DH group: '''''MODP1536'''''
| |
| | |
| - Force crypto proposal: '''''Off'''''
| |
| | |
| - IKE lifetime: '''''3h'''''
| |
| <br>
| |
|
| |
|
| [[File:RUT1 IPSec Proposal Settings Phase1.png|frame|none]]
| |
|
| |
|
| <br>
| | ===OverIP Client configuration=== |
| | |
| * Phase 2
| |
| - Proposals // It is VERY important that these settings match between both RUT1 & RUT2
| |
| - Encryption: '''''AES 128'''''
| |
| | |
| - Hash: '''''SHA1'''''
| |
| | |
| - PFS group: '''''MODP1536'''''
| |
| | |
| - Force crypto proposal: '''''Off'''''
| |
| | |
| - IKE lifetime: '''''3h'''''
| |
| <br>
| |
| | |
| [[File:RUT1 IPSec Proposal Settings Phase2.png|frame|none]]
| |
| | |
| <br>
| |
| | |
| * Hit '''''Save & Apply'''''
| |
| * Toggle the CA_EX tunnel on and hit '''''Save & Apply''''' once more
| |
| <br>
| |
| [[File:RUT1 IPSec Toggle On Save And Apply.png|frame|none]]
| |
| | |
| <br>
| |
| * Reboot the device once you have finished.
| |
| | |
| | |
| ===IPSec RUT2 Config=== | |
| ---- | | ---- |
| | After applying RS232 configuration scroll down and configure Over IP Server: |
|
| |
|
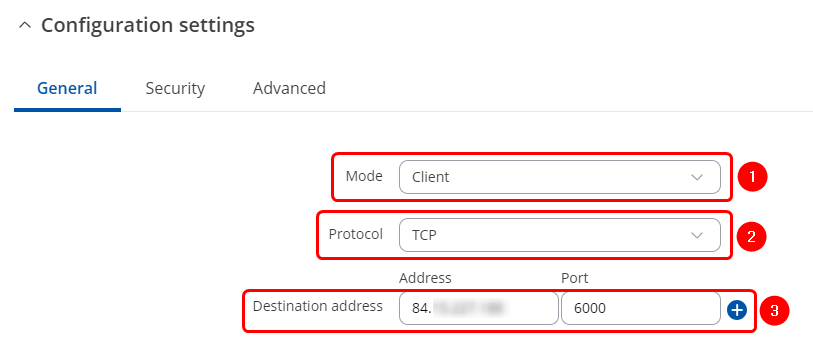
| | # Mode '''Client''' – the device initiates the connection. |
| | # Select a desired protocol, '''TCP or UDP'''. |
| | # '''Address''' is the Over IP Sever Public IP address. '''Port''' is the port we have configured on the Over IP Server device. |
|
| |
|
| * Login to the router's WebUI and go to '''System → Services → VPN -> IPsec'''
| | [[File:OverIP TCP Client configuration IP port.png|border|class=tlt-border]] |
| * Add a new instance called '''CA_EX'''
| |
| <br>
| |
| | |
| [[File:IPSec_RUT1_Config_Add_CA_EX.png|frame|none]] | |
| | |
| <br>
| |
| | |
| * IPsec Instance General settings configuration as follows:
| |
|
| |
| - Remote endpoint: '''''192.168.1.3''''' // This should be RUT1 WAN IP. You should be able to ping this IP from RUT2 WAN IP.
| |
| | |
| - Authentication method: '''''X.509'''''
| |
| | |
| - Key: '''''RUT2.key.pem''''' // Browse and import the RUT2.key.pem we created & downloaded earlier.
| |
| | |
| - Key decryption passphrase: Leave blank // This is only needed if an additional password was added to the cert, which we did not do in our earlier steps.
| |
| | |
| - Local certificate: '''''RUT2.cert.pem''''' // Browse and import the RUT1.cert.pem we created & downloaded earlier.
| |
| | |
| - CA certificate: '''''CAIPSec.cert.pem''''' // Browse and import the CAIPSec.cert.pem we created & downloaded earlier.
| |
| | |
| - Local identifier: '''''192.168.14.1''''' // We will use the LAN IP of RUT2 for the Identifier
| |
| | |
| - Remote identifier: '''''192.168.3.1''''' // We will use the LAN IP of RUT1 for the Identifier
| |
| <br>
| |
| | |
| [[File:RUT2 IPSec Instance General Settings Configuration.png|frame|none]]
| |
| | |
| <br>
| |
| | |
| * Connection settings Advanced settings configuration as follows:
| |
|
| |
| - Remote certificate: '''''RUT1.cert.pem''''' // Upload RUT1 cert we created earlier.
| |
| <br>
| |
| | |
| [[File:RUT2 IPSec Instance Advanced Settings Configuration.png|frame|none]]
| |
| | |
| <br>
| |
| | |
| * Connection settings General settings configuration as follows:
| |
| | |
| - Mode: '''''Start''''' // start loads a connection and brings it up immediately. For more configuration information please reference *auto* here (https://wiki.strongswan.org/projects/strongswan/wiki/Connsection)
| |
| | |
| - Type: '''''Tunnel'''''
| |
| | |
| - Default route: '''''off''''' // Only use this if you want your default route to be out this tunnel.
| |
| | |
| - Local subnet: '''''192.168.14.0/24''''' // RUT2 LAN subnet we want access to through the tunnel
| |
| | |
| - Remote subnet: '''''192.168.3.0/24''''' // RUT1 LAN subnet we want access to through the tunnel
| |
| | |
| - Key exchange: '''''IKEv2'''''
| |
| <br>
| |
| | |
| [[File:RUT2 IPSec Connection Settings General Settings Configuration.png|frame|none]]
| |
| | |
| <br>
| |
| | |
| * Connection settings Advanced settings configuration as follows:
| |
| | |
| - Force encapsulation: '''''On'''''
| |
| | |
| - Local Firewall: '''''On'''''
| |
| | |
| - Remote Firewall: '''''On'''''
| |
| | |
| - Inactivity: '''''3600''''' // This is in seconds. Can be changed depending on how often you want the tunnel to be checked for data passing.
| |
| | |
| - Dead peer detection: '''''On'''''
| |
| | |
| - DPD action: '''''Restart'''''
| |
| | |
| - DPD delay: '''''30''''' // This is in seconds.
| |
| | |
| - DPD Timeout: '''''150''''' // This is in seconds.
| |
| | |
| - The rest of the configuration leave as default
| |
| <br>
| |
| | |
| [[File:RUT2 IPSec Connection Settings Advanced Settings Configuration.png|frame|none]]
| |
| | |
| <br>
| |
| | |
| * Connection settings Proposal settings configuration as follows:
| |
| | |
| * Phase 1
| |
| - Proposals // It is VERY important that these settings match between both RUT1 & RUT2
| |
| - Encryption: '''''AES 128'''''
| |
| | |
| - Authentication: '''''SHA1'''''
| |
| | |
| - DH group: '''''MODP1536'''''
| |
| | |
| - Force crypto proposal: '''''Off'''''
| |
| | |
| - IKE lifetime: '''''3h'''''
| |
| <br>
| |
| | |
| [[File:RUT2 IPSec Proposal Settings Phase1.png|frame|none]]
| |
| | |
| <br>
| |
| | |
| * Phase 2
| |
| - Proposals // It is VERY important that these settings match between both RUT1 & RUT2
| |
| - Encryption: '''''AES 128'''''
| |
|
| |
| - Hash: '''''SHA1'''''
| |
|
| |
| - PFS group: '''''MODP1536'''''
| |
|
| |
| - Force crypto proposal: '''''Off'''''
| |
| | |
| - IKE lifetime: '''''3h'''''
| |
| <br>
| |
| | |
| [[File:RUT2 IPSec Proposal Settings Phase2.png|frame|none]]
| |
| | |
| <br>
| |
| | |
| * Hit '''''Save & Apply'''''
| |
| * Toggle the CA_EX tunnel on and hit '''''Save & Apply''''' once more
| |
| <br>
| |
| | |
| [[File:RUT2 IPSec Toggle On Save And Apply.png|frame|none]]
| |
| | |
| <br>
| |
| | |
| * Reboot the device once you have finished.
| |
| | |
|
| |
|
| ==Testing configuration== | | ==Testing configuration== |
| ----
| |
|
| |
| ===RUT1 to RUT2 Test===
| |
| ----
| |
|
| |
| Here we will check via SSH on both RUT1 & RUT2 devices that the IPsec tunnel has been established.
| |
| That each RUT device can ping the other's LAN IP. In this case 192.168.3.1 for RUT1 & 192.168.14.1 for RUT2.
| |
| And that LAN device on RUT1 can ping LAN device on RUT2.
| |
|
| |
| * First make sure each device has been rebooted at least once after you have finished configuring the previous steps.
| |
| * SSH into RUT1 device
| |
| * '''''ipsec statusall''''' // This should show 2 up with Security Associations and that the connection should be up for some minutes. You should also see the Cert info from the certs we created earlier.
| |
| <br>
| |
|
| |
| [[File:RUT1 IPSec Status.png|frame|none]]
| |
|
| |
| <br>
| |
| * '''''ping 192.168.14.1''''' // You should get a response if the tunnel has established properly
| |
| <br>
| |
|
| |
| [[File:RUT1 Ping To RUT2 Check.png|frame|none]]
| |
|
| |
| <br>
| |
|
| |
| * SSH into RUT2 device
| |
| * '''''ipsec statusall''''' // This should show 2 up with Security Associations and that the connection should be up for some minutes. You should also see the Cert info from the certs we created earlier.
| |
| <br>
| |
|
| |
| [[File:RUT2 IPSec Status.png|frame|none]]
| |
|
| |
| <br>
| |
|
| |
| * '''''ping 192.168.3.1''''' // You should get a response if the tunnel has established properly
| |
| <br>
| |
|
| |
| [[File:RUT2 Ping To RUT1 Check.png|frame|none]]
| |
|
| |
| <br>
| |
|
| |
| * SSH into RUT1 device
| |
| * '''''opkg update'''''
| |
| * '''''opkg install tcpdump'''''
| |
| * '''''tcpdump -i any -w Checking_For_ESP_Packets.pcap'''''
| |
| * SSH into RUT2 device
| |
| * On RUT2 ping the LAN ip for RUT1 and leave that running. In our example that would be `ping 192.168.3.1`
| |
| * On RUT1 wait 10 seconds then CTRL+C to stop the program
| |
| * Then use a program like WinSCP to download '''Checking_For_ESP_Packets.pcap''' from RUT1
| |
| * Open the file in a program called Wireshark and filter for encrypted ESP packets with this '''_ws.col.protocol == "ESP"'''. You should see ESP packets from both the WAN IPs. You shouldn't be able to see inside the packet because it is now encrypted, but if we decrypted the packets we would see the ICMP packets between the 2 RUT devices.
| |
| <br>
| |
|
| |
| [[File:Checking Pcap With Wireshark.png|frame|none]]
| |
|
| |
| <br>
| |
|
| |
| ===RUT1 LAN device to RUT2 LAN device Test===
| |
| ----
| |
|
| |
| Here we will confirm that LAN devices behind either RUTxxx devices are able to communicate with each other.
| |
|
| |
| * Attach a Windows/MacOS/Linux PC via ethernet or wifi to RUT1 LAN. Remove or disable any other active interfaces on your PC.
| |
| * Disable the firewall. Examples for each OS as follows.
| |
| * Windows 10/11
| |
| 1. Press '''''Windows-Key + R'''''
| |
| 2. Type '''''control''''' and hit enter
| |
| 3. Navigate to Firewall Settings -> System and Security -> Windows Defender Firewall
| |
| 4. On the left sidebar, click "Turn Windows Defender Firewall on or off"
| |
| 5. Select "Turn off Windows Defender Firewall (not recommended)" under both the Private and Public network settings
| |
| 6. Click "OK" to apply the changes
| |
| * MacOS Ventura
| |
| 1. Click on Apple menu and select "System Preferences"
| |
| 2. Click on "Security & Privacy"
| |
| 3. Click on the "Firewall" tab
| |
| 4. Select the lock icon at the bottom left and enter your administrator password
| |
| 5. Select "Turn Off Firewall"
| |
| * Linux (Ubuntu)
| |
| 1. Open a Terminal window
| |
| 2. '''''sudo ufw disable'''''
| |
| * Perform similar steps above for a 2nd device connected to RUT2 LAN
| |
| * Once both devices are connected to the LAN of RUT1 & RUT2 you should be able to ping the devices from each other.
| |
| <br>
| |
|
| |
|
| [[File:LAN To LAN Device Ping.png|frame|none]]
| | If you followed configuration steps both end devices should be able to send and receive data. In this example we use Hercules program on both computers and open serial communication with routers. We are able to send and receive data through RS232. |
|
| |
|
| <br>
| | [[File:Over IP Client Server hercules test.png|border|class=tlt-border|1004px]] |
| * Afterwards make sure to re-enable the firewall for both LAN devices
| |


