Setting up external Radius server for RUTOS authentication: Difference between revisions
TautvydasV (talk | contribs) (Created page with "==Summary== In this example we will perform a basic Radius server configuration for router's SSH and WebUI authentication. We will use ''freeradius'' package to set up a local...") |
No edit summary |
||
| (7 intermediate revisions by one other user not shown) | |||
| Line 1: | Line 1: | ||
<p style="color:red">The information in this page is updated in accordance with [https://wiki.teltonika-networks.com/view/FW_%26_SDK_Downloads'''00.07.10'''] firmware version.</p> | |||
==Summary== | ==Summary== | ||
In this example we will | In this example, we will set up a Teltonika Networks router to use a Radius server for SSH and/or WebUI authentication. We will use the ''freeradius'' package to set up a local Radius server on an Ubuntu virtual machine. Then we will create a new user. Lastly, we will test the configuration. | ||
This is the idea of how a Radius server is used for RUTOS authentication:<br> | |||
[[File:Networking freeradius lan principle diagram v1.png|border|class=tlt-border]] | [[File:Networking freeradius lan principle diagram v1.png|border|class=tlt-border]] | ||
==Topology used in this example== | ==Topology used in this example== | ||
[[File:Networking freeradius lan topology diagram v1.png|border|class=tlt-border]] | [[File:Networking freeradius lan topology diagram v1.png|border|600px|class=tlt-border]] | ||
==Prerequisites== | ==Prerequisites== | ||
*'''Router''' with the ability to install | *'''Router''' with the ability to install the PAM package and running firmware version 7.6 or later | ||
*'''Ubuntu machine''' with the ability to host a local FreeRadius server | *'''Ubuntu machine''' with the ability to host a local FreeRadius server | ||
'''Note:''' in this example Ubuntu version 22.04.3 LTS was used | |||
==Preparing Ubuntu machine== | ==Preparing Ubuntu machine== | ||
====Installing the FreeRadius server==== | ====Installing the FreeRadius server==== | ||
Firstly, update the package | Firstly, update the package source lists and upgrade the packages to their latest version: | ||
sudo apt update | sudo apt update | ||
sudo apt upgrade | sudo apt upgrade | ||
| Line 17: | Line 19: | ||
Next, install the FreeRadius package: | Next, install the FreeRadius package: | ||
sudo apt install freeradius | sudo apt install freeradius | ||
====Defining a client==== | |||
====Defining a | Client - a router that will use FreeRadius to authenticate WebUI and/or SSH users. | ||
Client - router that will use FreeRadius to authenticate WebUI and/or SSH users. | In order to add/edit clients, we need to access the '''clients.conf''' file. Use your favorite text editor to edit it: | ||
In order to add/edit clients, we need to access the '''clients.conf''' file. Use your favorite text editor to | |||
sudo nano /etc/freeradius/3.0/clients.conf | sudo nano /etc/freeradius/3.0/clients.conf | ||
For this example, we will add the following lines in order to accept any IP address as a client: | |||
For this example we will add the following lines in order to accept any IP address as a client: | |||
client 0.0.0.0/0 { | client 0.0.0.0/0 { | ||
secret = demoscrt | secret = demoscrt | ||
| Line 29: | Line 29: | ||
} | } | ||
'''Note:''' | '''Note:''' a specific public IP of the client can be used instead of 0.0.0.0/0 | ||
====Defining | ====Defining user login credentials==== | ||
Before we create | Before we create the user's login credentials, let's create an MD5 hash and use it instead of a clear text password. We will generate a hash value of '''Temp1234''' using the following command: | ||
echo -n | echo -n Temp1234| md5sum | awk '{print $1}' | ||
We will now define credentials for user '''demo'''. Use your favorite text editor to | We will now define credentials for user '''demo'''. Use your favorite text editor to edit the file '''users''': | ||
sudo nano /etc/freeradius/3.0/users | sudo nano /etc/freeradius/3.0/users | ||
Add | Add the name of the user, MD5 hash value of its password, and a reply message: | ||
demo MD5-Password:= " | demo MD5-Password:= "2aeac48777d7d33ac22cb0c1bac45bf3" | ||
Reply-Message := "Hello, %{User-Name}" | Reply-Message := "Hello, %{User-Name}" | ||
Once these changes are made, start the FreeRadius service: | Once these changes are made, start the FreeRadius service: | ||
sudo /etc/init.d/freeradius start | sudo /etc/init.d/freeradius start | ||
==Preparing router== | |||
==Preparing | Firstly, let us set a static lease for the Ubuntu machine running Radius server and configure port forwarding: | ||
* Login to WebUI and navigate to Network → DHCP → Static Leases | |||
Firstly, | #Press the '''ADD''' butoon. | ||
#Select MAC address of Ubuntu machine. | |||
* | #Press the '''Save & Apply''' button. | ||
[[File:Networking Radius server LAN edit v3.png|1100px|border|class=tlt-border|1097x1097px]] | |||
[[File:Networking | |||
===Creating a new RUTOS user=== | ===Creating a new RUTOS user=== | ||
Now we will need to create a new user | Now we will need to create a new user for SSH and/or WebUI access. To do that follow these steps: | ||
* Go to '''System → Administration → User Settings → System Users''' section | * Go to '''System → Administration → User Settings → System Users''' section | ||
* In the Add new user section fill the user's login credentials. | * In the Add new user section fill in the user's login credentials. | ||
You can specify your own custom role or choose one from the default roles. In this example, admin role was chosen. | You can specify your own custom role or choose one from the default roles. In this example, the admin role was chosen.<br> | ||
[[File:Networking new | [[File:Networking create new rutos user for freeradius fw76 v2.png|1100px|border|class=tlt-border]]<br> | ||
'''Remember:''' use the '''same username as in''' FreeRadius '''users''' file. The password can be different, compared to the one in FreeRadius '''users''' file. | '''Remember:''' use the '''same username as in''' FreeRadius '''users''' file. The password can be different, compared to the one in FreeRadius '''users''' file. | ||
===PAM package installation=== | ===PAM package installation=== | ||
Now we will need to install a PAM package, to do that follow these steps: | Now we will need to install a PAM package, to do that follow these steps: | ||
* Go to '''System → Package Manager → Packages''' | * Go to '''System → Package Manager → Packages''' | ||
# '''Search''' for '''PAM''' package | |||
# '''Install''' the '''PAM''' package | |||
[[File:Networking create new rutos user for freeradius fw76 part2 v2.png|1100px|border|class=tlt-border]] | |||
===Radius server configuration=== | ===Radius server configuration=== | ||
Now we will set the FreeRadius server's information on the router | Now we will set the FreeRadius server's information on the router | ||
====For SSH authentication==== | ====For SSH authentication==== | ||
To enable PAM authentication for SSH, follow these steps: | |||
* Go to '''System → Administration → Access Control → PAM''' section | * Go to '''System → Administration → Access Control → PAM''' section | ||
* Press [[File:Networking edit button fw76 v1.png]] near the SSH instance | * Press [[File:Networking edit button fw76 v1.png]] near the SSH instance | ||
# '''Enable''' the '''instance''' | |||
# Set '''module''' to '''RADIUS''' | |||
# Set '''type''' to '''Required''' | |||
# Set '''server''' to '''Ubuntu machine's IP''' | |||
# Set '''secret''' to '''the one defined in''' the FreeRadius '''clients.conf''' file | |||
* Leave Port and Timeout to their default values | * Leave '''Port''' and '''Timeout''' to their '''default''' values | ||
[[File:Networking pam ssh freeradius config fw76 | [[File:Networking pam ssh freeradius config fw76 v3.png|border|class=tlt-border]] | ||
* Press [[File:Networking save apply button fw76 v1.png]] | * Press [[File:Networking save apply button fw76 v1.png]] | ||
====For WebUI authentication==== | ====For WebUI authentication==== | ||
To enable PAM authentication for WebUI, follow these steps: | |||
* Go to '''System → Administration → Access Control → PAM''' section | * Go to '''System → Administration → Access Control → PAM''' section | ||
* Press [[File:Networking edit button fw76 v1.png]] near the | * Press [[File:Networking edit button fw76 v1.png]] near the WebUI instance | ||
# '''Enable''' the '''instance''' | |||
# Set '''module''' to '''RADIUS''' | |||
# Set '''type''' to '''Required''' | |||
# In the '''Select users add the''' newly created '''user or enable''' PAM authentication '''for all users''' | |||
# Set '''server''' to '''Ubuntu machine's IP''' | |||
# Set '''secret''' to '''the one defined in''' the FreeRadius '''clients.conf''' file | |||
* Leave Port and Timeout to their default values | * Leave '''Port''' and '''Timeout''' to their '''default''' values | ||
[[File:Networking pam webui freeradius config fw76 | [[File:Networking pam webui freeradius config fw76 v3.png|border|class=tlt-border]] | ||
* Press [[File:Networking save apply button fw76 v1.png]] | * Press [[File:Networking save apply button fw76 v1.png]] | ||
==Testing | ==Testing configuration== | ||
Now that we have the setup configured, we can test if the server properly authenticates the user. | |||
Now that we have the setup configured, we can test if the server authenticates the | To see authentication requests on the FreeRadius server side, follow these steps: | ||
* Stop the FreeRadius service using this command: | |||
sudo /etc/init.d/freeradius stop | |||
* Start the FreeRadius server in debug mode using this command: | |||
sudo freeradius -X | |||
* Try connecting to the router's WebUI and/or SSH service | |||
sudo /etc/init.d/freeradius stop | |||
sudo freeradius -X | |||
If the authentication is successful the server logs will contain these lines: | |||
Auth-Type PAP { | |||
pap: Login attempt with password | |||
pap: Comparing with "known-good" MD5-Password | |||
pap: User authenticated successfully | |||
[pap] = ok | |||
} # Auth-Type PAP = ok | |||
If the authentication is unsuccessful the server logs will contain these lines: | |||
Auth-Type PAP { | |||
pap: Login attempt with password | |||
pap: Comparing with "known-good" MD5-Password | |||
pap: ERROR: MD5 digest does not match "known good" digest | |||
pap: Passwords don't match | |||
[pap] = reject | |||
[ | } # Auth-Type PAP = reject | ||
[[Category: | [[Category:Router control and monitoring]] | ||
Latest revision as of 09:31, 14 October 2024
Main Page > General Information > Configuration Examples > Router control and monitoring > Setting up external Radius server for RUTOS authenticationThe information in this page is updated in accordance with 00.07.10 firmware version.
Summary
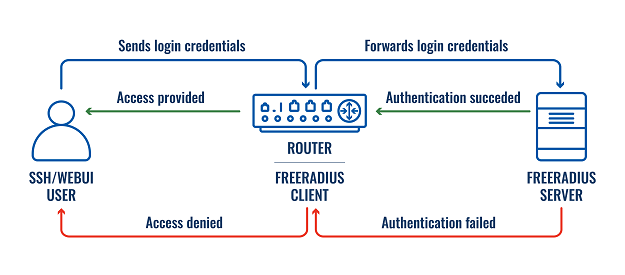
In this example, we will set up a Teltonika Networks router to use a Radius server for SSH and/or WebUI authentication. We will use the freeradius package to set up a local Radius server on an Ubuntu virtual machine. Then we will create a new user. Lastly, we will test the configuration.
This is the idea of how a Radius server is used for RUTOS authentication:

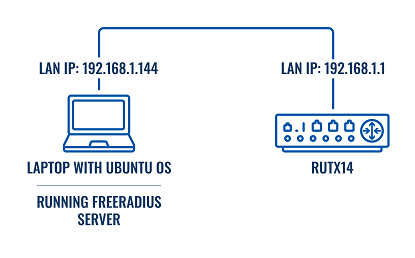
Topology used in this example
Prerequisites
- Router with the ability to install the PAM package and running firmware version 7.6 or later
- Ubuntu machine with the ability to host a local FreeRadius server
Note: in this example Ubuntu version 22.04.3 LTS was used
Preparing Ubuntu machine
Installing the FreeRadius server
Firstly, update the package source lists and upgrade the packages to their latest version:
sudo apt update
sudo apt upgrade
Next, install the FreeRadius package:
sudo apt install freeradius
Defining a client
Client - a router that will use FreeRadius to authenticate WebUI and/or SSH users. In order to add/edit clients, we need to access the clients.conf file. Use your favorite text editor to edit it:
sudo nano /etc/freeradius/3.0/clients.conf
For this example, we will add the following lines in order to accept any IP address as a client:
client 0.0.0.0/0 {
    secret = demoscrt
    shortname = 0.0.0.0/0
}
Note: a specific public IP of the client can be used instead of 0.0.0.0/0
Defining user login credentials
Before we create the user's login credentials, let's create an MD5 hash and use it instead of a clear text password. We will generate a hash value of Temp1234 using the following command:
echo -n Temp1234| md5sum | awk '{print $1}'
We will now define credentials for user demo. Use your favorite text editor to edit the file users:
sudo nano /etc/freeradius/3.0/users
Add the name of the user, MD5 hash value of its password, and a reply message:
demo     MD5-Password:= "2aeac48777d7d33ac22cb0c1bac45bf3"
       Reply-Message := "Hello, %{User-Name}"
Once these changes are made, start the FreeRadius service:
sudo /etc/init.d/freeradius start
Preparing router
Firstly, let us set a static lease for the Ubuntu machine running Radius server and configure port forwarding:
- Login to WebUI and navigate to Network → DHCP → Static Leases
- Press the ADD butoon.
- Select MAC address of Ubuntu machine.
- Press the Save & Apply button.
Creating a new RUTOS user
Now we will need to create a new user for SSH and/or WebUI access. To do that follow these steps:
- Go to System → Administration → User Settings → System Users section
- In the Add new user section fill in the user's login credentials.
You can specify your own custom role or choose one from the default roles. In this example, the admin role was chosen.

Remember: use the same username as in FreeRadius users file. The password can be different, compared to the one in FreeRadius users file.
PAM package installation
Now we will need to install a PAM package, to do that follow these steps:
- Go to System → Package Manager → Packages
- Search for PAM package
- Install the PAM package
Radius server configuration
Now we will set the FreeRadius server's information on the router
For SSH authentication
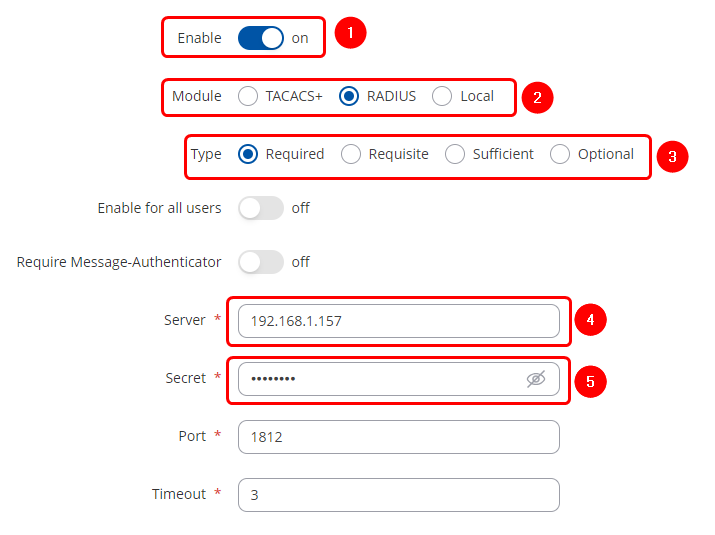
To enable PAM authentication for SSH, follow these steps:
- Enable the instance
- Set module to RADIUS
- Set type to Required
- Set server to Ubuntu machine's IP
- Set secret to the one defined in the FreeRadius clients.conf file
- Leave Port and Timeout to their default values
For WebUI authentication
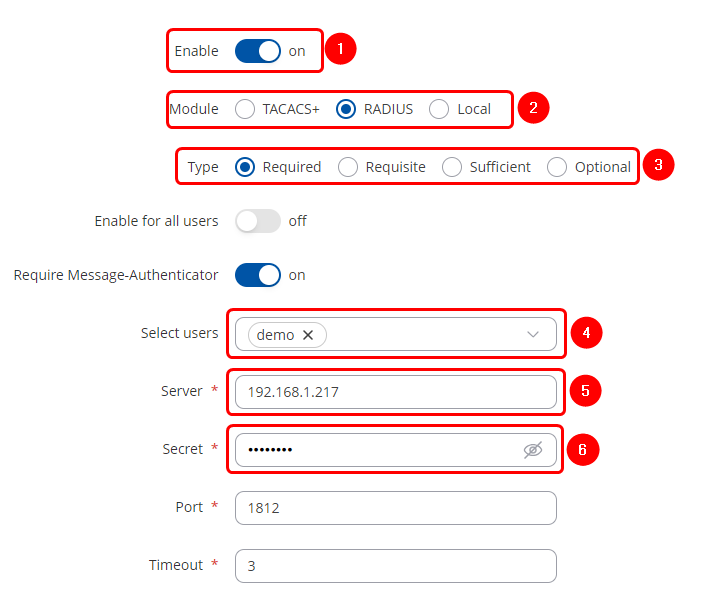
To enable PAM authentication for WebUI, follow these steps:
- Enable the instance
- Set module to RADIUS
- Set type to Required
- In the Select users add the newly created user or enable PAM authentication for all users
- Set server to Ubuntu machine's IP
- Set secret to the one defined in the FreeRadius clients.conf file
- Leave Port and Timeout to their default values
Testing configuration
Now that we have the setup configured, we can test if the server properly authenticates the user. To see authentication requests on the FreeRadius server side, follow these steps:
- Stop the FreeRadius service using this command:
sudo /etc/init.d/freeradius stop
- Start the FreeRadius server in debug mode using this command:
sudo freeradius -X
- Try connecting to the router's WebUI and/or SSH service
If the authentication is successful the server logs will contain these lines:
Auth-Type PAP {
 pap: Login attempt with password
 pap: Comparing with "known-good" MD5-Password
 pap: User authenticated successfully
     [pap] = ok
   } # Auth-Type PAP = ok
If the authentication is unsuccessful the server logs will contain these lines:
Auth-Type PAP {
 pap: Login attempt with password
 pap: Comparing with "known-good" MD5-Password
 pap: ERROR: MD5 digest does not match "known good" digest
 pap: Passwords don't match
     [pap] = reject
   } # Auth-Type PAP = reject


