TLS Certificates: Difference between revisions
(Created page with "Services like HTTPS, OpenVPN, MQTT sometimes use TLS certificates for authentication. If you're setting up a custom system, you can generate TLS certificates by yourself with...") |
|||
| (7 intermediate revisions by 4 users not shown) | |||
| Line 1: | Line 1: | ||
<p style="color:red">The information in this page is updated in accordance with '''00.07.10.2''' firmware version.</p> | |||
==Summary== | |||
However, if you' | Some services (such as OpenVPN, MQTT, etc.) on Teltonika Networks devices can be secured using <b>TLS</b> for encryption and authentication. This page discusses where one can obtain TLS certificates and key for this purpose. | ||
==Certificate Generation== | |||
If you are using a third party service that requires TLS, all necessary files should be provided by the provider of that service. However, if you are setting up your own solution you may find use in of the <b>TLS certificate generation methods</b> described below. | |||
===Teltonika Networks device=== | |||
---- | |||
The easiest way to generate certificates and keys is by using the <b>Certificate Generation</b> page that is available in the device's WebUI: | |||
<ul> | |||
<li>System → Administration → [[RUTX11_Administration#Certificates|Certificates]]</li> | |||
</ul> | |||
====Generation of Certificate Authority (CA) Certificate & Key==== | |||
---- | |||
The first step is to generate a Certificate Authority (CA) certificate, which will be used to sign both server and client certificates. | |||
#Choose the file type as '''CA'''. | |||
#On Teltonika routers, users can select from four '''Key Size''' options, ranging from '''512 bits to 4096 bits.''' | |||
#Enter the '''Common Name'''. This usually represents the fully qualified domain name (FQDN) of the server (e.g., example.com), but it can be any name of your choice. | |||
[[File:Tls certificates ca.png|border|class=tlt-border]] | |||
#<li value="4">By enabling '''Subject Information''', you can provide details about the entity to which the certificate is issued (Optional): | |||
::A. '''Country Code (CC)''': The two-letter country code (e.g., LT for Lithuania). | |||
::B. '''State or Province Name (ST)''': The name of the state or province (e.g., California). | |||
::C. '''Locality Name (L)''': The city or locality (e.g., San Francisco). | |||
::D. '''Organization Name (O)''': The name of the organization or company (e.g., Teltonika). | |||
::E. '''Organizational Unit Name (OU)''': The name of the department or unit within the organization (e.g., IT Department). | |||
# | |||
::''These fields help to clearly identify the organization or individual associated with the certificate.'' | |||
[[File:Tls certificates ca gen sub info.png|border|class=tlt-border]] | |||
#<li value="5"> Select the "'''On'''" option next to "'''Sign the Certificate'''." If not enabled, the Root CA will not sign or generate the new CA. | |||
#Enter the period of how long CA certificate will be valid | |||
#"'''Delete Signing Request'''" can be enabled, as it is not required after generation. | |||
#Click [[File:Tls certificates generate button.png|62px]] button | |||
# | |||
[[File:Tls certificates ca p3.png|border|class=tlt-border]] | |||
# | |||
====Generation of Server Certificate & Key==== | |||
---- | |||
A server certificate, signed by a trusted Certificate Authority (CA), is used to authenticate the server and facilitate secure, encrypted communications with clients. Generating a server certificate follows similar steps to those for creating a CA certificate. | |||
#Select '''Server''' file type. | |||
#Select '''Key Size''' | |||
#Enter '''Common Name''' of the '''Server''' | |||
#'''Subject Information''' of the server(Optional) | |||
#Select the "'''On'''" option next to "'''Sign the Certificate'''". | |||
#Define how long the certificate will be '''valid'''. | |||
#The system should automatically detect the CA certificate and key files from "Certificates Manager" tab. | |||
#"'''Delete Signing Request'''" (Optional) | |||
#Click [[File:Tls certificates generate button.png|62px]] button | |||
[[File:Tls certificates server.png|border|class=tlt-border]] | |||
====Generation of Client Certificate & Key==== | |||
---- | |||
A client certificate, signed by a trusted Certificate Authority (CA), is used to authenticate the client and facilitate secure, encrypted communications with other clients and servers. Generating a client certificate follows similar steps to those for creating a CA certificate. | |||
#Select '''Client''' file type. | |||
#Select '''Key Size''' | |||
#Enter '''Common Name''' of the Client | |||
#'''Subject Information''' of the Client(Optional) | |||
#Select the "'''On'''" option next to "'''Sign the Certificate'''". | |||
#Define how long the certificate will be '''valid'''. | |||
#The system should automatically detect the CA certificate and key files from the "Certificates Manager" tab. | |||
#"'''Delete Signing Request'''" (Optional) | |||
#"'''Private Key Decryption password'''" (Optional) | |||
#Click [[File:Tls certificates generate button.png|62px]] button | |||
[[File:Tls certificates client.png|border|class=tlt-border]] | |||
====Generation of DH Parameters==== | |||
---- | |||
The '''DH parameters''' refers to the parameters used in the Diffie-Hellman key exchange. This cryptographic protocol allows two parties to generate a shared secret over an untrusted communication channel securely. In practical use, such as with VPNs, TLS/SSL, or routers, DH parameters are used to securely generate session keys for encrypting data. Generating a DH Parameters follows similar steps: | |||
#Select '''DH Parameters''' file type. | |||
#Select '''Key Size''' | |||
#Enter '''Common Name''' | |||
#Click [[File:Tls certificates generate button.png|62px]] button | |||
[[File:Tls certificates dh.png|border|class=tlt-border]] | |||
====Generation of "Let's Encrypt" Certificate & Key==== | |||
---- | |||
Let's Encrypt provides free SSL/TLS certificates that are widely used for securing web services, VPNs, and other network communications. In practical use, such as with websites, routers, or VPNs, the Let's Encrypt certificate and key enable HTTPS connections or secure tunnels. Generating a Let's Encrypt certificate and key follows similar steps: | |||
#Select the "'''Let's Encrypt'''" file type. | |||
#Enter the '''Domain''' name of the remote server associated with the public IP. | |||
#Enable '''Automatic renewal''' if you'd like the certificates to be automatically renewed every 60 days (Optional). | |||
#Click [[File:Tls certificates generate button.png|62px]] button | |||
[[File:Tls certificates lets encrypt.png|border|class=tlt-border]] | |||
====Generation of SCEP Certificate & Key==== | |||
SCEP (Simple Certificate Enrollment Protocol) automates the process of obtaining digital certificates from a certificate authority (CA). The client submits a certificate request to the SCEP server, which acts as an intermediary between the client and the CA. This protocol facilitates secure authentication and encryption, simplifying certificate management and renewal, especially in large-scale deployments. | |||
#Select '''SCEP''' as the '''File type''' | |||
#Select '''Key Size''' | |||
#Enter the '''Common name''' | |||
#Enter URL address of the SCEP server | |||
#Enter the '''Challenge''' passkey (the unique value generated by the server for each session) | |||
#Click '''Enroll''' to initiate certificate request | |||
[[File:Tls certificates scep gen.png|border|class=tlt-border]] | |||
===Windows & Linux systems=== | |||
---- | |||
You can also use third party software to generate the certificates on your computer. Guides are available for: | |||
<ul> | |||
<li>[[How to generate TLS certificates (Windows)?|Windows]]</li> | |||
<li>[[How to generate TLS certificates (Ubuntu 18)?|Linux]]</li> | |||
</ul> | |||
[[Category:Security]] | [[Category:Security]] | ||
==Certificates Manager== | |||
All generated certificates and private keys can be found in the '''Certificates Manager''' tab. Here, users can import certificates and keys generated by third-party programs or export those generated on the router in the [[RUTX11_Administration#Certificates|Certificates]] tab. This section also provides information on expiration dates and key sizes. | |||
[[File:Tls certificates certificates manager tab.png|border|class=tlt-border]] | |||
Latest revision as of 12:52, 5 November 2024
Main Page > FAQ > Security > TLS CertificatesThe information in this page is updated in accordance with 00.07.10.2 firmware version.
Summary
Some services (such as OpenVPN, MQTT, etc.) on Teltonika Networks devices can be secured using TLS for encryption and authentication. This page discusses where one can obtain TLS certificates and key for this purpose.
Certificate Generation
If you are using a third party service that requires TLS, all necessary files should be provided by the provider of that service. However, if you are setting up your own solution you may find use in of the TLS certificate generation methods described below.
Teltonika Networks device
The easiest way to generate certificates and keys is by using the Certificate Generation page that is available in the device's WebUI:
- System → Administration → Certificates
Generation of Certificate Authority (CA) Certificate & Key
The first step is to generate a Certificate Authority (CA) certificate, which will be used to sign both server and client certificates.
- Choose the file type as CA.
- On Teltonika routers, users can select from four Key Size options, ranging from 512 bits to 4096 bits.
- Enter the Common Name. This usually represents the fully qualified domain name (FQDN) of the server (e.g., example.com), but it can be any name of your choice.
- By enabling Subject Information, you can provide details about the entity to which the certificate is issued (Optional):
- A. Country Code (CC): The two-letter country code (e.g., LT for Lithuania).
- B. State or Province Name (ST): The name of the state or province (e.g., California).
- C. Locality Name (L): The city or locality (e.g., San Francisco).
- D. Organization Name (O): The name of the organization or company (e.g., Teltonika).
- E. Organizational Unit Name (OU): The name of the department or unit within the organization (e.g., IT Department).
- These fields help to clearly identify the organization or individual associated with the certificate.
- Select the "On" option next to "Sign the Certificate." If not enabled, the Root CA will not sign or generate the new CA.
- Enter the period of how long CA certificate will be valid
- "Delete Signing Request" can be enabled, as it is not required after generation.
- Click
 button
Generation of Server Certificate & Key
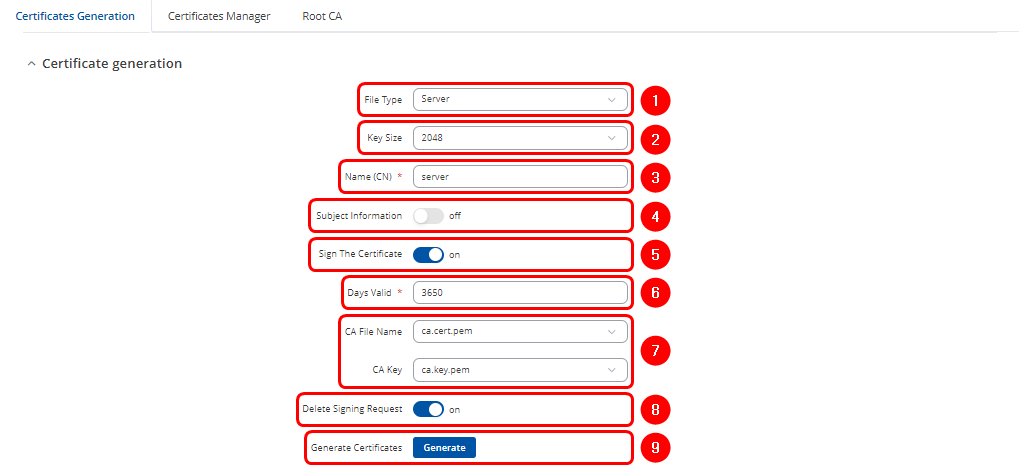
A server certificate, signed by a trusted Certificate Authority (CA), is used to authenticate the server and facilitate secure, encrypted communications with clients. Generating a server certificate follows similar steps to those for creating a CA certificate.
- Select Server file type.
- Select Key Size
- Enter Common Name of the Server
- Subject Information of the server(Optional)
- Select the "On" option next to "Sign the Certificate".
- Define how long the certificate will be valid.
- The system should automatically detect the CA certificate and key files from "Certificates Manager" tab.
- "Delete Signing Request" (Optional)
- Click
 button
Generation of Client Certificate & Key
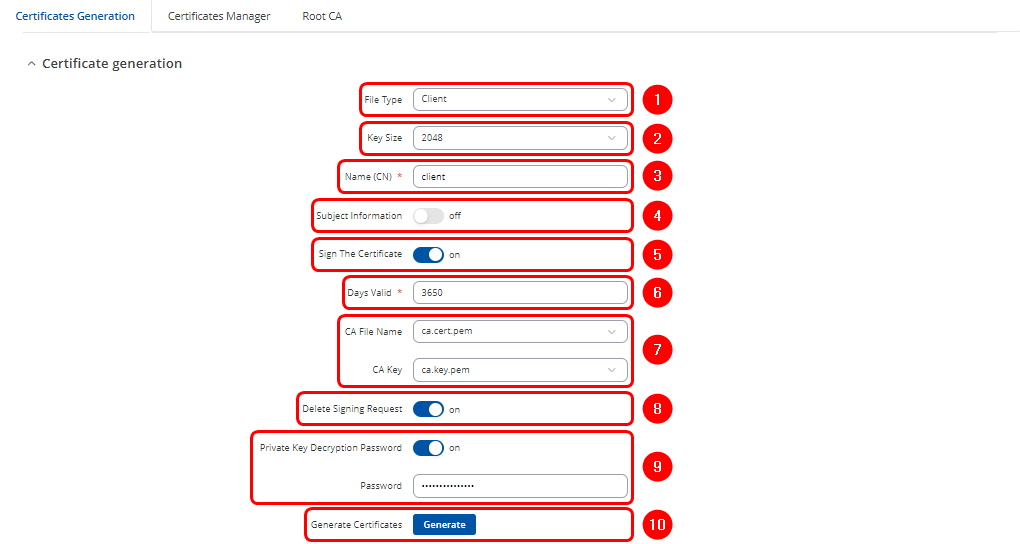
A client certificate, signed by a trusted Certificate Authority (CA), is used to authenticate the client and facilitate secure, encrypted communications with other clients and servers. Generating a client certificate follows similar steps to those for creating a CA certificate.
- Select Client file type.
- Select Key Size
- Enter Common Name of the Client
- Subject Information of the Client(Optional)
- Select the "On" option next to "Sign the Certificate".
- Define how long the certificate will be valid.
- The system should automatically detect the CA certificate and key files from the "Certificates Manager" tab.
- "Delete Signing Request" (Optional)
- "Private Key Decryption password" (Optional)
- Click
 button
Generation of DH Parameters
The DH parameters refers to the parameters used in the Diffie-Hellman key exchange. This cryptographic protocol allows two parties to generate a shared secret over an untrusted communication channel securely. In practical use, such as with VPNs, TLS/SSL, or routers, DH parameters are used to securely generate session keys for encrypting data. Generating a DH Parameters follows similar steps:
Generation of "Let's Encrypt" Certificate & Key
Let's Encrypt provides free SSL/TLS certificates that are widely used for securing web services, VPNs, and other network communications. In practical use, such as with websites, routers, or VPNs, the Let's Encrypt certificate and key enable HTTPS connections or secure tunnels. Generating a Let's Encrypt certificate and key follows similar steps:
- Select the "Let's Encrypt" file type.
- Enter the Domain name of the remote server associated with the public IP.
- Enable Automatic renewal if you'd like the certificates to be automatically renewed every 60 days (Optional).
- Click
 button
Generation of SCEP Certificate & Key
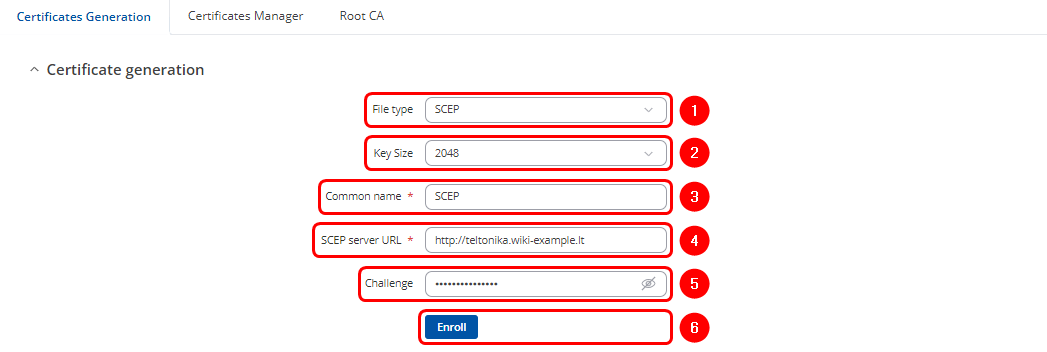
SCEP (Simple Certificate Enrollment Protocol) automates the process of obtaining digital certificates from a certificate authority (CA). The client submits a certificate request to the SCEP server, which acts as an intermediary between the client and the CA. This protocol facilitates secure authentication and encryption, simplifying certificate management and renewal, especially in large-scale deployments.
- Select SCEP as the File type
- Select Key Size
- Enter the Common name
- Enter URL address of the SCEP server
- Enter the Challenge passkey (the unique value generated by the server for each session)
- Click Enroll to initiate certificate request
Windows & Linux systems
You can also use third party software to generate the certificates on your computer. Guides are available for:
Certificates Manager
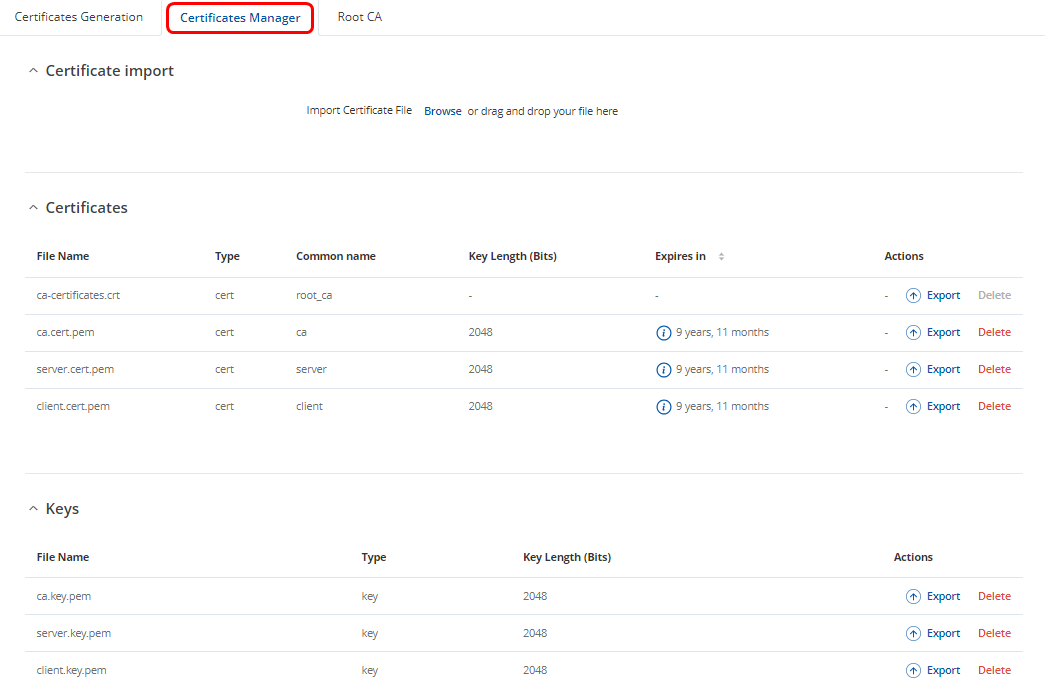
All generated certificates and private keys can be found in the Certificates Manager tab. Here, users can import certificates and keys generated by third-party programs or export those generated on the router in the Certificates tab. This section also provides information on expiration dates and key sizes.


