|
|
| (33 intermediate revisions by 2 users not shown) |
| Line 1: |
Line 1: |
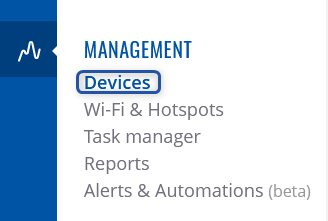
| − | To add a new device(s) to RMS, go to the RMS web page, Left sidebar panel, (<b>Management → Devices</b>) and click on <b>Devices</b> submenu. | + | To add a new device(s) to RMS, go to the RMS web page, Left sidebar panel, (<b>Management → Overview</b>) and click on <b>Overview</b> submenu. |
| − | | |
| − | Scroll your mouse pointer to the Top control '''Device''' menu and select '''Add device''' (Device → Add device).
| |
| | | | |
| | [[File:RMS-device-menu-left-sidebar-panel.jpg]] [[File:RMS-top-menu-add-device.jpg]] | | [[File:RMS-device-menu-left-sidebar-panel.jpg]] [[File:RMS-top-menu-add-device.jpg]] |
| − |
| |
| − | <br>
| |
| − | Watch a Youtube tutorial:
| |
| − |
| |
| − | <br>
| |
| − | <youtube>J3HSM2LP-k0</youtube>
| |
| | | | |
| − | ===Step by step instructions===
| + | Scroll your mouse pointer to the Top control '''Devices''' menu (Devices → Add device). |
| − | ----
| |
| − | Alternatively, read these step-by-step instructions to learn how to add a new device(s).
| |
| | | | |
| | + | #Leave the '''Enable auto license checkmark''' checked. |
| | + | #In the pop-up box select your company. |
| | + | #Choose the device's type (RUT or TRB). |
| | + | #Type a custome name for your device |
| | + | #Enter the device's serial number<span class="asterisk">*</span>, LAN MAC Address<span class="asterisk">*</span> (IMEI<span class="asterisk">*</span> for TRB). |
| | | | |
| − | [[File:Rms faq add device1.png|border|class=tlt-border|700px]] | + | Click the plus ([[File:Rms plus symbol.png]]) symbol to add more than one device. Click <b>Add</b>: |
| − | * Make sure your device has an Internet connection.
| |
| − | * Follow the directions above to locate the correct menu item.
| |
| − | # Select the desired '''company''' to which you will be adding the device.
| |
| − | # Select the '''model''' type of the device you will be adding.
| |
| − | # Enable '''device service''' if you want the device to be able to connect to the RMS platform (This will activate a trial credit or credit from your RMS company credit pool)
| |
| − | # Provide the necessary details: input the desired device name, '''serial number''', '''LAN MAC''' address, and the device's '''current admin password'''.
| |
| − | # Click '''Submit''' if all details are correct and you're ready to add the device to your RMS company.
| |
| | | | |
| | + | '''<span style="color:#0455a4">Important</span>'''. '''Enable auto license checkmark''' - if checked, a license will automatically be assigned to the added device (if there are any available). |
| | | | |
| | + | <br> |
| | + | [[File:RMS-Device-Add-device.gif]] |
| | | | |
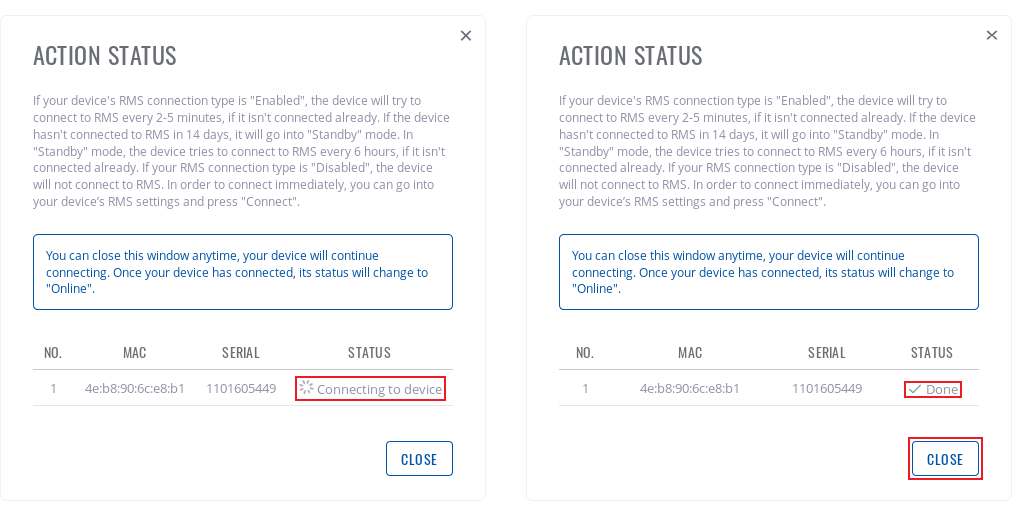
| − | * Wait for about a minute for the system to finish adding the device(s). You will know the process is finished when the word "Done" appears under the Status field.
| + | <br> |
| − | * After closing the pop-up window, you will see the newly added device(s) a the top of the device table.
| + | <span class="asterisk">*</span> You can find the serial number, LAN MAC address and IMEI on the device's package or in the WebUI, in the <b>System → Administration → RMS</b> page |
| − | | |
| − | <h2>RMS Authentication code</h2>
| |
| − | '''In some cases''', while adding the device, you will be provided an '''authentication code'''. This code is not related to the device's admin/root password. Code is only used to authorize the device with the associated RMS Company.
| |
| − | | |
| − | [[File:Rms faq add device2.png|border|class=tlt-border|700px]]
| |
| − | | |
| − | * This authentication code for the provided device must be inserted in the devices RMS configuration.
| |
| − | '''<span style="color:red">Note:</span>''' authentication code can only be inserted on devices with RutOS firmware '''07.07.x''' and above.
| |
| − | | |
| − | # In device's '''WebUI''', navigate to '''Services -> Cloud Solutions -> RMS'''.
| |
| − | # In the field '''Authentication code''', type in the code that was provided to you by RMS while adding the device. ''If you missed the authentication code during device registration, you can view it in the '''Device's details''' page in RMS or by changing table settings in the '''Devices''' page to display the Authentication code column.''
| |
| − | # Save the change by clicking '''Save & Apply'''.
| |
| − | [[File:Rms faq add device4.mp4|thumbnail|right|Adding a device with Authentication code]]
| |
| − | [[File:Rms faq add device3.png|border|class=tlt-border|700px]]
| |
| − | | |
| | | | |
| | + | ---- |
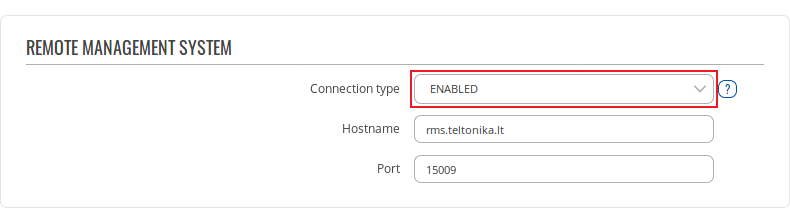
| | + | Don't forget to set the <b>Connection type</b> field the <b>Enabled</b> on the device(s) that you are trying to add. You can do that from the <b>System → Administration → RMS</b>:<br>[[File:Networking rms manual management device add device part 4 v3.png]] |
| | | | |
| − | '''<span style="color:#0455a4"><big>Important!</big></span>'''
| |
| | ---- | | ---- |
| − | * Click the plus ([[File:Rms plus symbol.png]]) symbol to add more than one device.
| + | Wait for about a minute for the system to finish adding the device(s). You will know the process is done when the word "Done" appears under the Status field:<br>[[File:Networking rms manual management device add device part 3 v2.png]] |
| − | * '''Enable auto crediting checkmark''' - if checked, a credit will automatically be assigned to the added device (if there are credits available).
| + | </li> |
| − | * You can close the pop-up window earlier if you wish.
| |
| − | * When the status circle turns green, the system will have finished adding the device to RMS.
| |
| − | | |
| − | [[File:RMS-add-device-green-light.jpg]] | |
| − | | |
| − | ===Locating serial, MAC, IMEI ===
| |
| | ---- | | ---- |
| − | You can find the serial number, LAN MAC address, IMEI on the device or in the '''WebUI'''. For RUTX11 <b>Services → Cloud Solutions → RMS</b> or check for more information [https://wiki.teltonika-networks.com/view/RUTX11_Cloud_Solutions#RMS RUTX11 RMS page in Cloud Solutions]. And for example, for RUT955, go to the <b>System → Administration → RMS</b> or visit [https://wiki.teltonika-networks.com/view/RUT955_Administration#RMS RUT955 RMS page in Administration] for more information. | + | <li>You can close the box earlier if you wish. You should be able to see the newly added device(s) in the device table. When status circle turns green, the system will have finished adding the device to RMS:<br>[[File:Networking rms manual management device add device part 5 v1.png]] |
| − | | + | </li> |
| − | '''<span style="color:#0455a4">Important!</span>''' Make sure you are using the '''LAN MAC''' address when adding a device to RMS.
| + | </ul> |
To add a new device(s) to RMS, go to the RMS web page, Left sidebar panel, (Management → Overview) and click on Overview submenu.
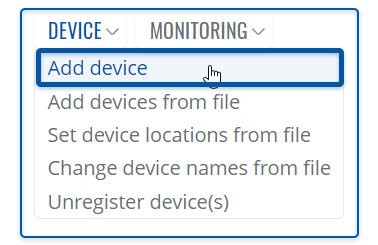
Scroll your mouse pointer to the Top control Devices menu (Devices → Add device).
- Leave the Enable auto license checkmark checked.
- In the pop-up box select your company.
- Choose the device's type (RUT or TRB).
- Type a custome name for your device
- Enter the device's serial number*, LAN MAC Address* (IMEI* for TRB).
Click the plus ( ) symbol to add more than one device. Click Add:
Important. Enable auto license checkmark - if checked, a license will automatically be assigned to the added device (if there are any available).
* You can find the serial number, LAN MAC address and IMEI on the device's package or in the WebUI, in the System → Administration → RMS page
Don't forget to set the Connection type field the Enabled on the device(s) that you are trying to add. You can do that from the System → Administration → RMS:
Wait for about a minute for the system to finish adding the device(s). You will know the process is done when the word "Done" appears under the Status field:
You can close the box earlier if you wish. You should be able to see the newly added device(s) in the device table. When status circle turns green, the system will have finished adding the device to RMS:


