|
|
| (7 intermediate revisions by 3 users not shown) |
| Line 1: |
Line 1: |
| <p style="color:red">The information on this page is updated in accordance with the [https://wiki.teltonika-networks.com/view/FW_%26_SDK_Downloads'''00.07.17.4'''] firmware version.</p>
| |
|
| |
| ==Introduction== | | ==Introduction== |
| This article provides an extensive configuration example with details on how to configure Ipsec with overlapping subnets. | | This article provides an extensive configuration example with details on how to solve overlapping subnets when using IPsec. |
|
| |
|
| ==Configuration overview and prerequisites== | | ==Configuration overview and prerequisites== |
| '''Prerequisites:''' | | '''Prerequisites:''' |
| *Two RUTxxx routers of any type. | | *Two RUTxxx routers of any type (excluding RUT850) |
| *A SIM card with a Public Static or Public Dynamic IP address for the IPsec server. | | *A SIM card with a Public Static or Public Dynamic IP address for the IPsec server |
| *An end device (PC, Laptop, Tablet, Smartphone) to configure the | | *An end device (PC, Laptop, Tablet, Smartphone) to configure the routers |
| *Installing package via '''[https://wiki.teltonika-networks.com/view/RUT241_Package_Manager package manager]''' on both devices: '''IPtables NAT extra'''
| |
| | |
| | |
| ---- | | ---- |
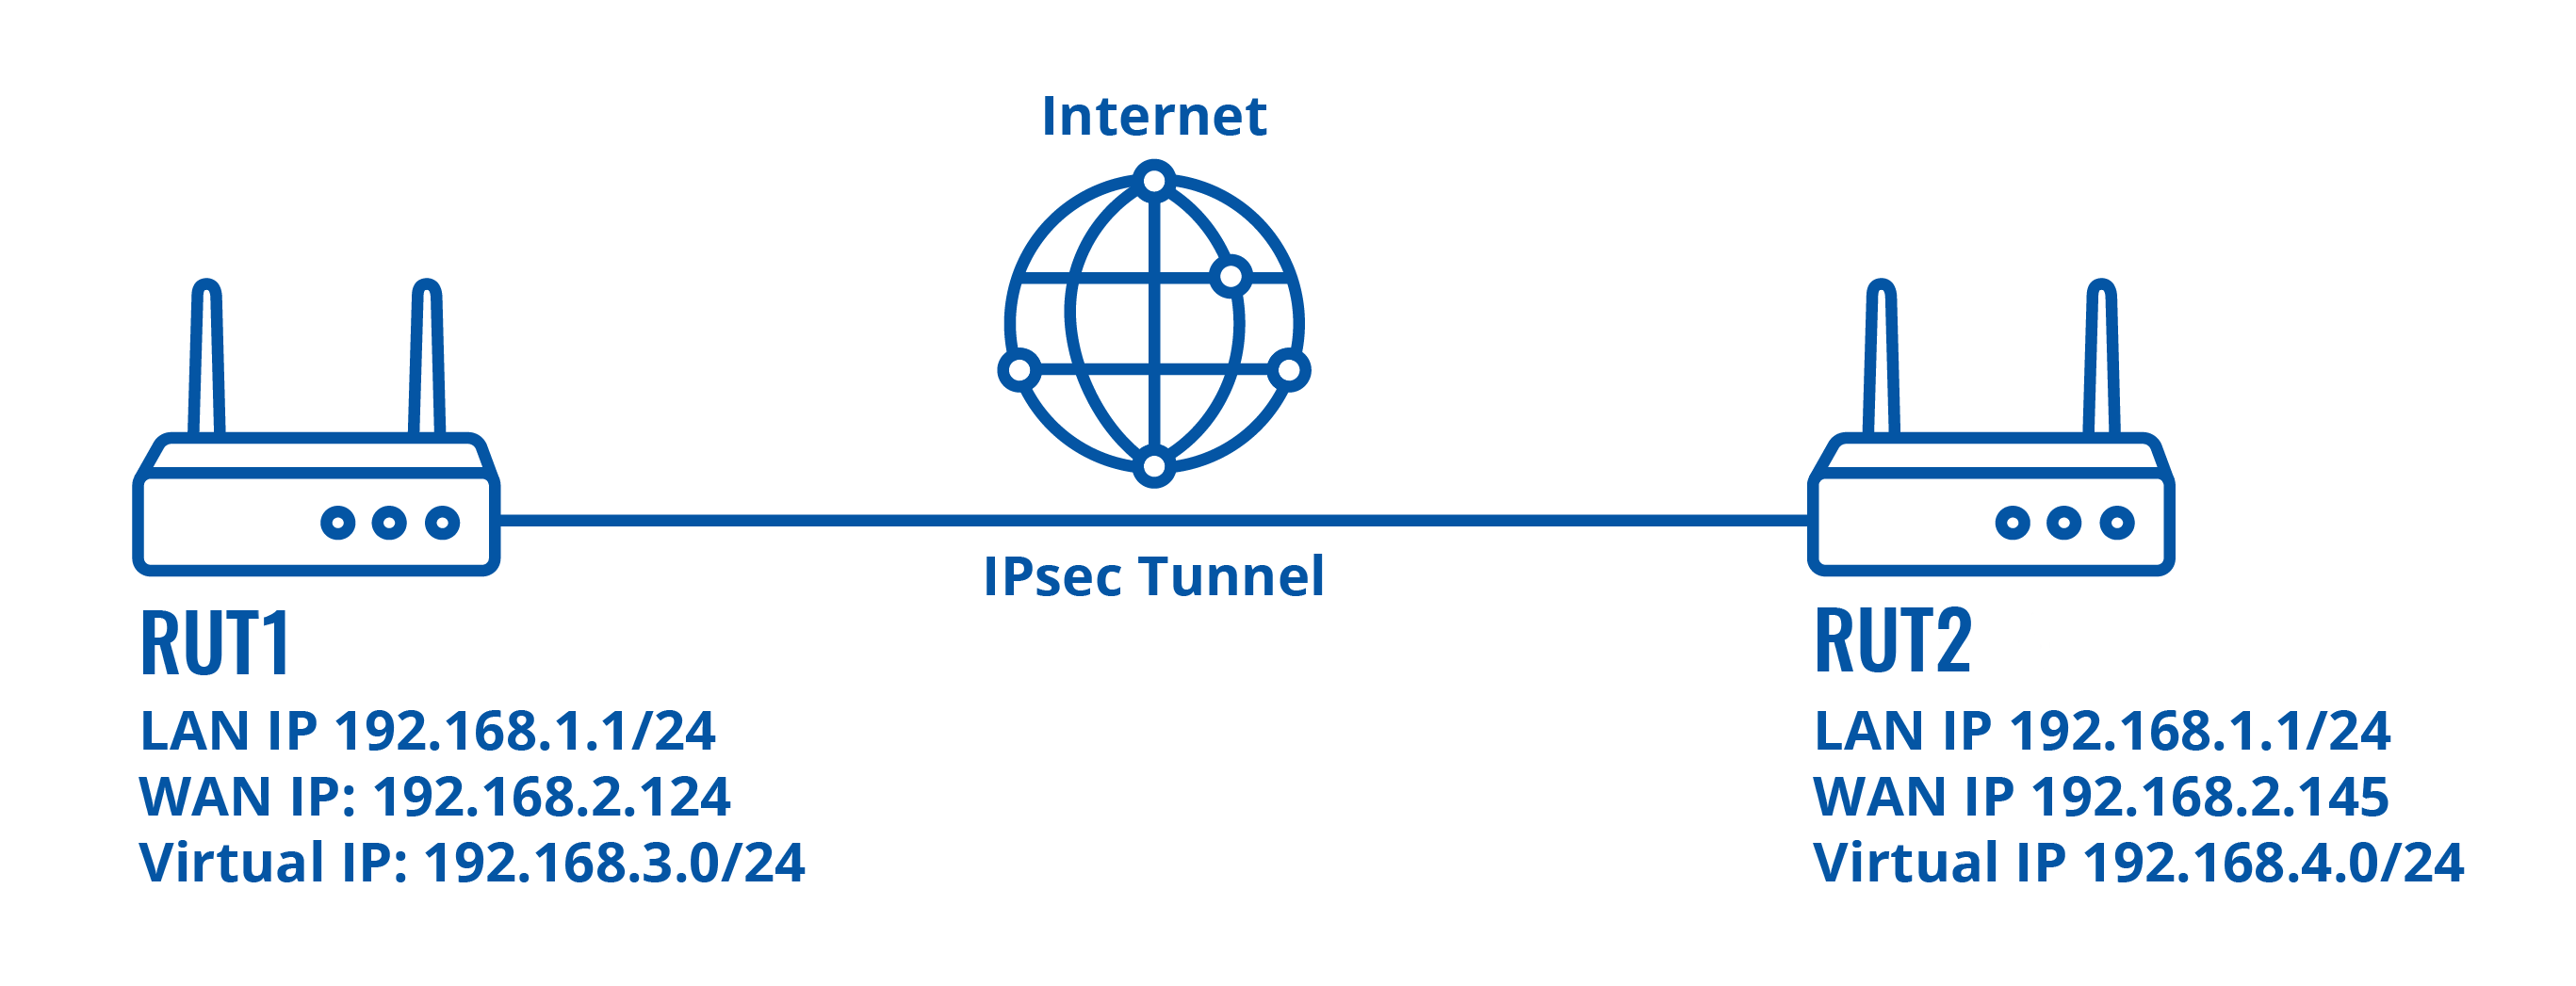
| '''Configuration scheme''': | | '''Configuration scheme''': |
|
| |
|
| [[File:Configuration_examples_ipsec_subnet_overlapping.png|border|class=tlt-border|700x700px]] | | [[File:Configuration_examples_ipsec_subnet_overlapping.png]] |
|
| |
|
| ==Router configuration== | | ==Router configuration== |
| Line 22: |
Line 17: |
| ===Basic tunnel=== | | ===Basic tunnel=== |
| ---- | | ---- |
| First of all, let’s configure a simple connection between two IPsec instances, i.e., RUT1 and RUT2. | | First of, lets configure a simple connection between two IPsec instances, i.e., RUT1 and RUT2. |
| | |
| ====RUT1 configuration====
| |
| ----
| |
| [[File:Ipsec_Over_1.png|border|class=tlt-border]]
| |
| [[File:Ipsec_Over_2.png|border|class=tlt-border]]
| |
| #'''Enable''' instance.
| |
| #'''Remote endpoint''' (Only one side of IPsec needs to have it configured)
| |
| #Enter the '''Pre shared key'''(a shared password used for authentication between the peers. The value of this field must match on both instances).
| |
| #Select tunnel '''Type'''
| |
| #Enter '''Local subnet '''(an IP address/Subnet mask of the router on which the IPsec instance is configured).
| |
| #Enter '''Remote subnet '''
| |
| | |
| ====RUT2 configuration====
| |
| ----
| |
| [[File:Ipsec_Over_3.png|border|class=tlt-border]]
| |
| [[File:Ipsec_Over_4.png|border|class=tlt-border]]
| |
| #'''Enable''' instance.
| |
| #Enter '''Remote endpoint'''
| |
| #Enter '''Pre shared key''' (a shared password used for authentication between the peers. The value of this field must match on both instances).
| |
| #Select tunnel '''Type'''
| |
| #Enter '''Local subnet '''(an IP address/Subnet mask of the router on which the IPsec instance is configured).
| |
| #Enter '''Remote subnet '''
| |
| | |
| ====Check IPsec tunnel status====
| |
| ----
| |
| If you’ve followed all the steps above, your configuration should be complete. However, as with any configuration, it is wise to test the setup to ensure it works properly. This can be verified by running '''swanctl --list-sas''' command in RUT CLI, you should see tunnel between virtual networks:
| |
| | |
| <pre>root@RUT1:~# swanctl --list-sas
| |
| Server: #7, ESTABLISHED, IKEv1, da0c8d300529bd5a_i 812482f852fb55b7_r*
| |
| local '192.168.2.124' @ 192.168.2.124[500]
| |
| remote '192.168.2.145' @ 192.168.2.145[500]
| |
| AES_CBC-128/HMAC_SHA1_96/PRF_HMAC_SHA1/MODP_1536
| |
| established 2409s ago, rekeying in 11816s
| |
| Server_c: #2, reqid 1, INSTALLED, TUNNEL, ESP:AES_CBC-128/HMAC_SHA1_96/MODP_1536
| |
| installed 2408s ago, rekeying in 1017s, expires in 1555s
| |
| in c0795e33, 0 bytes, 0 packets
| |
| out c7a0bca0, 0 bytes, 0 packets
| |
| local 192.168.3.0/24
| |
| remote 192.168.4.0/24 </pre>
| |
| | |
| ===Firewall configuration===
| |
| After establishing IPsec tunnel it's necessary to map LAN network IP addresses to virtual IPsec network addresses, for this we'll use iptables NETMAP target. Insert these IPtables rules into '''WebUI -> Network -> Firewall -> Custom rules'''.
| |
| | |
| ====RUT1 Firewall configuration====
| |
| ----
| |
| <pre>iptables -t nat -I POSTROUTING -s 192.168.1.0/24 -d 192.168.4.0/24 -j NETMAP --to 192.168.3.0/24
| |
| iptables -t nat -I PREROUTING -s 192.168.4.0/24 -j NETMAP --to 192.168.1.0/24</pre>
| |
| | |
| [[File:Ipsec_Over_5.png|border|class=tlt-border]]
| |
| | |
| ====RUT2 Firewall configuration====
| |
| ----
| |
| <pre>iptables -t nat -I POSTROUTING -s 192.168.1.0/24 -d 192.168.3.0/24 -j NETMAP --to 192.168.4.0/24
| |
| iptables -t nat -I PREROUTING -s 192.168.3.0/24 -j NETMAP --to 192.168.1.0/24</pre>
| |
| | |
| [[File:Ipsec_Over_6.png|border|class=tlt-border]]
| |
| | |
| ===Routing configuration===
| |
| ----
| |
| To reach virtual addresses routes should be configured under '''WebUI -> Network -> Routing -> Policy Based Routing'''.
| |
| | |
| Aplly configuration to the devices that virutal addresses would be reachable form LAN:
| |
| | |
| =====RUT1 Routing Configuration=====
| |
| ----
| |
| Add new instance:
| |
| | |
| # Enter ID: '''123'''
| |
| # Enter New configuration name: '''Ipsec'''
| |
| [[File:Ipsec_Over_7.png|border|class=tlt-border|center]]
| |
| | |
| click [[File:Add Button.png|40x70px]] in the new window make following changes:
| |
| | |
| =====Static IPv4 Routes=====
| |
| ----
| |
| click [[File:Add Button.png|40x70px]] and apply this to the route:
| |
| #Select Interface: '''lan''' | Enter Target: '''192.168.4.0''' | Enter IPv4-Netmask: '''255.255.255.0''' | Enter IPv4-Gateway: '''192.168.1.1'''
| |
| [[File:Ipsec_Over_8.png|border|class=tlt-border|center|1000x300px]]
| |
| | |
| ====Routing Rules for IPv4====
| |
| ----
| |
| By clicking [[File:Add Button.png|40x70px]] create rule under '''Routing Rules for IPv4''' tab apply these changes to the rules:
| |
| =====RUT1 Policy Rule=====
| |
| ----
| |
| # Enter Priority: '''1'''
| |
| # Lookup Table: '''Ipsec (123)'''
| |
| | |
| [[File:Ipsec_Over_9.png|border|class=tlt-border|center|1000x800px]]
| |
| | |
| =====RUT2 Routing Configuration=====
| |
| ----
| |
| Add new instance:
| |
| | |
| # Enter ID: '''123'''
| |
| # Enter New configuration name: '''Ipsec'''
| |
| [[File:Ipsec_Over_7.png|border|class=tlt-border|center]]
| |
| | |
| click [[File:Add Button.png|40x70px]] in the new window make following changes:
| |
| | |
| =====Static IPv4 Routes=====
| |
| ----
| |
| click [[File:Add Button.png|40x70px]] and apply this to the route:
| |
| #Select Interface: '''lan''' | Enter Target: '''192.168.3.0''' | Enter IPv4-Netmask: '''255.255.255.0''' | Enter IPv4-Gateway: '''192.168.1.1'''
| |
| [[File:Ipsec_Over_10.png|border|class=tlt-border|center|1000x300px]]
| |
| | |
| ====Routing Rules for IPv4====
| |
| ----
| |
| By clicking [[File:Add Button.png|40x70px]] create rule under '''Routing Rules for IPv4''' tab apply these changes to the rules:
| |
| =====RUT2 Policy Rule=====
| |
| ----
| |
| # Enter Priority: '''1'''
| |
| # Lookup Table: '''Ipsec (123)'''
| |
| | |
| [[File:Ipsec_Over_9.png|border|class=tlt-border|center|1000x800px]]
| |
| | |
| ===Connectivity testing===
| |
| ----
| |
| Sending ping requests from the LAN to the virtual addresses
| |
|
| |
|
| ====RUT1====
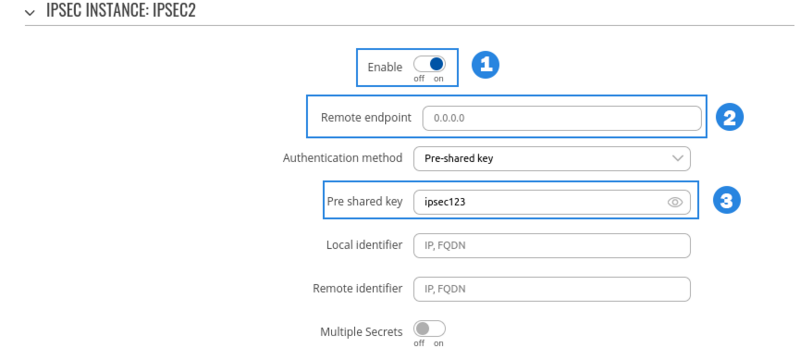
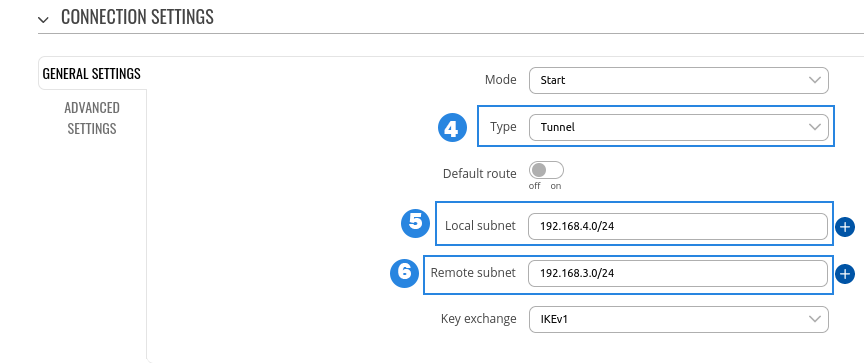
| | ===RUT1 configuration=== |
| ---- | | ---- |
| [[File:Ipsec_Over_11.png|border|class=tlt-border|center]] | | [[File:IPsec1 config.png]] |
| | [[File:Ipsec2_config.png]] |
| | #Enable - Enables IPsec instance |
| | #Remote endpoint - IP address or hostname of remote IPsec instance, only one side of IPsec needs to have it configured |
| | #Pre-shared key - Shared password used for authentication between the peers. The value of this field must match the other instance |
| | #Type - select tunnel |
| | #Local subnet - Virtual local IP address used to install IPsec tunnel |
| | #Remote subnet - Virtual remote IP address used to install IPsec tunnel |
|
| |
|
| ====RUT2====
| | ===RUT2 configuration=== |
| ---- | | ---- |
| [[File:Ipsec_Over_12.png|border|class=tlt-border|center]] | | [[File:Ipsec3 config Overlapping subnets solution example .png]] |
| [[Category:VPN]] | | [[File:Ipsec4 config Overlapping subnets solution example .png]] |
| | #Enable - Enables IPsec instance |
| | #Remote endpoint - IP address or hostname of remote IPsec instance, only one side of IPsec needs to have it configured |
| | #Pre-shared key - Shared password used for authentication between the peers. The value of this field must match the other instance |
| | #Type - select tunnel |
| | #Local subnet - Virtual local IP address used to install IPsec tunnel |
| | #Remote subnet - Virtual remote IP address used to install IPsec tunnel |
Introduction
This article provides an extensive configuration example with details on how to solve overlapping subnets when using IPsec.
Configuration overview and prerequisites
Prerequisites:
- Two RUTxxx routers of any type (excluding RUT850)
- A SIM card with a Public Static or Public Dynamic IP address for the IPsec server
- An end device (PC, Laptop, Tablet, Smartphone) to configure the routers
Configuration scheme:
Router configuration
If you have familiarized yourself with the configuration scheme and have all of the devices in order, we can start configuring the routers using instructions provided in this section.
Basic tunnel
First of, lets configure a simple connection between two IPsec instances, i.e., RUT1 and RUT2.
RUT1 configuration

- Enable - Enables IPsec instance
- Remote endpoint - IP address or hostname of remote IPsec instance, only one side of IPsec needs to have it configured
- Pre-shared key - Shared password used for authentication between the peers. The value of this field must match the other instance
- Type - select tunnel
- Local subnet - Virtual local IP address used to install IPsec tunnel
- Remote subnet - Virtual remote IP address used to install IPsec tunnel
RUT2 configuration

- Enable - Enables IPsec instance
- Remote endpoint - IP address or hostname of remote IPsec instance, only one side of IPsec needs to have it configured
- Pre-shared key - Shared password used for authentication between the peers. The value of this field must match the other instance
- Type - select tunnel
- Local subnet - Virtual local IP address used to install IPsec tunnel
- Remote subnet - Virtual remote IP address used to install IPsec tunnel


