|
|
| (169 intermediate revisions by the same user not shown) |
| Line 1: |
Line 1: |
| − | <p style="color:red">The information in this page is updated in accordance with firmware version [https://wiki.teltonika-networks.com/images/8/8f/RUT9_R_00.07.02.7_WEBUI.bin|'''RUTX_R_00.07.02.7'''].</p> | + | <p style="color:red">The information on this page is updated in accordance with the [https://wiki.teltonika-networks.com/view/FW_%26_SDK_Downloads'''00.07.08'''] firmware version .</p> |
| − | ==Introduction== | + | __TOC__ |
| − | This article contains instructions on how to configure SMS and Script alerts using I/O Juggler and SMS Utilities between two RUT955 routers. | + | ==Summary== |
| | + | This article contains instructions on how to send M-Bus data to the server using various protocols. |
| | | | |
| − | ==Configuration overview and prerequisites== | + | ==Configuration overview & prerequisites== |
| − | | + | Before we begin, let's take a look at the configuration that we are attempting to achieve and the prerequisites that make it possible. |
| − | Before we begin, let's take a look at the configuration that we are attempting to achieve and the prerequisites that make it possible. On a RUT1, an I/O Juggler action is created to execute a command when Input 1 is being triggered to a state of "high" by a sensor to change the output state to "high" on a RUT2 and trigger the sensor. | |
| − | | |
| − | [[File:IO topology new.jpg|border|center|class=tlt-border|954x954px]]
| |
| | | | |
| | '''Prerequisites''': | | '''Prerequisites''': |
| − | * Two RUT955 routers (one of them with SIM card inserted); | + | * TRB143; |
| | + | * M-Bus device; |
| | + | * Server; |
| | * An end device (PC, Laptop, Tablet, Smartphone) for configuration; | | * An end device (PC, Laptop, Tablet, Smartphone) for configuration; |
| − | * Device to trigger input;
| |
| − |
| |
| − | If you're having trouble finding any page or some of the parameters described here on your device's WebUI, you should turn on '''"Advanced WebUI"''' mode. You can do that by '''clicking''' the '''"Basic"''' button '''under''' '''"Mode,"''' which is located at the top-right corner of the WebUI.
| |
| − | [[File:Basic WebUI Advanced.gif|border|center|class=tlt-border|1004x1004px]]
| |
| | | | |
| − | ==I/O control via SMS==
| |
| − | This section contains a detailed guide on how to configure an alert to send a SMS command to RUT2 to change the output state when RUT1 Input 1 is triggered.
| |
| − | ===RUT 2===
| |
| − | ----
| |
| − | This section contains information on how to configure the RUT2 device.
| |
| − | ====SMS Utilities configuration====
| |
| − | ----
| |
| − | The [[RUT955_Mobile_Utilities#SMS_Utilities|SMS Utilities section]] contains a list of rules that perform certain actions when they are activated by SMS messages. To setup a SMS Utilities:
| |
| − | * Log into Router 2 WebUI;
| |
| − | * Go to the '''Services → Mobile Utilities → SMS Utilities''' page and scroll down for '''Add new rule''';
| |
| − | * Enter '''desired SMS text''' command ('''1''') and '''select action''' ('''2''');
| |
| − | * '''Add''' new '''instance''' ('''3''');
| |
| | | | |
| − | [[File:SMS utils add.png|border|center|class=tlt-border|1004x1004px]]
| + | {{Template:Networking_rutos_manual_basic_advanced_webui_disclaimer |
| | + | | series = RUTX |
| | + | }} |
| | | | |
| − | After this you should redirected to configuration page for that rule:
| |
| − | [[File:SMS utils SMS config.png|border|center|class=tlt-border|1004x1004px]]
| |
| | | | |
| − | # '''Open General''' tab;
| + | ==Adding M-Bus devices== |
| − | # Check '''Enable''';
| + | To add a new device to the configuration press [[File:Add Button.png|60x90px]] button which is shown below. |
| − | # Action - '''Change I/O state''';
| |
| − | # I/O - '''Output(4)''';
| |
| − | # State - '''High'''
| |
| − | # SMS text - Enter your desired '''SMS text''';
| |
| − | # '''Save''' and '''apply''' '''changes''';
| |
| | | | |
| − | '''Note:''' Fields that are not indicated can be left as default.
| + | [[File:Mbus adding new device.png||border|class=tlt-border]] |
| | | | |
| − | ===RUT 1=== | + | ===Device configuration=== |
| | ---- | | ---- |
| − | This section contains RUT1 I/O Juggler configuration.
| + | You will be granted to a new window. Configure your M-Bus device accordingly: |
| − | ====I/O Juggler configuration====
| |
| − | ----
| |
| − | The [[RUT955_Input/Output#I.2FO_Juggler|I/O Juggler]] is a feature that provides the possibility to create automated rules that perform certain actions based on Input state changes and other conditions.
| |
| − | =====Actions configuration=====
| |
| − | ---- | |
| − | The [[RUT955_Input/Output#Actions|Actions section]] is used to manage and create new Actions that can be executed by the I/O Juggler Rules. To configure I/O Juggler Actions:
| |
| − | * Log into Router 1 WebUI and go to the '''Services → Input/Output → I/O Juggler → Actions (1)''' page;
| |
| − | * '''Enter''' the desired action '''instance name (2)''' and select '''desired action type (3)''';
| |
| − | * Click '''add (4)''';
| |
| − | [[File:IO juggler action sms.png|border|center|class=tlt-border|1004x1004px]]
| |
| | | | |
| − | This will open a new configuration page:
| + | # '''Name''': Enter the desired name of the M-Bus device |
| − | [[File:IO_juggler_SMS_config_new.png|border|center|class=tlt-border|1004x1004px]]
| + | # '''Address type''': select which M-Bus address will be used |
| | + | # '''Primary/Secondary address''': specify M-Bus address |
| | | | |
| − | # Type - '''SMS''';
| + | [[File:Mbus adding new device configuration v3.png|border|class=tlt-border]] |
| − | # Text message - '''RUT2 password''' and the '''SMS rule''' that have been created on RUT2;
| |
| − | # Recipient's phone number - RUT2''' SIM cards number''';
| |
| − | # '''Save''' and '''apply changes''';
| |
| | | | |
| − | '''Note:''' Fields that are not indicated can be left as default.
| + | Test if the M-Bus device is reachable by a specified primary/secondary address. To do so click on [[File:Ping_device_option_mbus.png|110x110px]]. You might get on of two outputs: |
| | | | |
| − | =====General configuration=====
| + | * If you have specified correct primary/secondary address, you will receive: |
| − | ----
| + | [[File:Mbus device pingable v2.png|border|class=tlt-border|300px]] |
| − | The [[RUT955_Input/Output#General|General section]] is used to Input Trigger rules, which can perform a specified user-configured action when the Input state changes. Once I/O Juggler Action tab is configured open:
| |
| − | *'''General''' tab ('''1''') and '''enable''' it ('''2''');
| |
| − | * Add '''new instance''' role ('''3''');
| |
| − | * Click Add ('''4''');
| |
| | | | |
| − | [[File:IO juggler general config.png|border|center|class=tlt-border|1004x1004px]] | + | * If you have specified incorrect primary/secondary address, you will receive (if you do not know what address should be used, refer to the Scanning for available M-Bus devices (PRIDET URL) secion: |
| | + | [[File:Mbus device not pingable v2.png|border|class=tlt-border|300px]] |
| | | | |
| − | After that, you will be prompted to edit an instance:
| + | Once finished, save the configuration by clicking [[File:Savenapply button.png|Savenapply button.png]]. |
| | | | |
| − | [[File:IO_Juggler_general_input_config.png|border|center|class=tlt-border|1004x1004px]]
| + | ===Scanning for available M-Bus devices=== |
| − | # Check '''Enable''';
| + | ---- |
| − | # Trigger - '''Raising''';
| |
| − | # Add actions - '''Action name''' that was created previously;
| |
| | | | |
| − | '''Note:''' Fields that are not indicated can be left as default.
| + | If you are not sure what address your M-Bus devices have, you can try scanning for the available M-Bus devices. To do so click on [[File:Scan button.png]] button. |
| | | | |
| − | ==I/O control via Public IP and HTTP== | + | ====Scan settings==== |
| − | For this configuration you will need a Static or Dynamic Public IP address on RUT2. You can read up more on this in our article on [[Private_and_Public_IP_Addresses|Private and Public IP Addresses.]] Action will execute a script that contains a curl -X command which will change RUT2 Output state to a high via RUT2 Public IP.
| |
| − | | |
| − | ===RUT 2===
| |
| − | ----
| |
| − | This section contain information on how to configure RUT2 device. A guide on how to [https://wiki.teltonika-networks.com/wikibase/index.php?title=Domnev&oldid=97979#SMS_Utilities_configuration configure SMS Utilities] can be found above.
| |
| − | ====Remote access configuration====
| |
| | ---- | | ---- |
| − | The [[RUT955_Administration#Access_Control|Access Control]] page is used to manage remote and local access to device. Navigate to:
| + | You will be granted to a new window. Configure scan settings accordingly: |
| | | | |
| − | * '''System → Administration → Access Control'''
| + | # '''Scan type''': select which M-Bus address will be scanned |
| − | * Open '''General''' tab ('''1''') and locate the '''WebUI section''';
| + | # '''Scan range''': From what M-Bus address scanning will start and M-Bus address until scanning will be performed. |
| − | * '''Enable''' remote '''HTTP''' ('''2''') and '''HTTPS''' access ('''3''');
| + | [[File:Mbus scan.png|border|class=tlt-border]] |
| − | * '''Save''' and '''apply''' '''changes''' ('''4''');
| |
| | | | |
| − | [[File:Access control rutos1.png|border|center|class=tlt-border|1004x1004px]] | + | To start the scan click on [[File:Start scan button.png]] button. |
| | | | |
| − | ====I/O Post/Get configuration==== | + | ====Found devices==== |
| | ---- | | ---- |
| − | [[RUT955_Mobile_Utilities#Post.2FGet|Post/Get]] allows you to perform action requests by writing them in the URL after your device’s IP address. Go to the:
| + | Once the scan is finished you should see the list of M-Bus devices that TRB143 were able to find: |
| − | * '''Services → Input/Output → Post/Get''';
| |
| − | * '''Enable''' Post/Get '''(1)''';
| |
| − | * '''Set a username (2)''' and '''password (3)''';
| |
| − | * '''Save''' and '''apply changes (4)''';
| |
| | | | |
| − | [[File:IO_post_get.png|border|center|class=tlt-border|1004x1004px]] | + | [[File:Mbus scanned devices add.png|border|class=tlt-border]] |
| | | | |
| − | ===RUT 1===
| + | You can either [[File:Pencil2.png]] '''(1)''' M-Bus devices primary address or [[File:Add Button.png|60x90px]] '''(2)''' to the M-Bus devices list. |
| − | ----
| |
| − | This section contain information on how to configure RUT1 device. A guide on how to [https://wiki.teltonika-networks.com/wikibase/index.php?title=Domnev&oldid=97979#I.2FO_Juggler_configuration configure I/O Juggler] can be found above.
| |
| − | =====Actions (Public IP) configuration=====
| |
| − | ---- | |
| − | Navigate to '''Services → Input/Output → I/O Juggler''' and create an Action instance.
| |
| | | | |
| − | [[File:IO juggler script conf.png|border|center|class=tlt-border|1004x1004px]]
| + | ==Gathering M-Bus data== |
| | | | |
| − | # Type ('''1''') - '''Script''';
| + | If the device successfully added to the list, under the General settings you should see that the Status changes to <span style="color:green">Active</span>. |
| − | # Specify path ('''2''') - you can choose between '''specifying''' the '''script path''' or '''uploading''' a '''script file''' directly;
| |
| − | # Script file ('''3''') - depending on what you have chosen in the field above, you will be asked to enter a '''script directory''' or '''upload a script''' file;
| |
| − | # Save and apply changes ('''4''')
| |
| | | | |
| − | '''Note:''' Fields that are not indicated can be left as default.
| + | [[File:Mbus status active v2.png|border|class=tlt-border]] |
| | | | |
| − | Script example can be seen below:
| + | ===Data collecting groups=== |
| − | <pre>#!/bin/sh
| + | ---- |
| − | | + | To reach data collecting groups configuration press [[File:Pencil2.png]] button. [[File:Add Button.png|60x90px]] button lets you to create a new instance. |
| − | curl -X GET "http:///84.XX.XXX.XX/cgi-bin/io_state?username=YOUR_USERNAME&password=YOUR_PASSWORD&pin=dout1&state=on"
| |
| | | | |
| − | exit 0</pre>
| + | [[File:Mbus data collect overview.png|border|class=tlt-border]] |
| | | | |
| − | '''Note''': replace YOUR_USERNAME and YOUR_PASSWORD with your Post/Get created username and password.
| + | ====Data collecting group instance==== |
| − | | |
| − | =====Actions (HTTP) configuration===== | |
| | ---- | | ---- |
| − | Navigate to '''Services → Input/Output → I/O Juggler''' and create an Action instance.
| |
| | | | |
| − | # Type ('''1''') - '''HTTP''';
| + | Each data collection group contains the following information. Configure device accordingly: |
| − | # Method ('''2''') - '''GET''';
| |
| − | # URL ('''3''') - Enter your '''POST/GET URL''';
| |
| − | # Save and apply changes ('''4''')
| |
| | | | |
| − | [[File:HTTP IO config.png|border|center|class=tlt-border|704x704px]]
| + | # '''Enabled''': on |
| | + | # '''Name''': desired name of the instance |
| | + | # '''Period''': desired time duration between data retrievals |
| | + | # '''Data type''': desired data type to process the received data. You can choose from JSON, XML, ASCII, Hexadecimal and Binary formats. |
| | | | |
| − | '''Note''': replace YOUR_USERNAME and YOUR_PASSWORD with your Post/Get created username and password.
| + | You can check if your configuration works accordingly by pressing the [[File:Mbus test button.png]] button. You should see the data in a pop-up field. |
| | | | |
| − | More information about '''POST/GET''' command syntax [[https://wiki.teltonika-networks.com/view/RUT955_Mobile_Utilities#Post.2FGet|here]].
| + | [[File:Mbus data collect group v2.png|border|class=tlt-border]] |
| − | | |
| − | ==I/O control via RMS VPN==
| |
| − | [https://teltonika-networks.com/lt/about-us/introducing-rms-vpn-service/ RMS VPN] is a service designed for remote efficient, low-cost management of large-scale networks. As opposed to point-to-point VPN service, RMS VPN allows creating encrypted VPN tunnels for secure access of multiple endpoints within a matter of seconds.
| |
| − | ===RMS VPN configuration===
| |
| − | ----
| |
| − | A guide on how to set up a RMS VPN Hub can be found [https://youtu.be/dfAudZR2wPY here].
| |
| − | | |
| − | [[File:RMS VPN IO config.png|border|center|class=tlt-border|704x704px]] | |
| − | | |
| − | Both RUT1 and RUT2 have to be added to RMS VPN Hub.
| |
| − | | |
| − | ====Script====
| |
| − | ----
| |
| − | Adjust the script accordingly to the RMS VPN Hub assigned IP to RUT2. [https://wiki.teltonika-networks.com/wikibase/index.php?title=Domnev&oldid=98293#Actions_configuration_2| Script example] can be found above.
| |
| | | | |
| − | ==Results==
| |
| | | | |
| − | If configured correctly you should be able to see that the RUT1 Input 1 state is being changed to high
| + | ==See Also== |
| | | | |
| − | [[File:Input 1 to high.gif|border|center|class=tlt-border|804x804px]]
| + | ==External links== |
| − | as well as RUT2 Output.
| + | [https://flespi.io/#/ Flespi.io] |
| − | [[File:Output 4 to high.gif|border|center|class=tlt-border|804x804px]] | |
The information on this page is updated in accordance with the 00.07.08 firmware version .
Summary
This article contains instructions on how to send M-Bus data to the server using various protocols.
Configuration overview & prerequisites
Before we begin, let's take a look at the configuration that we are attempting to achieve and the prerequisites that make it possible.
Prerequisites:
- TRB143;
- M-Bus device;
- Server;
- An end device (PC, Laptop, Tablet, Smartphone) for configuration;
If you're having trouble finding this page or some of the parameters described here on your device's WebUI, you should turn on "Advanced WebUI" mode. You can do that by clicking the "Advanced" button, located at the top of the WebUI.

Adding M-Bus devices
To add a new device to the configuration press  button which is shown below.

Device configuration
You will be granted to a new window. Configure your M-Bus device accordingly:
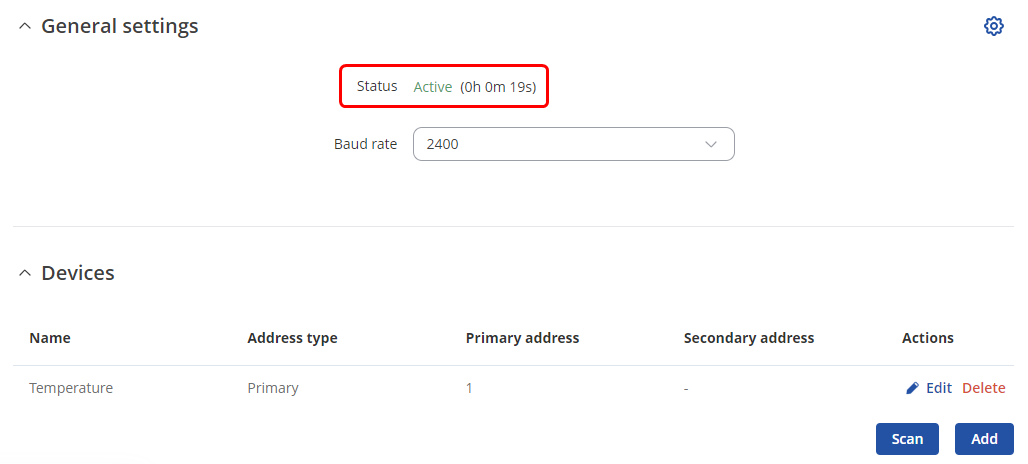
- Name: Enter the desired name of the M-Bus device
- Address type: select which M-Bus address will be used
- Primary/Secondary address: specify M-Bus address
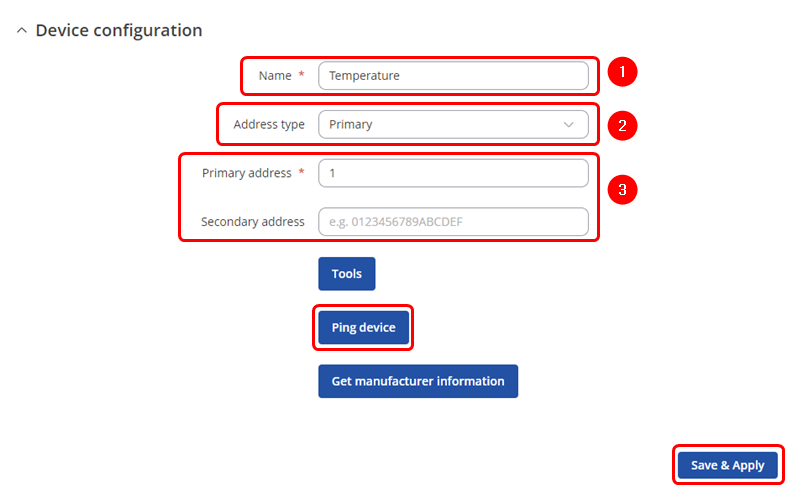
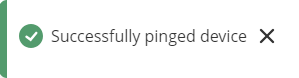
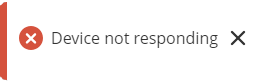
Test if the M-Bus device is reachable by a specified primary/secondary address. To do so click on  . You might get on of two outputs:
- If you have specified correct primary/secondary address, you will receive:
- If you have specified incorrect primary/secondary address, you will receive (if you do not know what address should be used, refer to the Scanning for available M-Bus devices (PRIDET URL) secion:
Once finished, save the configuration by clicking  .
.
Scanning for available M-Bus devices
If you are not sure what address your M-Bus devices have, you can try scanning for the available M-Bus devices. To do so click on  button.
Scan settings
You will be granted to a new window. Configure scan settings accordingly:
- Scan type: select which M-Bus address will be scanned
- Scan range: From what M-Bus address scanning will start and M-Bus address until scanning will be performed.
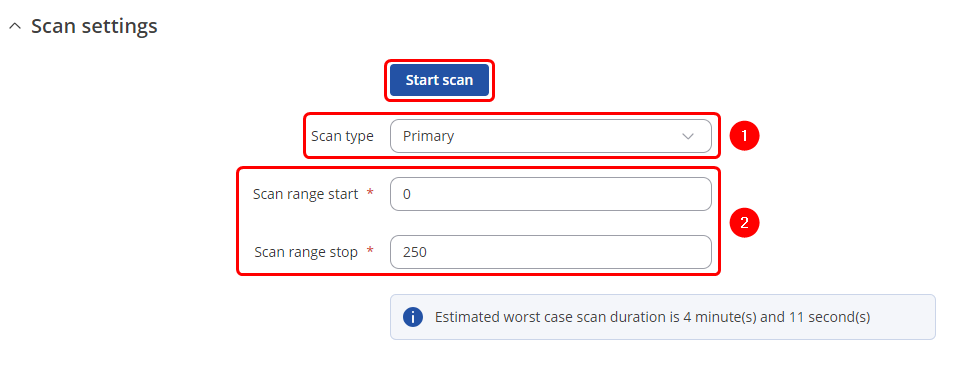
To start the scan click on  button.
Found devices
Once the scan is finished you should see the list of M-Bus devices that TRB143 were able to find:

You can either  (1) M-Bus devices primary address or (2) to the M-Bus devices list.
Gathering M-Bus data
If the device successfully added to the list, under the General settings you should see that the Status changes to Active.
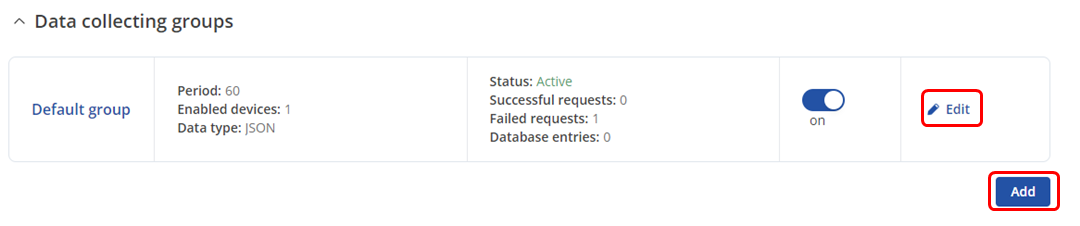
Data collecting groups
To reach data collecting groups configuration press button. button lets you to create a new instance.
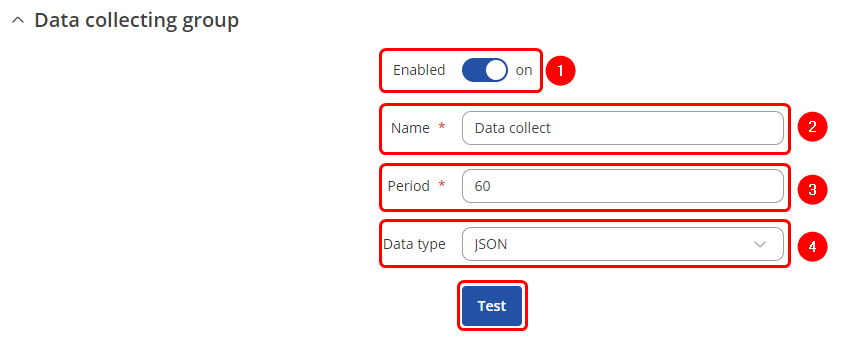
Data collecting group instance
Each data collection group contains the following information. Configure device accordingly:
- Enabled: on
- Name: desired name of the instance
- Period: desired time duration between data retrievals
- Data type: desired data type to process the received data. You can choose from JSON, XML, ASCII, Hexadecimal and Binary formats.
You can check if your configuration works accordingly by pressing the  button. You should see the data in a pop-up field.
See Also
External links
Flespi.io


