RUTOS SDK Usage Examples: Difference between revisions
No edit summary |
No edit summary |
||
| (4 intermediate revisions by the same user not shown) | |||
| Line 17: | Line 17: | ||
* Custom APN | * Custom APN | ||
* PAP authentication method | * PAP authentication method | ||
Open the '''config_generate''' script and navigate to the line 178. There, you should be able to see the '''"add_modem_section()"''' function, where we will be making our changes. To set a custom APN, you will need to add the following lines to the existing "uci_set" commands: | |||
<pre> | |||
uci_set network "${interface}" force "-1" | |||
uci_set network "${interface}" apn "YOUR_APN" | |||
</pre> | |||
To add PAP authentication method, change the existing "'''uci_set network "${interface}" auth "none"'''" line to "'''uci_set network "${interface}" auth "pap"'''", then add the following lines to define your APN username and password: | |||
<pre> | |||
uci_set network "${interface}" username "YOUR_USERNAME" | |||
uci_set network "${interface}" password "YOUR_PASSWORD" | |||
</pre> | |||
After applying the aforementioned changes, the '''"add_modem_section()"''' function in the script should look similar to this: | |||
[[File:Apn dif fin.png|1748x963px]] | |||
===Changing the default LAN IP address=== | |||
---- | |||
Open the '''config_generate''' script and navigate to the line 70; there, you should be able to see the '''"generate_network()"''' function, where we will be applying the following changes. For demonstration purposes, our custom LAN IP address will be set to '''"10.10.10.1"''': | |||
* In the line 119 you should be able to see the '''"ipad=${ipaddr:-"%%LAN_IP%%"}"''' line. Change the '''"%%LAN_IP%%"''' portion with your desired LAN IP address; for example: '''"ipad=${ipaddr:-"10.10.10.1"}"''' | |||
After applying this change, the '''"generate_network()"''' function should look similar to this: | |||
[[File:Lan ip-fin1.png|1793x762px]] | |||
===Setting WAN port as LAN=== | |||
---- | |||
To enable the '''“WAN as LAN”''' feature, you will need to disable the WAN/WAN6 interfaces and bridge the '''“eth1”''' interface to the LAN interface in the same '''"generate_network()"''' function. | |||
To bridge the '''"eth1"'''' interface to the LAN interface, add the following command after the line 120: | |||
<pre> | |||
uci set network."$1".ifname='eth0 eth1' | |||
</pre> | |||
To disable WAN/WAN6 interfaces, add the following commands after line 147 and line 158: | |||
'''After Line 147:''' | |||
<pre> | |||
set network.$1.disabled='1' | |||
</pre> | |||
'''After Line 158:''' | |||
<pre> | |||
set network.${1}6.disabled='1' | |||
</pre> | |||
After applying these changes, the '''"generate_network()"''' function should look similar to this: | |||
[[File:Lan-wan-fin1.png|1833x978px]] | |||
Latest revision as of 14:23, 24 January 2023
The information in this page is updated in accordance with firmware version 00.07.03.1.
Introduction
A software development kit (SDK) is a set of software development tools that provides the possibility to create applications for a certain software package, software framework, computer system or similar development platform.
This article will show you how to use the SDK to modify the default configuration of Teltonika devices, using the RUT955 as an example. These guidelines also apply to other Teltonika Networks devices running RUTOS firmware.
Changing the default Network settings
Network related settings are generally saved in the /etc/config/network .config file which is generated during the first-boot of the device by the config_generate script.
To change the default configuration and/or parameters of the services and features related to the /etc/config/network file, it is required to make direct appends to the script itself that generates the /etc/config/network file. The script that generates the /etc/config/network file is located in the /package/base-files/files/bin/config_generate directory.
Changing the default Mobile configuration
The “Mobile” parameters that we will be pre-configuring in the SDK:
- Custom APN
- PAP authentication method
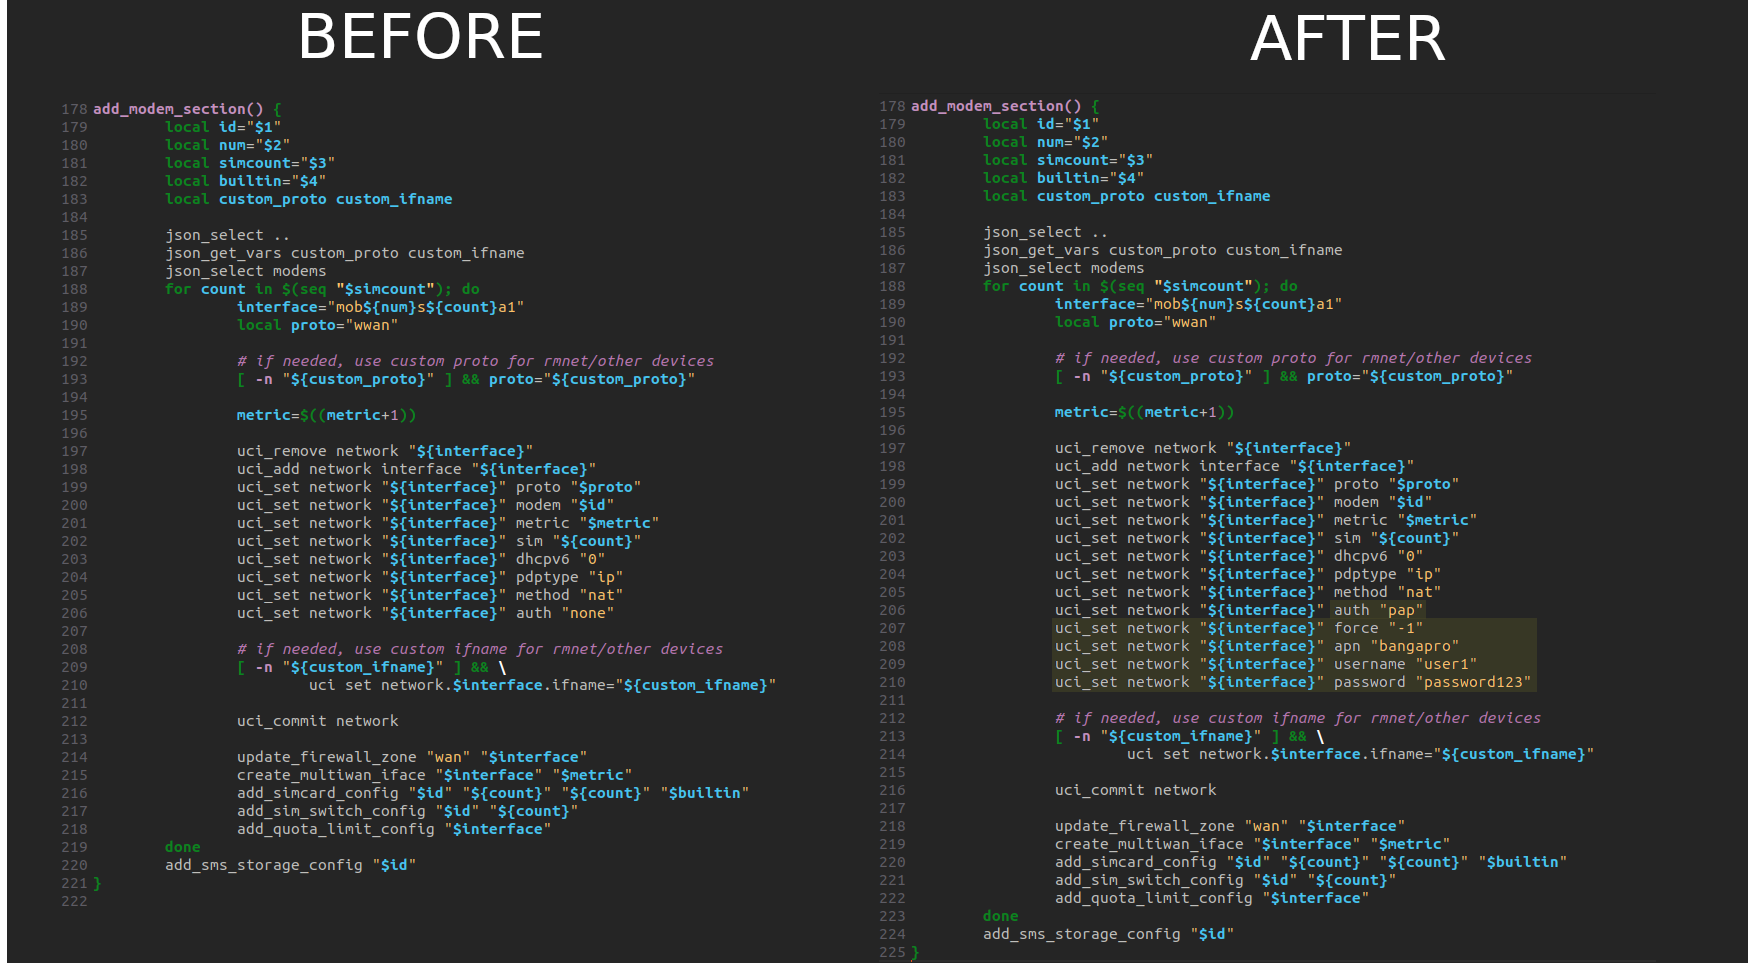
Open the config_generate script and navigate to the line 178. There, you should be able to see the "add_modem_section()" function, where we will be making our changes. To set a custom APN, you will need to add the following lines to the existing "uci_set" commands:
uci_set network "${interface}" force "-1"
uci_set network "${interface}" apn "YOUR_APN"
To add PAP authentication method, change the existing "uci_set network "${interface}" auth "none"" line to "uci_set network "${interface}" auth "pap"", then add the following lines to define your APN username and password:
uci_set network "${interface}" username "YOUR_USERNAME"
uci_set network "${interface}" password "YOUR_PASSWORD"
After applying the aforementioned changes, the "add_modem_section()" function in the script should look similar to this:

Changing the default LAN IP address
Open the config_generate script and navigate to the line 70; there, you should be able to see the "generate_network()" function, where we will be applying the following changes. For demonstration purposes, our custom LAN IP address will be set to "10.10.10.1":
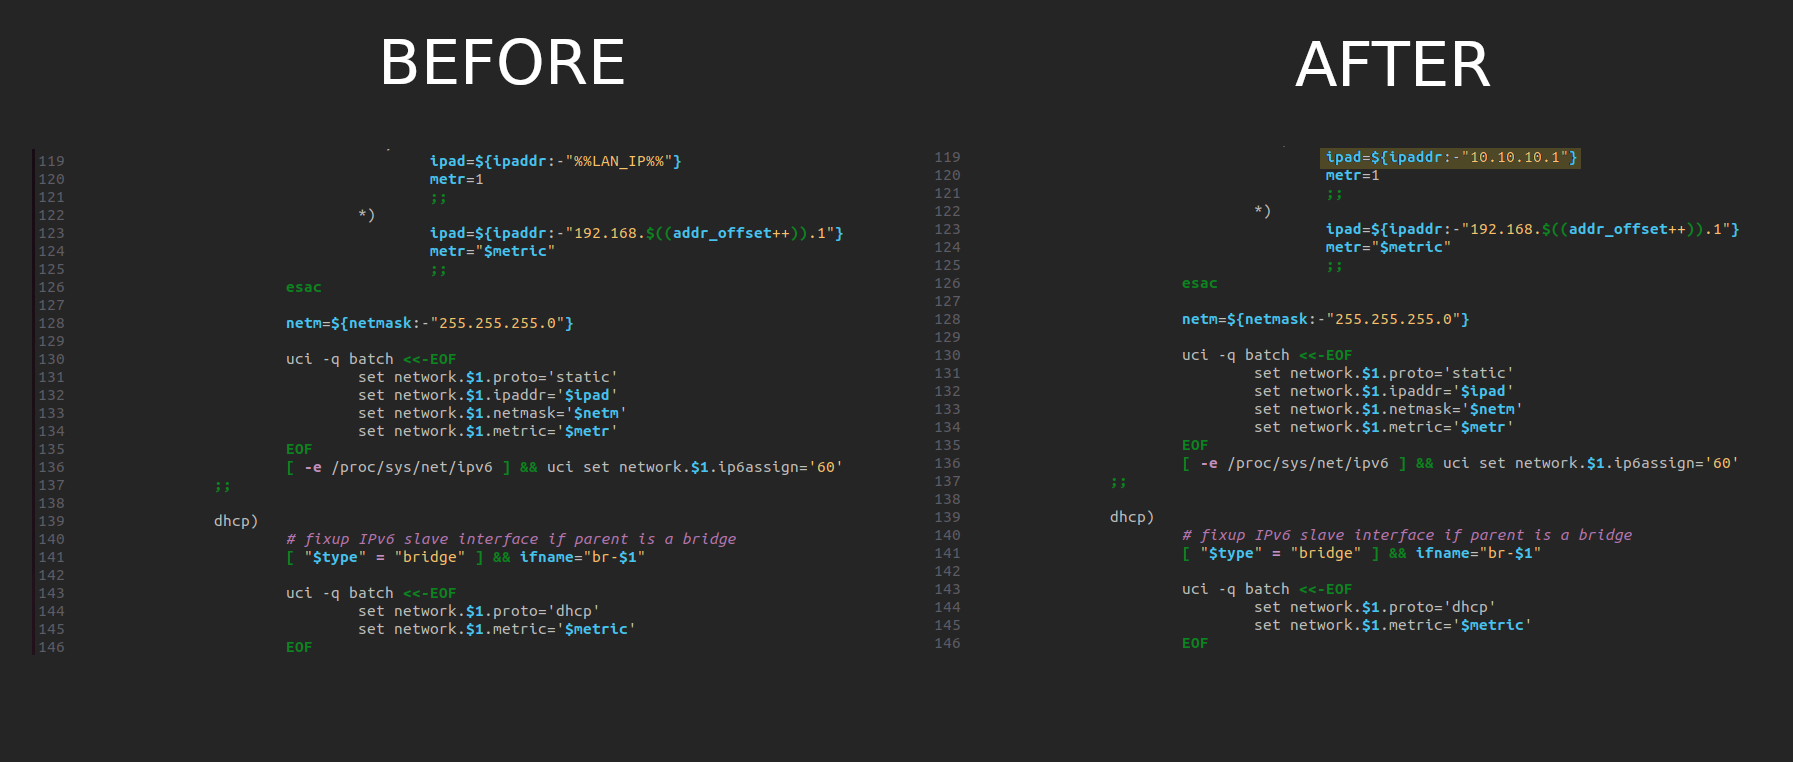
- In the line 119 you should be able to see the "ipad=${ipaddr:-"%%LAN_IP%%"}" line. Change the "%%LAN_IP%%" portion with your desired LAN IP address; for example: "ipad=${ipaddr:-"10.10.10.1"}"
After applying this change, the "generate_network()" function should look similar to this:

Setting WAN port as LAN
To enable the “WAN as LAN” feature, you will need to disable the WAN/WAN6 interfaces and bridge the “eth1” interface to the LAN interface in the same "generate_network()" function.
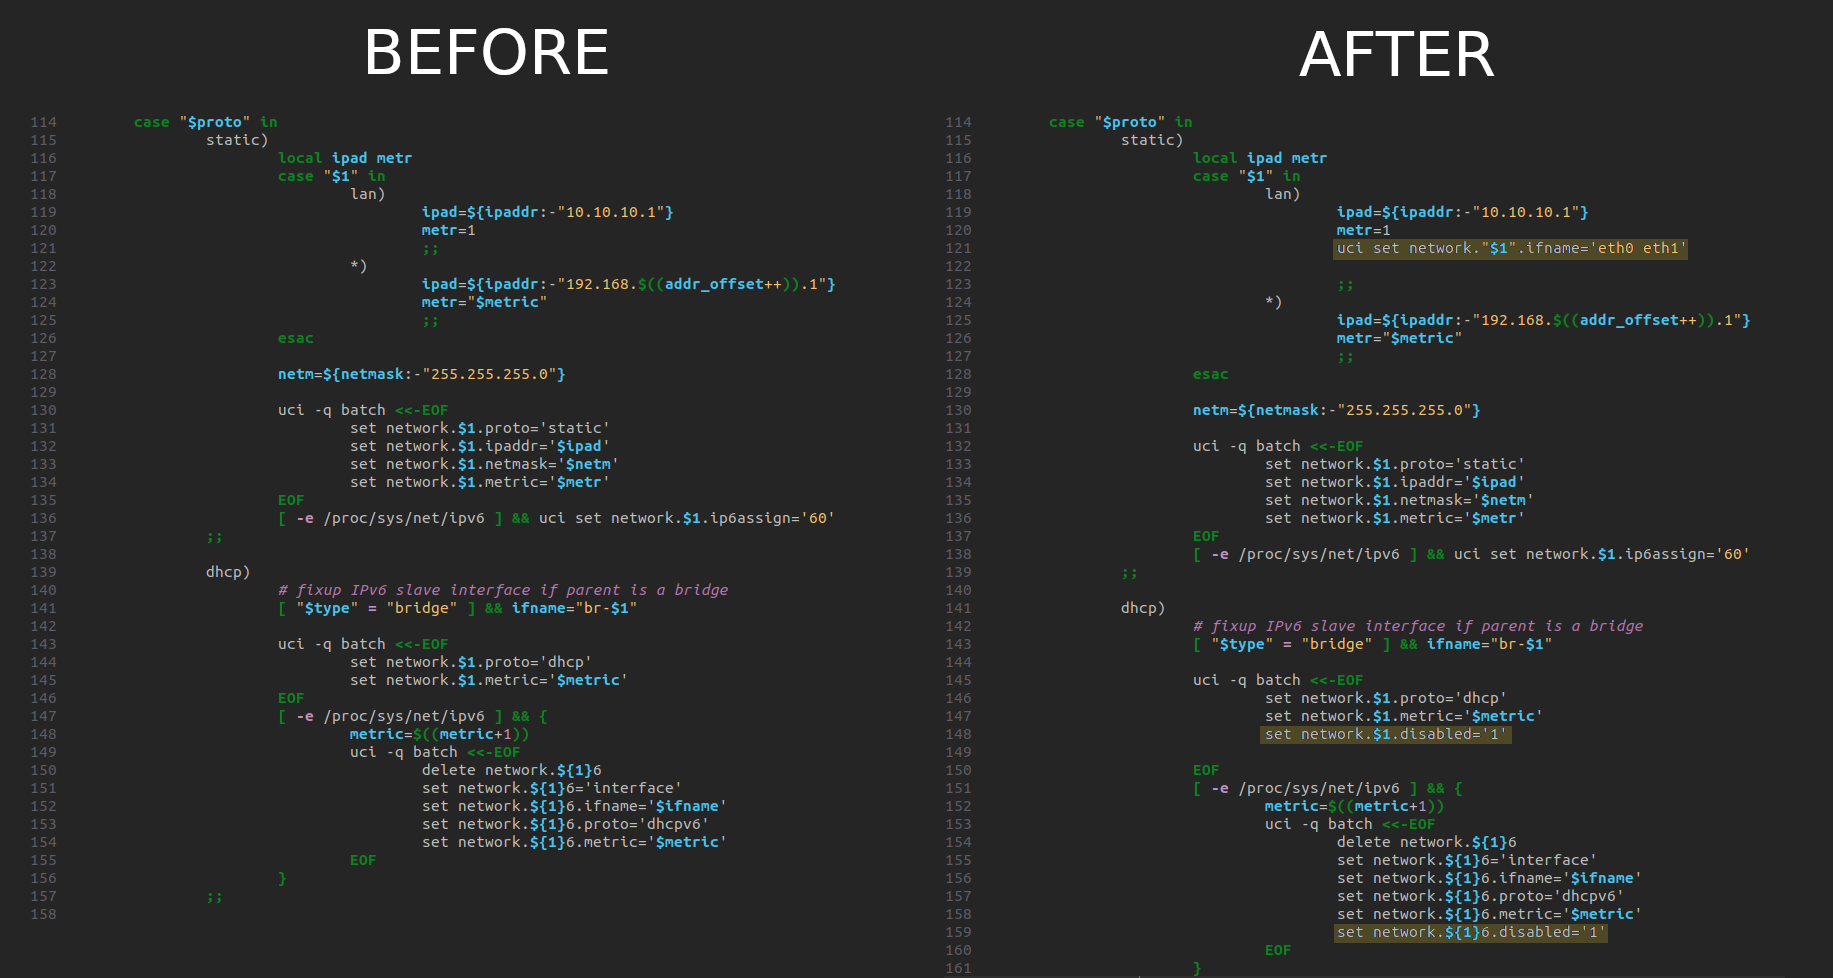
To bridge the "eth1"' interface to the LAN interface, add the following command after the line 120:
uci set network."$1".ifname='eth0 eth1'
To disable WAN/WAN6 interfaces, add the following commands after line 147 and line 158:
After Line 147:
set network.$1.disabled='1'
After Line 158:
set network.${1}6.disabled='1'
After applying these changes, the "generate_network()" function should look similar to this:

