|
|
| (84 intermediate revisions by the same user not shown) |
| Line 1: |
Line 1: |
| <span style="color: red;">The information in this page is shown in accordance with firmware versions {{{fw_version}}}.</span> | | <p style="color:red">The information on this page is updated in accordance with the [https://wiki.teltonika-networks.com/view/FW_%26_SDK_Downloads'''00.07.08'''] firmware version .</p> |
| | __TOC__ |
| | ==Summary== |
| | This article contains instructions on how to send M-Bus data to the server using various protocols. |
|
| |
|
| ==Introduction== | | ==Configuration overview & prerequisites== |
| | Before we begin, let's take a look at the configuration that we are attempting to achieve and the prerequisites that make it possible. |
|
| |
|
| '''''gsmctl''''' is an SSH command used to communicate with a {{{name}}} router's modem. In other words, ''gsmctl'' relays '''AT''' commands (a set of instructions used to control a modem) to the router's modem; thus, providing the user with a way to control and obtain information from the modem via SSH. This can be used to either obtain certain modem related variables (signal strength, operator, connection state, etc.) or to execute certain actions (sending SMS messages, changing the frequency band, etc.). | | '''Prerequisites''': |
| | * TRB143; |
| | * M-Bus device; |
| | * Server; |
| | * An end device (PC, Laptop, Tablet, Smartphone) for configuration; |
|
| |
|
| This article provides a complete overview on ''gsmctl'' commands available in {{{name}}} routers.
| | {{Template:Networking_rutos_manual_basic_advanced_webui_disclaimer |
| | | series = RUTX |
| | }} |
|
| |
|
| ==Prerequisites== | | ==Adding M-Bus devices== |
| | The '''[[TRB143_M-Bus|M-Bus Settings]]''' section is used to configure the general service functionality. To set up a new M-Bus instance, go to '''Services → M-Bus → Client'''. Add a new device to the configuration press [[File:Add Button.png|60x90px]] button which is shown below. |
|
| |
|
| ''gsmctl'' commands can be used on all {{{name}}} routers via any type of command line interface (CLI) supported by the router. So all you need is:
| | [[File:Mbus adding new device.png||border|class=tlt-border]] |
|
| |
|
| *a {{{name}}} router
| | ===Device configuration=== |
| *knowledge on how to login via a '''[[Command line interfaces|command line interface]]'''
| |
| | |
| ==gsmctl options== | |
| | |
| ''gsmctl'' commands are used in tandem with various options that specify what type of action should be executed.
| |
| ----
| |
| '''Example structure'''
| |
| | |
| Individual options are described in separate subsections of this article. To find the information you are looking for faster, refer to the table of contents at the top of the page or use your browser's "Find in page" feature ('''Control + F''').
| |
| | |
| Each option is presented with its usage syntax and an example command. For easier differentiation of the different elements that make up the examples, different colors are used:
| |
| | |
| *<span style="color:blue;">options</span> are highlighted in blue
| |
| *<span style="color:red;">responses</span> are highlighted in red
| |
| *<span style="color:purple;">additional parameters</span> are highlighted in purple
| |
| | |
| ----
| |
| '''Two execution methods'''
| |
| | |
| Each option can be executed in two distinct ways. One is shorter, the other is longer and more descriptive. For example, to obtain the modem's IMEI you can either use:
| |
| | |
| *short version: '''''gsmctl -i'''''
| |
| *long version: '''''gsmctl --imei'''''
| |
| | |
| In both cases, you just type the desired command and press the "Enter" key on your keyboard to execute that command. The response will be printed out as a '''standard output''' ('''stdout''') string in your terminal window.
| |
| ----
| |
| '''Combined options'''
| |
| | |
| Multiple options can be combined together to obtain more than one parameter at a time. For example, to obtain the name of the operator used, signal strength and connection type with one command you can use one of the following:
| |
| | |
| *short version: '''''gsmctl -oqt'''''
| |
| *long version: '''''gsmctl --operator --signal --conntype'''''
| |
| | |
| Note that in the shorter version multiple options can be used together with one hyphen (-) symbol with no spacing, while in the longer version different options must be separated by spaces and before each option a double hyphen (--) is required.
| |
| | |
| ==Basic options==
| |
| | |
| This section overviews basic ''gsmctl'' options, usually related to obtaining certain modem related information.
| |
| | |
| ===Get number of bytes sent===
| |
| ----
| |
| To obtain the number of bytes sent (TX bytes) by a network interface, use '''''-e''''' or '''''--bsent''''' options.
| |
| | |
| '''Usage syntax''':
| |
| | |
| gsmctl <span style="color:blue;">-e</span>, <span style="color:blue;">--bsent</span> <span style="color:purple;"><INTERFACE></span>
| |
| | |
| Where ''<INTERFACE>'' is the name of a network interface.
| |
| | |
| '''Example''': obtaining the number of bytes sent (TX bytes) by the mobile connection interface:
| |
| | |
| root@Teltonika:~# gsmctl <span style="color:blue;">-e</span> <span style="color:purple;">{{#ifeq:{{{series}}}|RUTOS|mob1s1a1|wwan0}}</span>
| |
| <span style="color:red;">36335</span>
| |
| | |
| Where '''''wwan0''''' is the name of the mobile interface when the connection type is set to QMI (default). You can use the '''''ifconfig''''' command to check the names of existing network interfaces.
| |
| | |
| '''Possible responses''':
| |
| | |
| *An integer number representing '''bytes''' (not bits) sent
| |
| | |
| | |
| ===Get number of bytes received===
| |
| ----
| |
| To obtain the number of bytes received (RX bytes) by a network interface, use '''''-r''''' or '''''--brecv''''' options.
| |
| | |
| '''Usage syntax''':
| |
| | |
| gsmctl <span style="color:blue;">-r</span>, <span style="color:blue;">--brecv</span> <span style="color:purple;"><INTERFACE></span>
| |
| | |
| Where ''<INTERFACE>'' is the name of a network interface.
| |
| | |
| '''Example''': obtaining the number of bytes received (RX bytes) by the mobile connection interface:
| |
| | |
| root@Teltonika:~# gsmctl <span style="color:blue;">-r</span> <span style="color:purple;">{{#ifeq:{{{series}}}|RUTOS|mob1s1a1|wwan0}}</span>
| |
| <span style="color:red;">92551</span>
| |
| | |
| Where '''''wwan0''''' is the name of the mobile interface when the connection type is set to QMI (default). You can use the '''''ifconfig''''' command to check the names of existing network interfaces.
| |
| | |
| '''Possible responses''':
| |
| | |
| *An integer number representing '''bytes''' (not bits) received
| |
| | |
| | |
| ===Get network connection state===
| |
| ----
| |
| To obtain the network connection state, use '''''-j''''' or '''''--connstate''''' options.
| |
| | |
| '''Usage syntax''':
| |
| | |
| gsmctl <span style="color:blue;">-j</span>, <span style="color:blue;">--connstate</span>
| |
| | |
| '''Example''': obtaining the current network connection state:
| |
| | |
| root@Teltonika:~# gsmctl <span style="color:blue;">-j</span>
| |
| <span style="color:red;">connected</span>
| |
| | |
| '''Possible responses''':
| |
| | |
| *connected
| |
| *disconnected
| |
| ===-P===
| |
| ----
| |
| | |
| ===Get network link state===
| |
| ----
| |
| To obtain the registration state of the mobile network, use '''''-g''''' or '''''--netstate''''' options.
| |
| | |
| '''Usage syntax''':
| |
| | |
| gsmctl <span style="color:blue;">-g</span>, <span style="color:blue;">--netstate</span>
| |
| | |
| '''Example''': obtaining the registration state of the mobile network:
| |
| | |
| root@Teltonika:~# gsmctl <span style="color:blue;">-g</span>
| |
| <span style="color:red;">registered (home)</span>
| |
| | |
| '''Possible responses''':
| |
| | |
| *registered (home)
| |
| *registered (roaming)
| |
| *unregistered
| |
| *searching
| |
| *unknown
| |
| | |
| ===Get cell ID parameter===
| |
| ----
| |
| To obtain the ID of the cell that the SIM card is connected to, use '''''-C''''' or '''''--cellid''''' options.
| |
| | |
| '''Usage syntax''':
| |
| | |
| gsmctl <span style="color:blue;">-C</span>, <span style="color:blue;">--cellid</span>
| |
| | |
| '''Example''': obtaining the cell ID:
| |
| | |
| root@Teltonika:~# gsmctl <span style="color:blue;">-C</span>
| |
| <span style="color:red;">1037089</span>
| |
| | |
| '''Possible responses''':
| |
| | |
| *a 7 digit sequence of decimal numbers indicating the cell ID
| |
| *N/A - returned when the SIM card is not inserted or unregistered
| |
| | |
| | |
| ===Get name of operator used===
| |
| ---- | | ---- |
| To obtain the name of the operator used, use '''''-o''''' or '''''--operator''''' options.
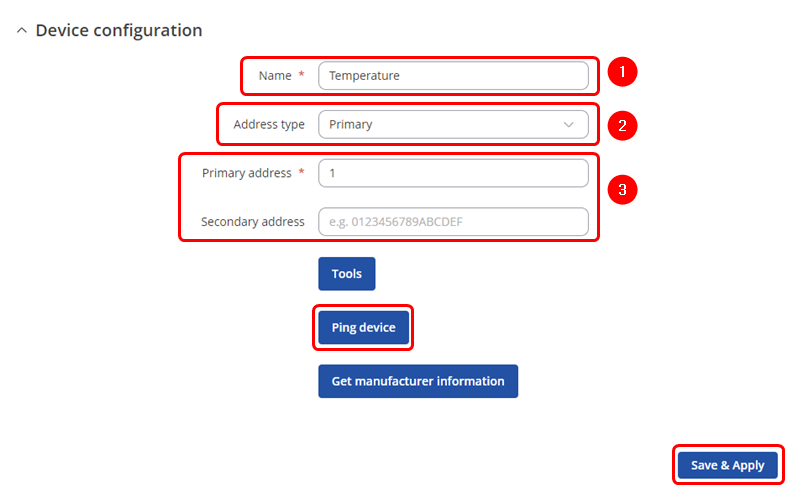
| | You will be granted to a new window. Configure your M-Bus device accordingly: |
|
| |
|
| '''Usage syntax''': | | # '''Name''': Enter the desired name of the M-Bus device |
| | # '''Address type''': select which M-Bus address will be used |
| | # '''Primary/Secondary address''': specify M-Bus address |
|
| |
|
| gsmctl <span style="color:blue;">-o</span>, <span style="color:blue;">--operator</span>
| | [[File:Mbus adding new device configuration v3.png|border|class=tlt-border]] |
|
| |
|
| '''Example''': obtaining the operator name:
| | Test if the M-Bus device is reachable by a specified primary/secondary address. To do so click on [[File:Ping_device_option_mbus.png|110x110px]]. You might get on of two outputs: |
|
| |
|
| root@Teltonika:~# gsmctl <span style="color:blue;">-o</span>
| | * If you have specified correct primary/secondary address, you will receive: |
| <span style="color:red;">LT BITE GSMC</span>
| | [[File:Mbus device pingable v2.png|border|class=tlt-border|300px]] |
|
| |
|
| '''Possible responses''':
| | * If you have specified incorrect primary/secondary address, you will receive (if you do not know what address should be used, refer to the Scanning for available M-Bus devices (PRIDET URL) secion: |
| | [[File:Mbus device not pingable v2.png|border|class=tlt-border|300px]] |
|
| |
|
| *a string of text representing the network operator's name
| | Once finished, save the configuration by clicking [[File:Savenapply button.png|Savenapply button.png]]. |
| *N/A - returned when the SIM card is not connected to any operator
| |
|
| |
|
| ===Get operator number=== | | ===Scanning for available M-Bus devices=== |
| ---- | | ---- |
| To obtain the network operator's number, use '''''-f''''' or '''''--opernum''''' options.
| |
|
| |
| '''Usage syntax''':
| |
|
| |
| gsmctl <span style="color:blue;">-f</span>, <span style="color:blue;">--opernum</span>
| |
|
| |
| '''Example''': obtaining the network operator's number:
| |
|
| |
| root@Teltonika:~# gsmctl <span style="color:blue;">-f</span>
| |
| <span style="color:red;">24602</span>
| |
|
| |
| '''Possible responses''':
| |
|
| |
| *a 6 digit sequence of decimal numbers
| |
| *N/A - returned when the SIM card is not connected to any operator
| |
|
| |
|
| | If you are not sure what address your M-Bus devices have, you can try scanning for the available M-Bus devices. To do so click on [[File:Scan button.png]] button. |
|
| |
|
| ===Get data carrier type=== | | ====Scan settings==== |
| ---- | | ---- |
| To obtain the connection type, use '''''-t''''' or '''''--conntype''''' options.
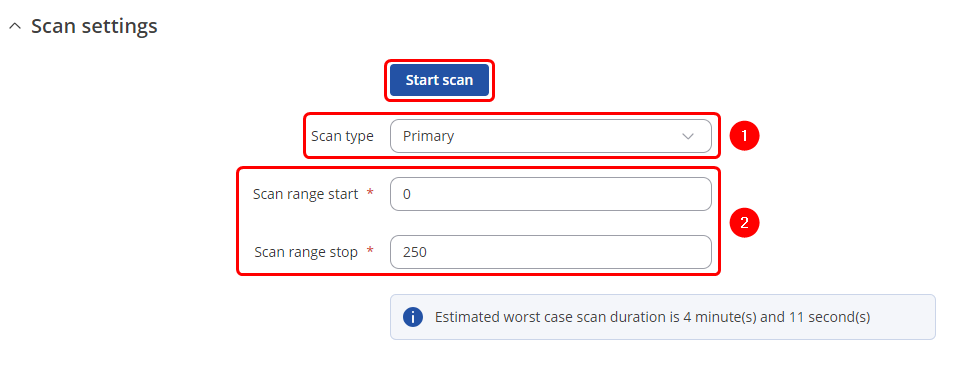
| | You will be granted to a new window. Configure scan settings accordingly: |
| | |
| '''Usage syntax''':
| |
| | |
| gsmctl <span style="color:blue;">-t</span>, <span style="color:blue;">--conntype</span>
| |
| | |
| '''Example''': obtaining the connection type:
| |
| | |
| root@Teltonika:~# gsmctl <span style="color:blue;">-t</span>
| |
| <span style="color:red;">LTE</span>
| |
|
| |
|
| '''Possible responses''': | | # '''Scan type''': select which M-Bus address will be scanned |
| | # '''Scan range''': From what M-Bus address scanning will start and M-Bus address until scanning will be performed. |
| | [[File:Mbus scan.png|border|class=tlt-border]] |
|
| |
|
| *NOSERVICE - NOSERVICE mode
| | To start the scan click on [[File:Start scan button.png]] button. |
| *GSM - GSM/GPRS/EDGE mode
| |
| *WCDMA - WCDMA/HSDPA/HSPA mode
| |
| *TDSCDMA - TDSCDMA mode
| |
| *LTE - LTE mode
| |
| *CDMA - CDMA mode
| |
| *EVDO - EV-DO/eHRPD mode
| |
| *CDMA-EVDO - CDMA/EV-DO(eHRPD) mode
| |
|
| |
|
| ===Get network information=== | | ====Found devices==== |
| ---- | | ---- |
| To obtain information related to the mobile network information, use '''''-F''''' or '''''--network''''' options.
| | Once the scan is finished you should see the list of M-Bus devices that TRB143 were able to find: |
| | |
| '''Usage syntax''':
| |
|
| |
|
| gsmctl <span style="color:blue;">-F</span>, <span style="color:blue;">--network</span>
| | [[File:Mbus scanned devices add.png|border|class=tlt-border]] |
| | |
| '''Example''': obtaining mobile network information:
| |
| | |
| root@Teltonika:~# gsmctl <span style="color:blue;">-F</span>
| |
| <span style="color:red;">+QNWINFO: "FDD LTE",46001,"LTE BAND 3",1650</span>
| |
| | |
| '''Possible responses''':
| |
| | |
| *response syntax: ''+QNWINFO: <Act>,<oper>,<band>,<channel>'' <br> Where:
| |
| **'''''<Act>''''' - service mode
| |
| **'''''<oper>''''' - operator number
| |
| **'''''<band>''''' - frequency band used
| |
| **'''''<channel>''''' - channel ID
| |
| | |
| <b>Note</b>: From FW version <i>R_00.07.03</i> the values are returned in a different format. Example:
| |
| | |
| root@Teltonika:~# gsmctl -F
| |
| LTE | LTE_B3 | 24602
| |
| | |
| ===Get serving cell information===
| |
| ----
| |
| To obtain the serving cell information, use '''''-K''''' or '''''--serving''''' options.
| |
| | |
| '''Usage syntax''':
| |
| | |
| gsmctl <span style="color:blue;">-K</span>, <span style="color:blue;">--serving</span>
| |
| | |
| '''Example''': obtaining the serving cell information
| |
| | |
| root@Teltonika:~# gsmctl <span style="color:blue;">-K</span>
| |
| <span style="color:red;">+QENG: "servingcell","NOCONN","LTE","FDD",246,02,FD317,109,1850,3,5,5,92,-108,-12,-76,14,-</span>
| |
| MEIG modem output:
| |
| <span style="color:red;">+SGCELLINFOEX:LTE,FDD LTE,246,02,1037079,109,4051,23,146,3,100,1850,19850,-63,-99,-13,199,19,4,255,-,-,4,-,0,-,0,0,0</span>
| |
| | |
| <b>Note</b>: From FW version <i>R_00.07.03</i> the values are returned in a different format. Example:
| |
| | |
| root@Teltonika:~# gsmctl -K
| |
| Access tech: LTE | TDD mode: FDD | MCC: 246 | MNC: 2 | UE state: 3
| |
| | |
| ===Get neighbour cell information=== | |
| ----
| |
| To obtain the neighbor cell information, use '''''-I''''' or '''''--neighbour''''' options.
| |
|
| |
|
| '''Usage syntax''': | | You can either [[File:Pencil2.png]] '''(1)''' M-Bus devices primary address or [[File:Add Button.png|60x90px]] '''(2)''' to the M-Bus devices list. |
|
| |
|
| gsmctl <span style="color:blue;">-I</span>, <span style="color:blue;">--neighbour</span>
| | ==Gathering M-Bus data== |
|
| |
|
| '''Example''': obtaining the neighbour cell information
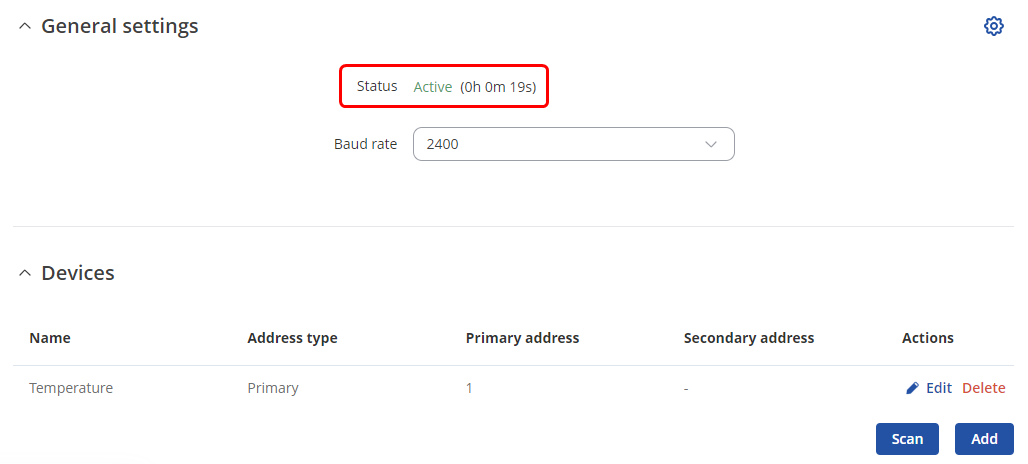
| | If the device successfully added to the list, under the General settings you should see that the Status changes to <span style="color:green">Active</span>. |
|
| |
|
| root@Teltonika:~# gsmctl <span style="color:blue;">-I</span>
| | [[File:Mbus status active v2.png|border|class=tlt-border]] |
| <span style="color:red;">+QENG: "neighbourcell intra","LTE",522,269,-9,-87,-58,0,-,-,-,-,-</span>
| |
|
| |
|
| ===Get VoLTE state status=== | | ===Data collecting groups=== |
| ---- | | ---- |
| To obtain the VoLTE state, use '''''-v''''' or '''''--volte_state''''' options. | | To reach data collecting groups configuration press [[File:Pencil2.png]] button. [[File:Add Button.png|60x90px]] button lets you to create a new instance. |
| | |
| <b>Note</b>: This argument is supported from FW version <i>R_00.07.03</i>.
| |
| | |
| '''Usage syntax''':
| |
| | |
| gsmctl <span style="color:blue;">-v</span>, <span style="color:blue;">--volte_state</span>
| |
|
| |
|
| '''Example''': obtaining the VoLTE state.
| | [[File:Mbus data collect overview.png|border|class=tlt-border]] |
|
| |
|
| root@Teltonika:~# gsmctl -v
| | ====Data collecting group instance==== |
| Active
| |
| ===-b=== | |
| ----
| |
| ==Modem commands==
| |
| ===Send AT command to device===
| |
| ---- | | ---- |
|
| |
|
| To send AT command to device, use '''''-A''''' or '''''--at''''' options.
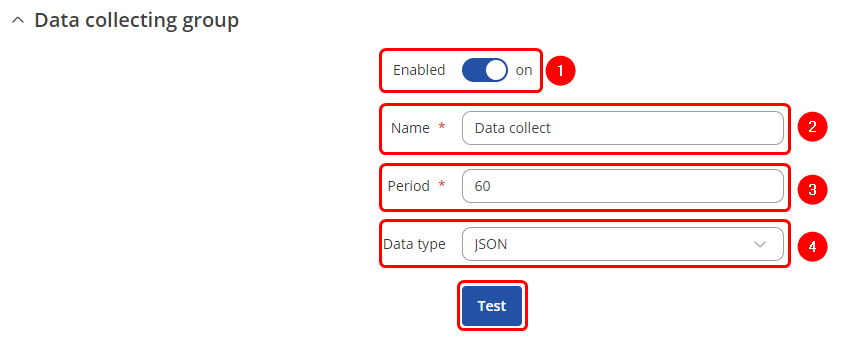
| | Each data collection group contains the following information. Configure device accordingly: |
| | |
| '''Usage syntax''':
| |
| | |
| gsmctl <span style="color:blue;">-A, --at</span> <span style="color:purple;">'AT+command'</span>
| |
|
| |
|
| '''Example''': | | # '''Enabled''': on |
| | # '''Name''': desired name of the instance |
| | # '''Period''': desired time duration between data retrievals |
| | # '''Data type''': desired data type to process the received data. Depending on your needs you can select between 5 different data types: '''JSON, XML, ASCII, Hexadecimal''' and '''Binary'''. |
|
| |
|
| root@Teltonika:~# gsmctl <span style="color:blue;">-A</span> <span style="color:purple;">'AT+CLCK="SC",2'</span>
| | [[File:Mbus data collect group v2.png|border|class=tlt-border]] |
| <span style="color:red;"></span>
| |
|
| |
|
| '''Possible responses''':
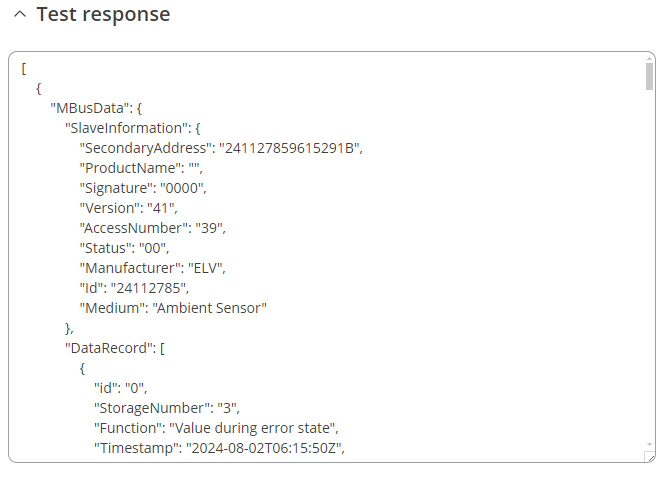
| | You can check if your configuration works accordingly by pressing the [[File:Mbus test button.png]] button. You should see the data in a pop-up field: |
|
| |
|
| *This example will return SIM card pin lock state ("+CLCK: 0" - pin lock disabled).
| | [[File:Mbus TEST output.png|border|class=tlt-border]] |
|
| |
|
| ===Get device IMEI=== | | ====Group values==== |
| ---- | | ---- |
| To obtain the modem's International Mobile Equipment Identity (IMEI), use '''''-i''''' or '''''--imei''''' options. | | To reach group values configuration press [[File:Pencil2.png]] button: |
|
| |
|
| '''Usage syntax''':
| | [[File:Mbus edit group values.png|border|class=tlt-border]] |
|
| |
|
| gsmctl <span style="color:blue;">-i</span>, <span style="color:blue;">--imei</span>
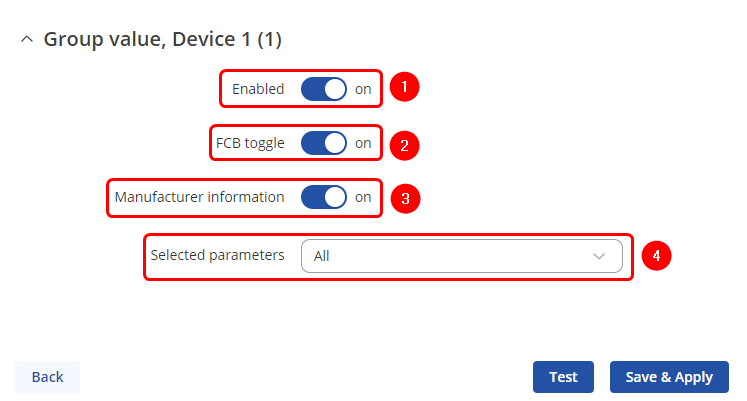
| | There you can adjust additional settings: |
|
| |
|
| '''Example''': obtaining the modem's IMEI: | | # '''Enable''': Enable/disable data group value. |
| | # '''FCB toggle''': FCB (Frame Count-Bit), one-bit counter for reliable server-client communication. |
| | # '''Manufacturer information''': Select to include manufacturer information in the payload. |
| | # '''Selected parameters''': Select to include the all parameters saved from device, or a custom subset of them. If the custom is selected you can specify '''frame''', '''record''' numbers and also a '''paramater''' |
|
| |
|
| root@Teltonika:~# gsmctl <span style="color:blue;">-i</span>
| | [[File:Mbus device groupsa.png|border|class=tlt-border]] |
| <span style="color:red;">990000862471854</span>
| |
|
| |
|
| '''Possible responses''':
| |
|
| |
|
| *a 15 digit sequence of decimal numbers
| | ==Sending data to the server== |
| | The '''[[TRB143_Data_to_Server|Data to Server]]''' feature provides you with the possibility to set up data senders that collect data from various sources and periodically send it to remote servers. This section will walk you through configuring the Data to Server to send M-Bus data to the desired HTTP or MQTT server. |
|
| |
|
| ===Get SIM ICCID=== | | ===Data to Server configuration=== |
| ---- | | ---- |
| To obtain the Integrated Circuit Card Identifier (ICCID) of the SIM card that is currently in use, use '''''-J''''' or '''''--iccid''''' options. | | To set up Data to Server, navigate to Services → Data to Server. Enter desired name of the instnace and hit [[File:Add Button.png|60x90px]] button which is shown below. |
| | |
| '''Usage syntax''':
| |
| | |
| gsmctl <span style="color:blue;">-J</span>, <span style="color:blue;">--iccid</span>
| |
| | |
| '''Example''': obtaining the ICCID of the SIM card in use:
| |
| | |
| root@Teltonika:~# gsmctl <span style="color:blue;">-J</span>
| |
| <span style="color:red;">89310410106543789301</span>
| |
| | |
| '''Possible responses''':
| |
|
| |
|
| *a 19 or 20 digit sequence of decimal numbers
| | [[File:Mbus data to server create.png|border|class=tlt-border]] |
|
| |
|
| ===Get device model=== | | ===Data configuration=== |
| ---- | | ---- |
| To obtain the modem's model name, use '''''-m''''' or '''''--model''''' options.
| |
|
| |
| '''Usage syntax''':
| |
|
| |
| gsmctl <span style="color:blue;">-m</span>, <span style="color:blue;">--model</span>
| |
|
| |
|
| '''Example''': obtaining the modem's model name
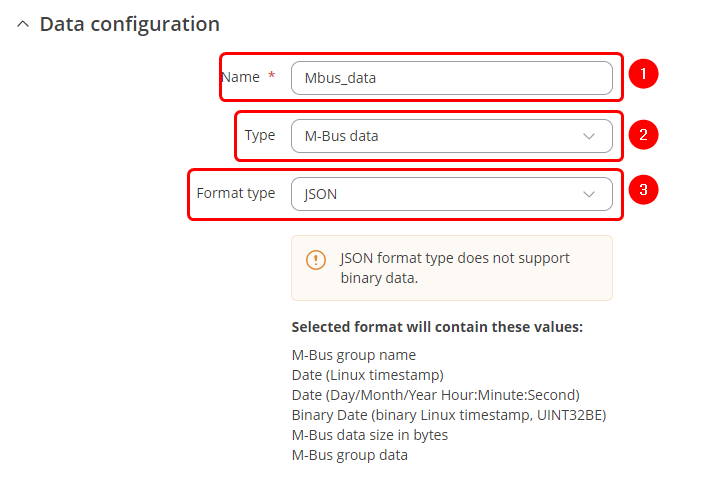
| | Each data collection group contains the following information. Configure device accordingly: |
|
| |
|
| root@Teltonika:~# gsmctl <span style="color:blue;">-m</span>
| | # '''Name''': desired name of the instance |
| <span style="color:red;">model_name</span>
| | # '''Type''': M-Bus data |
| | # '''Format''': custom or JSON depending on a need. |
|
| |
|
| '''Possible responses''':
| | [[File:Mbus data to server configuration.png|border|class=tlt-border]] |
|
| |
|
| *a string of letters and digits representing the model name
| |
|
| |
|
| | Once finished configuring Data configuration tab click on [[File:Mbus data to server collection edit.png|160x160px]] button. |
|
| |
|
| ===Get device manufacturer=== | | ===Collection configuration=== |
| ---- | | ---- |
| To obtain the modem's manufacturer's name, use '''''-w''''' or '''''--manuf''''' options.
| |
|
| |
| '''Usage syntax''':
| |
|
| |
| gsmctl <span style="color:blue;">-w</span>, <span style="color:blue;">--manuf</span>
| |
|
| |
|
| '''Example''': obtaining the modem's manufacturer's name:
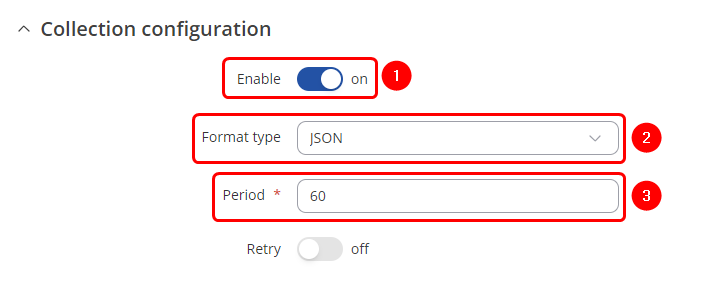
| | [[File:Mbus data to server collection configuration.png|border|class=tlt-border]] |
|
| |
|
| root@Teltonika:~# gsmctl <span style="color:blue;">-w</span>
| | Once finished configuring Collection configuration tab click on [[File:Mbus data to server server button.png|160x160px]] button. |
| <span style="color:red;">manufacturers_name</span>
| |
|
| |
|
| '''Possible responses''':
| | ===Server configuration=== |
| | |
| *a string of letters and digits representing the manufacturer's name
| |
| | |
| ===Get device revision number=== | |
| ---- | | ---- |
| To obtain the modem's revision number (firmware version), use '''''-y''''' or '''''--revision''''' options.
| | This section contains information on how to configure MQTT and HTTP servers information. |
| | |
| '''Usage syntax''':
| |
| | |
| gsmctl <span style="color:blue;">-y</span>, <span style="color:blue;">--revision</span>
| |
| | |
| '''Example''': obtaining the modem's revision number:
| |
| | |
| root@Teltonika:~# gsmctl <span style="color:blue;">-y</span>
| |
| <span style="color:red;">EC25EFAR02A08M4G</span>
| |
| | |
| '''Possible responses''':
| |
| | |
| *a string of letters and digits representing the revision number (firmware version)
| |
|
| |
|
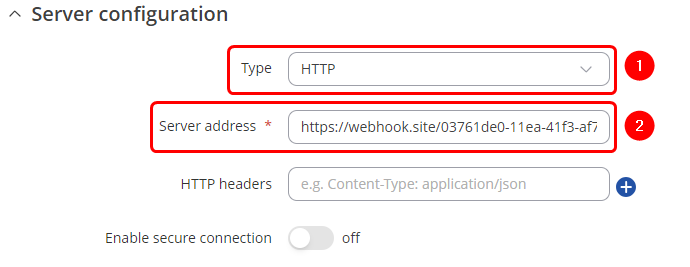
| | | ====HTTP configuration==== |
| ===Get IMSI=== | |
| ---- | | ---- |
| To obtain the International Mobile Subscriber Identity (IMSI), use '''''-x''''' or '''''--imsi''''' options.
| |
|
| |
|
| '''Usage syntax''': | | # '''Type''': HTTP |
| | # '''Server address''': desired server address |
|
| |
|
| gsmctl <span style="color:blue;">-x</span>, <span style="color:blue;">--imsi</span>
| | '''Note''': not specified fields are optional. |
|
| |
|
| '''Example''': obtaining IMSI:
| | [[File:Mbus data to server HTTP configuration.png|border|class=tlt-border]] |
|
| |
|
| root@Teltonika:~# gsmctl <span style="color:blue;">-x</span>
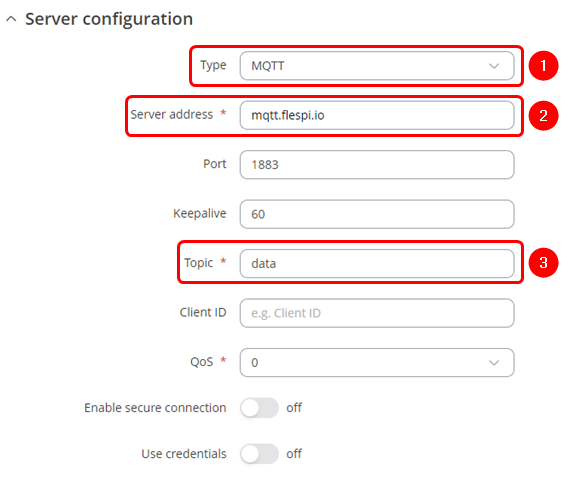
| | ====MQTT configuration==== |
| <span style="color:red;">246029999999999</span>
| |
| | |
| '''Possible responses''':
| |
| | |
| *a 15 digit (or less) sequence of decimal numbers
| |
| | |
| | |
| ===Get SIM card state=== | |
| ---- | | ---- |
| To obtain the state of the SIM card currently in use, use '''''-z''''' or '''''--simstate''''' options.
| |
|
| |
|
| '''Usage syntax''': | | # '''Type''': MQTT |
| | # '''Server address''': desired server address |
| | # '''Topic''': MQTT topic to be used for publishing the data. |
|
| |
|
| gsmctl <span style="color:blue;">-z</span>, <span style="color:blue;">--simstate</span>
| | '''Note''': not specified fields are optional. |
|
| |
|
| '''Example''': obtaining the current SIM state:
| | [[File:Mbus data to server MQTT configuration.png|border|class=tlt-border]] |
|
| |
|
| root@Teltonika:~# gsmctl <span style="color:blue;">-z</span>
| | Once finished configuring Server configuration tab click on [[File:Savenapply button.png|Savenapply button.png]] button. |
| <span style="color:red;">inserted</span>
| |
|
| |
|
| '''Possible responses''':
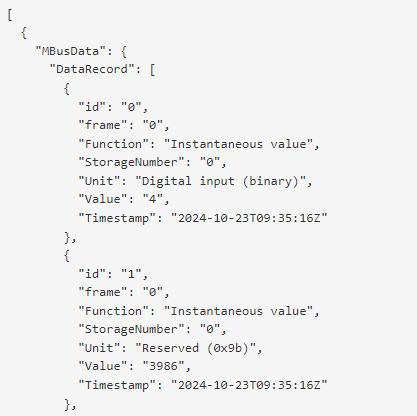
| | ===Results=== |
| | |
| *inserted
| |
| *not inserted
| |
| | |
| ===-u=== | |
| ---- | | ---- |
|
| |
|
| ===Get operator station time===
| | [[File:Mbus data received v2.png|border|class=tlt-border]] |
| ----
| |
| To obtain the operator station, use '''''-H''''' or '''''--modemtime''''' options with time argument (1 - GMT, 2 - local).
| |
| | |
| '''Usage syntax''':
| |
| | |
| gsmctl <span style="color:blue;">-H</span>, <span style="color:blue;">--modemtime</span> <span style="color:purple;"><1/2></span>
| |
| | |
| '''Example''': obtaining the operator time
| |
| | |
| root@Teltonika:~# gsmctl -H 1
| |
| 22/12/01,12:27:14
| |
| | |
| ===Get module temperature===
| |
| ----
| |
| To obtain the module's temperature, use '''''-c''''' or '''''--temp''''' options.
| |
| | |
| '''Usage syntax''':
| |
| | |
| gsmctl <span style="color:blue;">-c</span>, <span style="color:blue;">--temp</span>
| |
| | |
| '''Example''': obtaining the module's temperature:
| |
| | |
| root@Teltonika:~# gsmctl <span style="color:blue;">-c</span>
| |
| <span style="color:red;">360</span>
| |
| | |
| '''Possible responses''':
| |
| | |
| *an integer number representing the module's current temperature (in 0.1 degrees Celsius (°C))
| |
| | |
| | |
| ===Get PIN/PUK count===
| |
| ----
| |
| To obtain the PIN/PUK count, use '''''-B''''' or '''''--pincount''''' options.
| |
| | |
| '''Usage syntax''':
| |
| | |
| gsmctl <span style="color:blue;">-B</span>, <span style="color:blue;">--pincount</span>
| |
| | |
| '''Example''': obtaining the
| |
| | |
| root@Teltonika:~# gsmctl <span style="color:blue;">-B</span>
| |
| <span style="color:red;">3</span>
| |
| | |
| '''Possible responses''':
| |
| | |
| *an integer number representing the amount of PIN/PUK attempts left
| |
| *N/A - returned when the SIM card is not inserted
| |
| | |
| ===Get modem info in json format===
| |
| ----
| |
| To obtain the full modem information in JSON format, use '''''-E''''' or '''''--info''''' options.
| |
| | |
| <b>Note</b>: This argument is supported from FW version <i>R_00.07.03</i>.
| |
| | |
| '''Usage syntax''':
| |
| | |
| gsmctl <span style="color:blue;">-E</span>, <span style="color:blue;">--info</span>
| |
| | |
| '''Example''': obtaining the modem information
| |
| | |
| root@Teltonika:~# gsmctl -E
| |
| {
| |
| "name": "Quectel EG06-E",
| |
| "model": "EG06-E",
| |
| "manuf": "Quectel",
| |
| "driver": "Quectel EG06 AT",
| |
| "usb_id": "3-1",
| |
| ...
| |
| | |
| ===-U===
| |
| ----
| |
| | |
| ===-Y===
| |
| ----
| |
| | |
| ===Reboot the modem===
| |
| ----
| |
| To reboot the modem, use '''''-Q''''' or '''''--reboot''''' options. After the command is executed, the modem will start rebooting.
| |
| | |
| '''Usage syntax''':
| |
| | |
| gsmctl <span style="color:blue;">-Q</span>, <span style="color:blue;">--reboot</span>
| |
| | |
| '''Example''': rebooting the modem
| |
| | |
| root@Teltonika:~# gsmctl <span style="color:blue;">-Q</span>
| |
| <span style="color:red;">Modem was reset</span>
| |
| | |
| '''Possible responses''':
| |
| | |
| *Modem was reset
| |
| | |
| | |
| ==SMS management options==
| |
| | |
| This section overviews ''gsmctl'' options related to SMS management. Every SMS related command uses the '''''"-S"''''' or '''''"--sms"''''' along with another option.
| |
| | |
| ===Read SMS by index===
| |
| ----
| |
| | |
| To read a single SMS message, use '''''-S -r''''' or '''''--sms --read''''' options. Additionally you have to specify the '''''<INDEX>''''' of the message that you wish to read. The ''<INDEX>'' is an integer number that defines the position of a message in the SMS message list. It can range from 1 to however many messages your SMS memory can store.
| |
| | |
| '''Usage syntax''':
| |
| | |
| gsmctl <span style="color:blue;">-S -r</span>, <span style="color:blue;">--sms --read</span> <span style="color:purple;"><INDEX></span>
| |
| | |
| '''Example''': reading the first message in the SMS list
| |
| | |
| root@Teltonika:~# gsmctl <span style="color:blue;">-S -r</span> <span style="color:purple;">1</span>
| |
| <span style="color:red;">Index: 1
| |
| Date: 2018-08-02 10:33:20
| |
| Sender: +37061111111
| |
| Status: read
| |
| Text: Hello
| |
| | |
| '''Possible responses''':
| |
| | |
| *five lines of string type output indicating the following information related to the SMS message:
| |
| **Index - an integer number indicating the position of the message in the SMS message list
| |
| **Date - the date the message was received
| |
| **Sender - sender's phone number
| |
| **Status - indicates whether the message has been previously read. (Possible values: ''read'' or ''new'')
| |
| **Text - the body of the message
| |
| *no message - indicates that an SMS message with the specified ''<INDEX>'' does not exist
| |
| *out of range - indicates that the specified ''<INDEX>'' is out of range of the SMS message list
| |
| | |
| | |
| ===List SMS by type===
| |
| ----
| |
| | |
| To print a list of SMS messages, use '''''-S -l''''' or '''''--sms --list''''' options. Additionally you have to specify the '''''<TYPE>''''' of the list. ''<TYPE>'' can either '''''read''''', '''''new''''' or '''''all'''''
| |
| | |
| '''Usage syntax''':
| |
| | |
| gsmctl <span style="color:blue;">-S -l</span>, <span style="color:blue;">--sms --list</span> <span style="color:purple;"><TYPE></span>
| |
| | |
| '''Example''': printing the list of all new (unread) SMS messages
| |
| | |
| root@Teltonika:~# gsmctl <span style="color:blue;">-S -l</span> <span style="color:purple;">new</span>
| |
| <span style="color:red;">Index: 19
| |
| Date: 2018-08-03 08:26:36
| |
| Sender: +37061111111
| |
| Text: status
| |
| Status: new</span>
| |
| | |
| '''Possible responses''':
| |
| | |
| *multiple entries comprised of five lines of string type output indicating the following information related to an SMS message:
| |
| **Index - an integer number indicating the position of the message in the SMS message list
| |
| **Date - the date the message was received
| |
| **Sender - sender's phone number
| |
| **Text - the body of the message
| |
| **Status - indicates whether the message has been previously read. (Possible values: ''read'' or ''new'')
| |
| | |
| | |
| ===Print SMS memory usage===
| |
| ----
| |
| | |
| To check the SMS memory usage, use '''''-S -t''''' or '''''--sms --total''''' options.
| |
| | |
| '''Usage syntax''':
| |
| | |
| gsmctl <span style="color:blue;">-S -t</span>, <span style="color:blue;">--sms --total</span>
| |
| | |
| '''Example''': checking the SMS memory usage
| |
| | |
| root@Teltonika:~# gsmctl <span style="color:blue;">-S -t</span>
| |
| <span style="color:red;">Used: 28
| |
| Total: 50 </span>
| |
| | |
| '''Possible responses''':
| |
| | |
| *two lines of string type output
| |
| **Used - used memory space (integer)
| |
| **Total - total memory space (integer)
| |
| | |
| | |
| ===Delete SMS by index===
| |
| ----
| |
| | |
| To delete an SMS message, use '''''-S -d''''' or '''''--sms --delete''''' options. Additionally you have to specify the '''''<INDEX>''''' of the message that you wish to delete. The ''<INDEX>'' is an integer number that defines the position of a message in the SMS message list. It can range from 1 to however many messages your SMS memory can store.
| |
| | |
| '''Usage syntax''':
| |
| | |
| gsmctl <span style="color:blue;">-S -d</span>, <span style="color:blue;">--sms --delete</span> <span style="color:purple;"><INDEX></span>
| |
| | |
| '''Example''': deleting the first SMS message
| |
| | |
| root@Teltonika:~# gsmctl <span style="color:blue;">-S -d</span> <span style="color:purple;">1</span>
| |
| <span style="color:red;">OK</span>
| |
| | |
| '''Possible responses''':
| |
| | |
| *OK - indicates that the message with specified <INDEX> has been deleted successfully
| |
| *out of range - indicates that the specified <INDEX> is out of range of the SMS message list
| |
| | |
| | |
| ===Send SMS===
| |
| ----
| |
| | |
| To send an SMS message, use '''''-S -s''''' or '''''--sms --send''''' options.
| |
| | |
| '''Usage syntax''':
| |
| | |
| gsmctl <span style="color:blue;">-S -s</span>, <span style="color:blue;">--sms --send</span> <span style="color:purple;">"<NUMBER> <TEXT>"</span>
| |
| | |
| '''Example''': sending a "Hello" message to the number +37011111111
| |
| | |
| root@Teltonika:~# gsmctl <span style="color:blue;">-S -s</span> <span style="color:purple;">"0037011111111 Hello"</span>
| |
| <span style="color:red;"></span>
| |
| | |
| '''Possible responses''':
| |
| | |
| *If response in terminal "OK", SMS was sent successfully.
| |
| | |
| | |
| ===Send SMS encoded in base64===
| |
| ----
| |
| | |
| First you need to create a /tmp/.smstext file and append some text you want to send
| |
| | |
| <b>Note</b>: From FW version <i>R_00.07.03</i> this argument has been removed.
| |
| | |
| To send a base64 SMS message, use '''''-S -b''''' or '''''--sms --send-b64''''' options
| |
| | |
| '''Usage syntax''':
| |
| | |
| gsmctl <span style="color:blue;">-S -b,</span><span style="color:blue;">--sms --send-b64</span> <span style="color:purple;"><NUMBER></span>
| |
| | |
| '''Example''':
| |
| | |
| root@Teltonika:~# gsmctl <span style="color:blue;">-S -b</span> <span style="color:purple;">+37061234567</span>
| |
| <span style="color:red;"></span>
| |
| | |
| '''Possible responses''':
| |
| | |
| *If response in terminal "OK", SMS was sent successfully.
| |
| | |
| | |
| ===List available options===
| |
| ----
| |
| Using '''''-h''''' or '''''--help''''' options prints of all available ''gsmctl'' options with descriptions and usage syntax examples.
| |
| | |
| '''Usage syntax''':
| |
| | |
| gsmctl <span style="color:blue;">-h</span>, <span style="color:blue;">--help</span>
| |
| | |
| '''Example''': printing a list of available ''gsmctl'' options
| |
| | |
| root@Teltonika:~# gsmctl <span style="color:blue;">-h</span>
| |
| <span style="color:red;">usage: gsmctl OPTIONS
| |
| -p, --ip <INTERFACE> Get IP of logical interface
| |
| -e, --bsent <INTERFACE> Get number of bytes sent
| |
| -r, --brecv <INTERFACE> Get number of bytes recieved</span>
| |
| ...
| |
| '''Possible responses''':
| |
| | |
| *a list of options that can be used with ''gsmctl''
| |
| | |
| | |
| ===Print gsmctl version===
| |
| ----
| |
| To find out the current ''gsmctl'' version, use '''''-v''''' or '''''--version''''' options.
| |
| | |
| '''Usage syntax''':
| |
| | |
| gsmctl <span style="color:blue;">-v</span>, <span style="color:blue;">--version</span>
| |
| | |
| '''Example''': obtaining the ''gsmctl'' version
| |
| | |
| root@Teltonika:~# gsmctl <span style="color:blue;">-v</span>
| |
| <span style="color:red;">GSMCTL version: 0.2b</span>
| |
| | |
| '''Possible responses''':
| |
| | |
| *a string type output indicating the ''gsmctl'' version
| |
| | |
| ==Auxiliary options==
| |
| | |
| ==See also==
| |
|
| |
|
| *[[AT Commands]]
| | '''Note''': received data formating depends on the settings you apply under Data to Server and M-Bus configurations. |
![]() button which is shown below.
button which is shown below.
![]() . You might get on of two outputs:
. You might get on of two outputs:
![]() .
.
![]() button.
button.
![]() button.
button.
![]() (1) M-Bus devices primary address or
(1) M-Bus devices primary address or ![]() (2) to the M-Bus devices list.
(2) to the M-Bus devices list.
![]() button.
button. ![]() button lets you to create a new instance.
button lets you to create a new instance.
![]() button. You should see the data in a pop-up field:
button. You should see the data in a pop-up field:
![]() button:
button:
![]() button which is shown below.
button which is shown below.
![]() button.
button.
![]() button.
button.
![]() button.
button.


