WiFi WAN example: Difference between revisions
Appearance
PauliusRug (talk | contribs) Created page with "==Introduction== WiFi WAN allows you to have an additional WAN source for Internet access for failover or as a main WAN source for devices that do not have access to a wired..." |
No edit summary |
||
| (One intermediate revision by one other user not shown) | |||
| Line 1: | Line 1: | ||
<p style="color:red">The information in this page is updated in accordance with [https://wiki.teltonika-networks.com/view/FW_%26_SDK_Downloads'''00.07.13.1'''] firmware version.</p> | |||
==Introduction== | ==Introduction== | ||
| Line 4: | Line 5: | ||
==WiFi WAN == | ==WiFi WAN == | ||
*To set up WiFi WAN, login to the router's WebUI and navigate to the Network section found the Wireless tab by side ('''Network → Wireless → SSIDs''') | |||
*To set up WiFi WAN, login to the router's WebUI and navigate to the Network section found the Wireless tab by side ('''Network → Wireless''') | |||
---- | ---- | ||
*To begin configuring WiFi Client first click the 'Scan' button to scan the surrounding area and attempt to connect to a new wireless access point. You can choose whether to scan '''2.4 GHz''' or '''5 GHz''' wireless networks: | *To begin configuring WiFi Client first click the 'Scan' button to scan the surrounding area and attempt to connect to a new wireless access point. You can choose whether to scan '''2.4 GHz''' or '''5 GHz''' wireless networks: | ||
[[File: | [[File:RutOS_Relay_WIFI_extender_7.8_wifi_scan.png|border|1100x1100px|alt=]] | ||
*Once the scan is complete, you will be presented with a list of nearby WiFi Access Points. Locate and choose RUT1's Access Point and click "'''Join network'''": | *Once the scan is complete, you will be presented with a list of nearby WiFi Access Points. Locate and choose RUT1's Access Point and click "'''Join network'''": | ||
[[File: | [[File:RutOS_Relay_WIFI_extender_7.8_wifi_scan_connect.png|1100x1100px|alt=]] | ||
*You | *You will be redirected again to following window, where you will need to enter security password of the AP you are connecting to. | ||
[[File: | [[File:RutOS WiFi WAN connect.png|1100x1100px|border|class=tlt-border]] | ||
* Next window that opens will be ''' | * Next window that opens will be '''Wireless client Configuration'''. Values there, mostly, should be left unchanged to avoid connection problems, because they are dictated by ''Access'' Point. Other than that, only difference from Access Point settings are in ''Interface Configuration'' → ''General Setup section'', where '''Mode''' is set to '''Client''', and '''Network''' attached to this wireless interface is '''WAN''' instead of LAN: | ||
[[File: | [[File:RutOS_Relay_WIFI_extender_7.8_wifi_client_interface.png|1100x1100px|alt=]] | ||
*Click Save & Apply and if you configured correctly, you will have Wireless Client working. | *Click Save & Apply and if you configured correctly, you will have Wireless Client working. | ||
[[Category:WIFI]] | [[Category:WIFI]] | ||
Latest revision as of 14:56, 7 March 2025
Main Page > General Information > Configuration Examples > WIFI > WiFi WAN exampleThe information in this page is updated in accordance with 00.07.13.1 firmware version.
Introduction
WiFi WAN allows you to have an additional WAN source for Internet access for failover or as a main WAN source for devices that do not have access to a wired WAN or Mobile internet connectivity
WiFi WAN
- To set up WiFi WAN, login to the router's WebUI and navigate to the Network section found the Wireless tab by side (Network → Wireless → SSIDs)
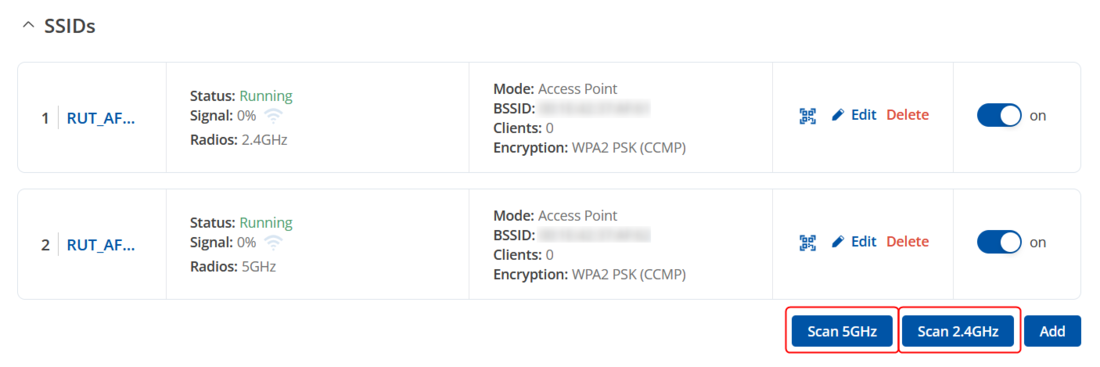
- To begin configuring WiFi Client first click the 'Scan' button to scan the surrounding area and attempt to connect to a new wireless access point. You can choose whether to scan 2.4 GHz or 5 GHz wireless networks:
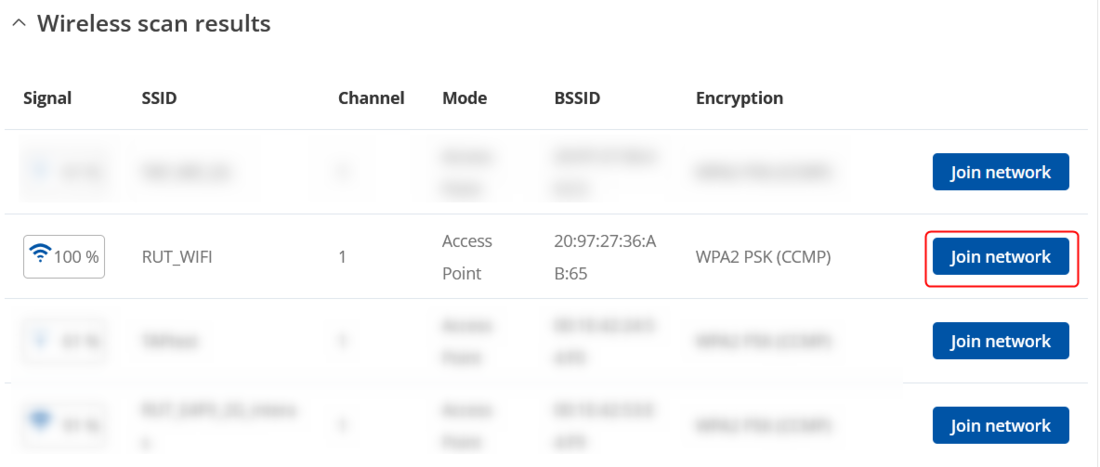
- Once the scan is complete, you will be presented with a list of nearby WiFi Access Points. Locate and choose RUT1's Access Point and click "Join network":
- You will be redirected again to following window, where you will need to enter security password of the AP you are connecting to.
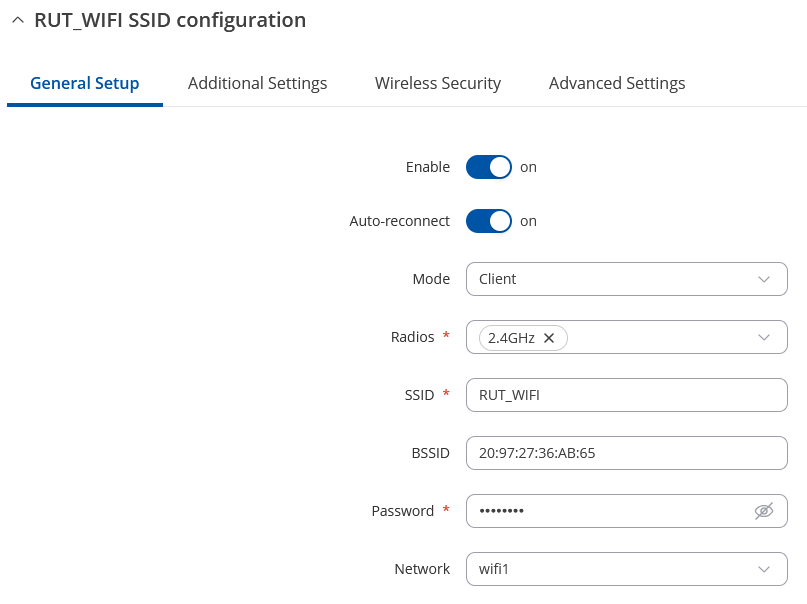
- Next window that opens will be Wireless client Configuration. Values there, mostly, should be left unchanged to avoid connection problems, because they are dictated by Access Point. Other than that, only difference from Access Point settings are in Interface Configuration → General Setup section, where Mode is set to Client, and Network attached to this wireless interface is WAN instead of LAN:
- Click Save & Apply and if you configured correctly, you will have Wireless Client working.


