RUTOS Software Development Kit (SDK) Instruction: Difference between revisions
No edit summary |
No edit summary |
||
| (76 intermediate revisions by 5 users not shown) | |||
| Line 1: | Line 1: | ||
A <b> | A <b>Software Development Kit</b> (<b>SDK</b>) is a set of software development tools that provides the possibility to create applications for a certain software package, software framework, computer system or similar development platform. | ||
<b>Note:</b> The information in this page is in accordance to using SDK version <b>R_00.07. | <b>Note:</b> The information in this page is in accordance to using SDK version <b>R_00.07.11</b>. The included Readme file in SDK archive file contains information for each separate SDK version and might differ from the older version or information provided in this wiki page. Please always follow the instruction provided in Readme file. | ||
__TOC__ | __TOC__ | ||
| Line 11: | Line 11: | ||
<li>Teltonika Router running RutOS</li> | <li>Teltonika Router running RutOS</li> | ||
<li>[https://ubuntu.com/download/desktop/ Ubuntu 22.04.3 LTS OS]</li> | <li>[https://ubuntu.com/download/desktop/ Ubuntu 22.04.3 LTS OS]</li> | ||
<li>SDK version <b>R_00.07. | <li>SDK version <b>R_00.07.11.x</b></li> | ||
</ul> | </ul> | ||
The examples apply to various RUTOS routers, SDK versions and operating systems. | The examples apply to various RUTOS routers, SDK versions and operating systems. The key concepts should apply regardless of the device, version, or system. The availability of SDK Firmware branding begins from version 7.11, although some of these modifications may be accessible on earlier firmware versions. | ||
Most examples provided in this page are independent from each other. But it is highly recommended to acquaint yourself with the basics by reading the "[[#Prerequisites|Prerequisites]]" and "[[#Compiling_a_standard_firmware|Compiling a standard firmware]]" sections first as they contain information that will be necessary in order to understand some aspects of the other examples. | Most examples provided in this page are independent from each other. But it is highly recommended to acquaint yourself with the basics by reading the "[[#Prerequisites|Prerequisites]]" and "[[#Compiling_a_standard_firmware|Compiling a standard firmware]]" sections first as they contain information that will be necessary in order to understand some aspects of the other examples. | ||
| Line 34: | Line 34: | ||
Compiling the firmware should be achievable on any Linux-based machine. Alternatively, options like Oracle's VirtualBox or Windows' WSL can be used, though the setup process may vary slightly. For this example, I will be using VMWare. | Compiling the firmware should be achievable on any Linux-based machine. Alternatively, options like Oracle's VirtualBox or Windows' WSL can be used, though the setup process may vary slightly. For this example, I will be using VMWare. | ||
You can download the '''VMWare''' here: [https://www.vmware.com/mena/products/workstation- | You can download the '''VMWare''' here: [https://www.vmware.com/mena/products/workstation-player/workstation-player-evaluation.html VMWare] | ||
For commercial use, consider downloading the '''VMware Pro Version''': [https://www.vmware.com/mena/products/workstation-pro/workstation-pro-evaluation.html VMWare Pro] | |||
If you prefer a personal and free alternative, you can use '''Oracle VirtualBox'''. Download it from their official website: [https://www.virtualbox.org/wiki/Downloads Oracle VirtualBox] | |||
[ | |||
3. Choose Typical -> choose the downloaded Ubuntu .iso file | 1. You can download latest '''Ubuntu''' version can be found here: [https://ubuntu.com/download/desktop Ubuntu] | ||
[[File:Ubunto.png|1100px|border|class=tlt-border]] | |||
2. After initiating VMware, click '''Create a New Virtual Machine''' | |||
[[File:Ubuntu2.jpg|1100px|border|class=tlt-border]] | |||
3. Choose '''Typical''' -> choose the downloaded '''Ubuntu .iso file'''. Then click '''Next'''. | |||
[[File:Ubuntu3.jpg|border|class=tlt-border]] | [[File:Ubuntu3.jpg|border|class=tlt-border]] | ||
4. Input Name, username, and password. Then input the Virtual Machine Name and the save path. Then click '''Next'''. | |||
4. Input Name, username, and password. Then input the Virtual Machine Name and the save path. | |||
'''Note:''' allocate at least 30-50GB GB for disk size and click Store virtual disk as a single file. | '''Note:''' allocate at least 30-50GB GB for disk size and click Store virtual disk as a single file. | ||
| Line 54: | Line 56: | ||
[[File:Ubuntu4.jpg|border|class=tlt-border]] | [[File:Ubuntu4.jpg|border|class=tlt-border]] | ||
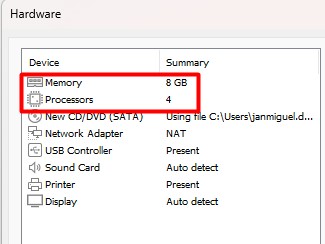
5. Select '''Customize Hardware'''. Allow for 4GB or more of memory and 2 or more processors, depending on your machine. Finally, click '''Finish'''. | |||
5. Select Customize Hardware. Allow for 4GB or more of memory and 2 or more processors | |||
[[File:Ubuntu5.jpg|border|class=tlt-border]] | [[File:Ubuntu5.jpg|border|class=tlt-border]] | ||
Ubuntu will initialize. Choose your language. The example will be in English. | Ubuntu will initialize. Choose your language. The example will be in English. | ||
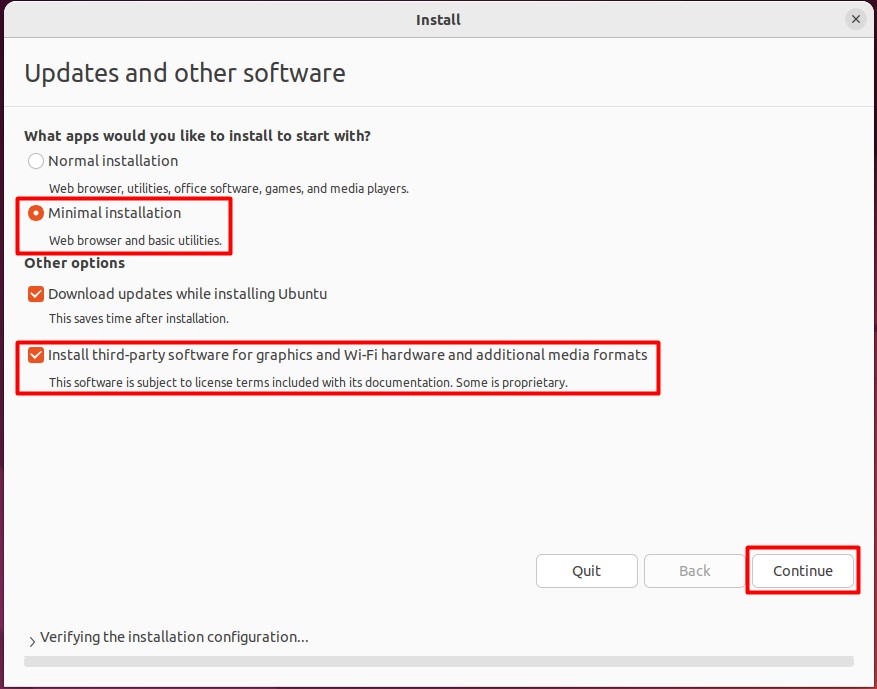
6. Choose Minimal installation and check Install third-party software for graphics and Wi-Fi hardware and additional media formats. | 6. Choose '''Minimal installation''' and check '''Install third-party software for graphics''' and Wi-Fi hardware and additional media formats. | ||
[[File:Ubuntu6.jpg|border|class=tlt-border]] | [[File:Ubuntu6.jpg|border|class=tlt-border]] | ||
Click Continue | Click '''Continue''' | ||
7. Once | 7. Once installation is done, click on '''Restart Now'''. | ||
8. Once Ubuntu is now running. Open a browser and download the SDK file from Teltonika Networks wiki. You can find it out here: [https://wiki.teltonika-networks.com/view/Software_Development_Kit Software Development Kit] | 8. Once Ubuntu is now running. Open a browser and download the SDK file from Teltonika Networks wiki. You can find it out here: [https://wiki.teltonika-networks.com/view/Software_Development_Kit Software Development Kit] | ||
==Compiling a standard firmware with Host OS== | |||
First, you can '''install the packages''' required for the SDK to work. Open the Terminal application (<b>Ctrl + ALT + T</b>) and execute the following commands: | |||
First, you | |||
sudo apt update | sudo apt update | ||
| Line 83: | Line 80: | ||
sudo apt install npm | sudo apt install npm | ||
sudo apt install build-essential | sudo apt install binutils binutils-gold bison build-essential bzip2 \ ca-certificates curl cmake default-jdk device-tree-compiler \ devscripts ecj file flex fuse g++ gawk gcc gcovr gengetopt gettext \ git gnupg groff gperf help2man java-wrappers java-propose-classpath \ jq libc6-dev libffi-dev libexpat-dev libncurses5-dev libpcre3-dev \ libsqlite3-dev libssl-dev libxml-parser-perl lz4 liblz4-dev \ libzstd-dev make ocaml ocaml-findlib ocaml-nox patch pkg-config \ psmisc python-is-python3 python3.11 python3.11-dev \ python3-setuptools python3-yaml rsync ruby sharutils subversion swig \ u-boot-tools unzip uuid-dev vim-common wget zip zlib1g-dev | ||
'''Note''': It is suggested to install '''NodeJS v20''' (or newer) and '''NPM v10.5''' (or newer). You can check NodeJS and NPM version by running these commands respectively: | |||
node -v | |||
npm -v | |||
Third-party helpers such as "nvm" (https://github.com/nvm-sh/nvm) or "n" (https://github.com/tj/n) can be used to manage multiple NodeJS and NPM versions on the system. | |||
Create a new folder (for this example I'll be using a directory called <i>RUTX_R</i> found at my <b>home</b> directory) and extract the SDK archive inside it. | Create a new folder (for this example I'll be using a directory called <i>RUTX_R</i> found at my <b>home</b> directory) and extract the SDK archive inside it. | ||
[[File: | [[File:DLv1.png|border|class=tlt-border]] | ||
You can achieve this with drag and drop or by executing this command via Terminal: | You can achieve this with drag and drop or by executing this command via '''Terminal''': | ||
Navigate to the "Downloads" folder: | Navigate to the '''"Downloads"''' folder: | ||
cd ~/Downloads | cd ~/Downloads | ||
Extract the tar.gz file: | Extract the '''tar.gz''' file: | ||
tar -xzvf RUTX_R_GPL_00.07. | tar -xzvf RUTX_R_GPL_00.07.11.X.tar.gz | ||
This command will extract the contents of the RUTX_R_GPL_00.07. | This command will extract the contents of the RUTX_R_GPL_00.07.11.X.tar.gz file into the current directory, After running this command, you should find the extracted files in the same directory where you ran the command. | ||
<b>Note</b>: don't forget to replace the file name and path in accordance with your own circumstances | <b>Note</b>: don't forget to replace the file name and path in accordance with your own circumstances | ||
| Line 101: | Line 105: | ||
Open a Terminal inside the SDK directory. You can change the directory in your current terminal (<i>cd ~/RUTX_R/openwrt-gpl-ipq40xx.Linux-x86_64</i>) | Open a Terminal inside the SDK directory. You can change the directory in your current terminal (<i>cd ~/RUTX_R/openwrt-gpl-ipq40xx.Linux-x86_64</i>) | ||
Once you open the Terminal, update the feeds: | Once you open the Terminal, '''update the feeds''': | ||
./scripts/feeds update -a | ./scripts/feeds update -a | ||
| Line 110: | Line 114: | ||
If all is in order, the output should look something like this: | If all is in order, the output should look something like this: | ||
[[File: | [[File:Make_SDK.gif|1100px|border|class=tlt-border]] | ||
<b>Note</b>: the first time you compile a firmware file it may take up to <b>30 minutes</b> before it is complete. Don't close the Terminal window up until then. Once it is finished, you will find the firmware in the <i>./bin/targets/ipq40xx/generic</i> directory. It should contain a file openwrt-ipq40xx-qcom-ipq4018-rutx-squashfs-apps.bin, it can be used to upgrade your router's firmware via its web interface. | <b>Note</b>: the first time you compile a firmware file it may take up to <b>30 minutes</b> before it is complete. Don't close the Terminal window up until then. Once it is finished, you will find the firmware in the <i>./bin/targets/ipq40xx/generic</i> directory. It should contain a file openwrt-ipq40xx-qcom-ipq4018-rutx-squashfs-apps.bin, it can be used to upgrade your router's firmware via its web interface. | ||
---- | ---- | ||
You can speed up this process by passing an extra argument <b>-j</b>. This argument then compiles the necessary packages in parallel. | You can speed up this process by passing an extra argument <b>-j</b>. This argument then compiles the necessary packages in parallel. | ||
To know how | To know how many jobs you can pass to the compiling process execute this command in the terminal: | ||
nproc | nproc | ||
| Line 123: | Line 127: | ||
make -j<nproc_output> | make -j<nproc_output> | ||
[[File: | [[File:Make_nproc.gif|1100px|border|class=tlt-border]] | ||
'''Troubleshooting tips:''' | '''Troubleshooting tips:''' | ||
| Line 133: | Line 137: | ||
3. Try running `make distclean` if you believe that your SDK installation is corrupt. This will recompile the firmware from scratch. | 3. Try running `make distclean` if you believe that your SDK installation is corrupt. This will recompile the firmware from scratch. | ||
4. | 4. Start compilation by running '''make -j<nproc_output> V=sc''' for verbose output. This way you will see more logs that may help to troubleshoot compilation issues. | ||
==Compiling a standard firmware with Docker environment== | |||
1. Install Docker. You can donwload it [https://docs.docker.com/engine/install/ubuntu here]. | |||
2. Extract the archive to an empty folder | |||
$ mkdir RUTX_R_GPL_00.07.11.1 | |||
$ tar -xzf ~/Downloads/RUTX_R_GPL_00.07.11.1.tar.gz -C RUTX_R_GPL_00.07.11.1 | |||
3. Update feeds | |||
$ cd RUTX_R_GPL_00.07.11.1 | |||
$ ./scripts/dockerbuild ./scripts/feeds update -a | |||
4. Build the image | |||
$ ./scripts/dockerbuild make | |||
5. Prepare packages for offline installation (optional) | |||
$ ./scripts/dockerbuild make pm | |||
After this you can find packages in "RUTX_R_GPL_00.07.11.1/bin/packages/<arch_name>/zipped_packages". | |||
6. Sign the image with local keys (optional): | |||
This step is only necessary if the firmware needs to be flashed from the bootloader. | |||
$ ./scripts/dockerbuild make sign | |||
'''Note''': do not launch the 'dockerbuild' script as root user (e.g. with sudo) - the script will use sudo itself, where appropriate. | |||
'''Note''': Rootless docker is unsupported due to file ownership issues - files created on host will appear to be owned by 'root' user in the container. | |||
==Changing Default Password== | ==Changing Default Password== | ||
To create a firmware with different default settings, you | To create a firmware with different default settings, you can change the default in the config files, which are contained in <b>/openwrt-gpl-ipq40xx.Linux-x86_64/package/</b>. However, there is no unifying system regarding where one should look for config files related to specific services. Therefore, it is very important to acquaint yourself with the <b>UCI system</b> (RutOS configuration file system) in order to successfully navigate through the files: | ||
<ul> | <ul> | ||
| Line 146: | Line 173: | ||
To change the default device password, changes need to be made inside: | To change the default device password, changes need to be made inside: | ||
"RUTX_R_GPL_00.07. | "RUTX_R_GPL_00.07.11/package/base-files/files/lib/preinit/84_set_password" | ||
Change "'''admin01'''" to your password on line '''[ -z "$passwd" ] && passwd="$(mkpasswd | |||
admin01)"''' | |||
Additionally, devices on newer batch are having unique passwords from MNF info. The new password should also be added under '''passwd''' in '''push_password''' list | |||
[[File:Mkpswd.png|border|class=tlt-border]] | |||
1- ./scripts/feeds update -a | To disable the option to change the '''default password for the first time''', kindly follow the professional instructions outlined below. | ||
go to the path: | |||
/package/feeds/vuci/api-core/files/etc/config/vuci | |||
change option firstlogin ''''1'''' to ''''0'''', so it would not ask to change the password on the first login. | |||
[[File:Firstlogin.jpg|border|class=tlt-border]] | |||
After making changes and saving them to the directory, we may '''build compile''' using the following commands: | |||
./scripts/feeds update -a | |||
make clean | |||
Following that, when compiling firmware using '''make''' command, specifying the number of processors to be used is possible, thus speeding it up. To determine the number of available processors, you can use '''nproc''' command. Then, pass this number to the '''-j''' option in '''make''' command. | |||
make -j1 V=sc | |||
The firmware can | The exact path to the firmware depends on the target. In this example, the firmware can be found in the following directory: | ||
rutos-ath79-rut9-gpl>bin>targets>ath79>generic>tltFws>RUTX_R_GPL_00.07. | rutos-ath79-rut9-gpl>bin>targets>ath79>generic>tltFws>RUTX_R_GPL_00.07.11.1_WEBUI | ||
'''file name''': RUTX_R_GPL_00.07. | '''file name''': RUTX_R_GPL_00.07.11.X_WEBUI | ||
==Changing Default IP Address== | ==Changing Default IP Address== | ||
To modify the default IP address, you can make use of a dedicated menu in the firmware configuration, which is accessed through the "menuconfig" interface. To access this configuration menu, follow these steps from the root directory of your project: | To modify the '''default IP address''', you can make use of a dedicated menu in the firmware configuration, which is accessed through the '''"menuconfig"''' interface. To access this configuration menu, follow these steps from the root directory of your project: | ||
Open a terminal and execute the following command: | Open a terminal and execute the following command: | ||
make menuconfig | make menuconfig | ||
After entering the "make menuconfig" command, it will launch a new interface known as the "OpenWrt Configuration." In this interface, navigate to the "Target Firmware options" section. | After entering the '''"make menuconfig"''' command, it will launch a new interface known as the "OpenWrt Configuration." In this interface, navigate to the "Target Firmware options" section. | ||
'''Disclaimer''': do not use '''target profile''' in the make menuconfig, if you are compiling firmware for example for RUTX, the firmware will be working for all of the RUTX series devices and you do not need to select the specific device. Same goes for any other of the series (RUTM, RUT2, RUT9). | |||
[[File:IP1.png|border|class=tlt-border]] | |||
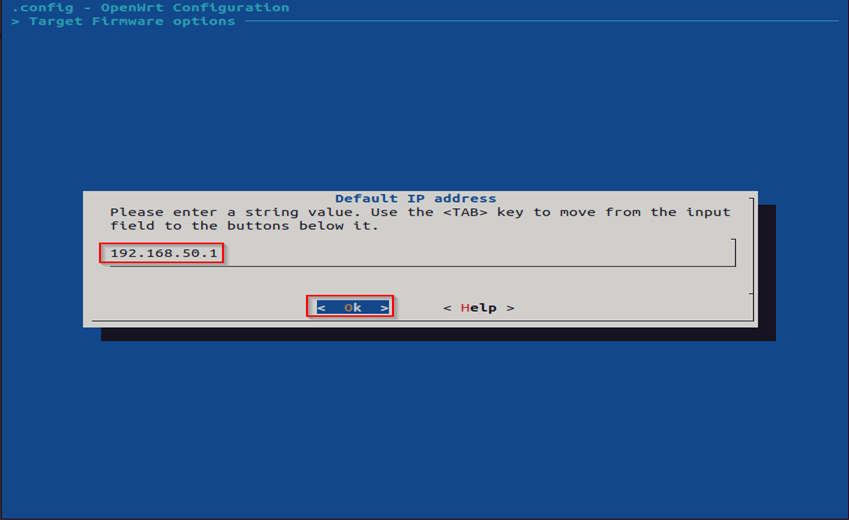
You will then be presented with the option to modify the '''Default IP address''', allowing you to input your desired value. By default, it is set to '''(192.168.1.1)'''. | |||
[[File:IP2.png|border|class=tlt-border]] | |||
[[File: | |||
You will then be presented with the option to modify the '''Default IP address''', allowing you to input your desired value. | |||
[[File: | [[File:IP3.png|border|class=tlt-border]] | ||
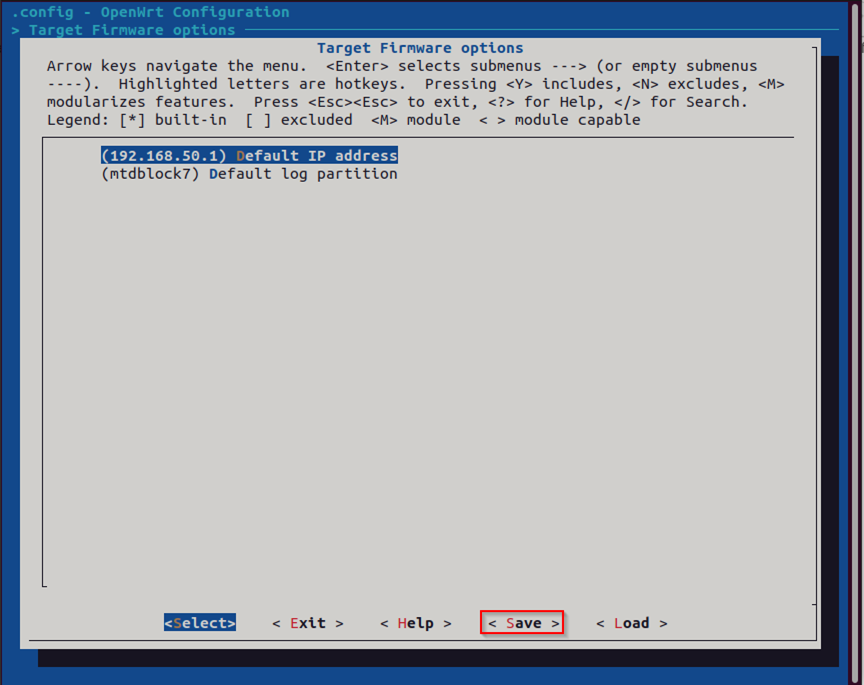
After making changes | After making the desired changes to the '''Default IP address''', you can then save those modifications. | ||
[[File:IP4.png|border|class=tlt-border]] | |||
After making changes and saving them to the directory, we may '''build compile''' using the following commands: | |||
./scripts/feeds update -a | |||
make clean | |||
Following that, when compiling firmware using '''make''' command, specifying the number of processors to be used is possible, thus speeding it up. To determine the number of available processors, you can use '''nproc''' command. Then, pass this number to the '''-j''' option in '''make''' command. | |||
make -j1 V=sc | |||
The firmware can | The exact path to the firmware depends on the target. In this example, the firmware can be found in the following directory: | ||
rutos-ath79-rut9-gpl>bin>targets>ath79>generic>tltFws>RUTX_R_GPL_00.07. | rutos-ath79-rut9-gpl>bin>targets>ath79>generic>tltFws>RUTX_R_GPL_00.07.11.1_WEBUI | ||
'''file name''': RUTX_R_GPL_00.07. | '''file name''': RUTX_R_GPL_00.07.11.X_WEBUI | ||
==Changing SSH Banner== | ==Changing SSH Banner== | ||
To modify the SSH banner, you can make use of the file search tool in the extracted GPL. To access this, follow these steps from the root directory of your project, you can find the file from route below: | To modify the '''SSH banner''', you can make use of the file search tool in the extracted GPL. To access this, follow these steps from the root directory of your project, '''you can find the file from route below''': | ||
~/Downloads/RUTX_R_GPL_00.07. | ~/Downloads/RUTX_R_GPL_00.07.11/rutos-ipq40xx-rutx-sdk/include | ||
[[File: | [[File:Blogo.png|border|class=tlt-border]] | ||
Make sure that the file that we want to edit is in the similar file path as above. | Make sure that the file that we want to edit is in the similar file path as above. | ||
[[File: | [[File:Bannernew.png|border|class=tlt-border]] | ||
The contents of the file should look similar to the image above. After making the desired changes to the banner, you can then save those modifications. | |||
Another way of producing a personalised banner is by using a free open source application such as '''figlet''', which you can install in your linux system by using the command: | |||
sudo apt-get install figlet | |||
[[File:Figlet install.png|border|class=tlt-border]] | |||
Then you can insert the generated ASCII art text to the '''banner.logo''' file by executing following command: | |||
figlet [YOUR TEXT] > "banner.logo" | |||
Make sure that your are in the same directory which contains the banner.logo file. | |||
[[File:Figlet.png|1100px|border|class=tlt-border]] | |||
After making changes and saving them to the directory, we may '''build compile''' using the following commands: | |||
./scripts/feeds update -a | |||
make clean | |||
Following that, when compiling firmware using '''make''' command, specifying the number of processors to be used is possible, thus speeding it up. To determine the number of available processors, you can use '''nproc''' command. Then, pass this number to the '''-j''' option in '''make''' command. | |||
make -j1 V=sc | |||
The exact path to the firmware depends on the target. In this example, the firmware can be found in the following directory: | |||
rutos-ath79-rut9-gpl>bin>targets>ath79>generic>tltFws>RUTX_R_GPL_00.07.11.1_WEBUI | |||
'''file name''': RUTX_R_GPL_00.07.11.X_WEBUI | |||
'''RESULTS:''' | |||
[[File:Sshnew.png|border|class=tlt-border]] | |||
==Changing Firmware Version== | |||
To modify the firmware version like Prefix, go to the directory where '''gpl_version''' file is located (''/Downloads/RUTX_R_GPL_00.07.11.1/rutos-ipq40xx-rutx-gpl''). Then run this command to edit file content. | |||
The firmware can | nano gpl_version | ||
rutos-ath79-rut9-gpl>bin>targets>ath79>generic>tltFws> | |||
'''file name''': | Replace the content to the desired firmware version. To save, type '''Ctrl + X'''. Then, click '''Y'''. | ||
[[File:FWV.png|border|class=tlt-border]] | |||
After making changes and saving them to the directory, we may '''build compile''' using the following commands: | |||
./scripts/feeds update -a | |||
make clean | |||
Following that, when compiling firmware using '''make''' command, specifying the number of processors to be used is possible, thus speeding it up. To determine the number of available processors, you can use '''nproc''' command. Then, pass this number to the '''-j''' option in '''make''' command. | |||
make -j1 V=sc | |||
The exact path to the firmware depends on the target. In this example, the firmware can be found in the following directory: | |||
rutos-ath79-rut9-gpl>bin>targets>ath79>generic>tltFws>Company_Ex_99.99.99_WEBUI | |||
'''file name''': Company_Ex_99.99.99_WEBUI | |||
'''RESULTS:''' | |||
[[File:Version1.png|border|class=tlt-border]] | |||
[[File:Version2.png|border|class=tlt-border]] | |||
==Changing Company Links== | ==Changing Company Links== | ||
To modify the Company Links, you can make use of the file search tool in the extracted GPL. To access this, follow these steps from the root directory of your project, you can find the file from route below: | To modify the '''Company Links''', you can make use of the file search tool in the extracted GPL. To access this, follow these steps from the root directory of your project, '''you can find the file from route below:''' | ||
~/Downloads/RUTX_R_GPL_00.07. | ~/Downloads/RUTX_R_GPL_00.07.11.1/rutos-ipq40xx-rutx-gpl/package/feeds/vuci/vuci-ui-core/bin/vuci-ui-core/src/dist/www/brand | ||
[[File: | [[File:Brandjson.png|1100px|border|class=tlt-border]] | ||
Make sure that the file that we want to edit is in the similar file path as above. | Make sure that the file that we want to edit is in the similar file path as above. | ||
[[File: | [[File:Brandnew.png|border|class=tlt-border]] | ||
The contents of the file should look similar to the image above. After making the desired changes to the banner, you can then save those modifications. | |||
After making changes and saving them to the directory, we may '''build compile''' using the following commands: | |||
./scripts/feeds update -a | |||
make clean | |||
Following that, when compiling firmware using '''make''' command, specifying the number of processors to be used is possible, thus speeding it up. To determine the number of available processors, you can use '''nproc''' command. Then, pass this number to the '''-j''' option in '''make''' command. | |||
make -j1 V=sc | |||
The exact path to the firmware depends on the target. In this example, the firmware can be found in the following directory: | |||
rutos-ath79-rut9-gpl>bin>targets>ath79>generic>tltFws>RUTX_R_GPL_00.07.11.1_WEBUI | |||
'''file name''': RUTX_R_GPL_00.07.11.X_WEBUI | |||
rutos-ath79-rut9-gpl>bin>targets>ath79>generic>tltFws>RUTX_R_GPL_00.07. | |||
'''file name''': RUTX_R_GPL_00.07. | |||
'''RESULTS:''' | '''RESULTS:''' | ||
[[File: | [[File:Companylink.png|1100px|border|class=tlt-border]] | ||
==Changing Device brand== | ==Changing Device brand== | ||
To modify the Device brand, you can make use search tool in the extracted GPL. To access this, follow these steps from the root directory of your project, you can find the TWO files from route below: | To modify the '''Device brand''', you can make use search tool in the extracted GPL. To access this, follow these steps from the root directory of your project, '''you can find the TWO files from route below''': | ||
'''First File:''' | '''First File:''' | ||
~/Downloads/RUTX_R_GPL_00.07. | ~/Downloads/RUTX_R_GPL_00.07.11/rutos-ipq40xx-rutx-gpl/package/feeds/vuci/vuci-ui-core/bin/dist | ||
[[File: | [[File:BRANDTELT.png|1100px|border|class=tlt-border]] | ||
'''Second File:''' | '''Second File:''' | ||
~/Downloads/RUTX_R_GPL_00.07. | ~/Downloads/RUTX_R_GPL_00.07.11/rutos-ipq40xx-rutx-gpl/package/feeds/vuci/vuci-ui-core/bin/dist/ tlt-icons | ||
[[File:BRANDTELT2.png|1100px|border|class=tlt-border]] | |||
'''Note:''' If you have a brand in a different format, you can convert it to SVG using any online converter, please keep in mind that online converters can cause scalability issues. | |||
[[File: | Afterwards, compress the file to .gz file as per screenshot below: | ||
[[File:SVG2.jpg|border|class=tlt-border]] | |||
To compress a logo into'''.gz format''', use the terminal command below: | |||
[ | gzip [file] | ||
''' | If your logo is compressed to'''.gz format''', you can extract it, if needed, via terminal by following command: | ||
gzip -d [file] | |||
'''Note''': It is worth that the logo has been changed to tlt-icons/tlt_networks_logo_white.The svg on the log in page is displayed on a blue background, however the tlt_networks_logo.svg displayed following the logging in line at the top is displayed on a white backdrop. The usual size of both logos is '''266px x 31px'''. | |||
After making changes and saving them to the directory, we may build compile using the following commands: | After making changes and saving them to the directory, we may '''build compile''' using the following commands: | ||
./scripts/feeds update -a | |||
make clean | |||
Following that, when compiling firmware using '''make''' command, specifying the number of processors to be used is possible, thus speeding it up. To determine the number of available processors, you can use '''nproc''' command. Then, pass this number to the '''-j''' option in '''make''' command. | |||
make -j1 V=sc | |||
The firmware can | The exact path to the firmware depends on the target. In this example, the firmware can be found in the following directory: | ||
rutos-ath79-rut9-gpl>bin>targets>ath79>generic>tltFws>RUTX_R_GPL_00.07. | rutos-ath79-rut9-gpl>bin>targets>ath79>generic>tltFws>RUTX_R_GPL_00.07.11.1_WEBUI | ||
'''file name''': RUTX_R_GPL_00.07. | '''file name''': RUTX_R_GPL_00.07.11.X_WEBUI | ||
'''RESULTS:''' | '''RESULTS:''' | ||
[[File: | [[File:brand_transparent.png|border|1100px|class=tlt-border]] | ||
==Changing | [[File:Companybrand.png|1100px|border|class=tlt-border]] | ||
To modify the | |||
==Changing Favicon== | |||
To modify the '''Favicon''', you can make use search tool in the extracted GPL. To access this, follow these steps from the root directory of your project, '''you can find the TWO files from route below''': | |||
'''First File:''' | '''First File:''' | ||
~/Downloads/RUTX_R_GPL_00.07. | ~/Downloads/RUTX_R_GPL_00.07.11.1/rutos-ipq40xx-rutx-gpl/package/feeds/vuci/vuci-ui-core/bin | ||
[[File: | [[File:Favicon.png|1100px|border|class=tlt-border]] | ||
'''Second File:''' | '''Second File:''' | ||
~/Downloads/RUTX_R_GPL_00.07. | ~/Downloads/RUTX_R_GPL_00.07.11.1/rutos-ipq40xx-rutx-gpl/package/feeds/vuci/vuci-ui-core/bin/dist/assests | ||
[[File: | [[File:Logo2.png|border|class=tlt-border]] | ||
'''Note:''' If you have a brand in a different format, you can convert it to ico using any online converter, please keep in mind that online converters can cause scalability issues. | |||
''' | To compress a logo into'''.gz format''', use the terminal command below: | ||
gzip [file] | |||
If your logo is compressed to'''.gz format''', you can extract it, if needed, via terminal by following command: | |||
gzip -d [file] | |||
'''Note''': It is worth that the logo has been changed to tlt-icons/tlt_networks_logo_white.The svg on the log in page is displayed on a blue background, however the tlt_networks_logo.svg displayed following the logging in line at the top is displayed on a white backdrop. The usual size of both logos is '''266px x 31px'''. | |||
After making changes and saving them to the directory, we may '''build compile''' using the following commands: | |||
./scripts/feeds update -a | |||
make clean | |||
Following that, when compiling firmware using '''make''' command, specifying the number of processors to be used is possible, thus speeding it up. To determine the number of available processors, you can use '''nproc''' command. Then, pass this number to the '''-j''' option in '''make''' command. | |||
make -j1 V=sc | |||
The exact path to the firmware depends on the target. In this example, the firmware can be found in the following directory: | |||
rutos-ath79-rut9-gpl>bin>targets>ath79>generic>tltFws>RUTX_R_GPL_00.07.11.1_WEBUI | |||
'''file name''': RUTX_R_GPL_00.07.11.X_WEBUI | |||
'''RESULTS:''' | |||
[[File:LOGORESULTS1.png|border|class=tlt-border]] | |||
==Changing WebUI Color== | |||
To modify color designs for the WebUI, locate '''brand.css''' file. In this configuration, it is in ''/RUTX_R_GPL_00.07.11/rutos-ipq40xx-rutx-gpl/package/feeds/vuci/vuci-ui-core/bin/dist/brand'' directory. Run '''ls''' command to see the contents of the directory. It should have a zip file entitled '''brand.css.gz'''. To extract brand.css.gz, run: | |||
gzip -d brand.css.gzip | |||
[[File:Brand1.png|border|class=tlt-border]] | |||
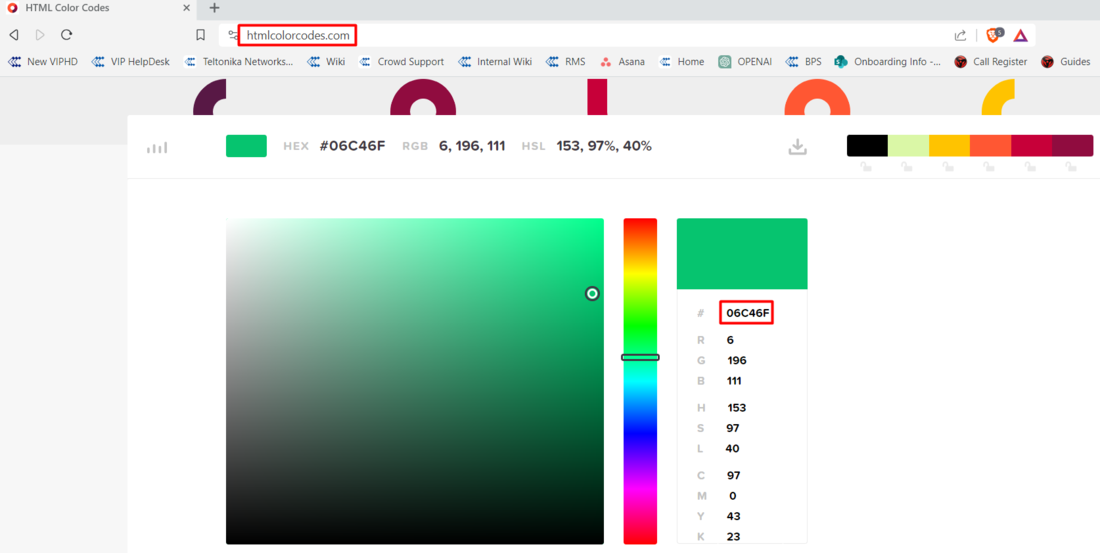
Run '''nano brand.css''' on the same directory to edit color values. Color schemes are using HTML color codes in HEX. You can generate '''HEX color codes''' with the help of this link: https://htmlcolorcodes.com/ | |||
[[File:Color5.png|border|1100px|class=tlt-border]] | |||
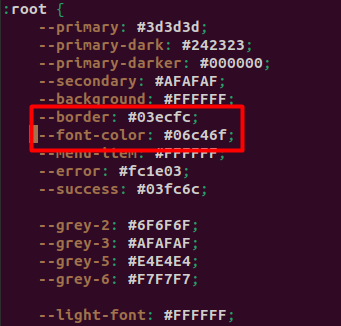
For demo purposes, let us change the '''border color '''and''' font-color''' to '''#03ECFC''' and '''#06C46F''' respectively. | |||
[[File:Color2.png|border|class=tlt-border]] | |||
To save, type '''Ctrl + X'''. Then, click '''Y'''. | |||
After making changes and saving them to the directory, we may '''build compile''' using the following commands: | |||
./scripts/feeds update -a | |||
make clean | |||
Following that, when compiling firmware using '''make''' command, specifying the number of processors to be used is possible, thus speeding it up. To determine the number of available processors, you can use '''nproc''' command. Then, pass this number to the '''-j''' option in '''make''' command. | |||
make -j1 V=sc | |||
The exact path to the firmware depends on the target. In this example, the firmware can be found in the following directory: | |||
rutos-ath79-rut9-gpl>bin>targets>ath79>generic>tltFws>RUTX_R_GPL_00.07.11.1_WEBUI | |||
'''file name''': RUTX_R_GPL_00.07.11.X_WEBUI | |||
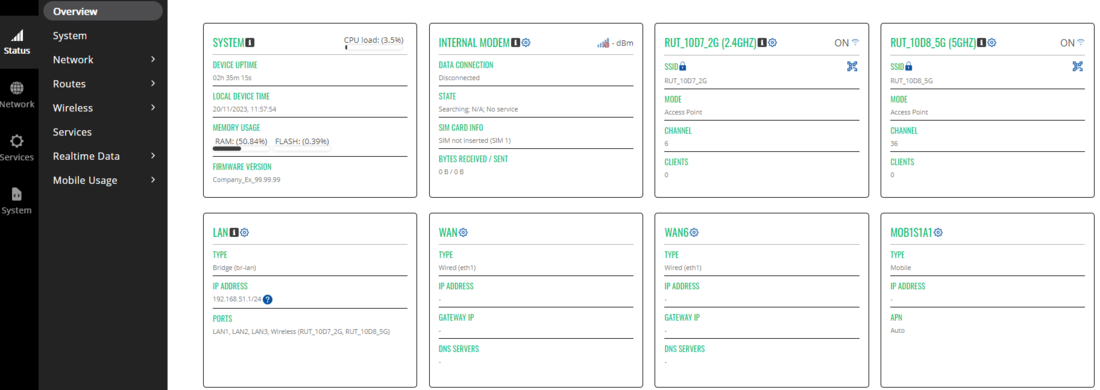
'''RESULTS:''' | '''RESULTS:''' | ||
[[File: | [[File:Color4.png|border|1100px|class=tlt-border]] | ||
== | ==Disclaimer== | ||
It may not be necessary to update scripts and make clean after making firmware changes; this will depend on the changes undertaken. In these cases, the commands were used to assure clean compilation and the removal of any potential artifacts from previous environments. | It may not be necessary to update scripts and make clean after making firmware changes; this will depend on the changes undertaken. In these cases, the commands were used to assure clean compilation and the removal of any potential artifacts from previous environments. | ||
[[Category:Other Topics]] | |||
Latest revision as of 12:25, 9 December 2024
Main Page > FAQ > Other Topics > RUTOS Software Development Kit (SDK) InstructionA Software Development Kit (SDK) is a set of software development tools that provides the possibility to create applications for a certain software package, software framework, computer system or similar development platform.
Note: The information in this page is in accordance to using SDK version R_00.07.11. The included Readme file in SDK archive file contains information for each separate SDK version and might differ from the older version or information provided in this wiki page. Please always follow the instruction provided in Readme file.
Introduction
This article contains instructions on how to utilize Teltonika SDK packages for RUTx series routers. The resources used in the provided examples are:
- Teltonika Router running RutOS
- Ubuntu 22.04.3 LTS OS
- SDK version R_00.07.11.x
The examples apply to various RUTOS routers, SDK versions and operating systems. The key concepts should apply regardless of the device, version, or system. The availability of SDK Firmware branding begins from version 7.11, although some of these modifications may be accessible on earlier firmware versions.
Most examples provided in this page are independent from each other. But it is highly recommended to acquaint yourself with the basics by reading the "Prerequisites" and "Compiling a standard firmware" sections first as they contain information that will be necessary in order to understand some aspects of the other examples.
It should also be noted early that the first time you compile a firmware it may take up to a few hours to complete. Once the initial compilation is complete, packages will not be re-compiled next time, therefore the duration will decrease significantly. Please be aware that this also depends on your machine.
Prerequisites
You will need:
- A PC, laptop or virtual machine running Linux OS (We recommend using Ubuntu 22.04.3 LTS)
- A RUTOS supported router (version R_00.07.00 and up)
- An SDK intended for your router, which can be downloaded here: Software Development Kit
Ubuntu Installation
Compiling the firmware should be achievable on any Linux-based machine. Alternatively, options like Oracle's VirtualBox or Windows' WSL can be used, though the setup process may vary slightly. For this example, I will be using VMWare.
You can download the VMWare here: VMWare
For commercial use, consider downloading the VMware Pro Version: VMWare Pro
If you prefer a personal and free alternative, you can use Oracle VirtualBox. Download it from their official website: Oracle VirtualBox
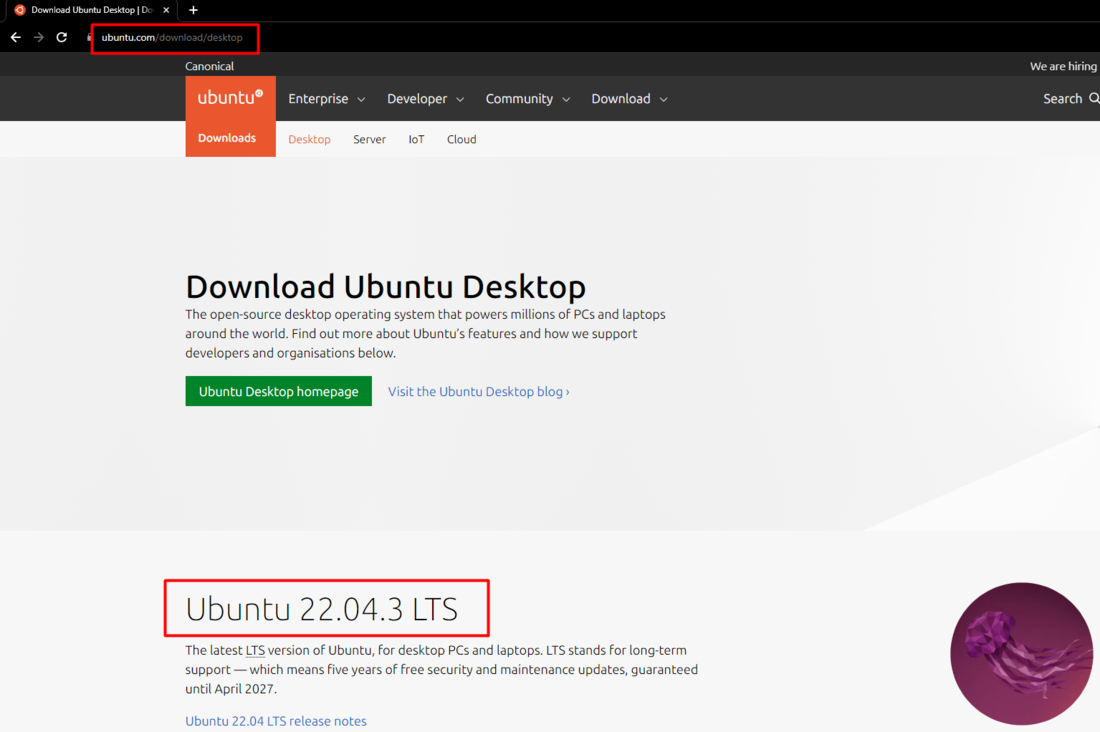
1. You can download latest Ubuntu version can be found here: Ubuntu
2. After initiating VMware, click Create a New Virtual Machine

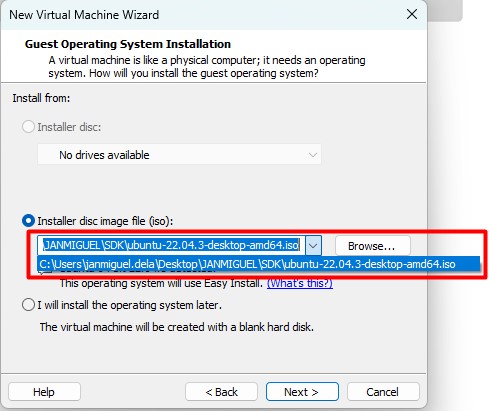
3. Choose Typical -> choose the downloaded Ubuntu .iso file. Then click Next.
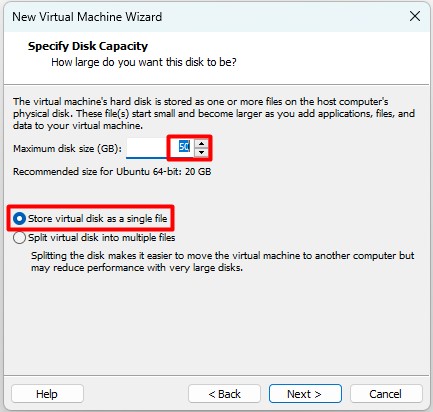
4. Input Name, username, and password. Then input the Virtual Machine Name and the save path. Then click Next.
Note: allocate at least 30-50GB GB for disk size and click Store virtual disk as a single file.
5. Select Customize Hardware. Allow for 4GB or more of memory and 2 or more processors, depending on your machine. Finally, click Finish.
Ubuntu will initialize. Choose your language. The example will be in English.
6. Choose Minimal installation and check Install third-party software for graphics and Wi-Fi hardware and additional media formats.
Click Continue
7. Once installation is done, click on Restart Now.
8. Once Ubuntu is now running. Open a browser and download the SDK file from Teltonika Networks wiki. You can find it out here: Software Development Kit
Compiling a standard firmware with Host OS
First, you can install the packages required for the SDK to work. Open the Terminal application (Ctrl + ALT + T) and execute the following commands:
sudo apt update
sudo apt install nodejs
sudo apt install npm
sudo apt install binutils binutils-gold bison build-essential bzip2 \ ca-certificates curl cmake default-jdk device-tree-compiler \ devscripts ecj file flex fuse g++ gawk gcc gcovr gengetopt gettext \ git gnupg groff gperf help2man java-wrappers java-propose-classpath \ jq libc6-dev libffi-dev libexpat-dev libncurses5-dev libpcre3-dev \ libsqlite3-dev libssl-dev libxml-parser-perl lz4 liblz4-dev \ libzstd-dev make ocaml ocaml-findlib ocaml-nox patch pkg-config \ psmisc python-is-python3 python3.11 python3.11-dev \ python3-setuptools python3-yaml rsync ruby sharutils subversion swig \ u-boot-tools unzip uuid-dev vim-common wget zip zlib1g-dev
Note: It is suggested to install NodeJS v20 (or newer) and NPM v10.5 (or newer). You can check NodeJS and NPM version by running these commands respectively:
node -v
npm -v
Third-party helpers such as "nvm" (https://github.com/nvm-sh/nvm) or "n" (https://github.com/tj/n) can be used to manage multiple NodeJS and NPM versions on the system.
Create a new folder (for this example I'll be using a directory called RUTX_R found at my home directory) and extract the SDK archive inside it.
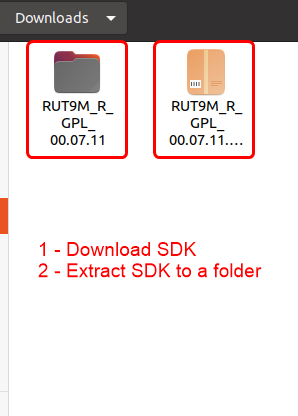
You can achieve this with drag and drop or by executing this command via Terminal:
Navigate to the "Downloads" folder:
cd ~/Downloads
Extract the tar.gz file:
tar -xzvf RUTX_R_GPL_00.07.11.X.tar.gz
This command will extract the contents of the RUTX_R_GPL_00.07.11.X.tar.gz file into the current directory, After running this command, you should find the extracted files in the same directory where you ran the command.
Note: don't forget to replace the file name and path in accordance with your own circumstances
Open a Terminal inside the SDK directory. You can change the directory in your current terminal (cd ~/RUTX_R/openwrt-gpl-ipq40xx.Linux-x86_64)
Once you open the Terminal, update the feeds:
./scripts/feeds update -a
Now you can compile a standard firmware by executing this command in the terminal:
make
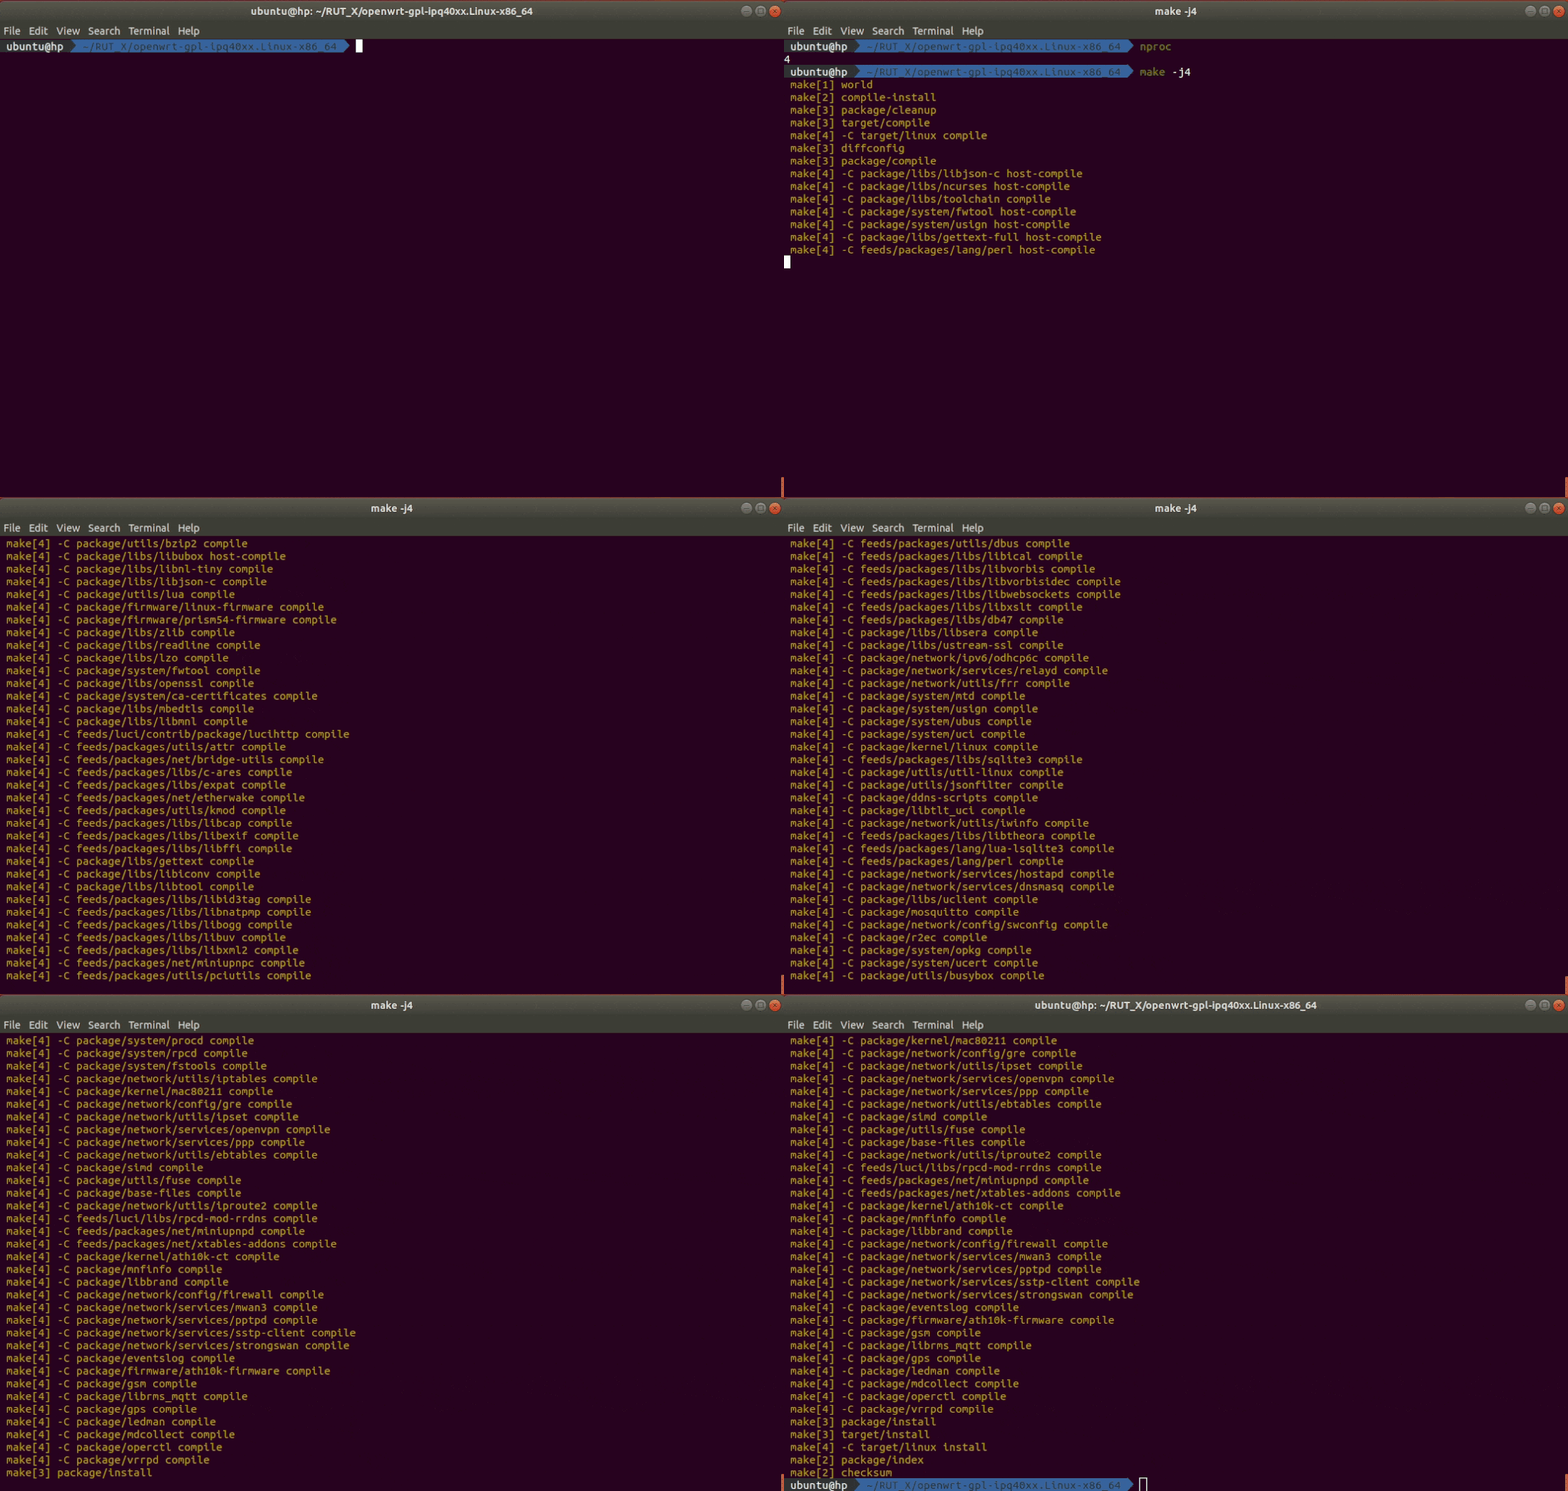
If all is in order, the output should look something like this:
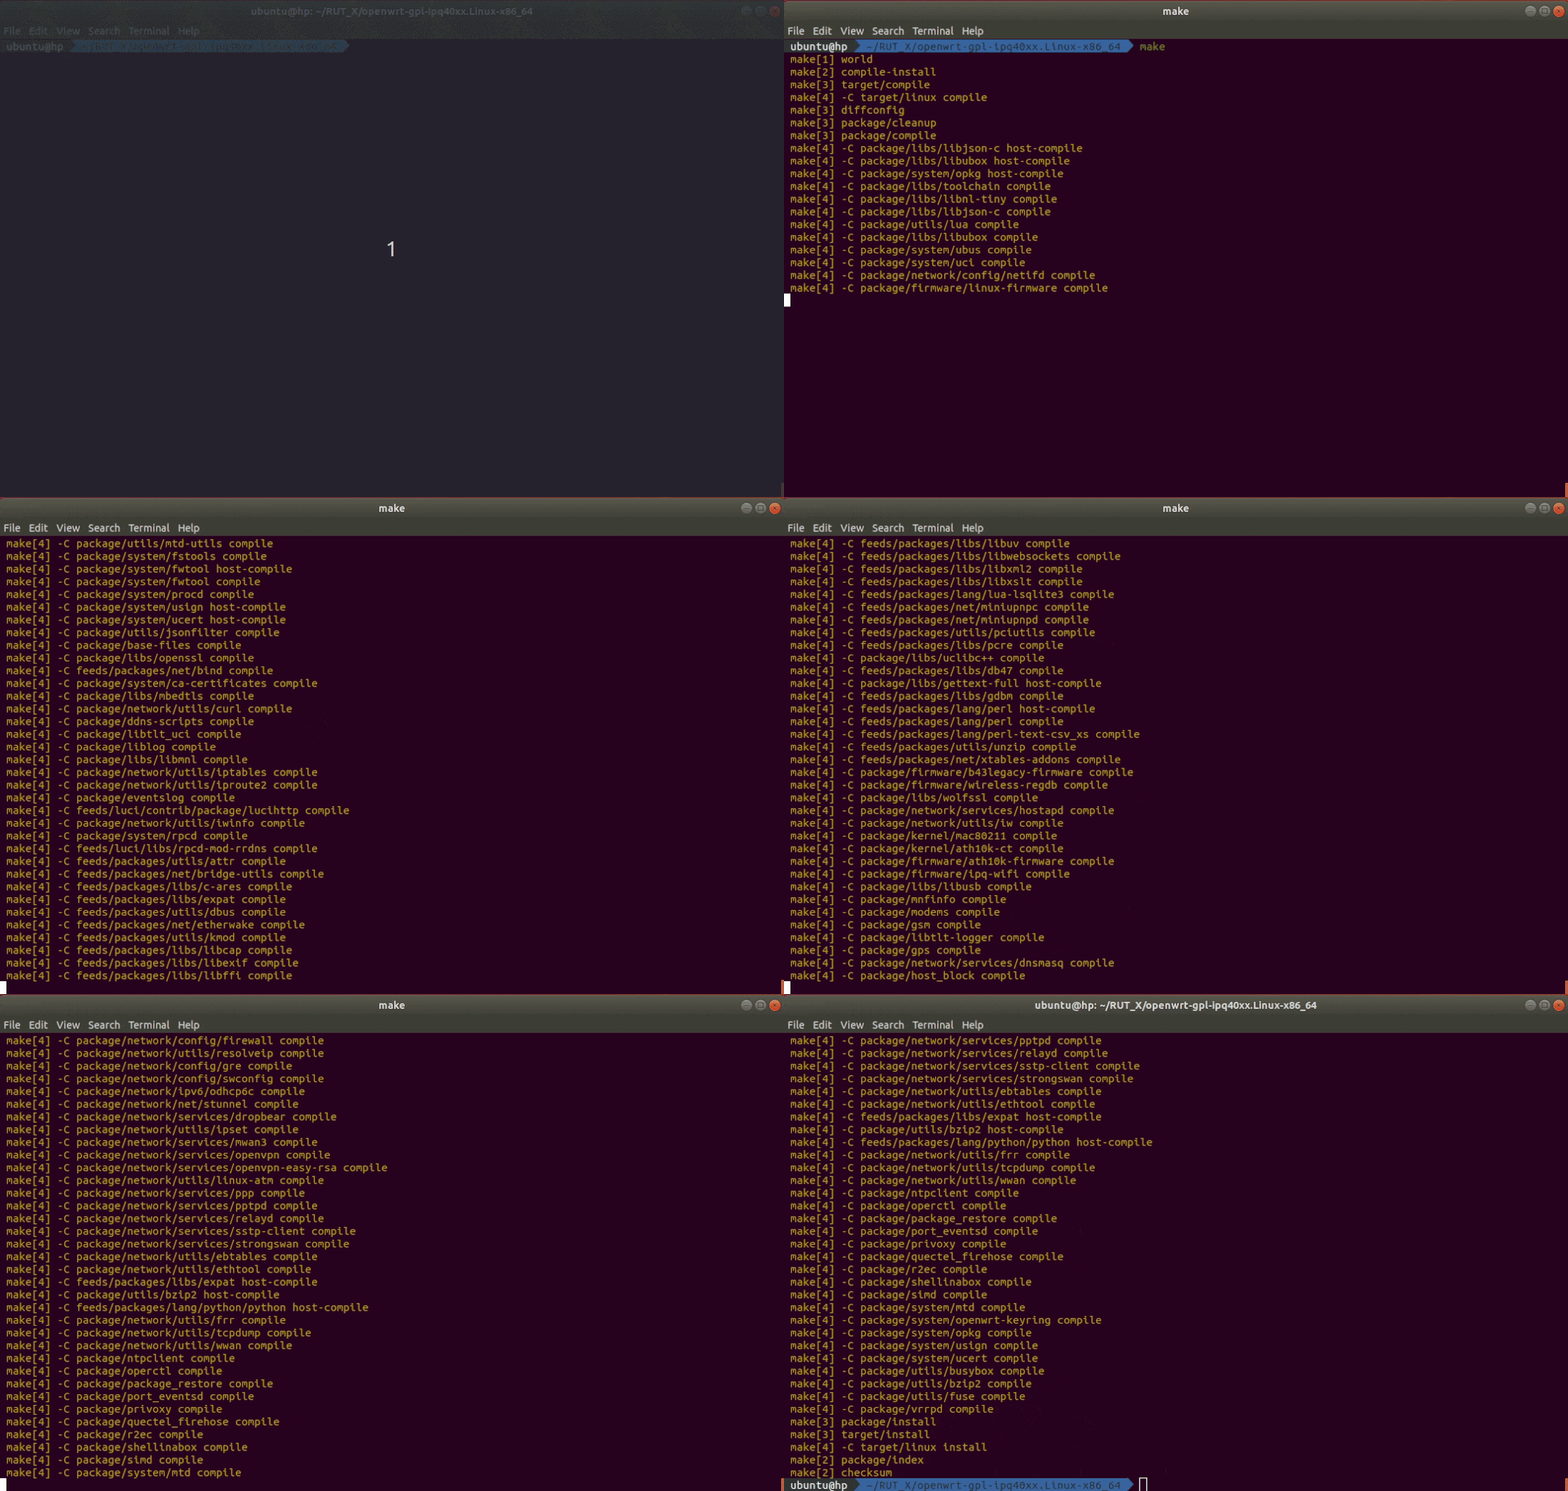
Note: the first time you compile a firmware file it may take up to 30 minutes before it is complete. Don't close the Terminal window up until then. Once it is finished, you will find the firmware in the ./bin/targets/ipq40xx/generic directory. It should contain a file openwrt-ipq40xx-qcom-ipq4018-rutx-squashfs-apps.bin, it can be used to upgrade your router's firmware via its web interface.
You can speed up this process by passing an extra argument -j. This argument then compiles the necessary packages in parallel. To know how many jobs you can pass to the compiling process execute this command in the terminal:
nproc
This commands output should be a number. This number tells how much processing units are available to the current process. Now execute this command in the terminal:
make -j<nproc_output>
Troubleshooting tips:
1. If you get error on first ‘make’, do ./scripts/feeds update -a once more.
2. Once you extract the SDK files, Rename rutos-ipq40xx-rutx-gpl to a different file name and move it to home directory.
3. Try running `make distclean` if you believe that your SDK installation is corrupt. This will recompile the firmware from scratch.
4. Start compilation by running make -j<nproc_output> V=sc for verbose output. This way you will see more logs that may help to troubleshoot compilation issues.
Compiling a standard firmware with Docker environment
1. Install Docker. You can donwload it here.
2. Extract the archive to an empty folder
 $ mkdir RUTX_R_GPL_00.07.11.1
 $ tar -xzf ~/Downloads/RUTX_R_GPL_00.07.11.1.tar.gz -C RUTX_R_GPL_00.07.11.1
3. Update feeds
 $ cd RUTX_R_GPL_00.07.11.1
 $ ./scripts/dockerbuild ./scripts/feeds update -a
4. Build the image
$ ./scripts/dockerbuild make
5. Prepare packages for offline installation (optional)
 $ ./scripts/dockerbuild make pm
 After this you can find packages in "RUTX_R_GPL_00.07.11.1/bin/packages/<arch_name>/zipped_packages".
6. Sign the image with local keys (optional):
 This step is only necessary if the firmware needs to be flashed from the bootloader.
 $ ./scripts/dockerbuild make sign
 Note: do not launch the 'dockerbuild' script as root user (e.g. with sudo) - the script will use sudo itself, where appropriate.
 Note: Rootless docker is unsupported due to file ownership issues - files created on host will appear to be owned by 'root' user in the container.
Changing Default Password
To create a firmware with different default settings, you can change the default in the config files, which are contained in /openwrt-gpl-ipq40xx.Linux-x86_64/package/. However, there is no unifying system regarding where one should look for config files related to specific services. Therefore, it is very important to acquaint yourself with the UCI system (RutOS configuration file system) in order to successfully navigate through the files:
- Click here for information on the configuration hierarchy
- Click here to find what configs are related to which services
To change the default device password, changes need to be made inside:
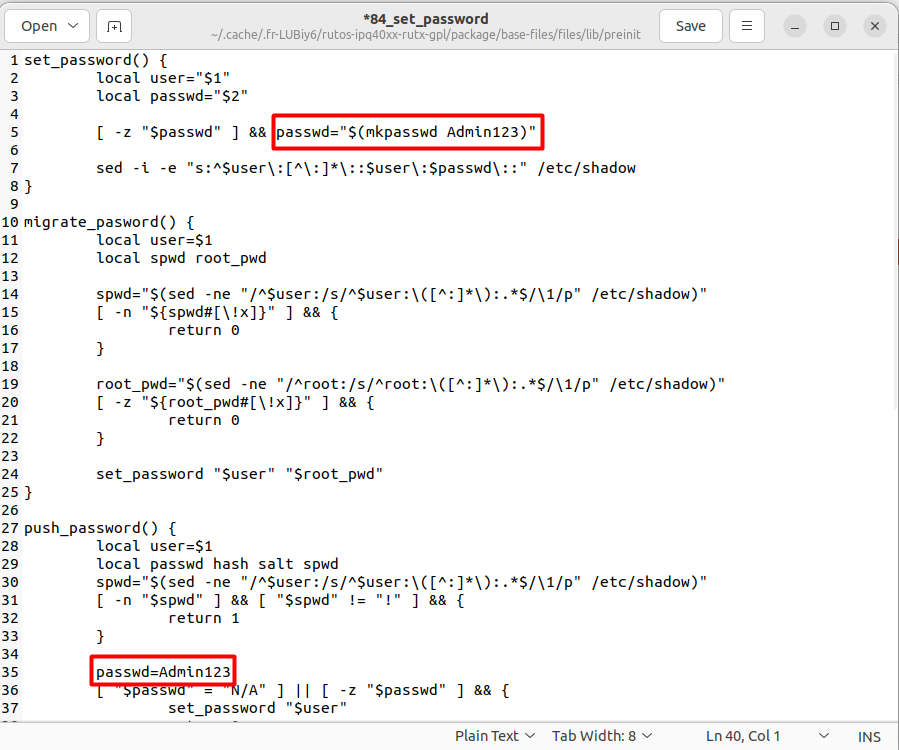
"RUTX_R_GPL_00.07.11/package/base-files/files/lib/preinit/84_set_password"
Change "admin01" to your password on line [ -z "$passwd" ] && passwd="$(mkpasswd admin01)"
Additionally, devices on newer batch are having unique passwords from MNF info. The new password should also be added under passwd in push_password list
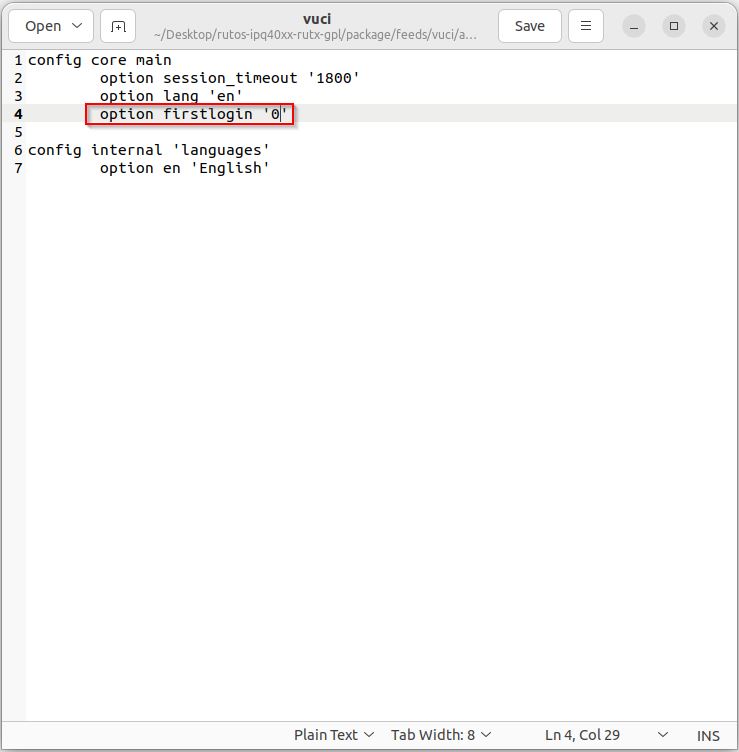
To disable the option to change the default password for the first time, kindly follow the professional instructions outlined below.
go to the path:
/package/feeds/vuci/api-core/files/etc/config/vuci
change option firstlogin '1' to '0', so it would not ask to change the password on the first login.
After making changes and saving them to the directory, we may build compile using the following commands:
./scripts/feeds update -a
make clean
Following that, when compiling firmware using make command, specifying the number of processors to be used is possible, thus speeding it up. To determine the number of available processors, you can use nproc command. Then, pass this number to the -j option in make command.
make -j1 V=sc
The exact path to the firmware depends on the target. In this example, the firmware can be found in the following directory:
rutos-ath79-rut9-gpl>bin>targets>ath79>generic>tltFws>RUTX_R_GPL_00.07.11.1_WEBUI
file name: RUTX_R_GPL_00.07.11.X_WEBUI
Changing Default IP Address
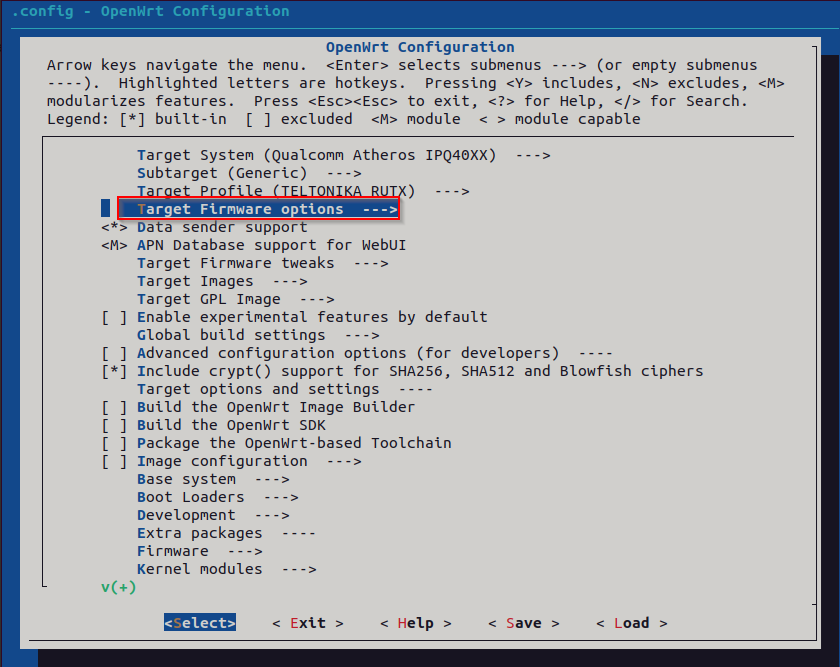
To modify the default IP address, you can make use of a dedicated menu in the firmware configuration, which is accessed through the "menuconfig" interface. To access this configuration menu, follow these steps from the root directory of your project: Open a terminal and execute the following command:
make menuconfig
After entering the "make menuconfig" command, it will launch a new interface known as the "OpenWrt Configuration." In this interface, navigate to the "Target Firmware options" section.
Disclaimer: do not use target profile in the make menuconfig, if you are compiling firmware for example for RUTX, the firmware will be working for all of the RUTX series devices and you do not need to select the specific device. Same goes for any other of the series (RUTM, RUT2, RUT9).
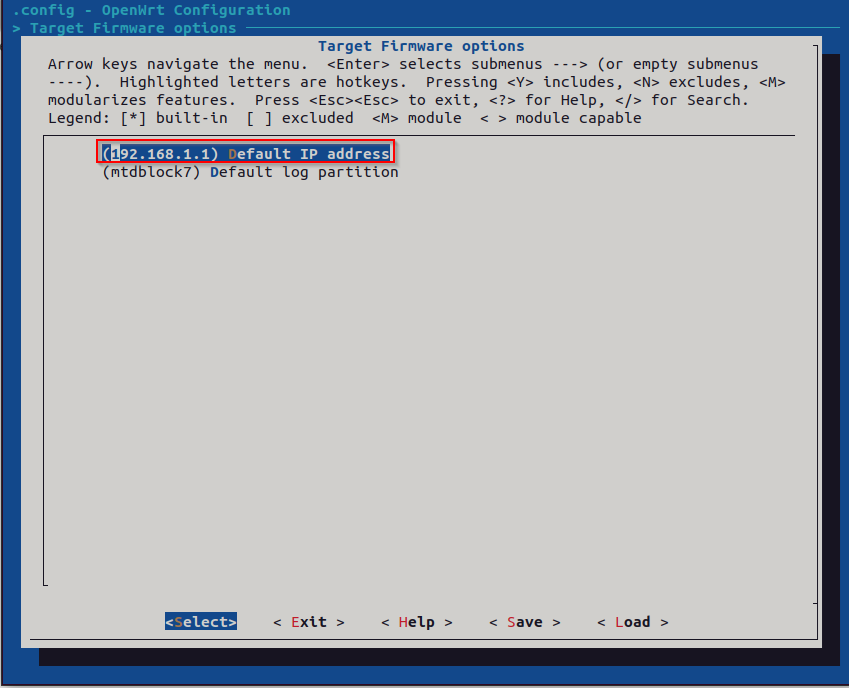
You will then be presented with the option to modify the Default IP address, allowing you to input your desired value. By default, it is set to (192.168.1.1).
You will then be presented with the option to modify the Default IP address, allowing you to input your desired value.
After making the desired changes to the Default IP address, you can then save those modifications.
After making changes and saving them to the directory, we may build compile using the following commands:
./scripts/feeds update -a
make clean
Following that, when compiling firmware using make command, specifying the number of processors to be used is possible, thus speeding it up. To determine the number of available processors, you can use nproc command. Then, pass this number to the -j option in make command.
make -j1 V=sc
The exact path to the firmware depends on the target. In this example, the firmware can be found in the following directory:
rutos-ath79-rut9-gpl>bin>targets>ath79>generic>tltFws>RUTX_R_GPL_00.07.11.1_WEBUI
file name: RUTX_R_GPL_00.07.11.X_WEBUI
Changing SSH Banner
To modify the SSH banner, you can make use of the file search tool in the extracted GPL. To access this, follow these steps from the root directory of your project, you can find the file from route below:
~/Downloads/RUTX_R_GPL_00.07.11/rutos-ipq40xx-rutx-sdk/include
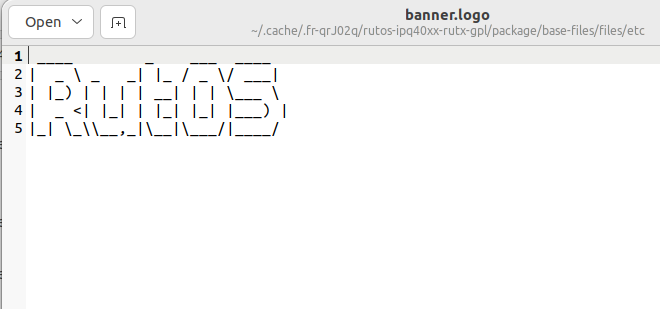
Make sure that the file that we want to edit is in the similar file path as above.
The contents of the file should look similar to the image above. After making the desired changes to the banner, you can then save those modifications.
Another way of producing a personalised banner is by using a free open source application such as figlet, which you can install in your linux system by using the command:
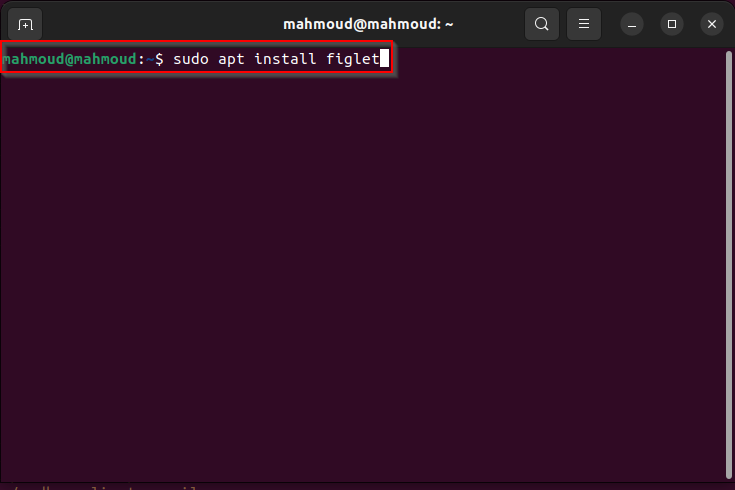
sudo apt-get install figlet
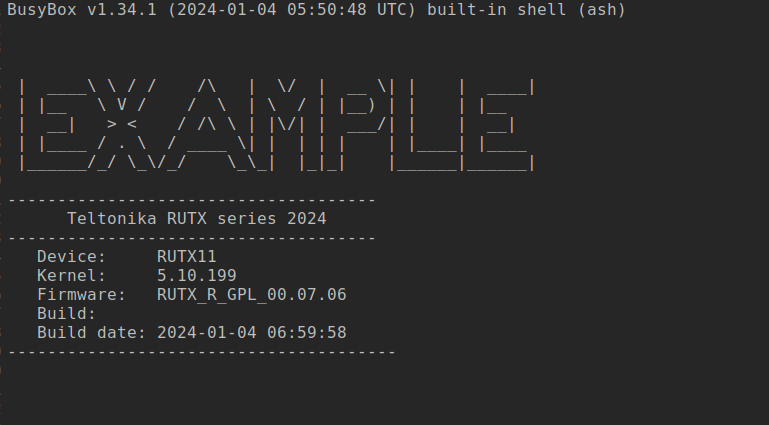
Then you can insert the generated ASCII art text to the banner.logo file by executing following command:
figlet [YOUR TEXT] > "banner.logo"
Make sure that your are in the same directory which contains the banner.logo file.
After making changes and saving them to the directory, we may build compile using the following commands:
./scripts/feeds update -a
make clean
Following that, when compiling firmware using make command, specifying the number of processors to be used is possible, thus speeding it up. To determine the number of available processors, you can use nproc command. Then, pass this number to the -j option in make command.
make -j1 V=sc
The exact path to the firmware depends on the target. In this example, the firmware can be found in the following directory:
rutos-ath79-rut9-gpl>bin>targets>ath79>generic>tltFws>RUTX_R_GPL_00.07.11.1_WEBUI
file name: RUTX_R_GPL_00.07.11.X_WEBUI
RESULTS:
Changing Firmware Version
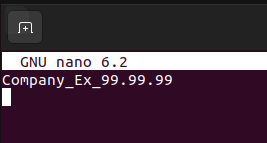
To modify the firmware version like Prefix, go to the directory where gpl_version file is located (/Downloads/RUTX_R_GPL_00.07.11.1/rutos-ipq40xx-rutx-gpl). Then run this command to edit file content.
nano gpl_version
Replace the content to the desired firmware version. To save, type Ctrl + X. Then, click Y.
After making changes and saving them to the directory, we may build compile using the following commands:
./scripts/feeds update -a
make clean
Following that, when compiling firmware using make command, specifying the number of processors to be used is possible, thus speeding it up. To determine the number of available processors, you can use nproc command. Then, pass this number to the -j option in make command.
make -j1 V=sc
The exact path to the firmware depends on the target. In this example, the firmware can be found in the following directory:
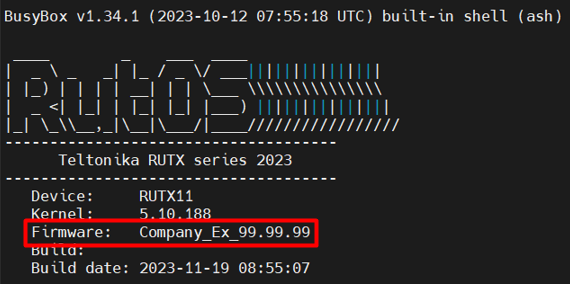
rutos-ath79-rut9-gpl>bin>targets>ath79>generic>tltFws>Company_Ex_99.99.99_WEBUI
file name: Company_Ex_99.99.99_WEBUI
RESULTS:
Changing Company Links
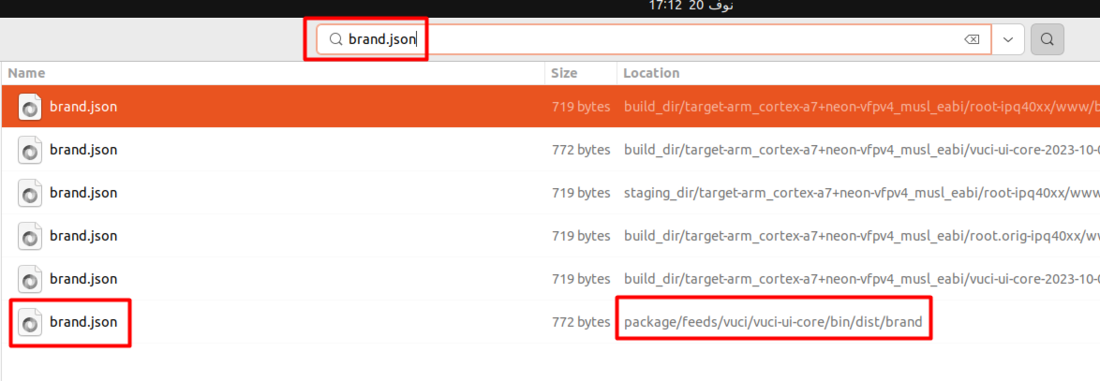
To modify the Company Links, you can make use of the file search tool in the extracted GPL. To access this, follow these steps from the root directory of your project, you can find the file from route below:
~/Downloads/RUTX_R_GPL_00.07.11.1/rutos-ipq40xx-rutx-gpl/package/feeds/vuci/vuci-ui-core/bin/vuci-ui-core/src/dist/www/brand
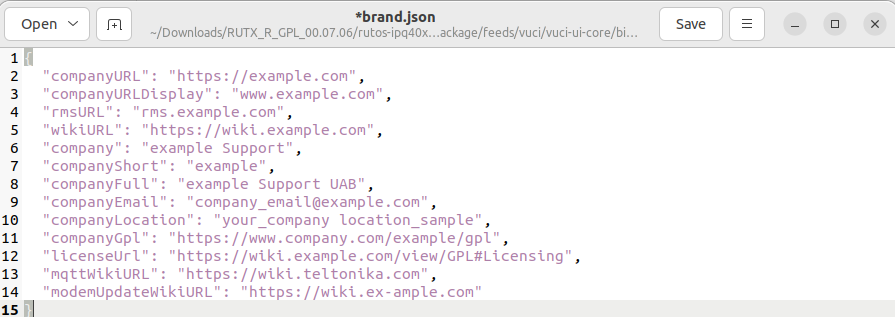
Make sure that the file that we want to edit is in the similar file path as above.
The contents of the file should look similar to the image above. After making the desired changes to the banner, you can then save those modifications.
After making changes and saving them to the directory, we may build compile using the following commands:
./scripts/feeds update -a
make clean
Following that, when compiling firmware using make command, specifying the number of processors to be used is possible, thus speeding it up. To determine the number of available processors, you can use nproc command. Then, pass this number to the -j option in make command.
make -j1 V=sc
The exact path to the firmware depends on the target. In this example, the firmware can be found in the following directory:
rutos-ath79-rut9-gpl>bin>targets>ath79>generic>tltFws>RUTX_R_GPL_00.07.11.1_WEBUI
file name: RUTX_R_GPL_00.07.11.X_WEBUI
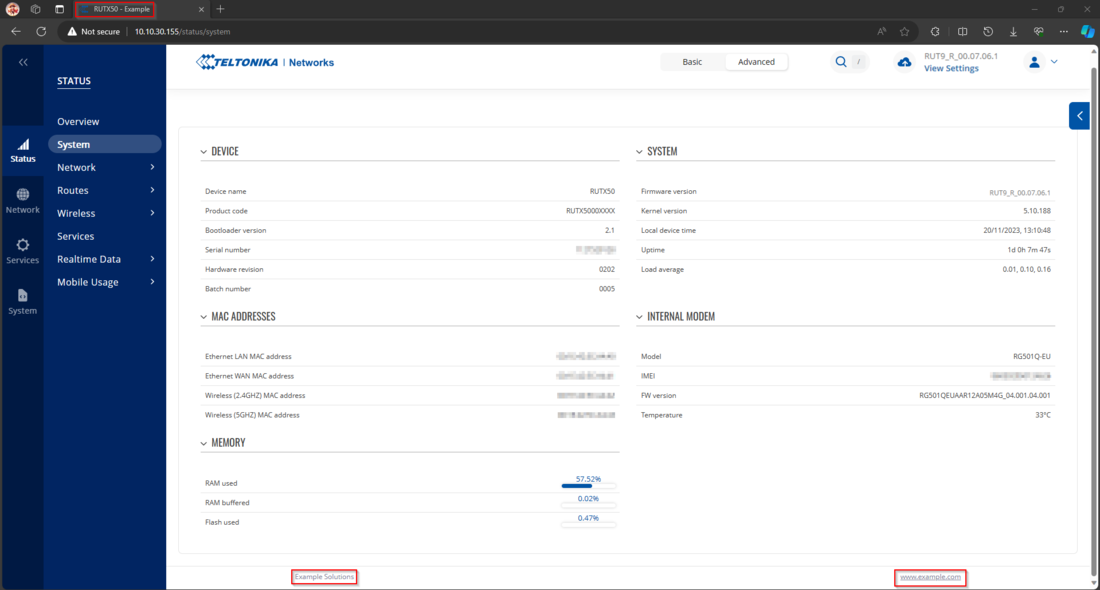
RESULTS:
Changing Device brand
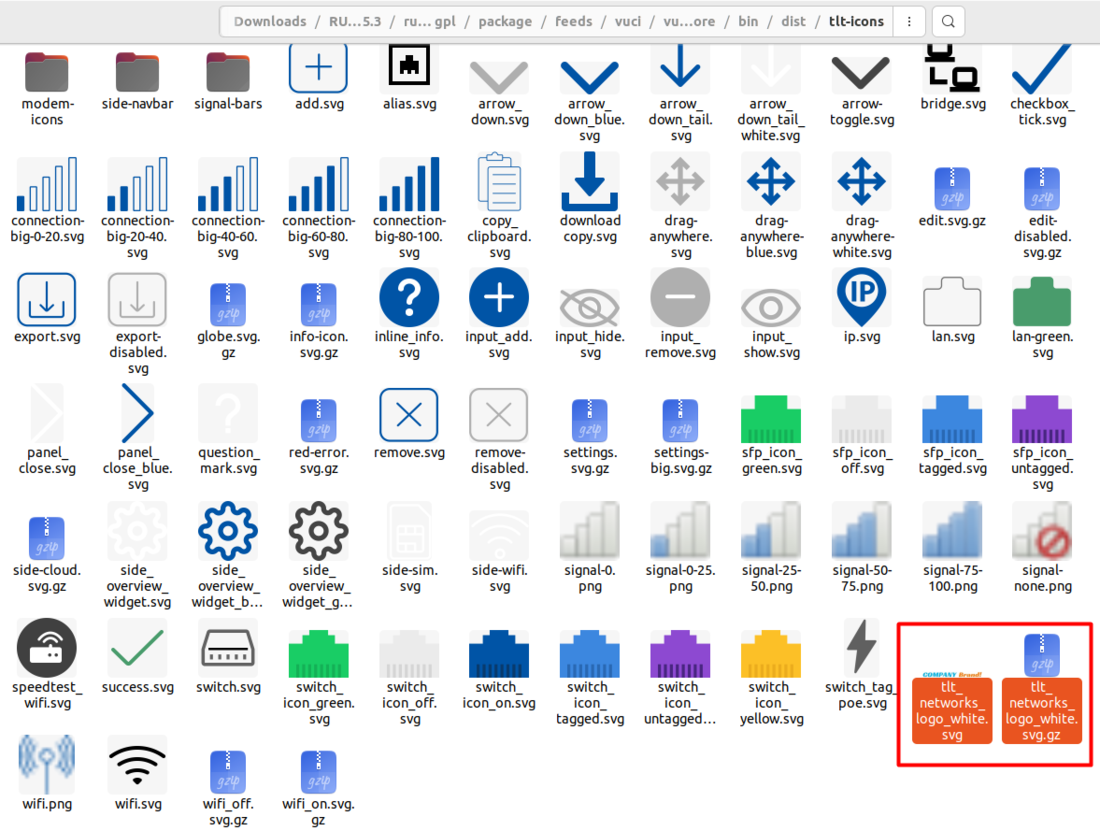
To modify the Device brand, you can make use search tool in the extracted GPL. To access this, follow these steps from the root directory of your project, you can find the TWO files from route below:
First File:
~/Downloads/RUTX_R_GPL_00.07.11/rutos-ipq40xx-rutx-gpl/package/feeds/vuci/vuci-ui-core/bin/dist
Second File:
~/Downloads/RUTX_R_GPL_00.07.11/rutos-ipq40xx-rutx-gpl/package/feeds/vuci/vuci-ui-core/bin/dist/ tlt-icons
Note: If you have a brand in a different format, you can convert it to SVG using any online converter, please keep in mind that online converters can cause scalability issues.
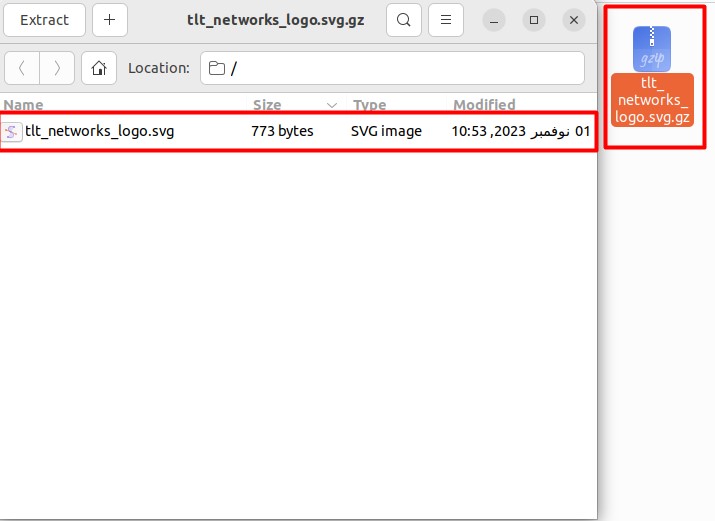
Afterwards, compress the file to .gz file as per screenshot below:
To compress a logo into.gz format, use the terminal command below:
gzip [file]
If your logo is compressed to.gz format, you can extract it, if needed, via terminal by following command:
gzip -d [file]
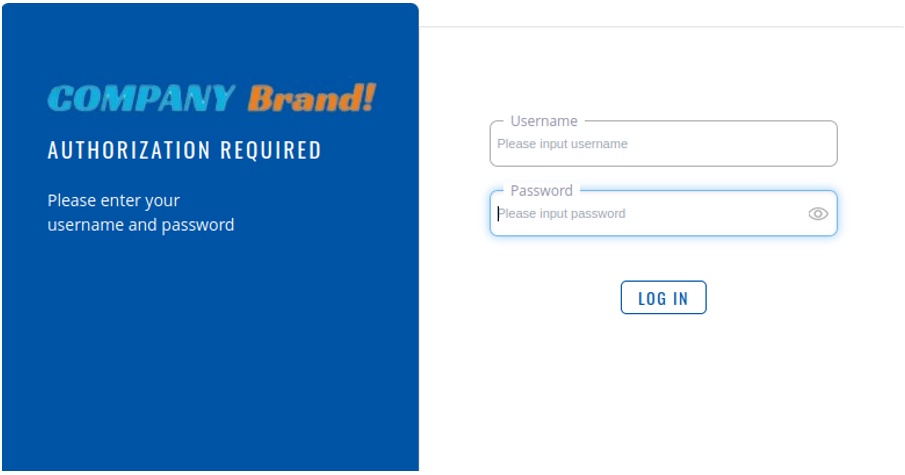
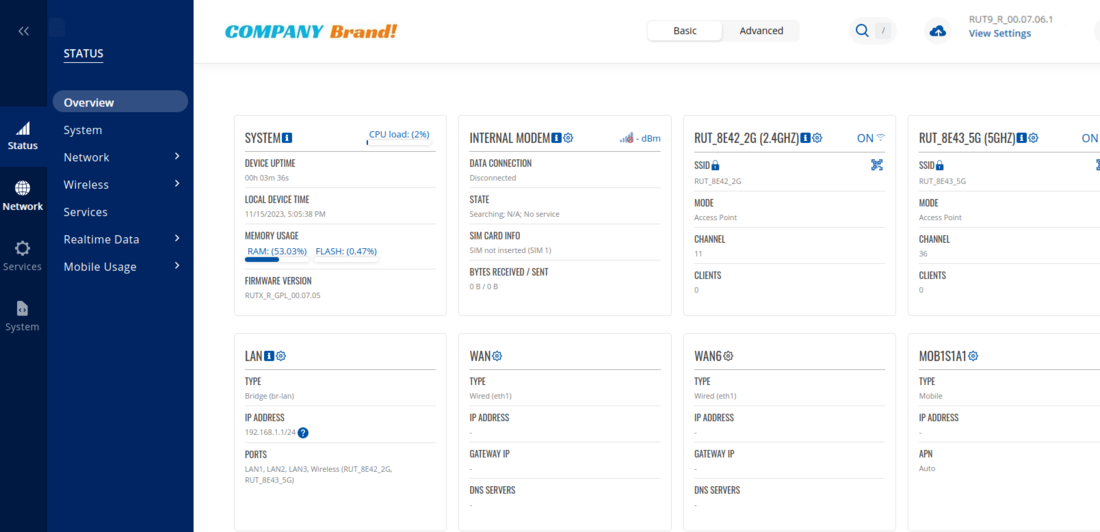
Note: It is worth that the logo has been changed to tlt-icons/tlt_networks_logo_white.The svg on the log in page is displayed on a blue background, however the tlt_networks_logo.svg displayed following the logging in line at the top is displayed on a white backdrop. The usual size of both logos is 266px x 31px.
After making changes and saving them to the directory, we may build compile using the following commands:
./scripts/feeds update -a
make clean
Following that, when compiling firmware using make command, specifying the number of processors to be used is possible, thus speeding it up. To determine the number of available processors, you can use nproc command. Then, pass this number to the -j option in make command.
make -j1 V=sc
The exact path to the firmware depends on the target. In this example, the firmware can be found in the following directory:
rutos-ath79-rut9-gpl>bin>targets>ath79>generic>tltFws>RUTX_R_GPL_00.07.11.1_WEBUI
file name: RUTX_R_GPL_00.07.11.X_WEBUI
RESULTS:
Changing Favicon
To modify the Favicon, you can make use search tool in the extracted GPL. To access this, follow these steps from the root directory of your project, you can find the TWO files from route below:
First File:
~/Downloads/RUTX_R_GPL_00.07.11.1/rutos-ipq40xx-rutx-gpl/package/feeds/vuci/vuci-ui-core/bin
Second File:
~/Downloads/RUTX_R_GPL_00.07.11.1/rutos-ipq40xx-rutx-gpl/package/feeds/vuci/vuci-ui-core/bin/dist/assests
Note: If you have a brand in a different format, you can convert it to ico using any online converter, please keep in mind that online converters can cause scalability issues.
To compress a logo into.gz format, use the terminal command below:
gzip [file]
If your logo is compressed to.gz format, you can extract it, if needed, via terminal by following command:
gzip -d [file]
Note: It is worth that the logo has been changed to tlt-icons/tlt_networks_logo_white.The svg on the log in page is displayed on a blue background, however the tlt_networks_logo.svg displayed following the logging in line at the top is displayed on a white backdrop. The usual size of both logos is 266px x 31px.
After making changes and saving them to the directory, we may build compile using the following commands:
./scripts/feeds update -a
make clean
Following that, when compiling firmware using make command, specifying the number of processors to be used is possible, thus speeding it up. To determine the number of available processors, you can use nproc command. Then, pass this number to the -j option in make command.
make -j1 V=sc
The exact path to the firmware depends on the target. In this example, the firmware can be found in the following directory:
rutos-ath79-rut9-gpl>bin>targets>ath79>generic>tltFws>RUTX_R_GPL_00.07.11.1_WEBUI
file name: RUTX_R_GPL_00.07.11.X_WEBUI
RESULTS:
Changing WebUI Color
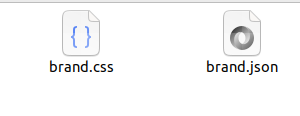
To modify color designs for the WebUI, locate brand.css file. In this configuration, it is in /RUTX_R_GPL_00.07.11/rutos-ipq40xx-rutx-gpl/package/feeds/vuci/vuci-ui-core/bin/dist/brand directory. Run ls command to see the contents of the directory. It should have a zip file entitled brand.css.gz. To extract brand.css.gz, run:
gzip -d brand.css.gzip
Run nano brand.css on the same directory to edit color values. Color schemes are using HTML color codes in HEX. You can generate HEX color codes with the help of this link: https://htmlcolorcodes.com/
For demo purposes, let us change the border color and font-color to #03ECFC and #06C46F respectively.
To save, type Ctrl + X. Then, click Y.
After making changes and saving them to the directory, we may build compile using the following commands:
./scripts/feeds update -a
make clean
Following that, when compiling firmware using make command, specifying the number of processors to be used is possible, thus speeding it up. To determine the number of available processors, you can use nproc command. Then, pass this number to the -j option in make command.
make -j1 V=sc
The exact path to the firmware depends on the target. In this example, the firmware can be found in the following directory:
rutos-ath79-rut9-gpl>bin>targets>ath79>generic>tltFws>RUTX_R_GPL_00.07.11.1_WEBUI
file name: RUTX_R_GPL_00.07.11.X_WEBUI
RESULTS:
Disclaimer
It may not be necessary to update scripts and make clean after making firmware changes; this will depend on the changes undertaken. In these cases, the commands were used to assure clean compilation and the removal of any potential artifacts from previous environments.

