OnboardingTest: Difference between revisions
No edit summary |
No edit summary |
||
| (9 intermediate revisions by the same user not shown) | |||
| Line 1: | Line 1: | ||
==Introduction== | ==Introduction== | ||
In this configuration example, you will be able to follow the steps to set up devices with RUTOS using Dynamic DNS, OpenVPN, and port forwarding. The purpose is to | In this configuration example, you will be able to follow the steps to set up devices with RUTOS using Dynamic DNS, OpenVPN, and port forwarding. The purpose of this configuration is to access the WebUI of a device on a LAN from a laptop on an external network, using DDNS because there is no fixed public IP, OpenVPN to establish connections from external networks, and Port Forwarding to reach the device’s WebUI through an external port..<br>[[File:Picture111.png|border|class=tlt-border]] | ||
==RUTX08 configuration== | ==RUTX08 configuration== | ||
===Dynamic DNS configuration on no-ip.com === | ===Dynamic DNS configuration on no-ip.com === | ||
| Line 33: | Line 33: | ||
<li>Go to the device <I> '''WebUI''' → '''Network''' → '''Firewall'''→ '''Port Forward'''</i> and set up your own parameters, the external port will be '''18000''' and internet port will be '''80''' (HTTP port).<br> | <li>Go to the device <I> '''WebUI''' → '''Network''' → '''Firewall'''→ '''Port Forward'''</i> and set up your own parameters, the external port will be '''18000''' and internet port will be '''80''' (HTTP port).<br> | ||
[[File:Picture112.png|border|class=tlt-border]]<br> | [[File:Picture112.png|border|class=tlt-border]]<br> | ||
You can learn more about Port Forwarding Configuration [[Port_Forwarding|here]]. | |||
==RUT200 configuration (End device)== | |||
===Remote Device Access === | |||
The router can be accessed remotely via any interface as it is listening for connections on all IPs when remote access is enabled. However, due to the firewall restrictions, access via interfaces other than LAN requires additional configuration. | |||
<ol> | |||
<li>Go to the device <I> '''WebUI''' → '''System''' → '''Administration'''→ '''Access Control'''</i> and turn ON HTTP remote access on WebUI.<br> | |||
[[File:Picture113.png|border|class=tlt-border]]<br> | |||
You can learn more about Remote Device Access Configuration [[Remote_Device_Access | here]]. | |||
==Testing from Laptop== | |||
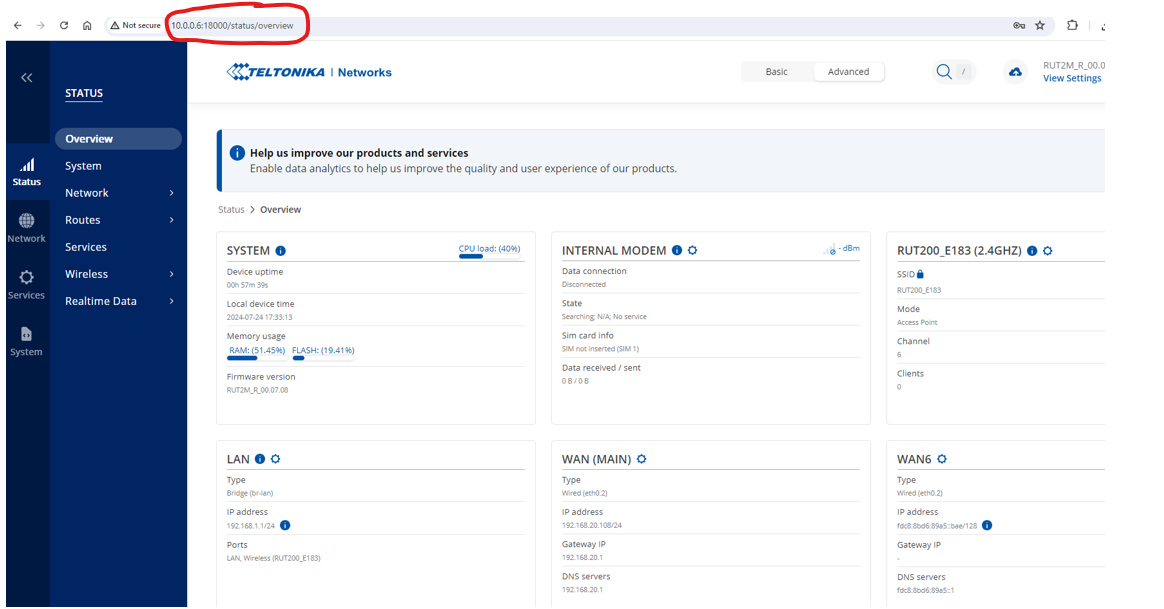
We made RUT200 WebUI reachable from external network using RUTX08 WAN IP and RUT956. You will see that you reached RUT200 WebUI via RUT956 LAN IP from a Laptop in an external network: | |||
[[File:Picture114.png|border|class=tlt-border]]<br> | |||
Latest revision as of 15:02, 25 July 2024
Introduction
In this configuration example, you will be able to follow the steps to set up devices with RUTOS using Dynamic DNS, OpenVPN, and port forwarding. The purpose of this configuration is to access the WebUI of a device on a LAN from a laptop on an external network, using DDNS because there is no fixed public IP, OpenVPN to establish connections from external networks, and Port Forwarding to reach the device’s WebUI through an external port..
RUTX08 configuration
Dynamic DNS configuration on no-ip.com
Go to the website [1], log in or create an account, and create a Hostname with the public IP that has been assigned to us. 
Dynamic DNS configuration on device
- Go to the device WebUI → System → Dynamic DNS and set up your own parameters.
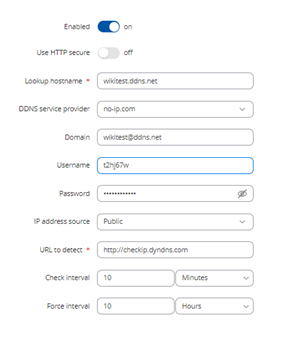
You will see that the status of this instance will be Running.
You can learn more about DDNS Configuration here.Certificate Generation
The easiest way to generate certificates and keys is by using the Certificate Generation page that is available in the device's WebUI:
- Go to the device WebUI → Administration → Certificates and push button Generate.
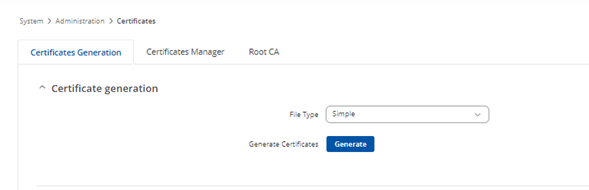
You will have the certificates available in the Certificates Manager tab. Download the authority certificate and the client certificates, as you will need to upload them to the device that has the VPN client role.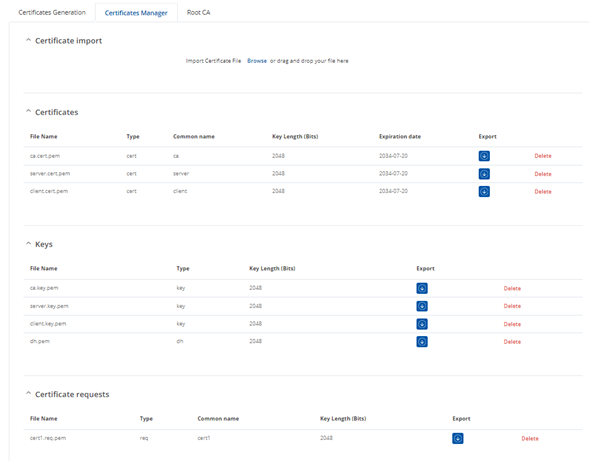
You can learn more about DDNS Configuration here.
OpenVPN as a server configuration on device
- Go to the device WebUI → Services → VPN→ OpenVPN and set up your own parameters.
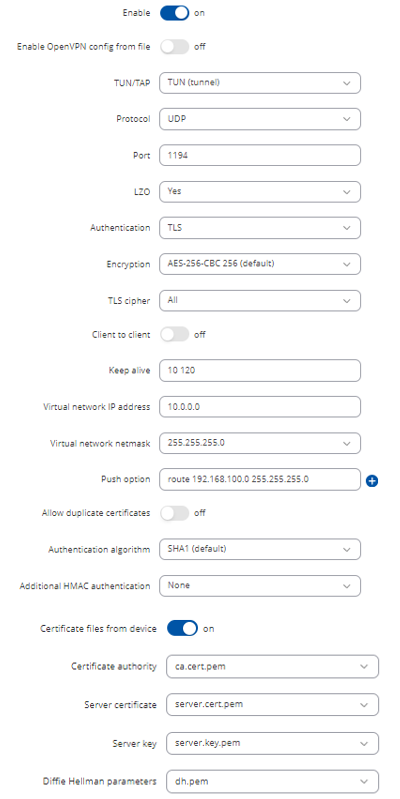
You will observe that the OpenVPN service as a server will be in a Running state.

You can learn more about OpenVPN Configuration OpenVPN_configuration_examples.
RUTX10 configuration
OpenVPN as a client configuration on device
- Go to the device WebUI → Services → VPN→ OpenVPN and set up your own parameters.

. Make sure the Certificates from device button is turned off, and upload the files you downloaded from the server device.
. You will observe that the OpenVPN service as a client will be in a Running state.

Port Forward configuration on device
- Go to the device WebUI → Network → Firewall→ Port Forward and set up your own parameters, the external port will be 18000 and internet port will be 80 (HTTP port).
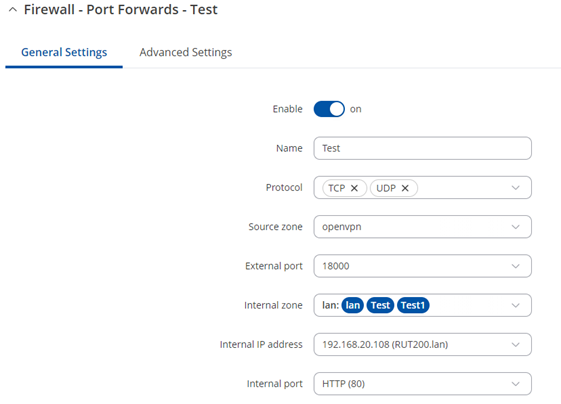
You can learn more about Port Forwarding Configuration here.RUT200 configuration (End device)
Remote Device Access
The router can be accessed remotely via any interface as it is listening for connections on all IPs when remote access is enabled. However, due to the firewall restrictions, access via interfaces other than LAN requires additional configuration.
- Go to the device WebUI → System → Administration→ Access Control and turn ON HTTP remote access on WebUI.
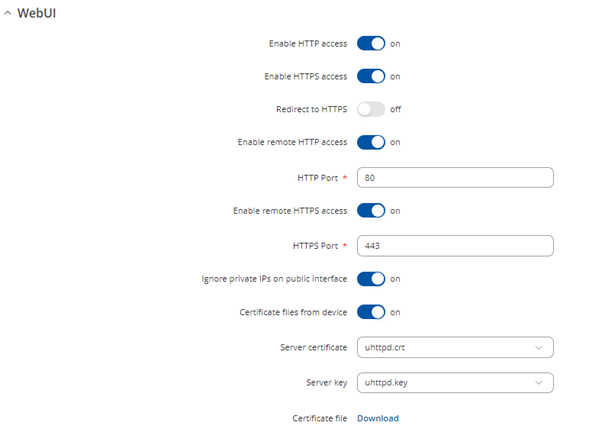
You can learn more about Remote Device Access Configuration here.Testing from Laptop
We made RUT200 WebUI reachable from external network using RUTX08 WAN IP and RUT956. You will see that you reached RUT200 WebUI via RUT956 LAN IP from a Laptop in an external network:
- Go to the device WebUI → System → Administration→ Access Control and turn ON HTTP remote access on WebUI.
- Go to the device WebUI → Network → Firewall→ Port Forward and set up your own parameters, the external port will be 18000 and internet port will be 80 (HTTP port).
- Go to the device WebUI → Services → VPN→ OpenVPN and set up your own parameters.
- Go to the device WebUI → Services → VPN→ OpenVPN and set up your own parameters.
- Go to the device WebUI → Administration → Certificates and push button Generate.


