Upload & Download Files from RutOS: Difference between revisions
(Created page with "This article details the process of how to upload/download files from a Teltonika-Networks device. __TOC__ ==Windows== For file transfer between Windows and RutOS we'll be us...") |
(→vivo) Tags: Mobile edit Mobile web edit |
||
| (3 intermediate revisions by one other user not shown) | |||
| Line 6: | Line 6: | ||
===File transfer=== | ===File transfer=== | ||
---- | |||
* Launch WinSCP and fill in the highlighted fields: | * Launch WinSCP and fill in the highlighted fields: | ||
| Line 39: | Line 39: | ||
===Upload files=== | ===Upload files=== | ||
---- | |||
To upload a file from a PC to the router, you must specify the source path to the file on your computer and the destination path to the router. | To upload a file from a PC to the router, you must specify the source path to the file on your computer and the destination path to the router. | ||
| Line 60: | Line 60: | ||
* If you upload configuration (''config'') files into the router, changes will not take effect until you reload the related service. You can use the '''''luci-reload'''' command to do so or simply '''reboot''' the router. | * If you upload configuration (''config'') files into the router, changes will not take effect until you reload the related service. You can use the '''''luci-reload'''' command to do so or simply '''reboot''' the router. | ||
* In most cases people upload config files, custom scripts or software packages. It useful to know where certain files should be uploaded. For example, all config files are stored in ''/etc/config/''; the | * In most cases people upload config files, custom scripts or software packages. It useful to know where certain files should be uploaded. For example, all config files are stored in ''/etc/config/''; the User Scripts file is called ''rc.common'' and stored in ''/etc/''. | ||
* Configuration files have fixed names. So, for example, if you upload an OpenVPN config file but with a different name than the one used in the example above, the configuration will not work. You can find a list of RUTxxx config file names and related services '''[[UCI_command_usage#Configuration_files|here]]'''. | * Configuration files have fixed names. So, for example, if you upload an OpenVPN config file but with a different name than the one used in the example above, the configuration will not work. You can find a list of RUTxxx config file names and related services '''[[UCI_command_usage#Configuration_files|here]]'''. | ||
===Download files=== | ===Download files=== | ||
---- | |||
Downloading files from a router is very similar to uploading. You just have specify the file path of the router in place of the file location. | Downloading files from a router is very similar to uploading. You just have specify the file path of the router in place of the file location. | ||
| Line 71: | Line 71: | ||
scp [email protected]:/etc/config/openvpn ~/Desktop | scp [email protected]:/etc/config/openvpn ~/Desktop | ||
As you may notice, all that is different is that source and destination paths are switched. | As you may notice, all that is different is that source and destination paths are switched. | ||
==Transfer directories== | ==Transfer directories== | ||
| Line 91: | Line 91: | ||
===External links=== | ===External links=== | ||
---- | |||
* [https://winscp.net/eng/download.php WinSCP download] | * [https://winscp.net/eng/download.php WinSCP download] | ||
[[Category: | [[Category:Control & Configuration]] | ||
Latest revision as of 01:01, 16 March 2021
Main Page > FAQ > Control & Configuration > Upload & Download Files from RutOSThis article details the process of how to upload/download files from a Teltonika-Networks device.
Windows
For file transfer between Windows and RutOS we'll be using WinSCP - a free application used to copy file between a local computer and other local/remote host and servers using FTP, FTPS, SCP, SFTP, WebDAV or S3 file transfer protocols. You can download WinSCP from here. Download and install it on your PC and you can start following the instructions provided in the next section.
File transfer
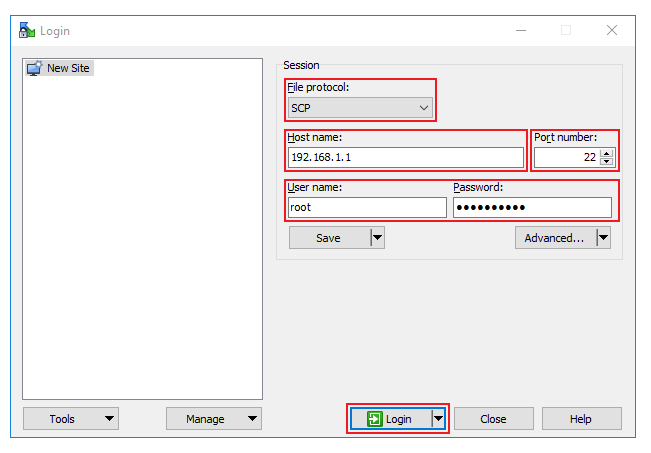
- Launch WinSCP and fill in the highlighted fields:
Where:
- File protocol - the file protocol used to copy files to and from the host
- Host name - the router's IP address or host name (replace this with your personal router's IP or host name)
- Port number - port used for SCP file transfer. By default it is port 22
- User name - the router's SSH user name. This is different than the user name used for WebUI logins. Always use root
- Password - the router's admin password
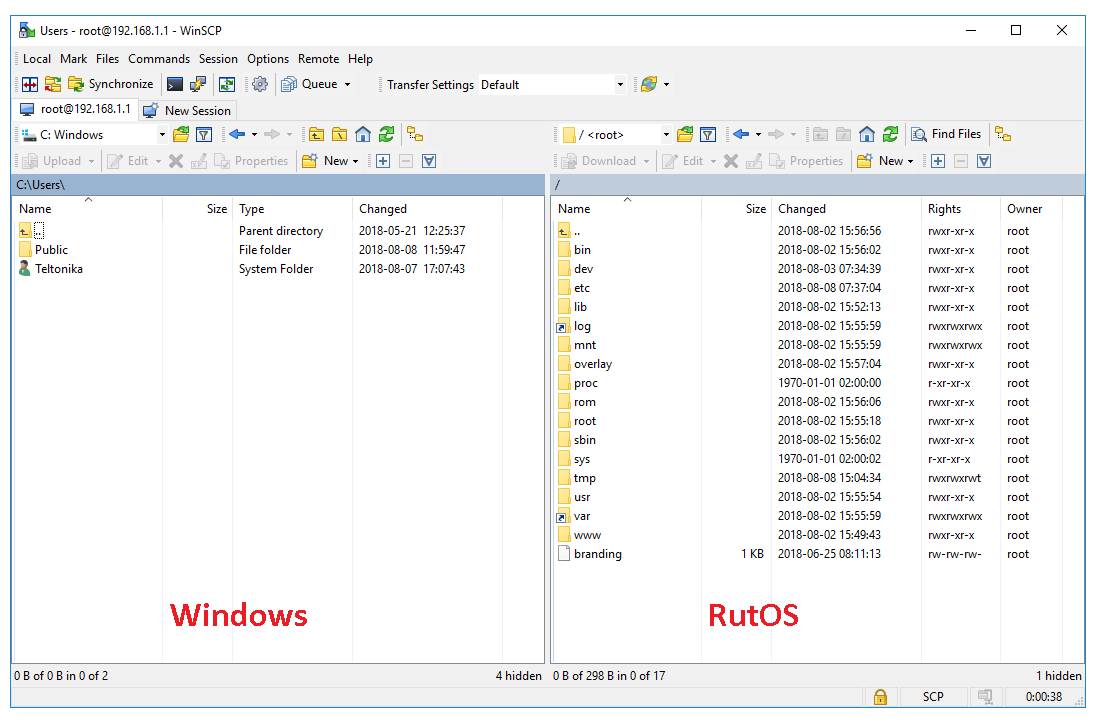
- If you are logging in for the first time, you will be prompted with a security warning. Click "Update" to proceed - this will setup an RSA key between your PC and the router. After that you will greeted with a window such as the the one presented below. You can then drag files into and from the router exactly like you would in Windows:
Linux
For file transfer between Linux and RutOS we'll be using the scp command. You can use scp to securely copy files and directories between hosts. scp encrypts both the file and any passwords exchanged.
The syntax of the scp command is:
scp [options] username1@source_host:directory1/filename1 username2@destination_host:directory2/filename2
Where:
- scp - denotes that the scp command is used
- [options] - can be used to specify various options that dictate scp
- username1@source_host:directory1/filename1 - username, hostname and path to the file's source location (the file that is to be copied)
- username2@destination_host:directory2/filename2 - username, hostname and path to the file's destination (where the file will be copied to)
username and hostname are not mandatory in every case. For example, when you're copying files from your PC to a router, you don't need to specify the username and hostname of your PC; only the path to the file is required. In short, username and hostname are used when an SSH access is required to reach the specified file path.
Upload files
To upload a file from a PC to the router, you must specify the source path to the file on your computer and the destination path to the router.
For example, let's say you want to upload an OpenVPN configuration file called "openvpn" into the router and the file is located on your Desktop. This means the path to the file is ~/Desktop/openvpn. Configuration files in the router are stored in the directory/etc/config/. So the command that should be used should look like this:
scp ~/Desktop/openvpn [email protected]:/etc/config/
Where:
- root - router's login username
- 192.168.1.1 - router's IP address (replace this with your own router's IP)
- ~ - the shortened version of the path /home/username/ (where the Desktop directory is located)
After executing the command, you will be asked to enter the router's password. It will the same password used to login to router's WebUI (admin01 by default). Then will see response such as this:
openvpn 100% 685 0.4KB/s 00:00
This means the file was transferred successfully.
Important notes:
- If you upload configuration (config) files into the router, changes will not take effect until you reload the related service. You can use the luci-reload' command to do so or simply reboot the router.
- In most cases people upload config files, custom scripts or software packages. It useful to know where certain files should be uploaded. For example, all config files are stored in /etc/config/; the User Scripts file is called rc.common and stored in /etc/.
- Configuration files have fixed names. So, for example, if you upload an OpenVPN config file but with a different name than the one used in the example above, the configuration will not work. You can find a list of RUTxxx config file names and related services here.
Download files
Downloading files from a router is very similar to uploading. You just have specify the file path of the router in place of the file location.
For example, let's try downloading the openvpn config file this time:
scp [email protected]:/etc/config/openvpn ~/Desktop
As you may notice, all that is different is that source and destination paths are switched.
Transfer directories
If you want to transfer an entire directory, you must the -r option. For this example, let's say that we want upload an entire folder called "config", located on your desktop:
scp -r ~/Desktop/config [email protected]:/etc/
The response this time will be a list of all files uploaded with the command:
ddns                                          100%  389     0.4KB/s   00:00
system                                        100% 1098     1.1KB/s   00:00
gps                                           100%  505     0.5KB/s   00:00
ntpserver                                     100%   49     0.1KB/s   00:00
...                                            ...  ...         ...     ...
If you want to download a directory from the router, the process would be the same as with single files, i.e., you need to switch the source and destination locations in the command:
scp -r [email protected]:/etc/config ~/Desktop/


