Template:Rms manual users add new profile: Difference between revisions
No edit summary |
No edit summary |
||
| Line 5: | Line 5: | ||
[[File:Rms profile hierarchy v2.jpg|800px]] | [[File:Rms profile hierarchy v2.jpg|800px]] | ||
Only your main RMS profile’s users with the '''Administrator''' role can create new sub-profiles and move license pools. Sub-profile users with | Only your main RMS profile’s users with the '''Administrator''' role can create new sub-profiles and move license pools. Sub-profile users with the Administrator role can still create new users in that sub-profile, but can not create new profiles. | ||
---- | ---- | ||
* Scroll your mouse pointer to the Profile submenu ('''Users → Profiles → Profile''') and click "Add new profile": | * Scroll your mouse pointer to the Profile submenu ('''Users → Profiles → Profile''') and click "Add new profile": | ||
Revision as of 12:03, 30 May 2018
The Add new profile function can be used to create sub-profiles on your RMS company (main RMS profile).
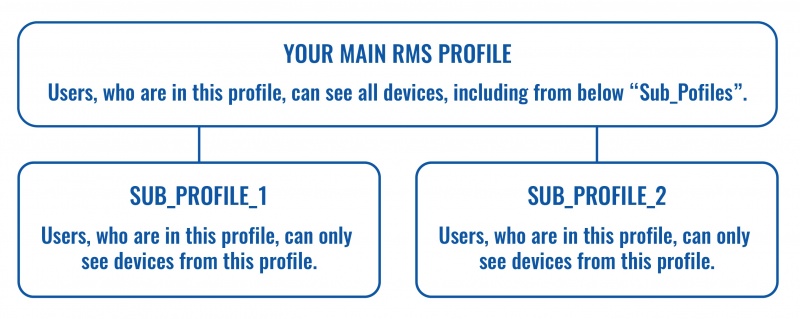
RMS profile hierarchy is comprised of two levels: on the first level is your main RMS profile; on the second level - sub-profiles created by your main RMS profile. Sub-profiles are child profiles that belong to a higher profile instance. Sub-profiles created from your main RMS profile can be monitored and managed from your main profile but are unreachable from and invisible to each other:
Only your main RMS profile’s users with the Administrator role can create new sub-profiles and move license pools. Sub-profile users with the Administrator role can still create new users in that sub-profile, but can not create new profiles.
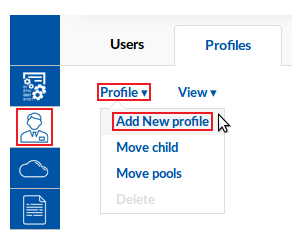
- Scroll your mouse pointer to the Profile submenu (Users → Profiles → Profile) and click "Add new profile":
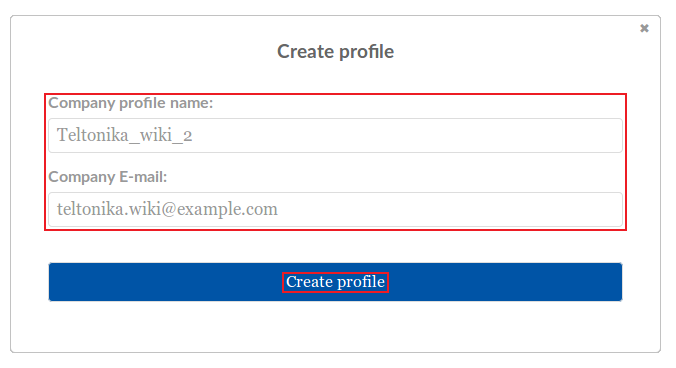
- Enter a custom name and an email address that will be associated with the new profile and click "Create profile":
- You will be informed that the profile was created successfully by a pop-up box. You can close it:
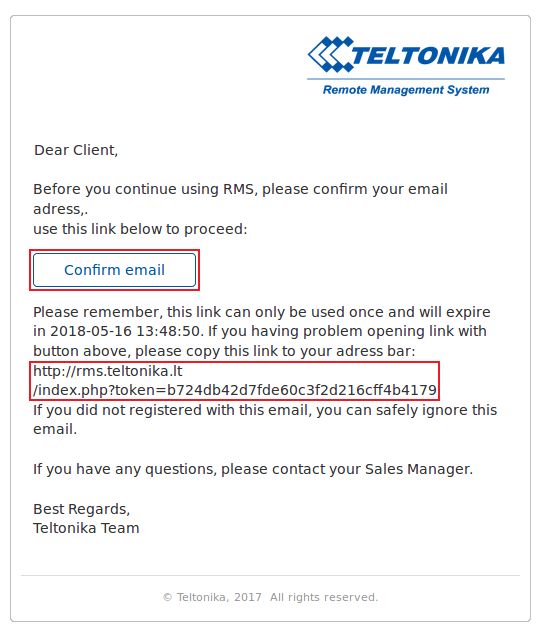
- The specified recipient will receive an email asking to confirm the email address for that profile. In that email, click the "Confirm email" button or if that doesn't work for some reason, copy the confirmation link provided in the email into your web browser's URL field:
- When you visit the link you will simply be greeted by a pop-up informing you that the email address has been confirmed:
At this point your new RMS sub-profile will have been created and ready to be used. If you want to add users to the new-sub-profile, we suggest visiting the RMS Users: Users page of the RMS Manual for instructions.


