OpenVPN client on Windows: Difference between revisions
PauliusRug (talk | contribs) No edit summary |
|||
| Line 66: | Line 66: | ||
* http://www.whatsmyip.org/ - a website where you can check your Public IP address | * http://www.whatsmyip.org/ - a website where you can check your Public IP address | ||
* https://community.openvpn.net/openvpn/wiki/Openvpn24ManPage - OpenVPN manual | * https://community.openvpn.net/openvpn/wiki/Openvpn24ManPage - OpenVPN manual | ||
[[Category:Configuration Examples]] | |||
Revision as of 14:49, 1 August 2023
Main Page > General Information > Configuration Examples > PC > Windows > OpenVPN client on WindowsIntroduction
OpenVPN is an open-source software application that implements virtual private network (VPN) techniques for creating secure point-to-point or site-to-site connections in routed or bridged configurations and remote access facilities.
This article provides a guide on how to configure an OpenVPN Tunnel connection between an OpenVPN client on a Windows PC/Laptop and any OpenVPN server using TLS certificates as the authentication method. The examples in this article only apply to Windows 7 and later versions. For a Linux guide, click here.
Configuration overview and prerequisites
Before we begin, let's overview the configuration that we are attempting to achieve and the prerequisites that make it possible.
Prerequisites:
- A PC or Laptop running on Windows 7 or a later version
- An active Internet connection
Configuration scheme:
The scheme itself is very simple - an OpenVPN client connects to an OpenVPN server. The client is configured on a Windows 10 PC or Laptop, while the server is undefined in this example, i.e., we will be focusing mainly on the client configuration method, since the server could belong to any OpenVPN service provider.
OpenVPN client installation
To create an OpenVPN client we'll need to download and install the OpenVPN Windows application. You can find the download link for the newest OpenVPN version here. The file in question should be named something like this: openvpn-install-2.4.6-I602.exe (actual name depends on the current OpenVPN version). Download and run this file. For examples in this guide you can just use default settings in the installation, unless your own configuration requires otherwise.
OpenVPN client configuration
If you have familiarized yourself with the configuration scheme, installed the necessary software and have all of the devices in order, we can start configuring the OpenVPN client using instructions provided in this section.
The client configuration is stored in a single text file. You can either download an example file from the Internet or use our configuration file as a template, which you can download by clicking here. The file stores standard OpenVPN options, the values of which depend on the server type and user preferences, and authentication certificates or file paths to the certificates. Since we'll be using TLS authentication for this example, we'll need to generate TLS certificates for our configuration to work. The process on how to do that is described here in detail.
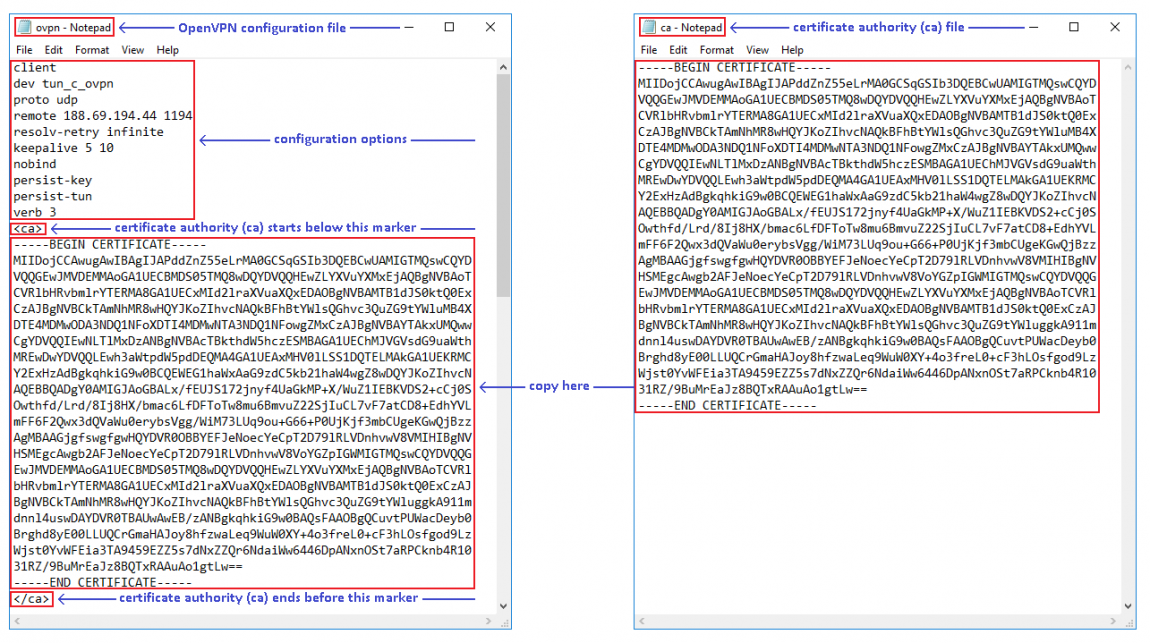
- When you have the certificates in order, you can start configuring the client. To do so, simply open the configuration file with any text editor. Enter the OpenVPN options relevant to your configuration. Then copy the contents of the certificates into that file. Below is an example of how the file looks like:
NOTE: don't forget to copy the other certificates as well. The necessary markers are in place inside the example config file.
- Save the file with an .ovpn extension. Then click the "Show hidden icons" (
 ) button located in the right hand corner of the Windows taskbar. Then right-click the "OpenVPN GUI" (
 ) icon and import your configuration file. When you have done so, the name of your client configuration will appear in the OpenVPN GUI drop-down menu. Scroll your mouse pointer over it and click "Connect":
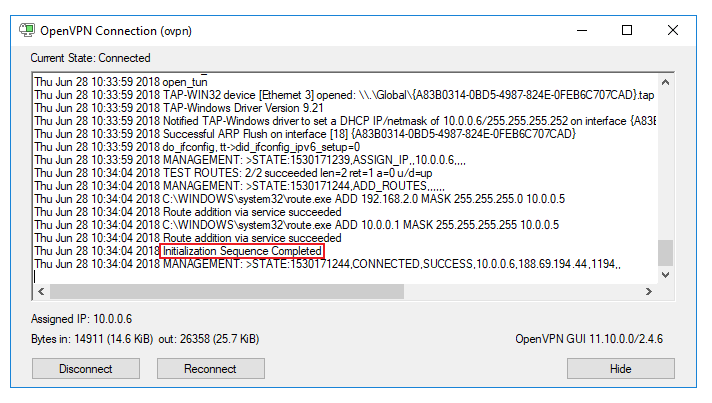
- At this point all you need to do is wait a few seconds for the connection to complete. After clicking "Connect" a status window for that client should appear. If the connection was successful, the status window should close itself automatically. To bring it up again, go to the OpenVPN GUI drop-down menu again and click "Show status" in your OpenVPN client's menu. You should a "Initialization Sequence Complete" message in the log:
- Additional testing for the connection may be required depending on the server's configuration and the overall intent of your OpenVPN connection. For instance, if you were supposed get access to server's private network or other clients' private networks, you can open the Windows "Command Prompt" and try pinging private IP addresses of the devices in the networks in question. Or if the server was intended to be used as a proxy, your computer's Public IP address should be the same as the server's. To check your public IP address, visit this website.
Different configurations
The configuration we discussed in earlier sections is very basic. Some options used in client configurations depend on the server's configuration, some are only specific to the client. If you're using a third party OpenVPN service, the configuration files (and necessary certificates) are almost always provided by that party, so if that is the case we suggest simply using their configuration file.
If you are configuring the server yourself you will also need to create the client config file yourself. You can use the one provided in this guide as a base, but keep in mind that you'll have set the options specific to your own configuration yourself. OpenVPNs supports a lot of different options and can be customized almost endlessly. A complete list of OpenVPN options can be found in the OpenVPN manual (external link).
See also
- Other OpenVPN related articles from our wiki:
- How to generate TLS certificates (Windows)? - a guide on generating TLS certificates
- OpenVPN Manual section - OpenVPN section of the router's manual
- OpenVPN configuration examples - basic OpenVPN configuration scenarios with detailed examples
- OpenVPN traffic split - a detailed example on how to configure different default gateways for devices in the router's LAN
- OpenVPN client on Linux
- OpenVPN server on Windows
External links
- https://openvpn.net/index.php/open-source/downloads.html - OpenVPN client download.
- http://www.whatsmyip.org/ - a website where you can check your Public IP address
- https://community.openvpn.net/openvpn/wiki/Openvpn24ManPage - OpenVPN manual


