Monitoring via JSON-RPC windows RutOS: Difference between revisions
No edit summary |
No edit summary |
||
| Line 222: | Line 222: | ||
The command above will change the router's DHCP Server's current Start address, Address limit and Lease time values '''''(highlighted in orange)''''' to custom values provided in the '''"values"''' section of the command '''''(highlighted in green)'''''. | The command above will change the router's DHCP Server's current Start address, Address limit and Lease time values '''''(highlighted in orange)''''' to custom values provided in the '''"values"''' section of the command '''''(highlighted in green)'''''. | ||
[[File:Networking rutxxx configuration examples dhcp server v1.jpg|border|class=tlt-border| | [[File:Networking rutxxx configuration examples dhcp server v1.jpg|border|class=tlt-border|520pxx520px]] | ||
[[File:Networking rutxxx configuration examples dhcp server v2.jpg|border|class=tlt-border| | [[File:Networking rutxxx configuration examples dhcp server v2.jpg|border|class=tlt-border|520pxx520px]]<br> | ||
'''Note: Remember always to use the commands in the order (set, commit, luci-reload)''' | '''Note: Remember always to use the commands in the order (set, commit, luci-reload)''' | ||
| Line 317: | Line 317: | ||
* '''batch''' - returns the router's Batch number | * '''batch''' - returns the router's Batch number | ||
* '''hwver''' - returns the router's Hardware Revision number | * '''hwver''' - returns the router's Hardware Revision number | ||
* '''simpin''' - returns the router's SIM card's PIN (as it is specified in the '''[[ | * '''simpin''' - returns the router's SIM card's PIN (as it is specified in the '''[[RUT955 Mobile|Mobile]]''' section) | ||
* '''blver''' - returns the router's Bootloader version | * '''blver''' - returns the router's Bootloader version | ||
<br><br><br> | <br><br><br> | ||
| Line 360: | Line 360: | ||
'''Response:''' | '''Response:''' | ||
{"jsonrpc":"2.0","id":1,"result":[0,{"data":"<span style=color:blue> | {"jsonrpc":"2.0","id":1,"result":[0,{"data":"<span style=color:blue>RUTXXX_R_00.07.02.0</span>\n"}]} | ||
This command ('''file''', '''read''', highlighted in red) is an alternative to the Linux '''cat''' command. All you need is to specify the path (in this case '''/etc/version''', highlighted in red) to the file that you wish to read. | This command ('''file''', '''read''', highlighted in red) is an alternative to the Linux '''cat''' command. All you need is to specify the path (in this case '''/etc/version''', highlighted in red) to the file that you wish to read. | ||
Revision as of 14:57, 6 June 2022
Main Page > General Information > Configuration Examples > Router control and monitoring > Monitoring via JSON-RPC windows RutOSIntroduction
The information in this page is updated in accordance with the RUTXXX_R_00_07_02 firmware version.
JSON-RPC is a remote procedure call protocol encoded in JSON. It is a very simple protocol (and very similar to XML-RPC), defining only a few data types and commands. JSON-RPC allows for notifications (data sent to the server that does not require a response) and for multiple calls to be sent to the server which may be answered out of order.
This article provides a guide on how to use JSON-RPC on RUTxxx routers.
Configuration overview and prerequisites
Before we begin, let's overview the configuration that we are attempting to achieve and the prerequisites that make it possible.
Prerequisites:
- A PC with HTTP request software.
- An Internet connection. (This example is based in a local configuration, but also can be used via wired WAN or a remote installation with Public IP)
- One RUTxxx series router.
Using JSON-RPC (Windows)
This section describes how to use JSON-RPC with a Windows operating system. If you're using a Linux OS, jump to this section of the guide: JSON-RPC with Linux
HTTP POST
To login to the router via JSON-RPC you will need software capable of sending HTTP POST requests to the router. The simplest solution is to install an extension similar to Chrome "Postman" (download link here).
If you're using Firefox you can use "RESTClient" (download link here).Once you've installed the add-on, Click it to launch it:
Obtaining a session ID
First, you must obtain a Session ID. In order to do so, you must send a HTTP POST request to the router asking for it.
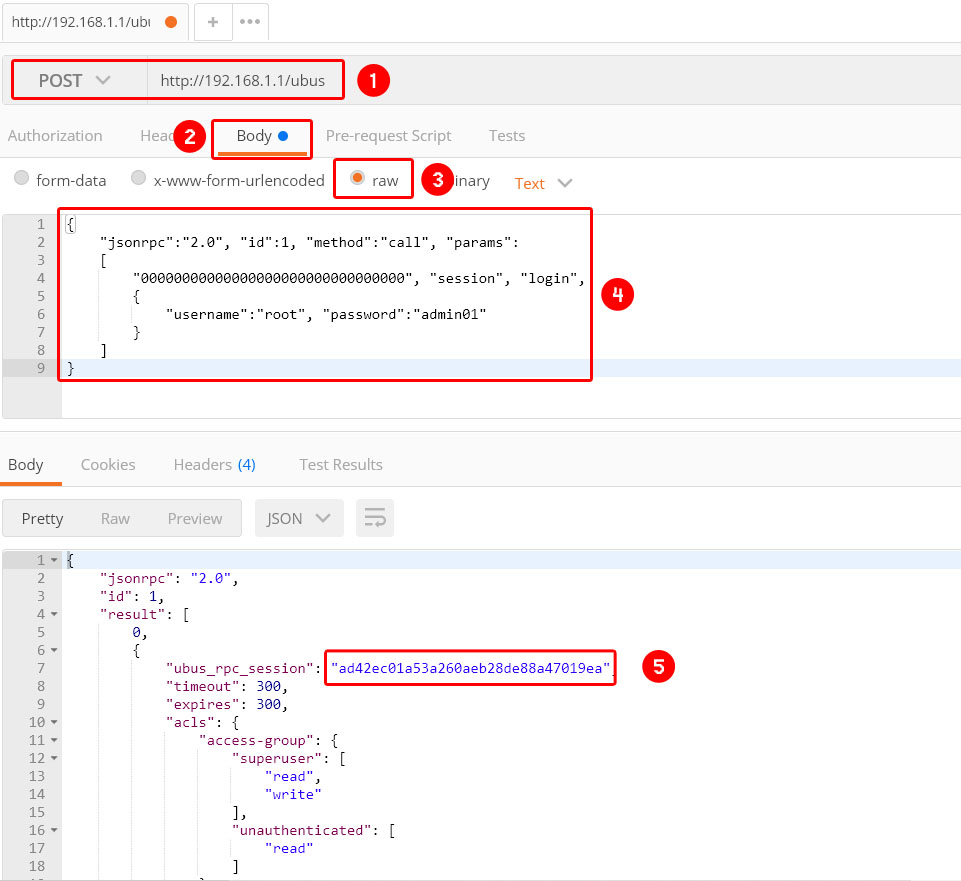
- Enter the router's IP address into the URL field http://192.168.1.1/ubus (use LAN IP for local access, WAN IP for remote access).
- Change the orange code fields with router's username and password (Or change it into the Postman User Auth. field.)
- Then paste the following command into the Body or Content to send field:
{
    "jsonrpc":"2.0", "id":1, "method":"call", "params":
    [
        "00000000000000000000000000000000", "session", "login",
        {
            "username":"root", "password":"admin01"
        }
    ]
}
The section highlighted in orange is the router's admin password which by default is admin01. Replace this part with your own router's password.
- Once you have everything in order, click Send:
-
Here's what the response should look like (The Session ID is shown in the sixth red rectangle):
- Copy the Session ID since you'll be needing it when issuing other commands to the router.
NOTE: if later on your commands stop working and you get a Response like this:
{
   "jsonrpc": "2.0",
   "id": 1,
   "error": {
       "code": -32002,
       "message": "Access denied"
   }
}
It probably means that your Session ID has expired so you'll need to ask for a new one. A Session ID expires after 300 seconds (5 minutes).
Getting router parameters
Now that you have obtained a Session ID, you can issue commands to the router. Let's start with commands that return information about the router.
Getting RSSI
{
    "jsonrpc": "2.0", "id": 1, "method": "call", "params":
    [
        "bde01a2da4a6f4a515bb9466f90bc58a", "file", "exec",
        {
            "command":"gsmctl",
            "params":
            [
                "-q"
            ]
        }
    ]
}
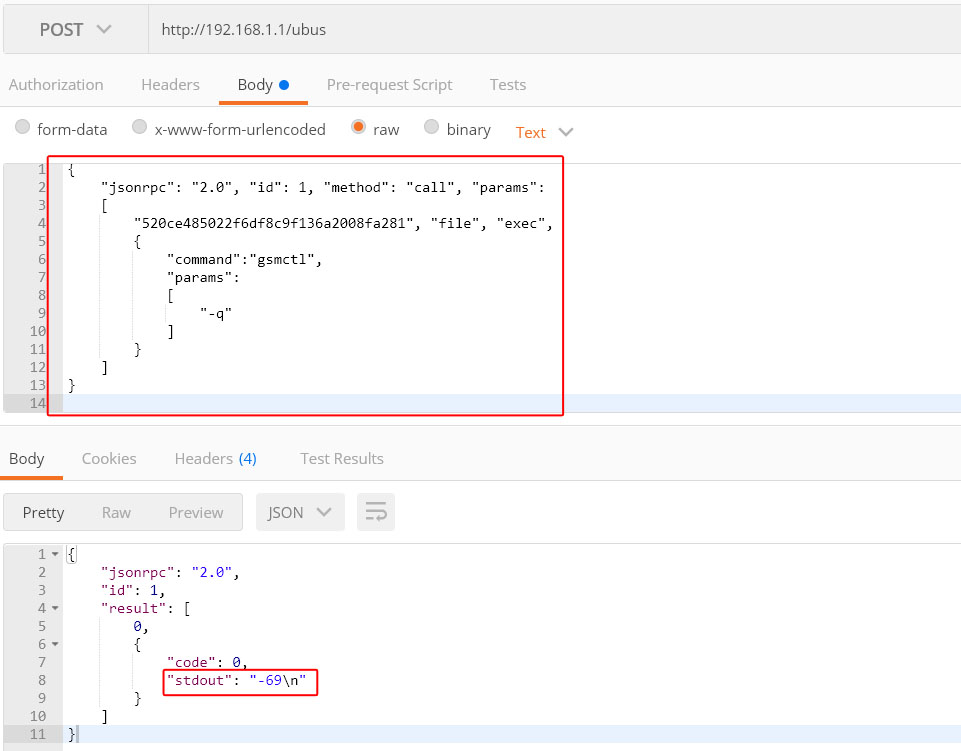
The test highlighted in red is your Session ID, and highlighted in orange are the command and the parameter. In this example, we're using a gsmctl -q command that returns the router's RSSI (signal strength) value.
Look for stdout in the post response: "stdout":"-69\n". This tells us that the router's current signal strength is -69 dBm.
Getting Network Config
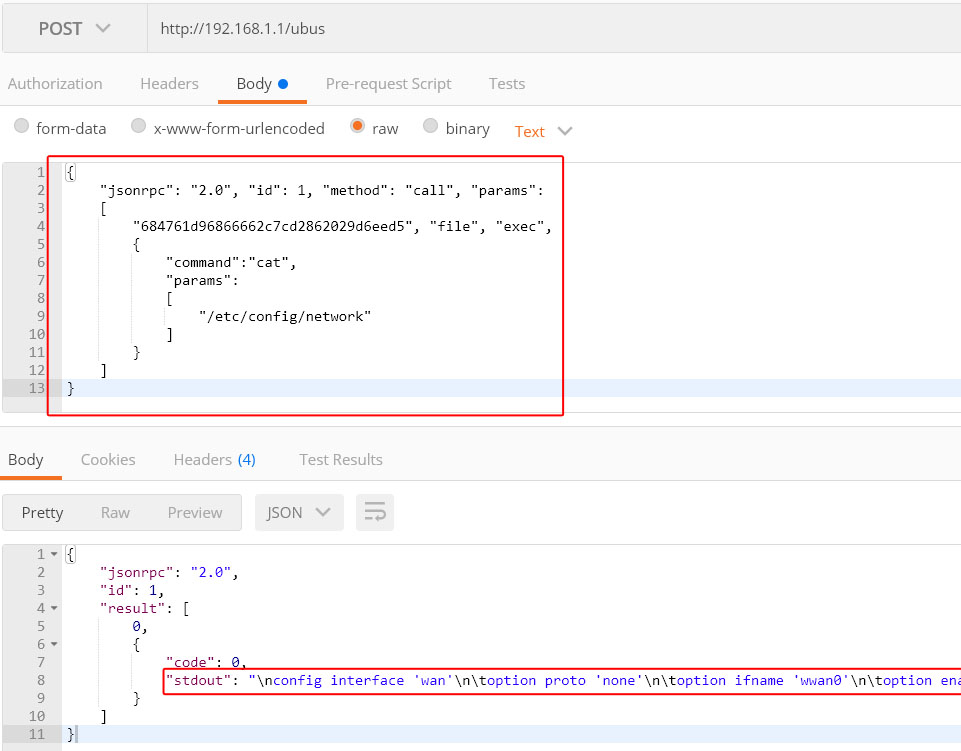
You can issue many SSH commands in a similar manner. For example, if you wish to check the network the command to do so would be:
{
    "jsonrpc": "2.0", "id": 1, "method": "call", "params":
    [
        "a74c8e07646f0da2bfddce35bf3de1f3", "file", "exec",
        {
            "command":"cat",
            "params":
            [
                "/etc/config/network"
            ]
        }
    ]
}
Again the command and the parameter are highlighted in orange. In this case the cat command is used to view the contents of the /etc/config/network file. The Response is:
Setting router parameters
To set parameters, is necessary to use three commands, they are set, commit and luci-reload
- The First one is used to set router parameters
- The second one is used to commit the changes from RAM to flash memory
- The third one is used to the changes take effect
We'll not go into detail on UCI commands in this article, but you can check out our UCI command usage guide for detailed examples.
UCI SET
The uci set command is used to set router parameters.
As an example, let's try to change the router's WiFi SSID. The command to do so looks like this:
{
    "jsonrpc":"2.0", "id":1, "method":"call", "params":
    [
        "9704f676709d9dedc98d7718c4e3e7d2", "uci", "set",
        {
            "config":"wireless",
            "type":"wifi-iface",
            "match":
            {
                "ssid": "Teltonika_Router"
            },
            "values":
            {
                "ssid":"9999"
            }
        }
    ]
}
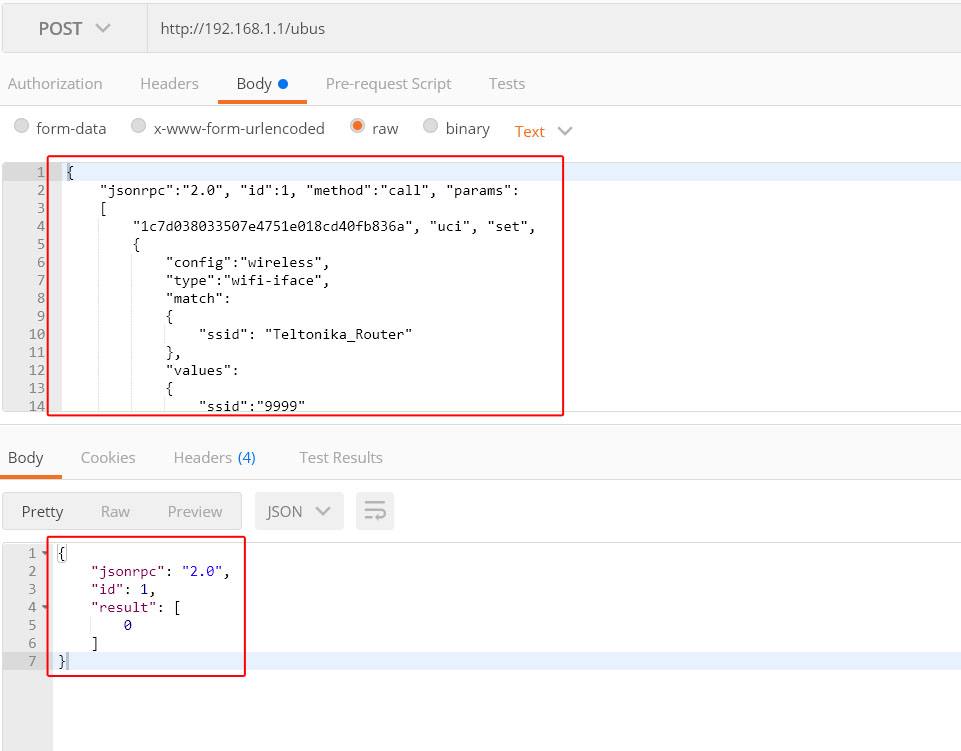
- The sections highlighted in orange describes the config file's name and section. (In this case, wireless config and wifi-iface section).
- Highlighted in red is the option of the config section that you wish to change. (In this case, the router's SSID.)
- Finally, highlighted in green is the value that will replace the old value. (In this case, it change the router's SSID to 9999.)
- Note: You should be sure that all the fields are correctly written
If the issued command was a success, you should see a Response like this:
UCI COMMIT
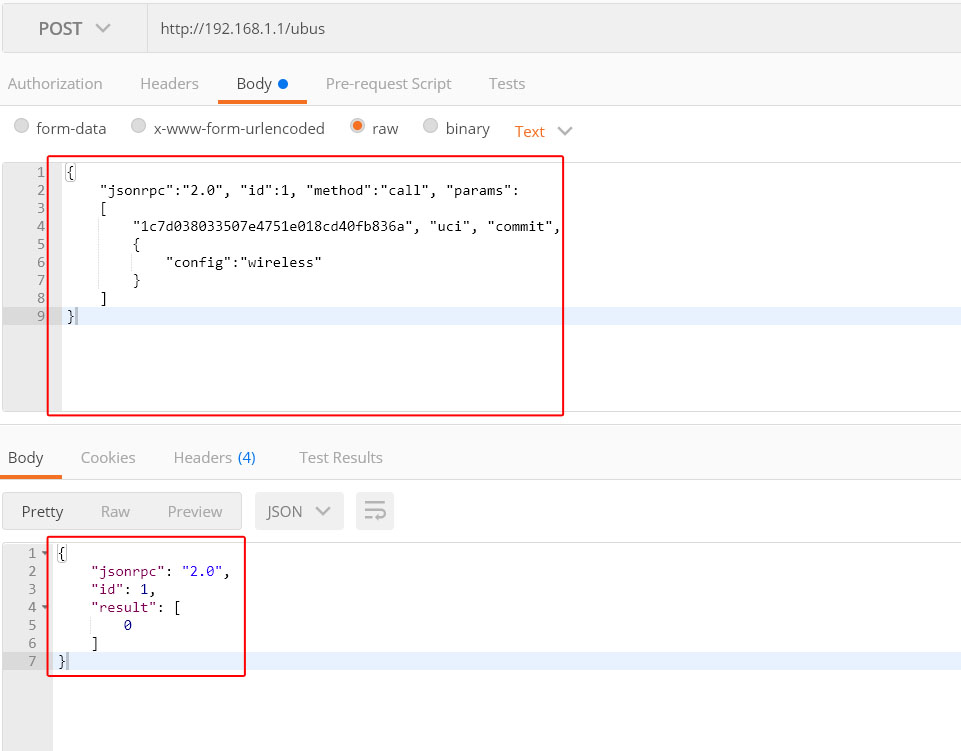
When you apply changes using uci set, you're only changing a copy of the file that is located in the router's RAM memory. In order for the changes to take place, you'll need to issue a uci commit command that will commit the changes from RAM to flash memory. Continuing from the example above, let's commit the Wireless SSID changes. The JSON-RPC command to do so looks like this:
{
    "jsonrpc":"2.0", "id":1, "method":"call", "params":
    [
        "9704f676709d9dedc98d7718c4e3e7d2", "uci", "commit",
        {
            "config":"wireless"
        }
    ]
}
If the commit was successful, you should see the same message as before:
LUCI-RELOAD
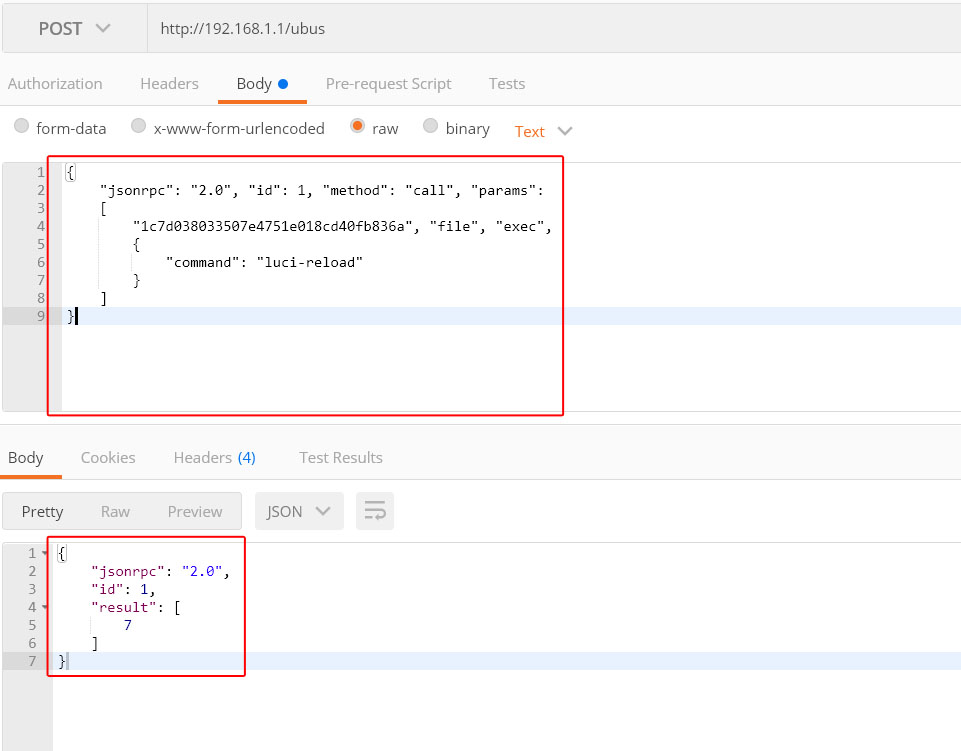
The last step to take in order for the changes to take effect is the luci-reload command which restarts all of the router's services. The luci-reload command looks like this:
{
    "jsonrpc": "2.0", "id": 1, "method": "call", "params":
    [
        "428a9fa57f1a391db0bd1b865fa16bb5", "file", "exec",
        {
            "command": "luci-reload"
        }
    ]
}
The command itself is highlighted in orange.
Setting Multiple Parameters
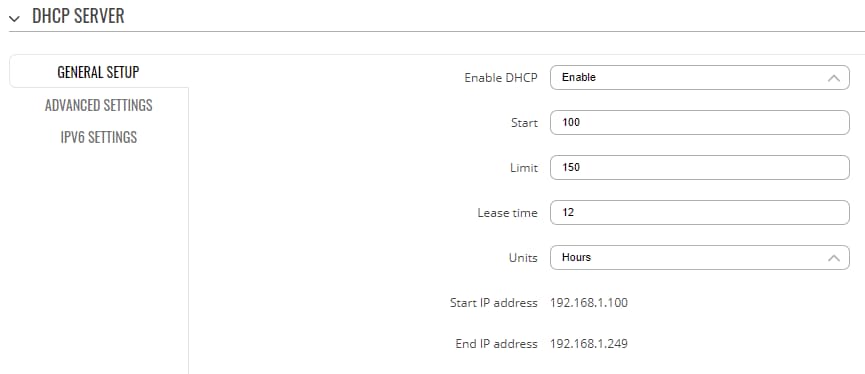
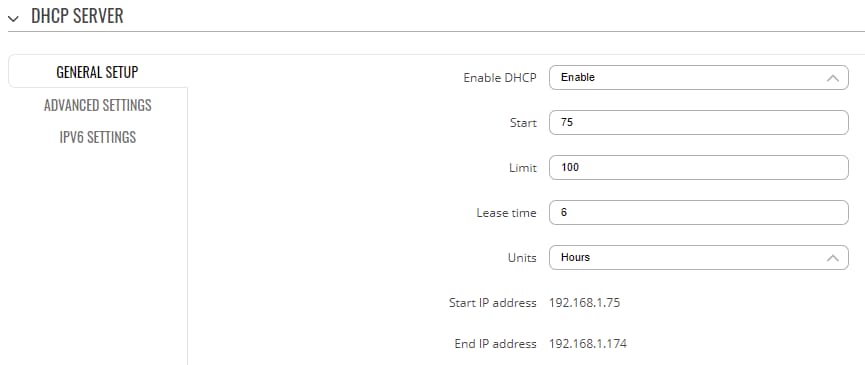
This next example describes how to set multiple parameters in a single config file, in this case, changes the default DHCP server values with custom ones:
{
    "jsonrpc":"2.0", "id":1, "method":"call", "params":
    [
        "558a9b03c940e52f373f8c02498952e3", "uci", "set",
        {
            "config":"dhcp", "type":"dhcp", "match":
            {
                "start":"100",
                "limit":"150",
                "leasetime":"12h"
            },
            "values":
            {
                "start":"75",
                "limit":"100",
                "leasetime":"6h"
            }
        }
    ]
}
The command above will change the router's DHCP Server's current Start address, Address limit and Lease time values (highlighted in orange) to custom values provided in the "values" section of the command (highlighted in green).
Note: Remember always to use the commands in the order (set, commit, luci-reload)
Some Additional Commands
If the commands found in the guide above did not suffice your needs, this section provides a list of additional ones. The commands presented in this section will be for both Linux and Windows operating systems. They should be used as syntax examples for your own purposes.
WiFi clients list
This command returns a list of devices connected to your WLAN and some additional information about the connection.
Windows:
{
    "jsonrpc": "2.0", "id": 1, "method": "call", "params":
    [
        "86fc586fa1471622473434ff0176fd66", "iwinfo", "assoclist",
        {
            "device":"wlan0"
        }
    ]
}
Linux:
curl -d "{ \"jsonrpc\": \"2.0\", \"id\": 1, \"method\": \"call\", \"params\": [ \"86fc586fa1471622473434ff0176fd66\", \"iwinfo\", \"assoclist\", {\"device\":\"wlan0\"} ] }" http://192.168.1.1/ubus
The response should look something like this:
{"jsonrpc":"2.0","id":1,"result":[0,{"results":
[{"mac":"E4:02:9B:88:09:AA","signal":-32,"noise":-88,"inactive":10,"rx":
{"rate":1000,"mcs":0,"40mhz":false,"short_gi":false},"tx":
{"rate":72200,"mcs":7,"40mhz":false,"short_gi":true}},
{"mac":"D8:C7:71:47:90:E1","signal":-12,"noise":-88,"inactive":400,"rx":
{"rate":1000,"mcs":0,"40mhz":false,"short_gi":false},"tx":
{"rate":72200,"mcs":7,"40mhz":false,"short_gi":true}}]}]}
To obtain these values, the Linux iwinfo command and assoclist parameter (red) are used. Highlighted in green are the devices connected to the router via WiFi as identified by their MAC addresses. The response information about the connection with the device, such as signal strength, noise, time of inactivity (idle time), rx, tx rate, etc., is highlighted in blue.
WiFi information
This command returns information on your WiFi Access Point.
Windows:
{
    "jsonrpc": "2.0", "id": 1, "method": "call", "params":
    [
        "a70ceeba344b6046625d8bcec132796c", "iwinfo", "info",
        {
            "device":"wlan0"
        }
    ]
}
Linux:
curl -d "{ \"jsonrpc\": \"2.0\", \"id\": 1, \"method\": \"call\", \"params\": [ \"a70ceeba344b6046625d8bcec132796c\", \"iwinfo\", \"info\", {\"device\":\"wlan0\"} ] }" http://192.168.1.1/ubus
Response:
{"jsonrpc":"2.0","id":1,"result":[0,
{"phy":"phy0","ssid":"HAL9000","bssid":"00:1E:42:16:D6:68","country":"00","mode":"Master","channel":6,"frequency":2437,"txpower":20,
"quality":22,"quality_max":70,"signal":22,"noise":-61,"bitrate":72200,"encryption":
{"enabled":false},"hwmodes":["b","g","n"],"hardware":{"name":"Generic MAC80211"}}]}
As with the clients list command described above, to obtain this information the Linux iwinfo command is used, but this time with the info parameter (red). The relevant information, such as WiFi SSID, WiFi MAC address, WiFi channel, Encryption type, etc., is highlighted in blue
Manufacturing information
This command returns information about the device's manufacturing details like device's Product Code, Serial Number MAC Address, etc.
Windows:
{
    "jsonrpc": "2.0", "id": 1, "method": "call", "params":
    [
        "805725a19ab0fba6c2b44ecf2f952fb9","file", "exec",
        {
            "command":"mnf_info", "params":["name", "sn", "mac"]
        }
    ]
}
Linux:
curl -d "{ \"jsonrpc\": \"2.0\", \"id\": 1, \"method\": \"call\", \"params\": [ \"805725a19ab0fba6c2b44ecf2f952fb9\",\"file\", \"exec\",{ \"command\":\"mnf_info\", \"params\":[\"name\", \"sn\", \"mac\"] } ] }" http://192.168.1.1/ubus
Response:
{"jsonrpc":"2.0","id":1,"result":[0,{"code":0,"stdout":"RUT950HG12C0\n1367435694\n001e4216d666\n"}]}
To obtain the manufacturing information the mnf_info (highlighted in red) command is used. In this case a query was sent asking for the device's Product Code (name), Serial Number (sn) and MAC Address (mac) (highlighted in red in the query; returned values highlighted in blue). Using mnf_info, you can "ask" the router for any type of manufacturing information. Here is the list of possible mnf_info parameters:
- mac - returns the router's LAN MAC address
- maceth - returns the router's WAN MAC address
- name - returns the router's Product Code
- wps - returns the router's WPS PIN number
- sn - returns the router's Serial number
- batch - returns the router's Batch number
- hwver - returns the router's Hardware Revision number
- simpin - returns the router's SIM card's PIN (as it is specified in the Mobile section)
- blver - returns the router's Bootloader version
GPS Data
This command returns the device's GPS GPS latitude and longitude.
Windows:
{
    "jsonrpc": "2.0", "id": 1, "method": "call", "params":
    [
      "456f77f6b686bf5972daa3a26bee60b0","file", "exec",
         {
           "command":"gpsctl", "params":["-ix"]
         }
    ]
}
Linux:
curl -d "{\"jsonrpc\":\"2.0\",\"id\":1,\"method\":\"call\",\"params\":[\"5363304b3ed4ee0806f101295fc52e93\",\"file\",\"exec\",{\"command\":\"gpsctl\",\"params\":[\"-ix\"]}]}" http://192.168.1.1/ubus
Response:
{"jsonrpc":"2.0","id":1,"result":[0,{"code":0,"stdout":"-23.612625\n-46.626355\n"}]}
The blue part in the code are the Latitude and Longitude.
Firmware number
This command returns the device's Firmware version number.
Windows:
{
    "jsonrpc": "2.0", "id": 1, "method": "call", "params":
    [
        "85ea4cb00398d8387b22d8fa6f75f753", "file", "read",
        {
            "path":"/etc/version"
        }
    ]
}
Linux:
curl -d "{ \"jsonrpc\": \"2.0\", \"id\": 1, \"method\": \"call\", \"params\": [ \"85ea4cb00398d8387b22d8fa6f75f753\",\"file\", \"read\",{ \"path\":\"/etc/version\"} ] }" http://192.168.1.1/ubus
Response:
{"jsonrpc":"2.0","id":1,"result":[0,{"data":"RUTXXX_R_00.07.02.0\n"}]}
This command (file, read, highlighted in red) is an alternative to the Linux cat command. All you need is to specify the path (in this case /etc/version, highlighted in red) to the file that you wish to read.
Reboot
Windows:
{
    "jsonrpc":"2.0","id":1,"method":"call","params":
    [
        "5cd4b143b182c07bc578ae3310d6280e","file","exec",
        {
            "command":"reboot","params":["config"]
        }
    ]
}
Linux:
curl -d "{\"jsonrpc\":\"2.0\",\"id\":1,\"method\":\"call\",\"params\":[\"5cd4b143b182c07bc578ae3310d6280e\",\"file\",\"exec\",{\"command\":\"reboot\",\"params\":[\"config\"]}]}" http://192.168.1.1/ubus
Response:
The success response for this command is an empty message. If the response contains no data, the command was executed successfully.
Set SIM card information
In this last example we'll try to change the mobile connection's MTU and Service mode values.
Windows:
{
    "jsonrpc":"2.0", "id":1, "method":"call", "params":
    [
        "558a9b03c940e52f373f8c02498952e3", "uci", "set",
        {
            "config":"simcard", "type":"sim1", "match":
            {
                "service":"auto",
                "mtu":"1500"
            },
            "values":
            {
                "service":"lte-only",
                "mtu":"1476"
            }
        }
    ]
}
Linux:
curl -d "{\"jsonrpc\":\"2.0\", \"id\":1, \"method\":\"call\", \"params\":[\"558a9b03c940e52f373f8c02498952e3\", \"uci\", \"set\", {\"config\":\"simcard\", \"type\":\"sim1\", \"match\":{\"service\":\"auto\", \"mtu\":\"1500\"}, \"values\":{\"service\":\"lte-only\", \"mtu\":\"1476\"} } ] }" http://192.168.1.1/ubus
Response:
{"jsonrpc":"2.0","id":1,"result":[0]}
The command used is uci set (highlighted in red). The config file name is simcard, section sim1, options mtu and service (configs, sections and options highlighted in orange). The response shown above is a positive response, but don't forget to execute uci commit and luci-reload afterwards or else your changes will not take effect.


