LAN as WAN on TRB series: Difference between revisions
Justas.Cip (talk | contribs) |
Justas.Cip (talk | contribs) |
||
| Line 18: | Line 18: | ||
Set your WebUI to '''Basic Mode''': | Set your WebUI to '''Basic Mode''': | ||
[[File: | [[File:75fwbasicmode.png|border|800px|class=tlt-border]] | ||
Navigate to '''Network → LAN → edit LAN''' the instance: | Navigate to '''Network → LAN → edit LAN''' the instance: | ||
[[File: | [[File:2023-10-13 10h15 08 edit lan trb.png|border|class=tlt-border|800px]] | ||
Once there, ''' | Once there, press on the '''LAN to WAN''' button: | ||
[[File: | [[File:2023-10-13 10h13 18 trb lan to wan.png|border|class=tlt-border|500px]] | ||
You will receive a pop-up message to confirm that the interface will be switched. Note that '''Remote access will be turned on automatically''', so the device will be reachable through the WAN port. Press on the '''Switch Interface''' button to continue: | |||
[[File:2023-10-13 10h21 34 switch interface.png|border|class=tlt-border|650px]] | |||
To finish up the configuration, press '''Save & Apply''' to create a new interface for WAN: | |||
[[File:2023-10-13 10h25 31save n apply.png|border|class=tlt-border|650px]] | |||
With this, the configuration is done. | |||
Revision as of 09:27, 13 October 2023
The information on this page is updated in accordance with the 00.07.5 firmware version .
Introduction
This article provides a guide on how to configure the LAN port as WAN on TRB series devices that have Ethernet ports. It can be useful if you want the device to be able to connect to the internet without relying on a SIM card.
Configuration overview and prerequisites
Before we begin, let's overview the configuration that we are attempting to achieve and the prerequisites that make it possible.
Prerequisites:
- TRB series device with Ethernet port.
- Router or a gateway that could provide TRB with internet connectivity.
- End device for configuration.
Device configuration
Set your WebUI to Basic Mode:
Navigate to Network → LAN → edit LAN the instance:
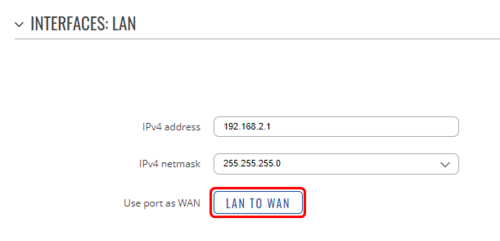
Once there, press on the LAN to WAN button:
You will receive a pop-up message to confirm that the interface will be switched. Note that Remote access will be turned on automatically, so the device will be reachable through the WAN port. Press on the Switch Interface button to continue:
To finish up the configuration, press Save & Apply to create a new interface for WAN:
With this, the configuration is done.


