IPsec configuration examples: Difference between revisions
No edit summary |
|||
| Line 35: | Line 35: | ||
===Basic tunnel=== | ===Basic tunnel=== | ||
---- | ---- | ||
First of, lets configure a simple connection between two IPsec instances, i.e., '''RUT1''' and '''RUT2'''. | First of, lets configure a simple connection between two IPsec instances, i.e., '''RUT1''' and '''RUT2''' as described above in ''configuration scheme 1''. | ||
* Login to the router's | |||
* Login to the router's WebUI and go to '''Services → VPN → IPsec'''. Enter a custom name (for this example we use ''RUT1'') for the IPsec instance click the "Add" button: | |||
[[File:Creating an ipsec instance part 1 v1.png]] | [[File:Creating an ipsec instance part 1 v1.png]] | ||
---- | |||
* Click the "Edit" button located next to the newly created instance: | |||
[[File:Creating an ipsec instance part 2 v1.png]] | [[File:Creating an ipsec instance part 2 v1.png]] | ||
---- | |||
* You will be redirected to the instance's configuration window. From here we will discuss how to configure both instances (''RUT1'' and ''RUT2''). Creating a second instance is analogous to how we created the first one - just login to the second router and repeat the first two steps. Although not mandatory, we recommend that you use a distinct name for the second instance (for this example we use ''RUT2'') for easier management purposes. <br> The specifics of both configurations are described in the figure below: | |||
===Remote LAN access=== | ===Remote LAN access=== | ||
Revision as of 07:45, 5 June 2018
Introduction
In computing, Internet Protocol Security (IPsec) is a secure network protocol suite of IPv4 that authenticates and encrypts the packets of data sent over an IPv4 network. IPsec includes protocols for establishing mutual authentication between agents at the beginning of the session and negotiation of cryptographic keys to use during the session. IPsec can protect data flows between a pair of hosts (host-to-host), between a pair of security gateways (network-to-network), or between a security gateway and a host (network-to-host). Internet Protocol security (IPsec) uses cryptographic security services to protect communications over Internet Protocol (IP) networks. IPsec supports network-level peer authentication, data-origin authentication, data integrity, data confidentiality (encryption), and replay protection.
This article provides an extensive configuration example with details on how to create a connection between two IPsec instances, both of which configured on RUTxxx routers.
Configuration overview and prerequisites
Before we begin, let's overview the configuration that we are attempting to achieve and the prerequisites that make it possible.
Prerequisites:
- Two RUTxxx routers of any type (excluding RUT850)
- Both routers must have a Public Static or Public Dynamic IP addresses
- At least one end device (PC, Laptop, Tablet, Smartphone) to configure the routers
- (Optional) A second end device to configure and test remote LAN access
There will be two IPsec configuration schemes presented. Although the second scheme is only an extension of the first one. Therefore, to configure the second scheme, you will have to configure the first as well.
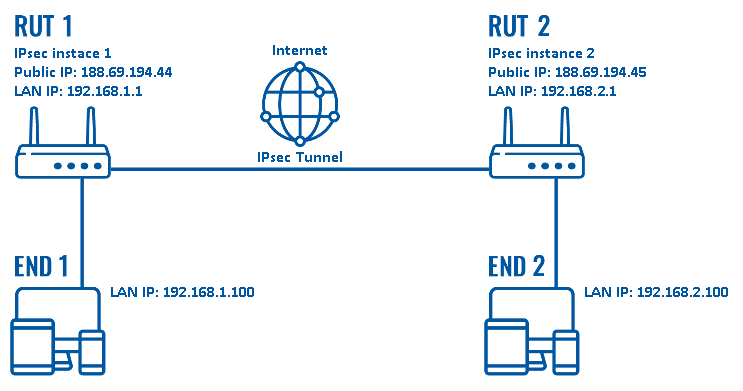
Configuration scheme 1:
The figure above above depicts two RUTxxx routers (RUT1 and RUT2) connected by an IPsec tunnel via the Internet.
Configuration scheme 2:
For the sake of better understanding, lets look at sche
Router configuration
If you have familiarized yourself with the configuration schemes and have all of the devices in order, we can start configuring the routers using instructions provided in this section.
Basic tunnel
First of, lets configure a simple connection between two IPsec instances, i.e., RUT1 and RUT2 as described above in configuration scheme 1.
- Login to the router's WebUI and go to Services → VPN → IPsec. Enter a custom name (for this example we use RUT1) for the IPsec instance click the "Add" button:
- Click the "Edit" button located next to the newly created instance:
- You will be redirected to the instance's configuration window. From here we will discuss how to configure both instances (RUT1 and RUT2). Creating a second instance is analogous to how we created the first one - just login to the second router and repeat the first two steps. Although not mandatory, we recommend that you use a distinct name for the second instance (for this example we use RUT2) for easier management purposes.
The specifics of both configurations are described in the figure below:
Remote LAN access
Testing the setup
See also
- Other types of VPNs suported by RUTxxx devices:


