L2TP over IPsec: Difference between revisions
No edit summary |
No edit summary |
||
| Line 83: | Line 83: | ||
==Testing the setup== | ==Testing the setup== | ||
If you've followed all the steps presented above, your configuration should be finished. But as with any other configuration, it is always wise to test the set up in order to make sure that it works properly. We already tested the IPsec connection login to one of the routers' | If you've followed all the steps presented above, your configuration should be finished. But as with any other configuration, it is always wise to test the set up in order to make sure that it works properly. We already tested the IPsec connection in the '''[[L2TP_over_IPsec#Testing_the_connection|3.1.3]]''' section of this article. To test an L2TP connection, login to one of the routers' WebUIs and go to '''Services → CLI'''. Login with user name: '''root''' and the router's admin password. You should then be able to '''ping''' the opposite instance, i.e., if you logged in to the server's CLI, you should be able to ping the client's virtual IP address, and vice versa. To use a ping command, type '''ping <ip_address>''' and press the "Enter" key on your keyboard: | ||
[[File:Configuration example l2tp pptp testing.png]] | [[File:Configuration example l2tp pptp testing.png]] | ||
If the ping requests are successful, congratulations, your | If the ping requests are successful, congratulations, your setup works! If not, we suggest that you review all steps once more. | ||
While you're connected to the Command Line Interface, you can also check the IPsec connection status again just to be safe. If you don't remember how to do that, refer to the '''[[L2TP_over_IPsec#Testing_the_connection|3.1.3]]''' section of this article. | |||
==See also== | ==See also== | ||
Revision as of 10:28, 8 June 2018
Introduction
Layer 2 Tunneling Protocol (L2TP) is a VPN tunneling protocol that allows remote clients to use the public IP network to securely communicate with private corporate network servers. L2TP uses PPP over UDP (port 1701) to tunnel the data.
Configuration overview and prerequisites
Before we begin, let's overview the configuration that we are attempting to achieve and the prerequisites that make it possible.
Prerequisites:
- Two RUTxxx routers of any type (excluding RUT850)
- At least one router with a Public Static or Public Dynamic IP addresses
- At least one end device (PC, Laptop, Tablet, Smartphone) to configure the routers
Configuration scheme:
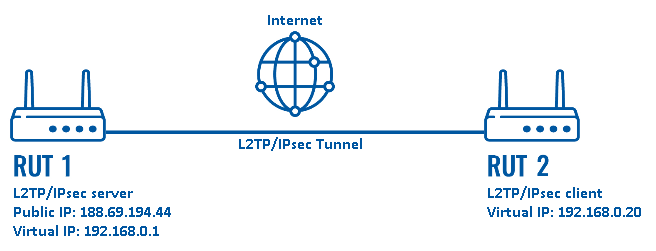
The figure above depicts the L2TP/IPsec scheme. It is fairly similar to the L2TP and IPsec configuration schemes - the router with the Public IP address (RUT1) acts as the L2TP/IPsec server and the other router (RUT) acts a client. L2TP connects the networks of RUT1 and RUT2 and IPsec provides the encryption for the L2TP tunnel.
Router configuration
If you have familiarized yourself with the configuration scheme and have all of the devices in order, we can start configuring the routers using instructions provided in this section. To summarize, we'll be configuring an L2TP server and an IPsec Transport instance (server) on RUT1; an L2TP client and an IPsec Transport instance (client) on RUT2.
IPsec
First, you must configure a working IPsec Transport connection. This subsection contains instructions on how to do just that. The relevant parameters will be encapsulated in red rectangles. Explanations about these parameters will be provided under each example. Other used parameters will be defaults; you can find explanations for those parameters in the VPN manual page, IPsec section.
Server (RUT1)
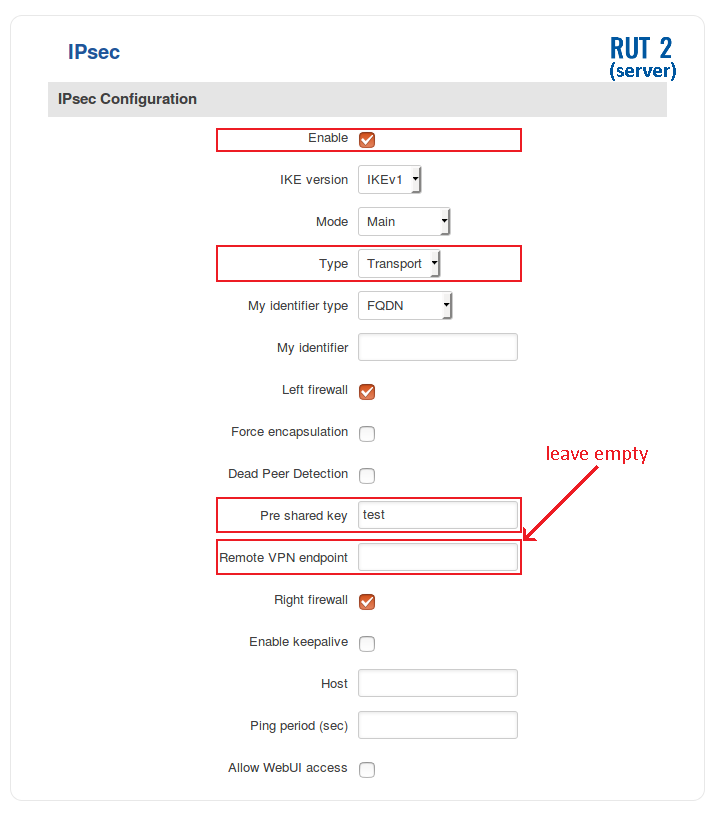
- Login to the router's WebUI and navigate to Services → VPN → IPsec. Enter a custom name for your IPsec instance and click the "Add" button. Then click the "Edit" button located next to the newly created instance after which you will redirected to that instance's configuration window. Adhere to the configurations presented in the figure below:
- Enable - if checked, enables the IPsec instance
- Type - the type of the connection. Transport encrypts only the payload and Encapsulating Security Payload (ESP) trailer; so the IP header of the original packet is not encrypted. Transport mode is usually used when another tunneling protocol (such as GRE, L2TP) is used to first encapsulate the IP data packet, then IPsec is used to protect the GRE/L2TP tunnel packets. NAT traversal is not supported with the transport mode
- Pre shared key - a shared password used for authentication between the peers. The value of this field must match the other instance
- Remote VPN endpoint - IP address or hostname of the remote IPsec instance. Leave empty for the server configuration
Client (RUT2)
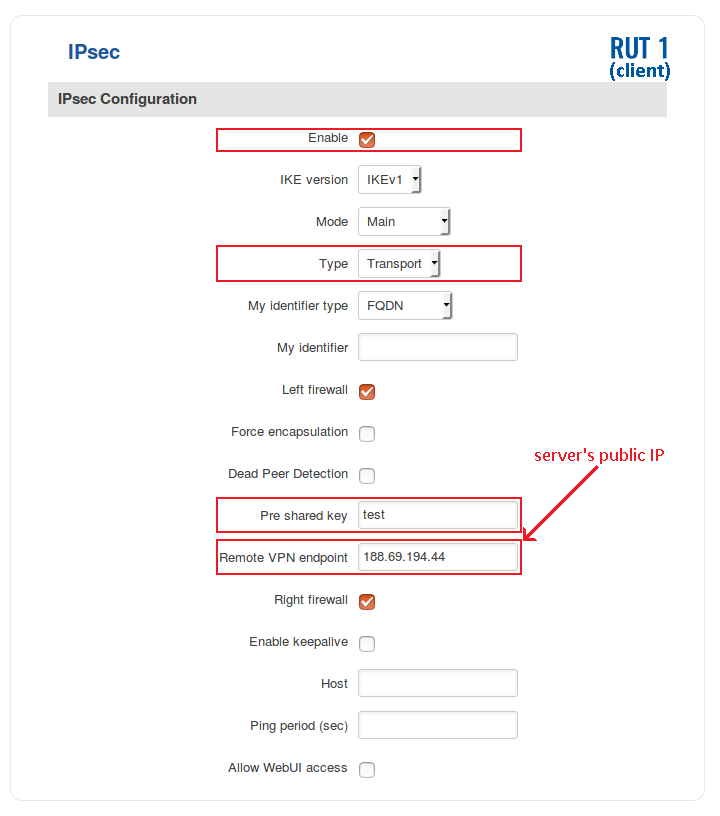
- Create another instance on the second router the same way you created the server (login, add new instance, click "Edit"). Adhere to the configurations presented in the figure below:
- Enable - if checked, enables the IPsec instance
- Type - the type of the connection. Transport encrypts only the payload and Encapsulating Security Payload (ESP) trailer; so the IP header of the original packet is not encrypted. Transport mode is usually used when another tunneling protocol (such as GRE, L2TP) is used to first encapsulate the IP data packet, then IPsec is used to protect the GRE/L2TP tunnel packets. NAT traversal is not supported with the transport mode
- Pre shared key - a shared password used for authentication between the peers. The value of this field must match the other instance
- Remote VPN endpoint - IP address or hostname of the remote IPsec instance. Enter the IPsec server's Public IP address in the client's configuration
Testing the connection
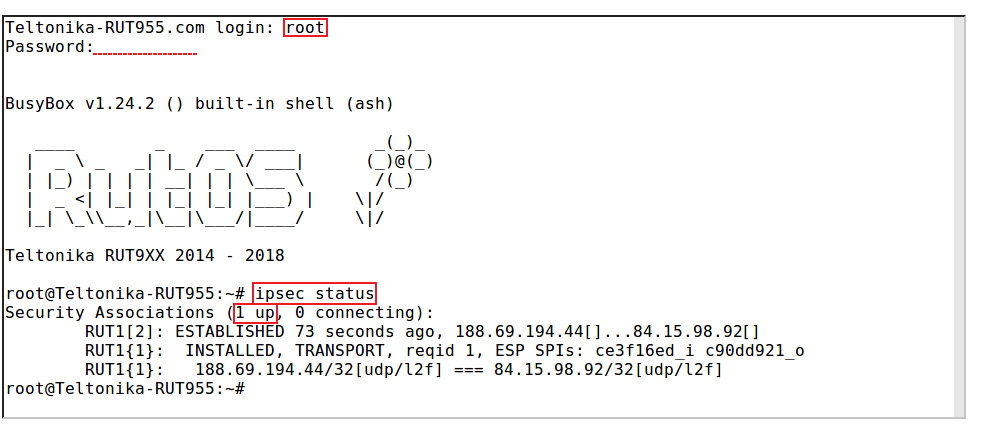
When you're done with the configuration, you should test whether it works before you move on. The simplest way to test an IPsec connection is using the ipsec status command. You can execute this command via a command line interface (CLI). A CLI is present in all RUTxxx routers' WebUIs. To access it, login to one of the routers' WebUI (doesn't matter which one) and navigate to Services → CLI. Login to CLI with the user name root and the router's admin password. Then simply the ipsec status and press the "Enter" key:
As you can see, executing ipsec status displays the number of active/inactive IPsec connections. If the connection you just configured is the only IPsec connection that you're using, you should a 1 up indication next to Security Associations.
L2TP
Next, you must configure a working L2TP connection. This subsection contains instructions on how to do just that. The relevant parameters will be encapsulated in red rectangles. Explanations about these parameters will be provided under each example. For more VPN manual page, IPsec section.
New L2TP instances can be created from the Services → VPN → L2TP section of the router's WebUI. Select a role (Server or Client), enter a custom name and click the "Add" button to create a new instance. Then click the "Edit" button located next to the newly created instance to enter its configuration page.
Although technically it doesn't matter on which router you create the Server or the Client, we recommend that for the sake of clarity and easier management you create the L2TP Server on the same router where you created the IPsec Server and the L2TP Client on the same router where you created the IPsec Client.
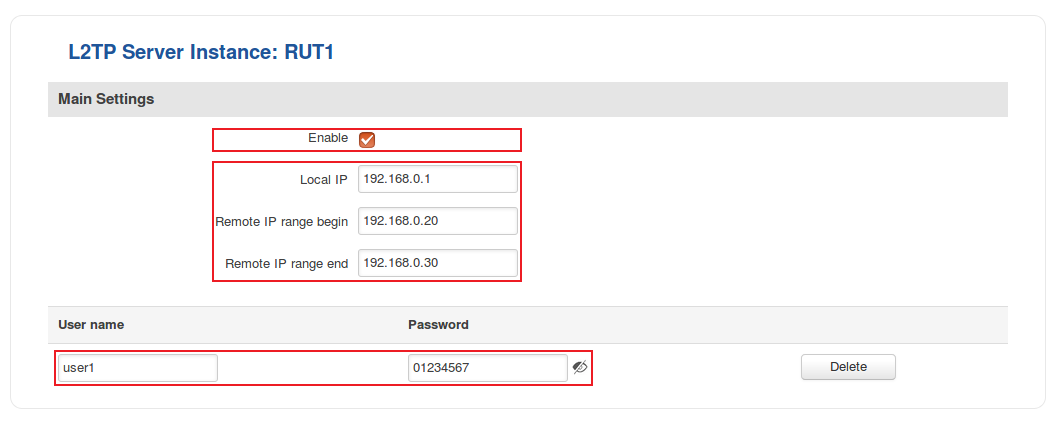
- Server configuration:
- Enable - when checked, enables the instance
- Local IP - the server's virtual IP address
- Remote IP range parameters - the range of virtual IP addresses that will be assigned to connecting clients
- User name and Password - authentication information used to authenticate connecting clients
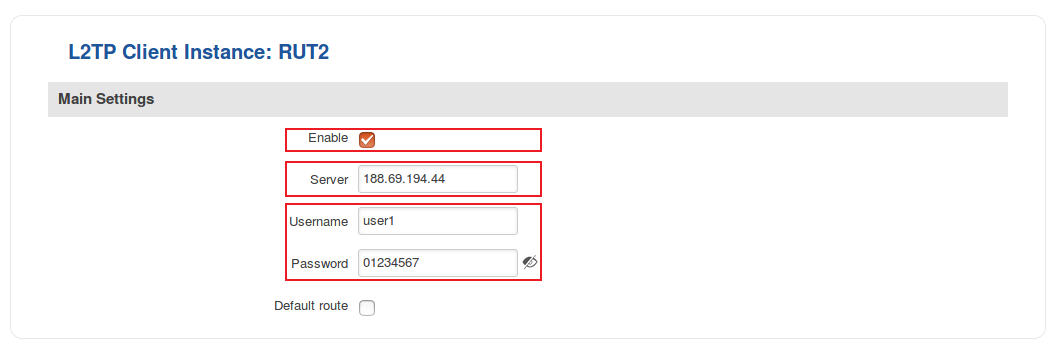
- Client configuration:
- Enable - when checked, enables the instance
- Server - L2TP server's Public IP address
- User name and Password - authentication information. Used the values specified in the Server's configuration
Testing the setup
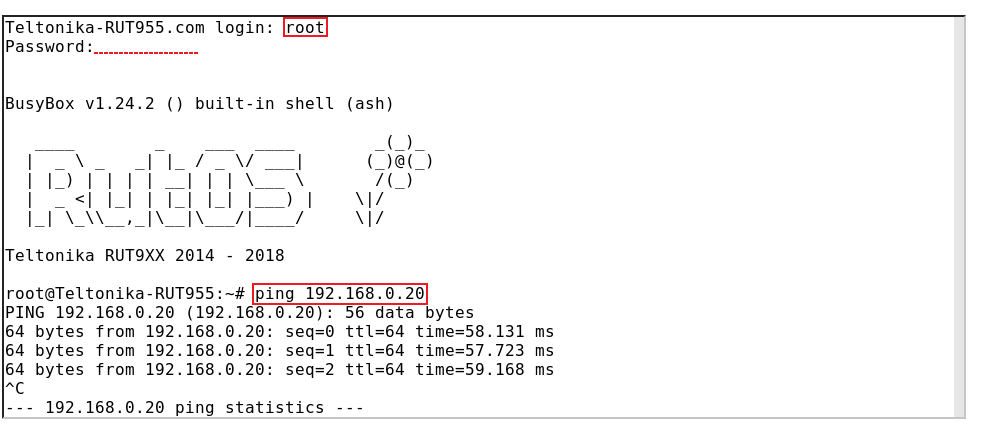
If you've followed all the steps presented above, your configuration should be finished. But as with any other configuration, it is always wise to test the set up in order to make sure that it works properly. We already tested the IPsec connection in the 3.1.3 section of this article. To test an L2TP connection, login to one of the routers' WebUIs and go to Services → CLI. Login with user name: root and the router's admin password. You should then be able to ping the opposite instance, i.e., if you logged in to the server's CLI, you should be able to ping the client's virtual IP address, and vice versa. To use a ping command, type ping <ip_address> and press the "Enter" key on your keyboard:
If the ping requests are successful, congratulations, your setup works! If not, we suggest that you review all steps once more.
While you're connected to the Command Line Interface, you can also check the IPsec connection status again just to be safe. If you don't remember how to do that, refer to the 3.1.3 section of this article.
See also
- Other types of VPNs suported by RUTxxx devices:

