Template:DHCP over IPsec Configuration
The information in this page is updated in accordance with 00.07.09.1 firmware version.
Introduction
In computing, Internet Protocol Security (IPsec) is a secure network protocol suite of IPv4 that authenticates and encrypts the packets of data sent over an IPv4 network. IPsec includes protocols for establishing mutual authentication between agents at the beginning of the session and negotiation of cryptographic keys to use during the session. IPsec can protect data flows between a pair of hosts (host-to-host), between a pair of security gateways (network-to-network), or between a security gateway and a host (network-to-host). Internet Protocol security (IPsec) uses cryptographic security services to protect communications over Internet Protocol (IP) networks. IPsec supports network-level peer authentication, data-origin authentication, data integrity, data confidentiality (encryption), and replay protection.
As organizations increasingly rely on virtual private networks (VPNs) to safeguard their data, the need for robust and flexible networking solutions becomes evident. One such solution is the integration of Dynamic Host Configuration Protocol (DHCP) over IPsec (Internet Protocol Security). While IPsec ensures secure data transmission by encrypting and authenticating IP packets, DHCP simplifies network management by dynamically assigning IP addresses to devices.
This article provides an extensive configuration example with details on how to create a tunnel connection between two IPsec instances, both of which are configured on RUTxxx routers, while one of them is a DHCP server.
The IP provided by the DHCP server over IPsec will be defined as a second IP in the IPsec Interface and name as Virtual IP.
Configuration overview and prerequisites
Before we begin, let's overview the configuration that we are attempting to achieve and the prerequisites that make it possible.
Prerequisites:
- 2 RUTxxx routers
- At least one router must have a Public Static or Public Dynamic IP address
- At least one end device (PC, Laptop, Tablet, Smartphone) to configure the routers
Configuration topology:
 RUT1 – It will be connected to a RUT2 to be able to reach RUT2 LAN subnet. RUT1 has a LAN subnet of 192.168.1.1/24 and a WAN with private IP.
RUT2 – It will be our remote endpoint for the RUT1 router. RUT2 has a LAN subnet of 192.168.10.0/24 and a WAN with Public IP, which should be reachable by RUT1.
It should also be noted that the connection type used is Tunnel and not Transport. Tunnel protects the internal routing information by encrypting the IP header of the original packet. The original packet is encapsulated by a another set of IP headers. Transport encrypts only the payload and Encapsulating Security Payload (ESP) trailer; so the IP header of the original packet is not encrypted. Transport mode is usually used when another tunneling protocol (such as GRE, L2TP) is used to first encapsulate the IP data packet, then IPsec is used to protect the GRE/L2TP tunnel packets.
The tunnel is more widely implemented in site-to-site VPN scenarios and supports NAT traversal. For instructions on how to configure Transport mode, you may want to check out our L2TP over IPsec article.
Router configuration
If you have familiarized yourself with the configuration schemes and have all of the devices in order, we can start configuring the routers using instructions provided in this section. We will start our configuration with RUT1.
IPsec RUT1 Config
- Login to the router's WebUI and go to Services → VPN -> IPsec
- Add a new instance with your desired name, in my case, I will be using RUT1

Note: Not specified fields can be left as is or changed according to your needs.
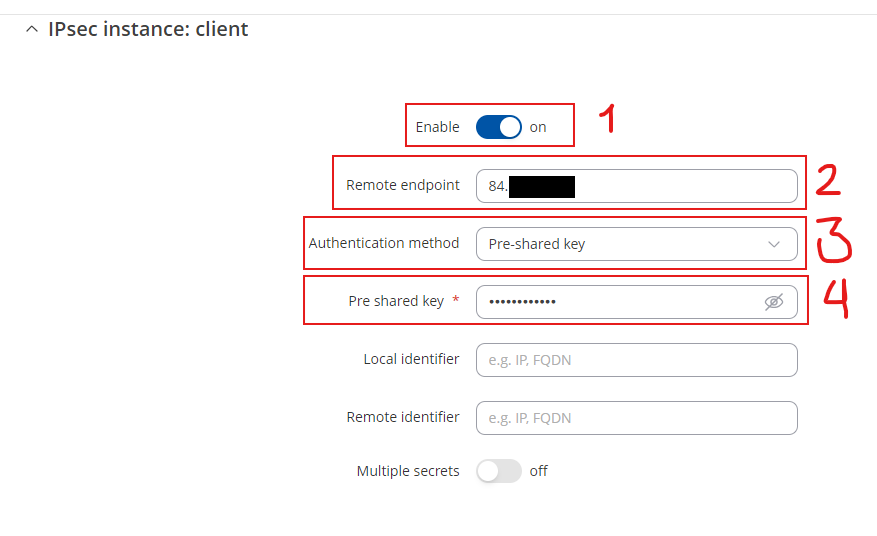
Instance configuration
Make the following changes:
- Enable instance;
- Remote endpoint - RUT2 public WAN IP;
- Authentication method - Pre-shared key;
- Pre shared key - Your chosen password (must match for both RUT1 & RUT2)
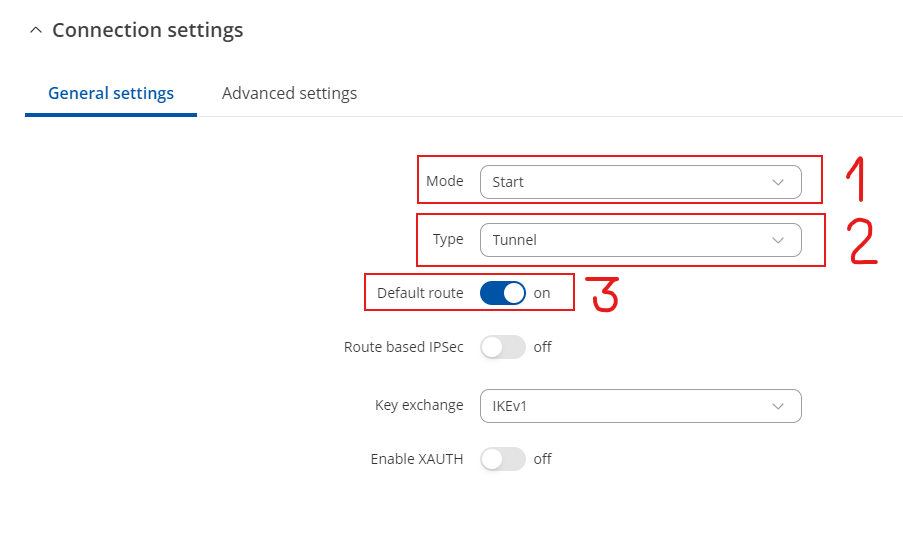
Connection general section configuration
Make the following changes:
- Mode - Start;
- Type - Tunnel;
- Default Route – ON
- Key exchange - IKEv2;
Proposal configuration
Important: Both the RUT1 and RUT2 Encryptions must match in order for this configuration to work.
Note: This is only an example of a secure configuration. Other algorithms or even combinations of them could be used. However, we strongly recommend refraining from using older encryption and hashing algorithms unless support for certain legacy systems is required.
IPsec RUT2 Config
- Login to the router's WebUI and go to Services → VPN -> IPsec
- Add a new instance with your desired name, in my case I will be using RUT2

Note: Not specified fields can be left as is or changed according to your needs.
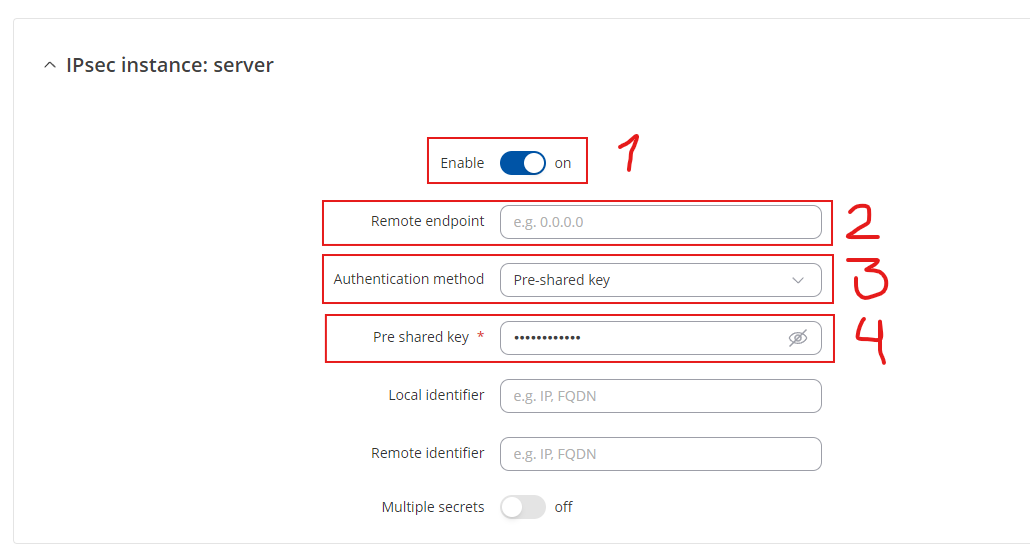
Instance configuration
Make the following changes:
- Enable instance;
- Authentication method - Pre-shared key;
- Pre shared key - Your chosen password (must match for both RUT1 & RUT2)
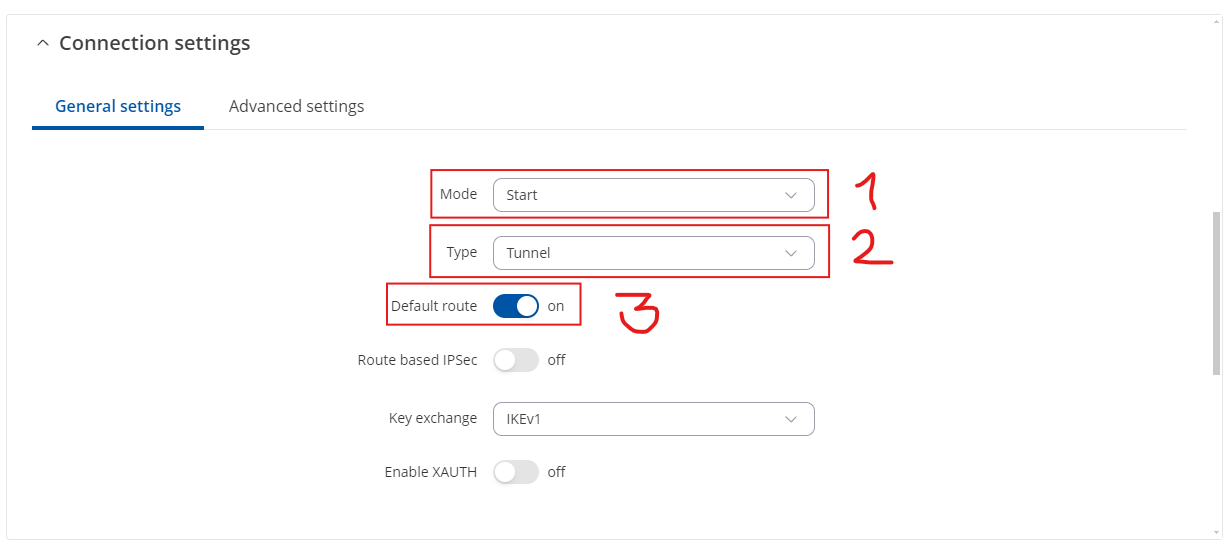
Connection general section configuration
Make the following changes:
- Mode - Start;
- Type - Tunnel;
- Default Route – ON
- Key exchange - IKEv2;
Proposal configuration
Important: Both the RUT1 and RUT2 Encryptions must match in order for this configuration to work.
Note: This is only an example of a secure configuration. Other algorithms or even combinations of them could be used. However, we strongly recommend refraining from using older encryption and hashing algorithms unless support for certain legacy systems is required.
Advanced configuration
Make the following changes:
- Remote Source IP - The internal source IP to use in a tunnel for the remote (right) peer.
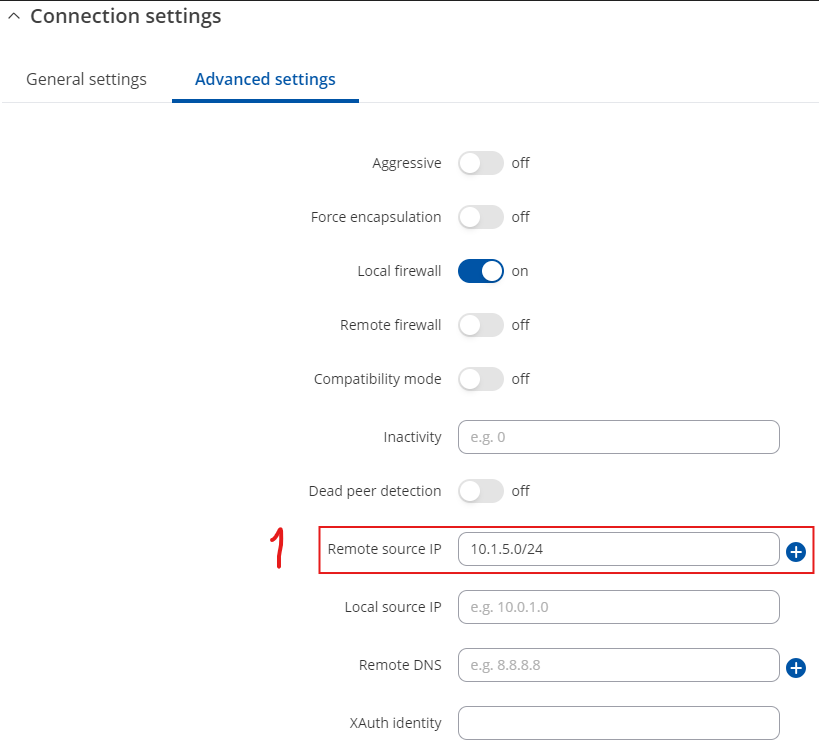
Note: Toggling ON for Default Route in Connection general section configuration for RUT2 should route all traffic through the IPsec tunnel and, depending on the other device, should be enough to ask for a Virtual IP. If your device does not comply and does not receive an IP, add the above Advanced Settings configuration to force DHCP. The network is defined at Remote Source IP field.
Testing the configuration
If you have followed all the above steps, your configuration should be finished. But as with any other configuration, it is always wise to test the setup in order to make sure that it works properly.
Using the webUI we can see the Active Clients in the list in either RUT1 or RUT2.

Note that when clicking in Active Clients, the IP for Local ID and for Remote ID will not match the Virtual IP configured. It is needed to access CLI through SSH and run commandline ifconfigifconfig and check for your WAN interface second IP (Virtual IP).

Using the ipsec status or we can use ipsec statusall command for a more verbose output. With these commands we can see that the IPsec tunnel is successfully established on RUTxxx router. The command output on a RUT1 device:

Also, we can try to ping the RUT2 device by executing this command ping 192.168.10.1, by which you should get a response if the IPsec tunnel has been established properly.

To check if the IPsec tunnel is working properly from RUT2, we can try pinging our RUT1 device by using this command in command line interface on RUT2ping 192.168.1.1:

Also we can check it by executing the ipsec status or we can use ipsec statusall command for a more verbose output. With these commands we can see that the IPsec tunnel is successfully established on RUTxxx router. The command output on a RUT2 device:

You can also test if LAN access is working the same way. Instead of pinging the opposite instance's LAN IP address, ping one of the end device's IPs. One common issue that can be encountered here is that the end devices might need their DHCP leases renewed. There are many methods of accomplishing this, but the easiest and most accessible way is to simply disconnect and reconnect the LAN cable to device or the router that it's connected to.
If the ping requests are successful, congratulations, your setup works! If not, we suggest that you review all steps once more.
See also
- Other types of VPNs suported by RUTxxx devices:
