OpenVPN configuration examples
Introduction
OpenVPN is an open-source software application that implements virtual private network (VPN) techniques for creating secure point-to-point or site-to-site connections in routed or bridged configurations and remote access facilities.
This article contains various OpenVPN configuration examples that require more in-depth explanations to achieve a successful configuration. All of the examples given concern two or more RUT routers. For more basic explanations on the OpenVPN WebUI section, visit our VPN manual page.
OpenVPN configuration type
Before configuring anything you should first know what type of OpenVPN connection suits your needs the best. The key things to be considered here are the type of connection (TUN (tunnel) or TAP (bridged)), the data transfer protocol (User Datagram Protocol (UDP) or Transmission Control Protocol (TCP)), and the authentication type (TLS or Static key). Here is a short overview of the differences:
- Type
- TUN (tunnel) - simulates a network layer device and it operates with layer 3 packets like IP packets. TUN is used for routing and connecting multiple clients to a single server.
- TAP (bridged) - simulates a link layer device and it operates with layer 2 packets like Ethernet frames. TAP is used for creating a network bridge between two Ethernet segments in different locations.
- Protocol
- UDP - is used by apps to deliver a faster stream of information by doing away with error-checking.
- TCP - a suite of protocols used by devices to communicate over the Internet and most local networks. It provides apps a way to deliver (and receive) an ordered and error-checked stream of information packets over the network.
- Authentication
- TLS - uses SSL/TLS + certificates for authentication and key exchange.
- Static key - uses a pre-shared Static key. Can only be used between two peers.
Overviews of most of these types and variations are provided in this article. Concerning TCP vs UDP, we will be using UDP for all examples. Choosing between TCP and UDP doesn't affect the rest of the configuration, so you can still follow the given examples no matter which protocol you are using. Simply choose the one that suits your purposes.
TLS Authentication
This section provides a guide on how to configure a successful OpenVPN connection between an OpenVPN Client and Server, using the TLS Authentication method on RUTxxx routers.
Generating TLS certificates/keys
A connection that uses TLS requires multiple certificates and keys for authentication:
- OpenVPN server
- The root certificate file (Certificate Authority)
- Server certificate
- Server key
- Diffie Hellman Parameters
- OpenVPN client
- The root certificate file (Certificate Authority)
- Client certificate
- Client key
Before you continue you'll have to obtain the necessary certificates and keys. When you use a third-party OpenVPN service, they should provide you with their certificates and even configuration files.
If you're creating your server, you'll have to generate these files yourself. To get detailed instructions on how to generate TLS certificates and keys check out our article on the topic of Windows TLS certificate generation.
Configuration
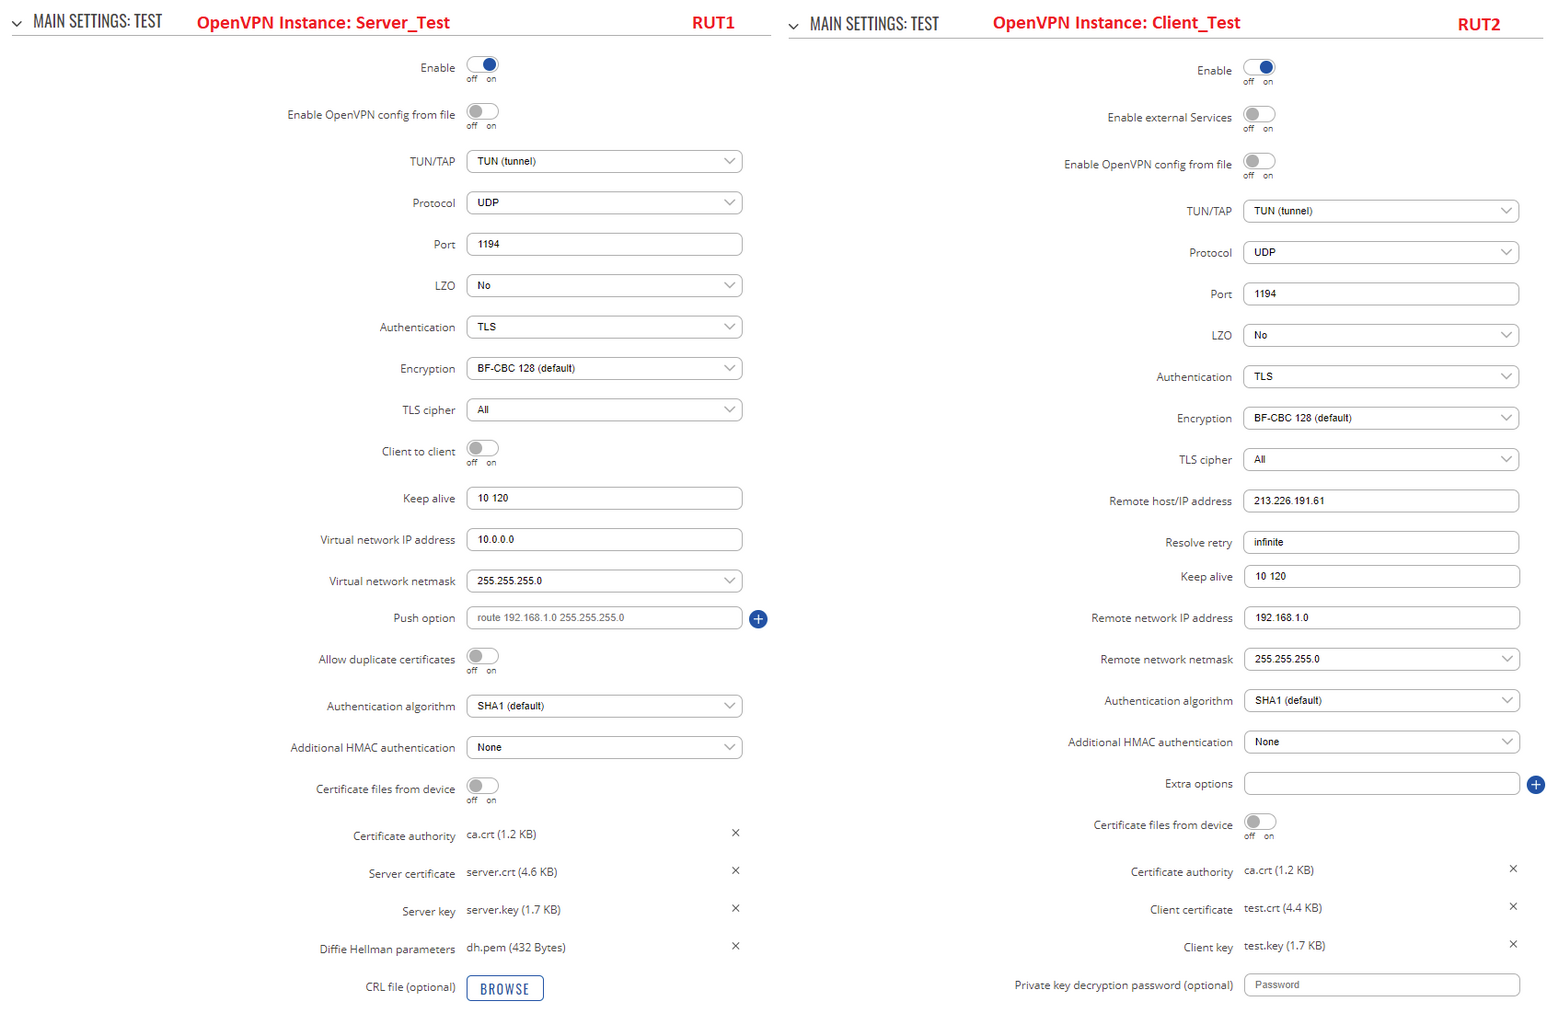
Now we can start configuring OpenVPN Server and Client instances. For this example we will be creating a TUN (Tunnel) type connection that uses the UDP protocol for data transfer and TLS for Authentication. We will be using two RUT routers: RUT1 (Server; LAN IP: 192.168.1.1; WAN (Public static) IP: 213.226.191.61) and RUT2 (Client; LAN IP: 192.168.2.1); that will be connected into virtual network (with the virtual address: 10.0.0.0):
To sum up, just make sure the Server and the Clients use the same parameters (same authentication, same port, same protocol, etc.). Another important aspect is the Virtual network IP address (10.0.0.0 in this case). The Server and the connected Clients will be given IP addresses that belong to this network. If you're creating an exceptionally large network, you might want to change the Virtual network netmask.
From the Client side, make sure to enter the correct Remote host/IP address (213.226.191.61 in this case). This is the Server's Public IP address, not the virtual IP address.
Static key Authentication
This section provides a guide on how to configure a successful OpenVPN connection between an OpenVPN Client and Server, using the Static key Authentication method on RUT routers.
Creating a Static key
A Static key connection uses a pre-shared for authentication between a Server and one Client. You can generate a Static key within the router itself or with a PC that uses a Linux-based OS.
Within the router
In order to generate a Static key within the router connect to the device via the Command Line Interface (CLI) or SSH (the default username is root, the password is your router's admin password, admin01 by default). CLI can be found in the router's WebUI, under Services. To connect to the router via SSH, use the Terminal app (type ssh [email protected]; replace 192.168.1.1 with your router's LAN IP address) if you're using a Linux-based OS. Or download PuTTY, a free SSH and telnet client, if you're using Windows.
When you have connected to the router, relocate to the directory (for example, cd /etc/easy-rsa/keys/) where you want to store your Static key and use this command:
# openvpn --genkey --secret static.key
The newly generated Static key will appear in the same directory where you issued the command above.
Extracting the key
If you are using a Linux-based OS, extracting files from the router is simple. Just go to the directory on your PC where you want to relocate the files, right click anywhere and choose the Open in Terminal option. In the Terminal command line use the Secure Copy (scp) command to copy the files from the router. The full command should look something like this:
$ scp [email protected]:/etc/easy-rsa/keys/static.key ./
The [email protected]:/etc/easy-rsa/keys/static.key specifies the path to where the Static key is located (replace the IP address with your router's LAN IP); the ./ denotes that you want to copy the contents to the directory you are in at the moment.
If you are using Windows, you can copy files from the router using WinSCP, an Open source freeware SFTP, SCP, and FTP client for Windows OS. Use the same login information with WinSCP as with CLI or SSH. Once you've connected to the router with WinSCP, copying the files should be simple enough: just relocate to the directory where you generated the key, select the Static key file and drag it to a directory on your PC where you would like to store it.
Please note: You must select SCP as File Protocol in WinSCP Session settings.
On a Linux PC
To generate a Static key on a Linux PC, go to the directory where you want the key to appear, right-click anywhere in that directory, and chose the option Open in Terminal. In the Terminal window execute this command:
$ openvpn --genkey --secret static.key
The newly generated key should then appear in the directory you were in.
Configuration
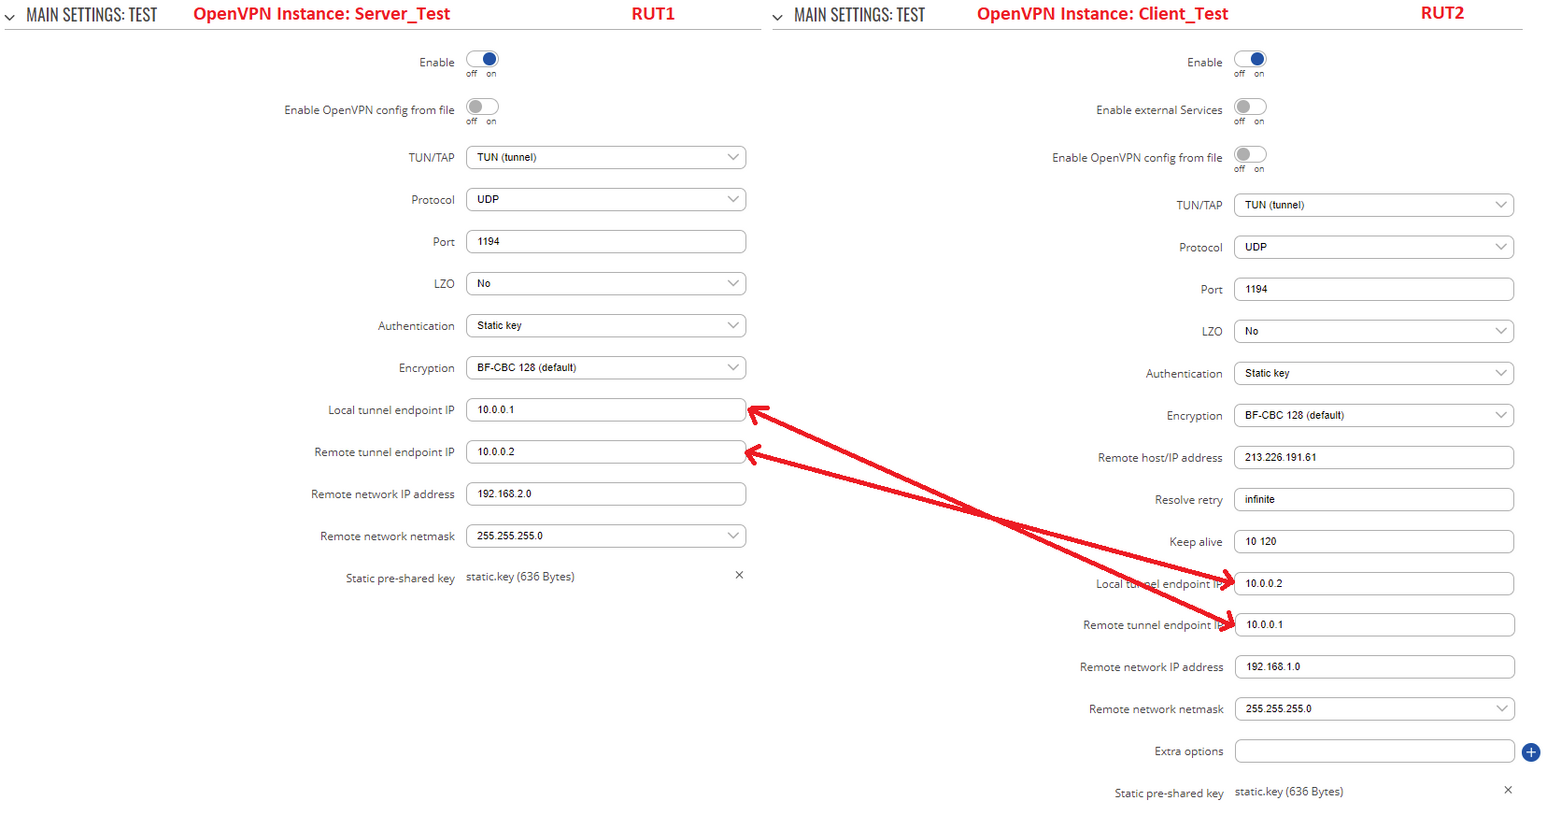
When you have a Static key, you can start configuring OpenVPN Server and Client instances. For this example we will be creating a TUN (Tunnel) type connection that uses the UDP protocol for data transfer and Static key for Authentication. We will be using two RUT routers: RUT1 (Server; LAN IP: 192.168.1.1; WAN (Public static) IP: 213.226.191.61) and RUT2 (Client; LAN IP: 192.168.2.1); the two routers will be connected via OpenVPN; the Server's Virtual IP address will be 10.0.0.1; the Client's - 10.0.0.2:
To sum up, just make sure the Server and the Clients use the same parameters (same authentication, same port, same protocol, etc.). Other important aspects are the Local tunnel endpoint IP and the Remote tunnel endpoint IP. Take note these two particular parameter values are reversed for the individual Client and the Server configurations since these values represent opposite things depending on the instance's perspective.
From the Client side, make sure to enter the correct Remote host/IP address (213.226.191.61 in this case). This is the Server's Public IP address, not the virtual IP address.
TAP (bridged) OpenVPN
This section provides a guide on how to configure a successful OpenVPN TAP (bridged) connection between an OpenVPN Client and Server on RUT routers.
Configuration
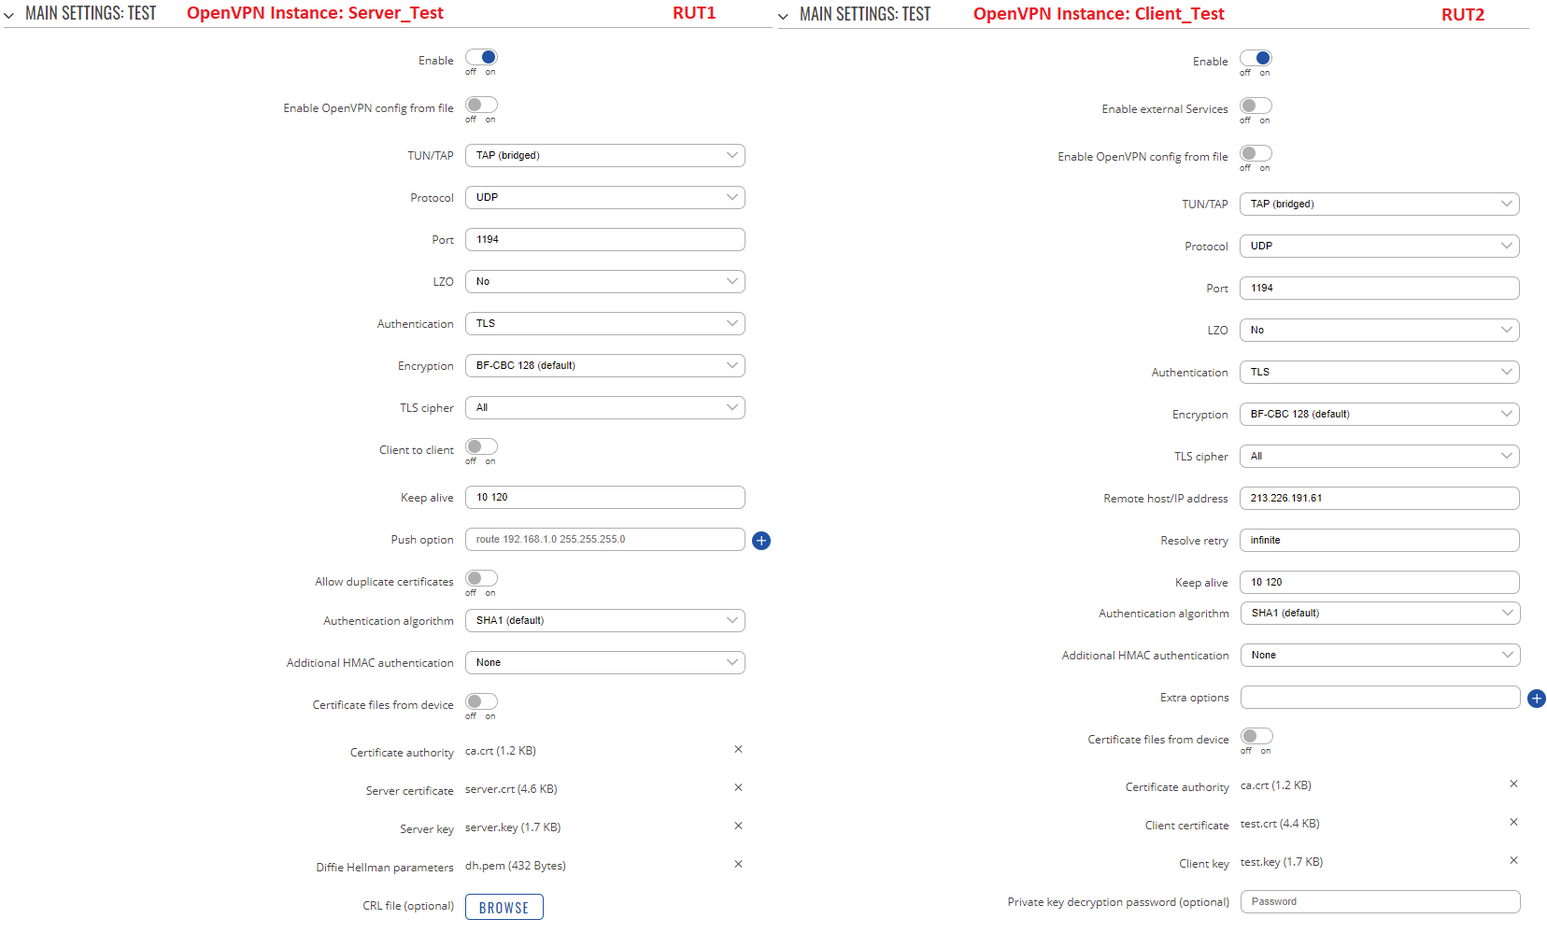
TAP is used for creating a network bridge between Ethernet segments in different locations. For this example we will be creating a TAP (bridged) type connection that uses the UDP protocol for data transfer and TLS for Authentication. We will be using two RUT routers: RUT1 (Server; LAN IP: 192.168.1.1; WAN (Public static) IP: 213.226.191.61) and RUT2 (Client; LAN IP: 192.168.1.2); the two routers will be connected via OpenVPN.
To sum up, just make sure the Server and the Clients use the same parameters (same authentication, same port, same protocol, etc.). Since the OpenVPN interface that comes up is bridged with the LAN interface, make sure the routers are in the same subnet (192.168.1.0 in this case). While making sure of that, don't forget that the routers can't have the same IP address, just the same subnet (for example, if both routers have the LAN IP 192.168.1.1, the connection won't work; if one has, for example, 192.168.1.1 and the other 192.168.1.100, then the connection will work).
For this example we used TLS Authentication. If you want to use a different Authentication method, refer to the relevant section of this article. The authentication configuration will not be different because of the chosen OpenVPN type (TUN or TAP).
From the Client side, make sure to enter the correct Remote host/IP address (213.226.191.61 in this case). This is the Server's Public IP address, not the LAN IP address.
Testing an OpenVPN connection
The most important thing after configuration is making sure that the newly established connection works. You can check the status of an OpenVPN connection in the Status → Network → OpenVPN page:
Server side
Client side


