Relayd RutOS
The information on this page is updated in accordance with the 00.07.08 firmware version .
Introduction
Relayd is a daemon (a computer program that runs as a background process) used to relay and dynamically redirect incoming connections to a target host. Its main purpose in RUTxxx routers is to extend the wireless network. For example, when RUTxxx is in STA Wireless Station mode, it can be used to bridge WAN and LAN interfaces to create a larger Wireless network.
This article provides an extensive configuration example of a basic Relayd usage scenario with two RUTxxx devices.
If you're having trouble finding this page or some of the parameters described here on your device's WebUI, you should turn on "Advanced WebUI" mode. You can do that by clicking the "Advanced" button, located at the top of the WebUI.
Configuration overview and prerequisites
Before we begin, let's overview the configuration that we are attempting to achieve and the prerequisites that make it possible.
Prerequisites:
- Two RUTxxx routers (one of them with an active data connection)
- An end device (PC, Laptop, Tablet, Smartphone)
Configuration scheme:
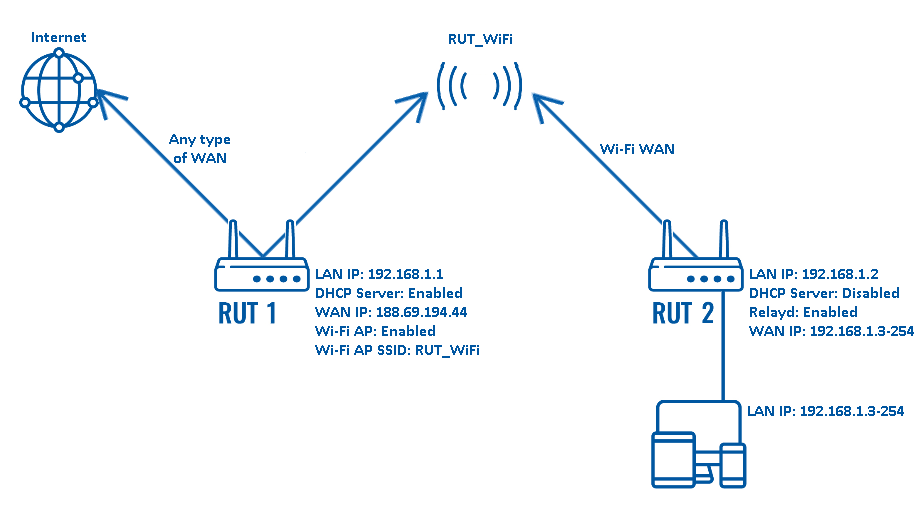
The scheme depicts two RUTxxx routers - RUT1 and RUT2. RUT1 has access to the Internet through an undefined type of WAN (it can be any). RUT2 acts as a WiFi Station (STA) and gains access to the Internet via RUT1's WiFi Access Point (AP) (SSID: RUT_WiFi). RUT2's DHCP Server is disabled. This is done so that the end devices connected to RUT2 get IP addresses from RUT1's DHCP Server with the help of Relayd.
So in short, this type of configuration connects devices from different networks into a single network, making it possible for the devices to communicate with each other while also providing the devices with an Internet connection.
NOTE: the parameters displayed in the scheme above will be used in further examples of this guide. Parameters like LAN IP addresses and WiFi SSID should be chosen in accordance with your own needs.
Router configuration
If you have familiarized yourself with the configuration scheme and have all of the devices in order, you can start configuring your routers using instructions provided in this section.
RUT1
The configuration for RUT1 is fairly simple. You only need to make sure that the router has:
- An active data connection (WAN type doesn't matter; use what is available to you or what best suits your needs)
- An active WiFi Access Point (AP)
- An active DHCP Server
A WiFi Access Point (AP) and DHCP Server are enabled by default on RUTxxx routers, but if you wish to make changes, you can find the configuration pages for these services by logging in to the router's WebUI and visiting the Network → Wireless section for WiFi and Network → DHCP for DHCP.
RUT2
The key things you need to configure in RUT2 are:
- Install Relayd package
- Enable WiFi WAN and connect to RUT1's WiFi Access Point
- Enable Relayd and disable DHCP Server
NOTE: in this case, the steps should be taken in the order they are presented, because if you disable RUT2's DHCP Server first, you may lose access to your router. So let's begin by setting up WiFi WAN.
Install Relayd Package
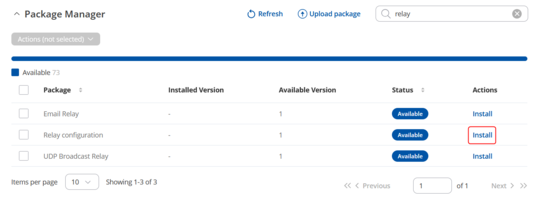
- Install Relayd package via WebUI by navigating to the System → Package Manager
- Click Install button for Relay configuration package:
WiFi WAN
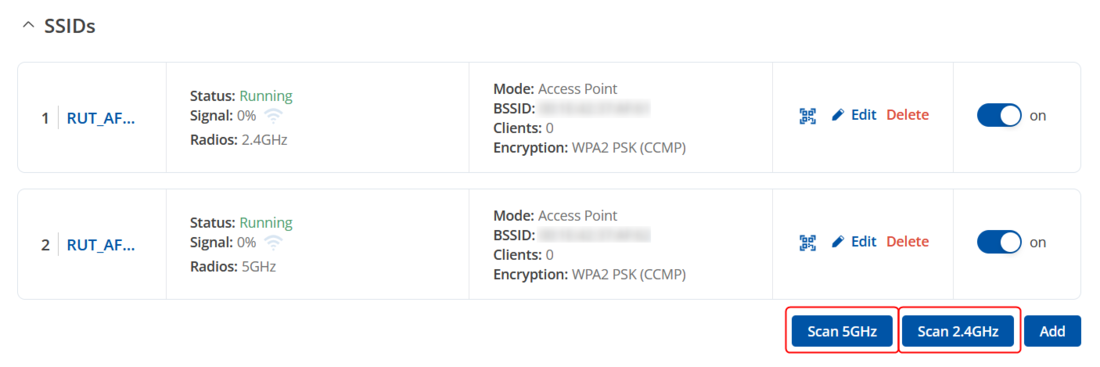
- To set up WiFi WAN, login to the router's WebUI and navigate to the Network section found the Wireless tab by side (Network → Wireless → SSIDs)
- To begin configuring WiFi Client first click the 'Scan' button to scan the surrounding area and attempt to connect to a new wireless access point. You can choose whether to scan 2.4 GHz or 5 GHz wireless networks:
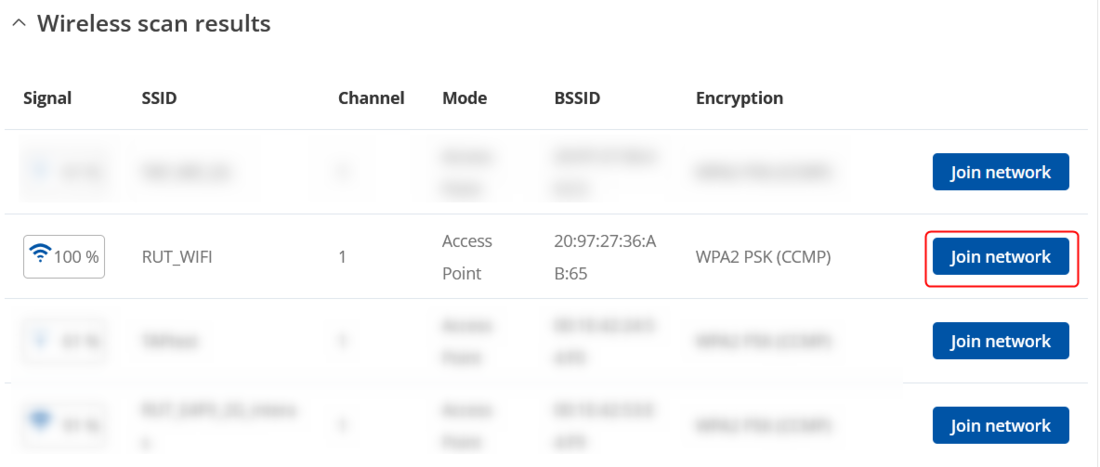
- Once the scan is complete, you will be presented with a list of nearby WiFi Access Points. Locate and choose RUT1's Access Point and click "Join network":
- You will be redirected again to following window, where you will need to enter WPA passphrase or other security password depending on AP that you are connecting to.
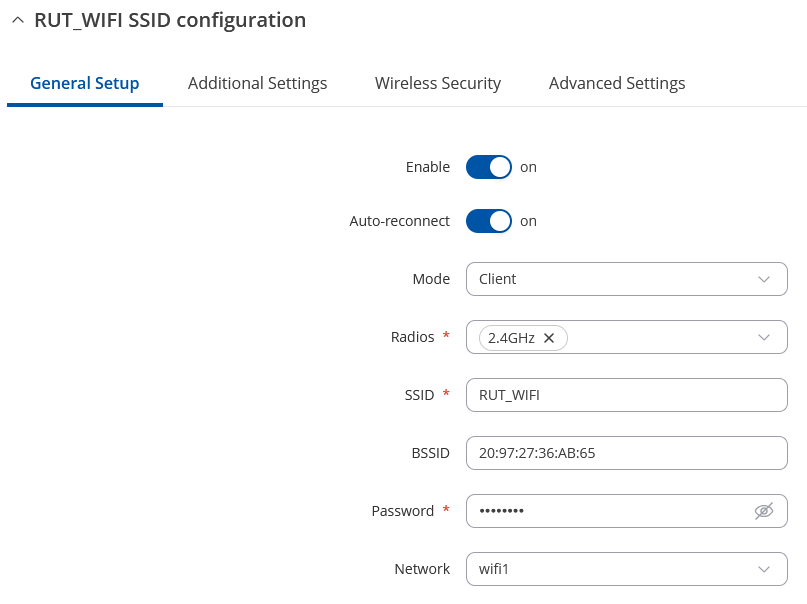
- Next window that opens will be Wireless client Configuration. Values there, mostly, should be left unchanged to avoid connection problems, because they are dictated by Access Point. Other than that, only difference from Access Point settings are in Interface Configuration → General Setup section, where Mode is set to Client, and Network attached to this wireless interface is WAN instead of LAN:
- Click Save & Apply and if you configured correctly, you will have Wireless Client working.
Relay and DHCP Server
- Configuration for Relay takes place in the Relayd section and DHCP in the LAN section of the router's WebUI. Log in and navigate to the Relayd section which is located by side of Network tab (Network → Wireless → Relayd):
- Enable Relay
- Select interface - lan
- Select Wireless interface - wifi1
NOTE: If you can not see Relay Configuration section displayed, Relay feature is additional software that can be installed from the System → Package Manager page. UDP Broadcast Relay is also an additional software that can be installed from the System → Package Manager page.
In this case scenario we choose interface named wifi1, because we named wireless network to which we connect as client as wifi1.
- After we configured relay, we will need to disable DHCP settings on our LAN interface. Go to Network → LAN and click on the button Edit:
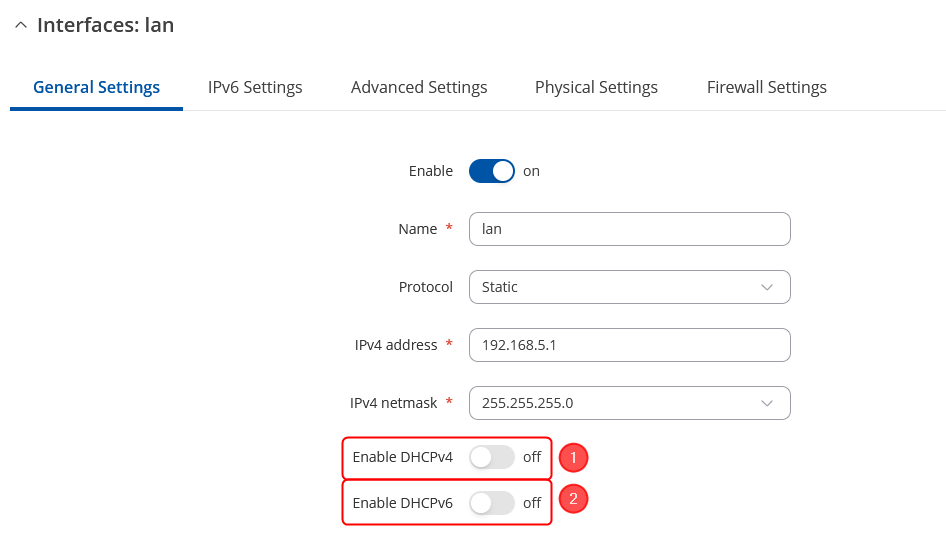
- After you clicked Edit button settings window will appear. Below LAN interface settings section you will see DHCPv4 and DHCPv6 settings section, where you will be available to disable DHCP server:
- Disable DHCPv4
- Disable DHCPv6
Testing the set up
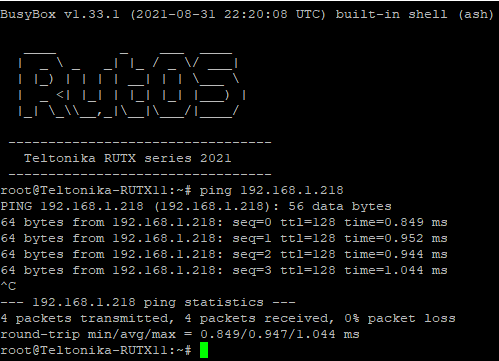
If you've taken all of the steps described above, the configuration is done. But as with any other configuration, it is always wise to test the set up in order to make sure that it works properly. To test this particular set up, login to any of the routers go to System → Maintenance → CLI. Login with user name: root and the router's admin password. You should then be able to ping the other router or any of the end devices that you have connected to either of the two routers. To execute a ping command, type ping <devices_ip> into the console and press the Enter key:
Replace <devices_ip> with an actual IP address of a device that is in your network and if the ping requests are successful it means the configuration is working. You can check the IP addresses of the devices connected to your network in RUT1's Status → Routes section.
Additional notes
An important issue to bring up is that the two routers will not be able to communicate with each other via their LAN IPs if they have LAN IP addresses in different subnets. If that is the case, there are still a few options you can take without changing either of the routers IP addresses:
- When communicating between routers, use RUT2's WAN IP instead of its LAN IP. This will work because RUT1 will lease the WAN IP address to RUT2 from its LAN network. If that is the case you chose, then don't forget to check RUT2's WAN IP after completing the 3.2.2 step of this guide
- Add Static Routes to each router in the Network → Routing → Static Routes section. This must be done from both ends, i.e., you must configure a route both in RUT1 and in RUT2
The communication between RUT1 and the end devices in either network will work regardless of what RUT2's LAN IP address is.

