Connecting to a Hotspot WiFi for Internet Connectivity
The information in this page is updated in accordance with 00.07.08 firmware version.
Introduction
This article contains instructions on connecting to an existing Captive portal wireless network and using it as a WAN source for your local network. This feature works by utilizing the TravelMate package. Once you connect to the Hotspot wireless network with the router, it will redirect a LAN client to the Captive portal to accept the Terms of Service, login, or otherwise authenticate to the Hotspot network.
Note: Only one LAN device needs to perform the authentification on the Hotspot network. All other devices should automatically receive an internet connection after successful authentication with the Hotspot RADIUS server.
Prerequisites
There are a few things that need to be done before connecting to the Hotspot network:
- If you're having trouble finding this page or some of the parameters described here on your device's WebUI, you should turn on "Advanced WebUI" mode. You can do that by clicking the "Advanced" button, located at the top of the WebUI.
- TravelMate package needs to be installed from the Package manager by navigating to Services → Package Manager → Packages.
- Alternatively, if the router does not have an internet connection, the package can be downloaded from the Package Downloads page on our Wiki. This page can be found by selecting the model of your device on the Wiki home page.
Configuration
For this configuration example we will be using:
- RUTM11 with a configured Hotspot network;
- RUT956 connected to the RUTM11 in wireless client mode;
- An Android phone connected to the RUT956 wireless network;
- A wired Windows machine connected to the RUT956;
Authentication on the Captive portal will be handled by RUT956 LAN device (Android phone or Windows device in this example). 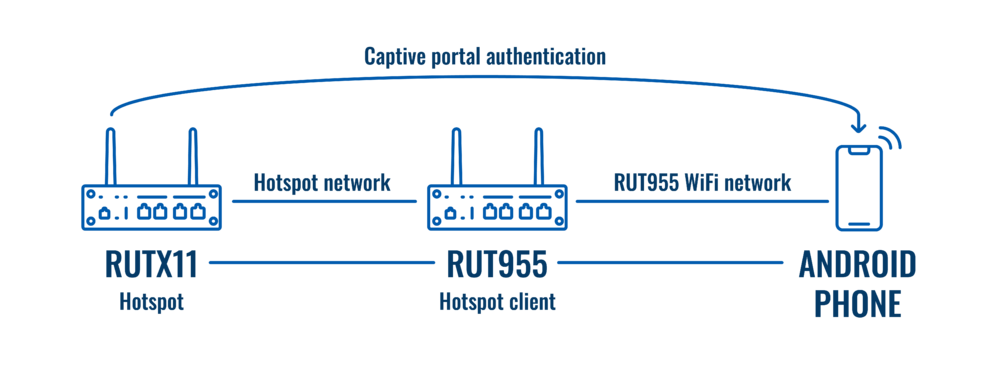
Connecting to a Hotspot wireless network
Connecting to a Hotspot network will be the same as connecting to any other wireless network where hotspot is setted up. navigate to the Network section found the Wireless tab by side (Network → Wireless → SSIDs)
- To begin configuring WiFi Client first click the 'Scan' button to scan the surrounding area and attempt to connect to a new wireless access point. You can choose whether to scan 2.4 GHz or 5 GHz wireless networks, but as we are using RUT956 in this case, it supports only 2.4 GHz scan:
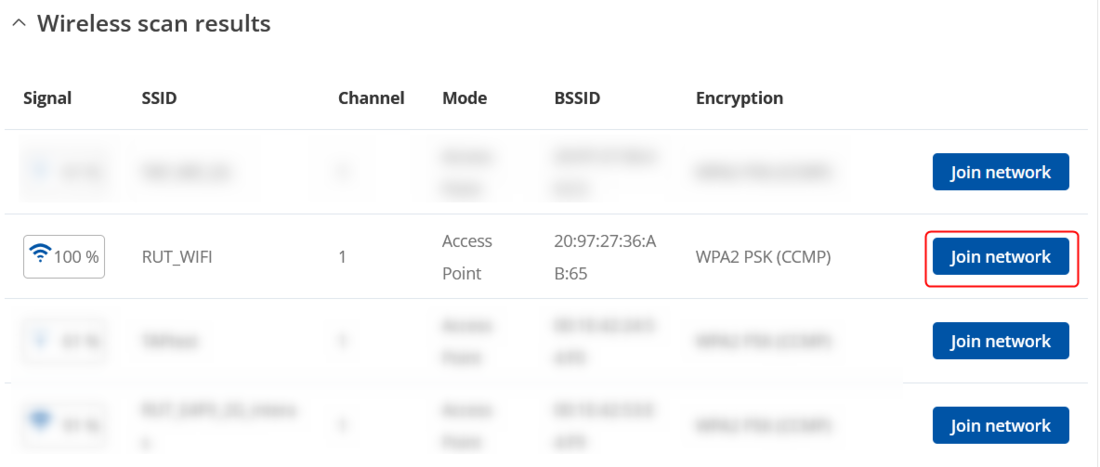
- Once the scan is complete, you will be presented with a list of nearby WiFi Access Points. Locate and choose RUT1's Access Point and click "Join network":
- You will be redirected again to following window, where you will need to enter WPA passphrase or other security password depending on AP that you are connecting to.
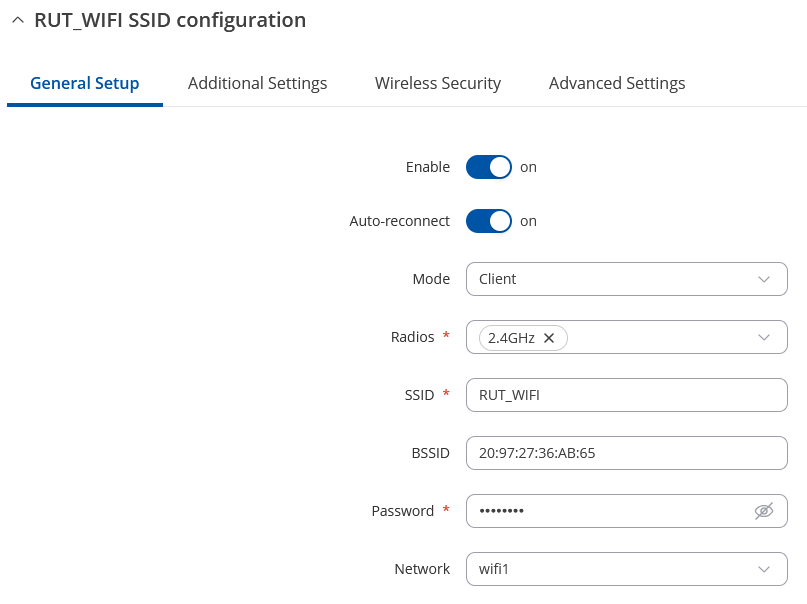
- Next window that opens will be Wireless client Configuration. Values there, mostly, should be left unchanged to avoid connection problems, because they are dictated by Access Point. Other than that, only difference from Access Point settings are in Interface Configuration → General Setup section, where Mode is set to Client, and Network attached to this wireless interface is WAN instead of LAN:
- Click Save & Apply and if you configured correctly, you will have Wireless Client working.
Redirecting the authentication page to the LAN clients
At this point, while the device is connected to a Hotspot page, no internet access will be present, as we haven't yet authenticated with the Hotspot RADIUS server. This authentication redirection will need to be enabled with the help of the TravelMate package.
- Navigate to Network → Wireless → SSIDs menu;
- Press the pencil icon to edit the Hotspot wireless interface:
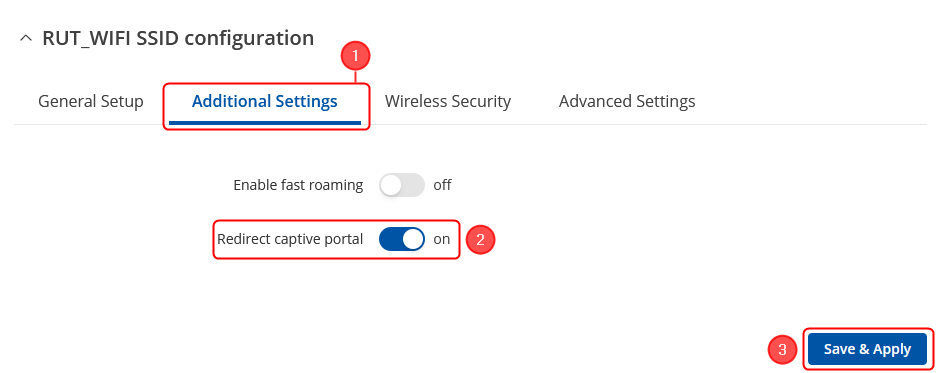
- Open the Advanced Settings tab, and enable the Redirect captive portal option:
- Press Save & Apply;
- Make sure to enable the Access Point instance on the router if you will be authenticating to the Hotspot network from a wireless client;
Authenticating to the Hotspot network from an Android phone
The configuration on the router is done, and the only thing left is to authenticate to the Hotspot network from a LAN client. This could be any client that supports Hotspot redirection, but for this example, we will be using an Android mobile phone.
- On the Mobile phone, open the WiFi settings, and find the network of the device you have configured the TravelMate package on (not the Hotspot network);
- Connect to this network. A notification should popup to Sign into the Hotspot network.
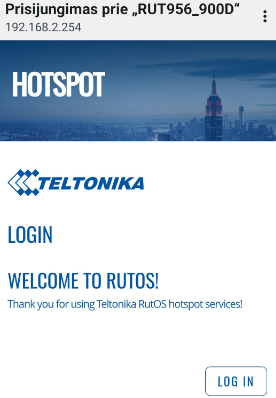
- Press on the notification or the WiFi network, a Hotspot login page will open up:
- Enter all of the needed details (depending on the authentication mode from hotspot side). Once the authentication is complete, the browser window will close and the device should have internet access:
Authenticating to the Hotspot network from a wired Windows device
The authentication on Windows is quite similar. After you have connected the router to a Hotspot network, the authentication page should automatically open up on your default browser:
After entering the required details, you should have internet connection.
Troubleshooting steps
If you are still having difficulty accessing the internet, here are a few steps to help troubleshoot the issue:
- Make sure that WiFi authentication redirection is enabled on your host machine;
- Try using a different LAN device to authenticate on the Hotspot network;
- Make sure the router is connected to the Hotspot WiFi network and receives an IP address (refer to the last step of Connecting to a Hotspot wireless network section)
- Make sure the Hotspot WiFi network does not require a password for joining;
- There might be a scenario where Teltonika device detects DNS-rebind attack (this can be seen in logs located at System -> Maintenance -> Event Log) if that is the case you will need to turn off Rebind protection found in Network -> DNS page.
References
TravelMate - An OpenWRT package for connecting to Hotspot networks.


