RUT260 Mobile Utilities
The information in this page is updated in accordance with firmware version RUT2M_R_00.07.11.3.
Summary
The Mobile Utilities page is used to configure various SMS and Call related device control options and to read, send and manage SMS messages and SMS storage space.
This manual page provides an overview of the Mobile Utilities page in RUT260 devices.
SMS Utilities
The SMS Utilities section contains a list of rules that perform certain actions when they are activated by SMS messages.
The entire list contains more than 20 rules, but it does not include all possible SMS actions. You can also create custom rules or modify existing rules. All possible SMS rule actions, their default SMS texts and descriptions are listed in the table below.
| Action | SMS Text | Description |
|---|---|---|
| Change I/O state | ioset | Changes the state of a selected output. |
| Change mobile settings | cellular | Is used to configure the device's mobile data connection. Click here for more information on this rule. |
| Change profile | no default text | Is used to change profiles on the device. Include the name of the profile that you wish to change to after the rule's SMS text, for example if SMS text is set to changeprof:
|
| Execute custom script | - | Executes a custom shell script. |
| Reset moble connection | reset_conn | Resets mobile connection. Useful when you want to reconnect to the best available operator. |
| Reload config | config_reload | Reloads the config and all affected services. |
| FW upgrade from server | fw_upgrade | Upgrades the device's firmware (provided a new version is available on the FOTA server). |
| Get list of profiles | profdisp | Sends a list of configuration profiles existing on the device. |
| IP unblock | ipunblock | Unblocks Web/SSH access for devices that were blocked for too many unsuccessful connection attempts. Send the SMS text to unblock all blocked devices or include the IP address of a single blocked device after the SMS text. For example:
|
| I/O status | iostatus | Sends a status report message on the state of the device's inputs and outputs. |
| Manage OpenVPN | vpnon | Turns a selected OpenVPN instance on. Include the name of the OpenVPN instance that you wish to turn on after the rule's SMS text:
|
| Manage OpenVPN | vpnoff | Turns a selected OpenVPN instance off. Include the name of the OpenVPN instance that you wish to turn off after the rule's SMS text:
|
| Mobile Data limit status | no default text | Sends a status report message that includes data limit usage information for mobile network interfaces (that have Mobile Data Limit enabled) |
| Mobile Data usage reset | no default text | Resets mobile data usage for specified interface. |
| Monitoring status | monitoring_status | Sends a status report message that includes the RMS connection type, state and the device serial number and MAC address. |
| More | more | Displays next part of a composite response message (more than 160 characters). |
| OpenVPN status | vpnstatus | Sends a status report message on all OpenVPN connections. |
| Reboot | reboot | Reboots the device. |
| Restore to default | restore | Restores factory settings on the device. |
| RMS action | rms_on | Turns RMS connection on. |
| RMS action | rms_off | Turns RMS connection off. |
| RMS connect | rms_connect | Forces the device to connect to RMS. This action is analogous to clicking the 'Connect' button in the Cloud Solutions → RMS page. |
| RMS status | rms_status | Sends a status report message on the state of the connection to RMS. |
| Send status | status | Sends a status report message. |
| SSH access control | sshon | Turns remote and local (by default) SSH access on. This rule can be modified to only include local SSH access. |
| SSH access control | sshoff | Turns SSH access off. |
| Switch mobile data | mobileon | Turns mobile data usage on. |
| Switch mobile data | mobileoff | Turns mobile data usage off. |
| Switch WiFi | wifion | Turns the WiFi radio on. |
| Switch WiFi | wifioff | Turns the WiFi radio off. |
| UCI API | uci | Is used to change the configuration settings on the device. Click here for more information on the UCI API rule. |
| Restore to user's defaults | userdefaults | Restores user's default configuration on the device. Click here for more information on User's default configuration. |
| Wake on LAN | wakeup | Sends a magic packet that "wakes up" a specified device from standby mode. If you have multiple Wake-on-LAN-capable devices, you will have to create a separate rule with a different SMS text for each one. Configuration for each device must include the MAC address of that device. |
| Web access control | webon | Turns remote and local (by default) HTTP and HTTPS access on. This rule can be modified to only include local HTTP/HTTPS access. |
| Web access control | weboff | Turns HTTP and HTTPS access off. This rule can also modified to turn of either HTTP or HTTPS separately. |
| API | api | Is used to change the configuration settings on the device. Click here for more information on the UCI API rule. |
| eSIM list | No default text | Sends a list of available eSIM profiles. |
| eSIM change | No default text | Changes the eSIM profile according to the provided ICCID. |
| eSIM install | No default text | Install the eSIM profile by using the provided activation code. |
SMS rule execution syntax
To execute an SMS rule, send an SMS message to your device's SIM card number with the rule's SMS Text preceded by the selected authorization keyword, which depends on the selected authorization method:
- No authorization - no special keyword required; simply send a rule's SMS Text. For example, to execute the reboot rule without authorization:
reboot
- By serial - include the device's serial number before a rule's SMS Text. For example, to execute the iostatus rule with serial authorization:
1111111111 iostatus
(replace 1111111111 with your device's serial number) - By device admin password - include the device's password before a rule's SMS Text. For example, to execute the vpnon rule with admin password authorization:
admin01 vpnon
(replace admin01 with your device's admin password) - By password - include the configured custom password before a rule's SMS Text. For example, to execute the sshon rule with password authorization:
Custompw1 sshon
(replace Custompw1 with your configured custom password)
Modify SMS Rule
Every SMS rule can be edited to your liking. To begin configuring a rule, click the click the 'Edit' button under "Actions" column:
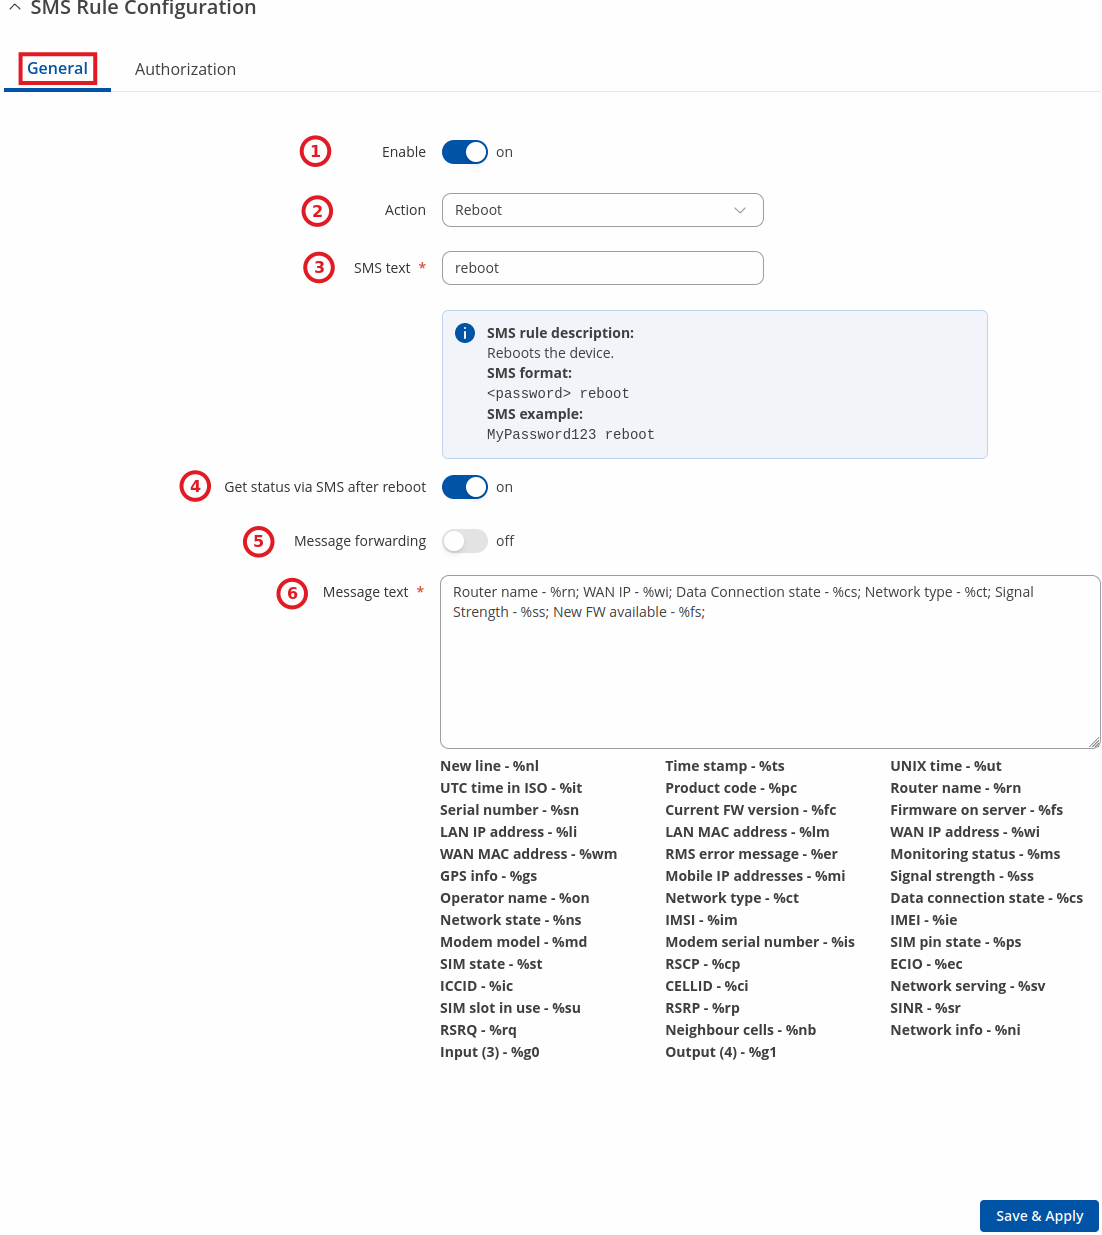
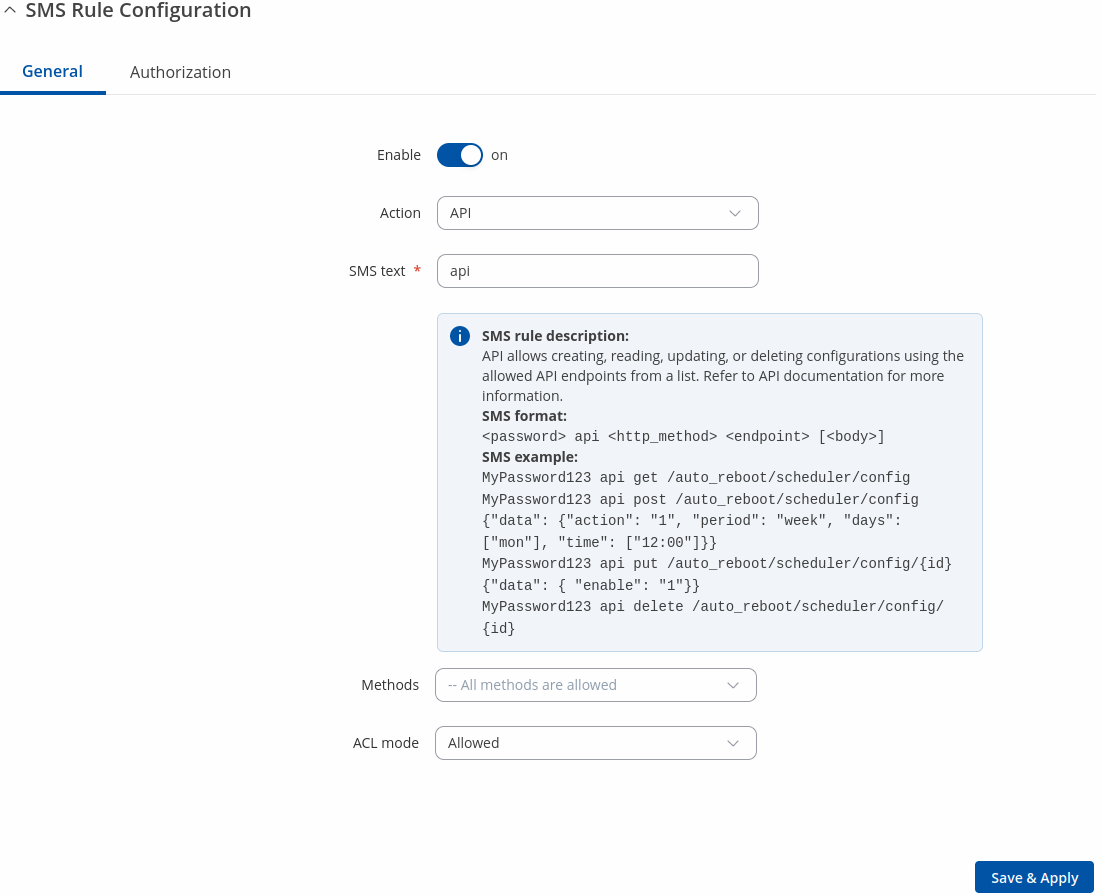
After this you should redirected to configuration page for that rule. Below are examples of what the configuration page for the reboot rule looks like.
General settings
- The Enable slider turn the rule on or off. In order to use a rule, this slider must be set to 'on'. By default, all existing SMS rules are turned on.
- The Action dropdown selection specifies which action should be performed when the rule is executed.
- The SMS text field specifies the text that will trigger the rule upon receiving a message.
- The Get status via SMS after reboot slider specifies whether the device should send a status report message after an action is executed. The name of this slider may differ from rule to rule and it is only available for some rules.
- The Message forwarding slider specifies whether the device should send a status report message to another number (besides the original sender). Setting this slider to 'on' will prompt you to enter an additional phone number(s) of the status message recipient(s).
- The Message text box is used to modify the text that should be included in an SMS rule's response message.
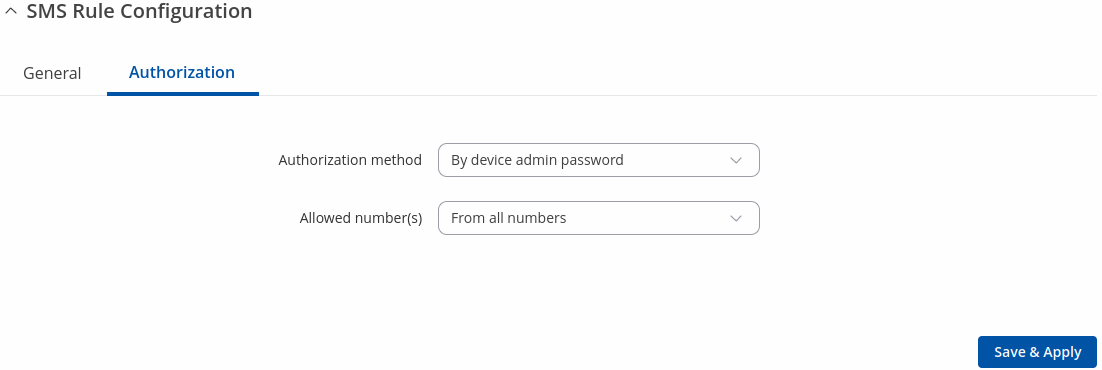
Authorization
- The Authorization method dropdown selection specifies the type of authorization an SMS rule requires (device admin password, serial number, password or none). If By password is selected a Password field will appear and a custom password will be required. A custom password must have at least one uppercase letter, one lowercase letter, one number and must be from a minimum of 8 to a maximum of 80 characters in length.
- The Allowed number(s) dropdown selection specifies who can execute an SMS rule (based on phone number).
Most rules are configured in a similar manner. However, the configuration does differ from rule to rule, depending on a rule's purpose (selected 'Action'). If you run into trouble when configuring a rule, hover your mouse cursor over the name of a field to see a hint that explains what that field does.
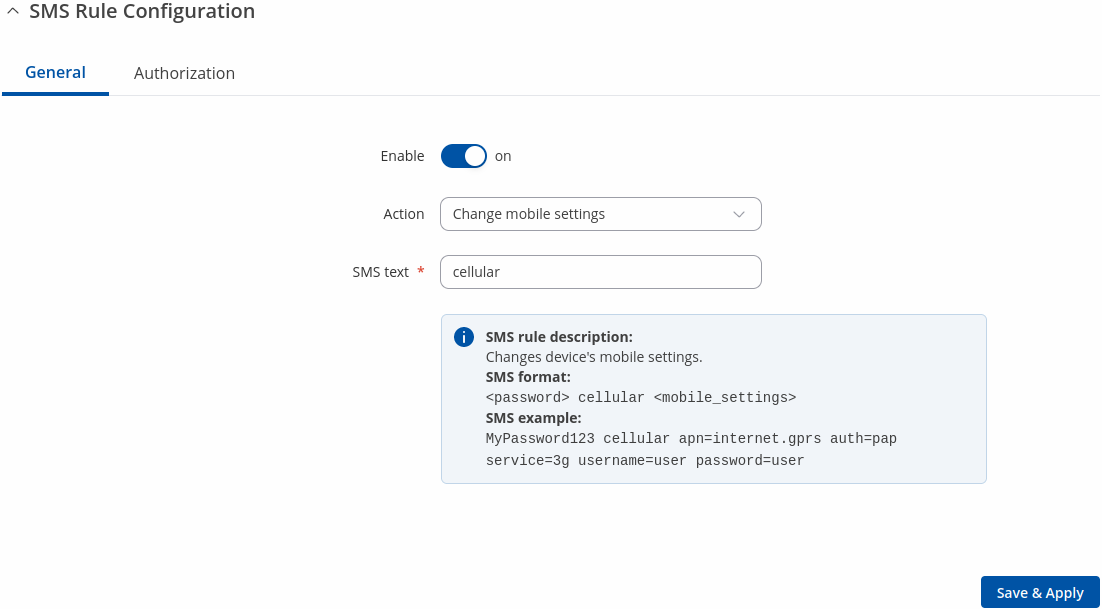
Change mobile settings (cellular) rule
The Change mobile settings rule is used to change the configuration settings of the mobile data connection. The usage of this rule is a bit more complex because the SMS text in and of itself does nothing, as you must also specify the parameters and values that you wish to set. For example, you can send a message that will change your APN only or a message that will change multiple parameters at once.
Below is the full list of parameters that can be changed with this rule.
| Parameter | Description | SMS text example |
|---|---|---|
| apn= | Sets APN. | cellular apn=internet |
| auto_apn= | Turns auto APN on or off. Possible values are 0/1. | cellular auto_apn=1 |
| dialnumber= | Sets Dialing number. | cellular dialnumber=*99***1# |
| auth_mode= | Sets the authentication method. Possible values are:
|
cellular auth_method=pap |
| service= | Sets the service mode. Possible values are:
|
cellular service=auto |
| username= | Sets the user name for PAP or CHAP authentication. | cellular username=user |
| password= | Sets the password for PAP or CHAP authentication. | cellular password=pass |
| roaming= | Turns mobile data roaming on or off. Possible values are:
|
cellular roaming=0 |
| interface= | Specifies the interface where changes should occur. | cellular apn=internet,interface=mob1s1a1 |
Each example above contains a single parameter but you can also send out multiple parameters in one message. For example:
cellular apn=internet service=3g
This message would set your APN to "internet" and the service mode of the mobile connection to "3G Only". You can also send a message that would include all of the parameters above:
cellular apn=internet auth_mode=pap service=3g username=user password=pass roaming=0
Note: only "apn=" or "auto_apn=" is required in a message. For example, to set custom APN:
cellular apn=internet
or if you want to turn auto APN on:
cellular auto_apn=1
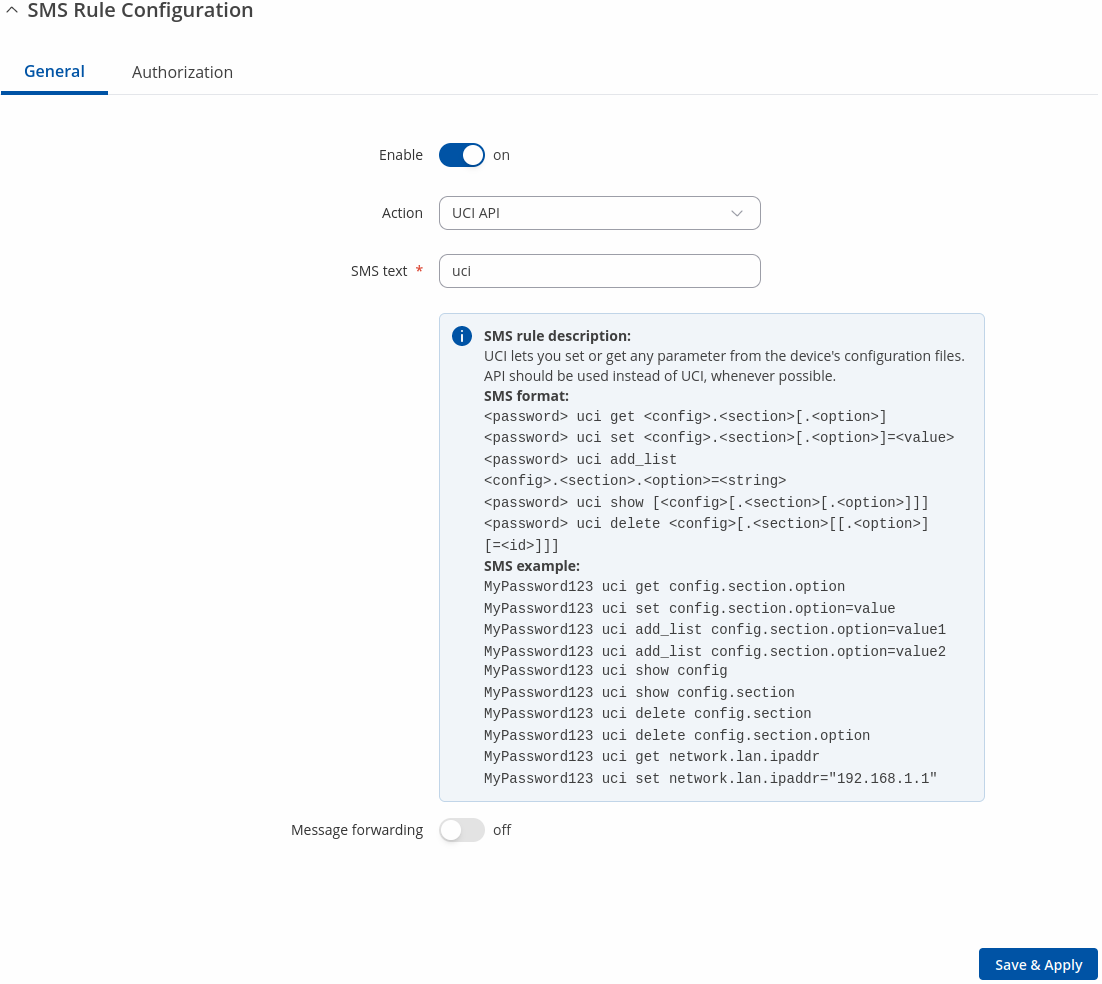
UCI API rule
The UCI API rule is used to configure any parameters on the device.
The following are syntax examples for the UCI API rule:
| Structure example | Description | SMS text example |
|---|---|---|
| uci get <config>.<section>.<option_name> | Returns the value of a single configuration option. |
|
| uci set <config>.<section>.<option_name>="value" | Sets the value of a specified configuration option. |
|
| uci show <config> | Returns the contents of a config file |
|
| uci show <config>.<section> | Returns the exact part (section) of a config file. |
|
The UCI rule requires that you know the names of the configuration files and sections and parameters contained within them. You can find the config file list and some examples of the UCI system usage in our UCI command usage article.
Disclaimer: do not enclose values in escape characters like you would when executing UCI commands via CLI. For example: uci set network.mobile.apn="example" will cause an error in SMS API and your value will be altered, as a result, UCI commands execution will fail. Instead, simply write uci set network.mobile.apn=example without any escape characters or quotes.
API rule
API allows creating, reading, updating, or deleting configurations using the allowed API endpoints from a list.
The following are syntax examples for the API rule:
| Structure example | Description | SMS text example |
|---|---|---|
| api get <method>.<config>.<section> | Returns specified config options. |
|
| api post<method> <config>.<section>.<option_name>="value" | Sets the value of a specified configuration option. |
|
| api put <method> <config>.<section>.<option_name>="value" | Edits a specified config options. |
|
| api delete <method> <config>.<section>.<config_id> | Deletes a specified configuration. |
|
Custom Rules
If none of the default rules suit your purposes, you can also configure custom ones. To do so, scroll down to the very bottom of the SMS Utilities page, where you will find the Add Rule section. Enter a custom SMS text, select an Action and click the 'Add' button:
SMS Gateway
This section provides a summary of the SMS Gateway functions for RUT260 devices.
Post/Get
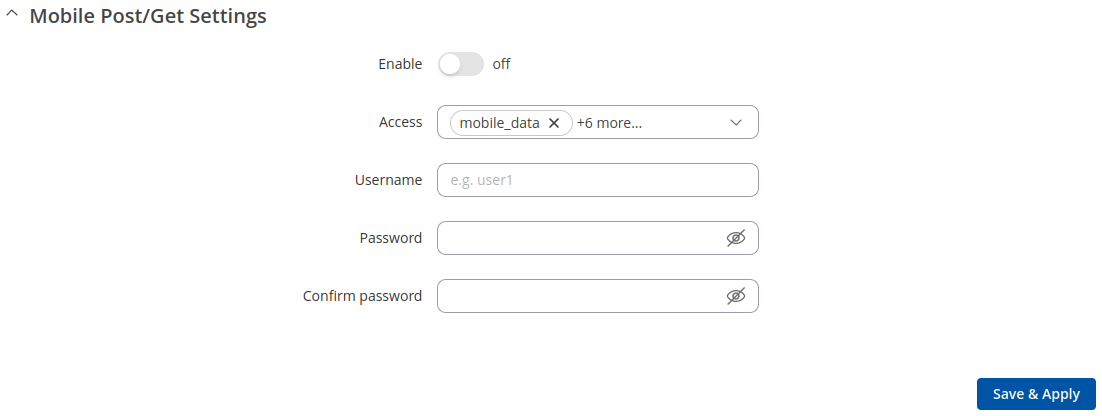
Post/Get allows you to perform action requests by writing them in the URL after your device’s IP address.
| Field | Value | Description |
|---|---|---|
| Enable | off | on; default: off | Enable SMS management functionality through POST/GET |
| Access | mobile_data | mobile_sim_pin | sms_delete | sms_list | sms_read | sms_send | sms_total; default: mobile_data, sms_delete, sms_list, sms_read, sms_send, sms_total | Methods available for Post/Get. All methods are allowed if this list is left empty. |
| User name | default: user1 | User name used for authorization (5 characters minimum). Allowed characters (a-zA-Z0-9!@#$%&*+-/=?^_`{|}~. ) |
| Password | default: user_pass | Password used for authorization (5 characters minimum). Allowed characters (a-zA-Z0-9!@#$%&*+-/=?^_`{|}~. ) |
Use a web browser or any other compatible software to send HTTP post/get strings to the router. The router must be connected to a GSM network when using the Send SMS feature. Below you will find a table with possible actions and examples on how to use them:
| Action | Post/get URL examples |
|---|---|
| Enable/Disable mobile data connection | http://192.168.1.1/cgi-bin/mobile_date?username=user1&password=user_pass&value=on/off |
| Set SIM PIN | http://192.168.1.1/cgi-bin/mobile_sim_pin?username=user1&password=user_pass&pin=0000 |
| View mobile messages list | http://192.168.1.1/cgi-bin/sms_list?username=user1&password=user_pass |
| Read mobile message | http://192.168.1.1/cgi-bin/sms_read?username=user1&password=user_pass&number=1 |
| Send mobile message to a single number | http://192.168.1.1/cgi-bin/sms_send?username=user1&password=user_pass&number=0037060000001&text=testmessage |
| Send mobile message to a group | http://192.168.1.1/cgi-bin/sms_send?username=user1&password=user_pass&group=group_name&text=testmessage |
| View mobile messages total | http://192.168.1.1/cgi-bin/sms_total?username=user1&password=user_pass |
| Delete mobile message | http://192.168.1.1/cgi-bin/sms_delete?username=user1&password=user_pass&number=1 |
- 192.168.1.1 - router's IP address. (Replace it with your LAN IP or WAN IP (when connecting remotely))
- SMS related post/get commands. Possible values are:
- mobile_data - enables/disables mobile data connection
- mobile_sim_pin - set SIM PIN for default sim
- sms_list - view all SMS messages in storage
- sms_read - read a single SMS message by specified SMS index (number)
- sms_send - send an SMS message to specified recipient
- sms_total - display SMS storage statistics
- sms_delete - delete a single SMS message by specified SMS index (number)
- & - separation symbol. After specifying the SMS command, other parameters must be separated by an ampersand (&) symbol
- username - SMS post/get configuration user name
- password - SMS post/get configuration password
- value - Mobile data On/Off values
- pin - SIM PIN code
- number - SMS message index or (depending on context) recipient's phone number. SMS message indexes can be
viewed with the sms_list command.
Correct phone number format is:- 00 - number must be preceded by two zeros
- <country_code> - the next following element is the number holder's country code
- <receivers_number> - phone number of the recipient
For example, a valid number would be 0037012345678 (370 is country code and 12345678 is the receiver's phone number, all preceded by 00) - text - SMS message text
To use Post/Get via SSH instead of a browser, you may want to use the curl -X command. Simply add the same URL command in between quotes and specify the HTTP method.
Examples:
- View SMS list:
curl -X GET "http://192.168.1.1/cgi-bin/sms_list?username=user1&password=user_pass"
- Send SMS:
curl -X GET "http://192.168.1.1/cgi-bin/sms_send?username=user1&password=user_pass&number=0037000000000&text=testmessage"
Responses:
- View SMS list:
Index: the oldest received message starts with index 0
Date: date of message
Sender: the sender's phone number
Text: mesagge text
Status: read
- Send SMS:
OK: when SMS was sent
Error: when an SMS cannot be sent or the SMS limit is reached
- Read SMS:
Index: the oldest received message starts with index 0
Date: date of message
Sender: the sender's phone number
Text: mesagge text
Status: read
WRONG_NUMBER: when the wrong sms number is specified
- View mobile messages total:
Used: information about used memory
Total: information about available memory
- Delete mobile message:
OK: message deleted
WRONG_NUMBER: when the wrong sms number is specified
- Set SIM PIN:
PIN state: Required PIN or OK
Set SIM PIN successfully: after succesul SIM PIN set
PIN is not specified or it's format is incorrect: wrong format of SIM PIN
Failed to set PIN: Invalid response (5): when etered wrong SIM PIN
Auto Reply
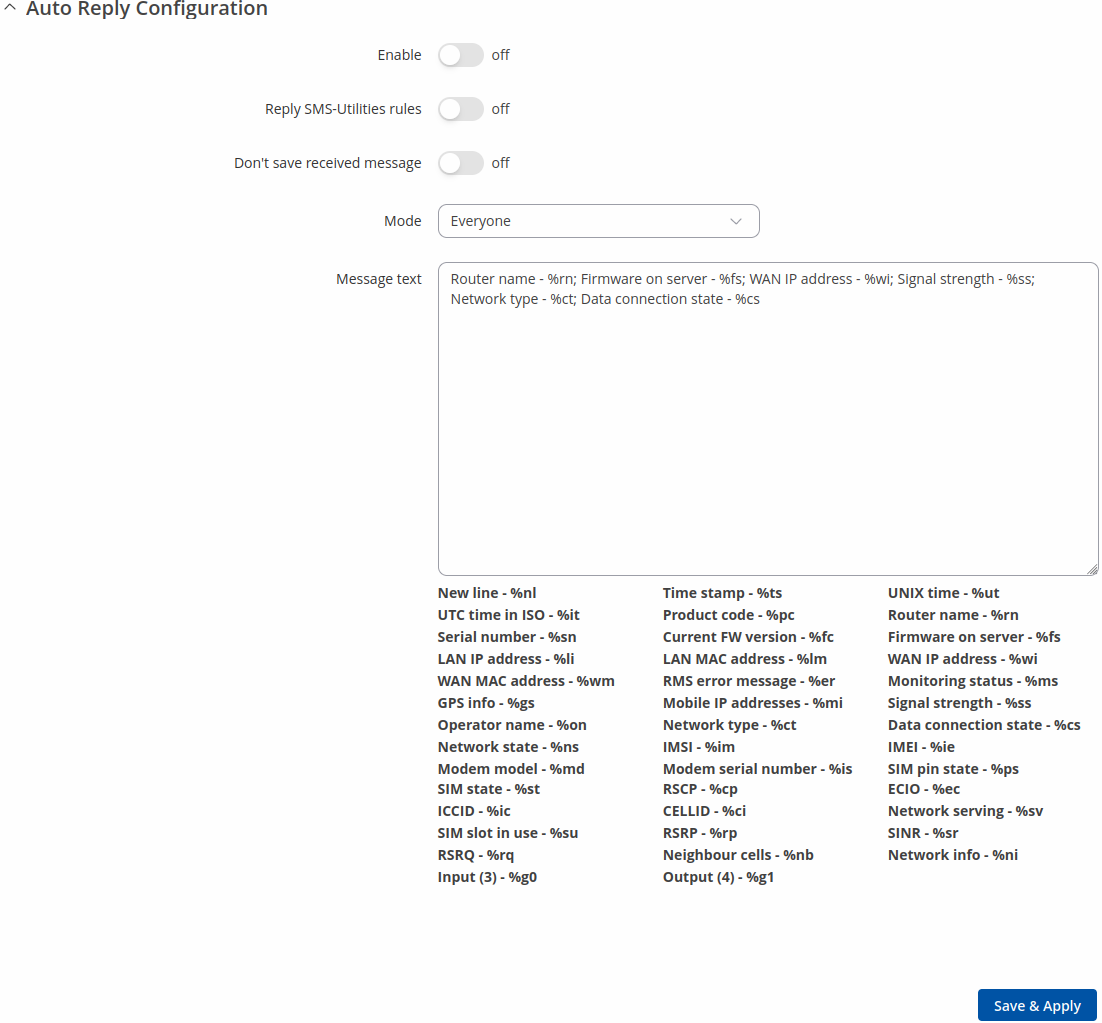
Auto reply allows you to configure automatic replying to SMS messages that the router receives.
| Field | Value | Description |
|---|---|---|
| Enable | off | on; default: off | Toggles Auto Reply ON or OFF |
| Reply SMS-Utilities rules | off | on; default: off | It will reply to sms rules, from SMS-Utilities |
| Don't save received messages | off | on; default: off | If enabled, the router will delete received SMS messages |
| Mode | default: Everyone | Specifies whether to auto reply to every phone number or just just specified phone numbers. Available options:
|
| Message text | default: none | The message that will be sent in reply |
SMS Forwarding
This section is a summary of the SMS Forwarding function in RUT260 routers.
SMS Forwarding To HTTP
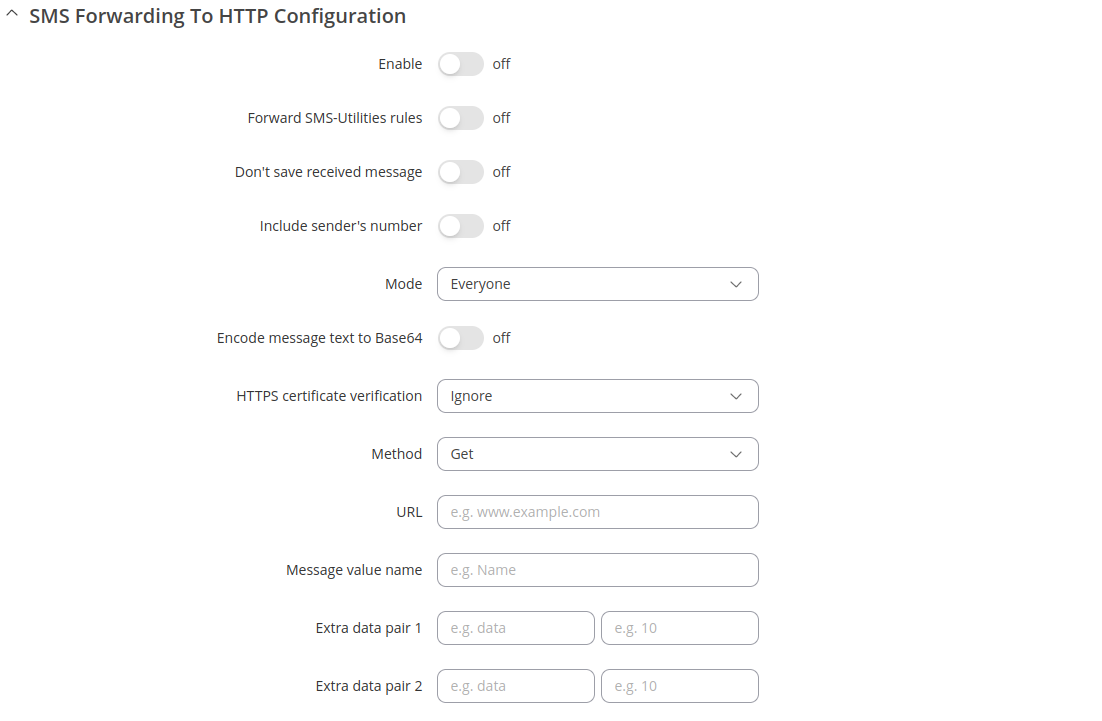
The SMS Forwarding To HTTP functionality forwards SMS messages to HTTP, using either POST or GET methods.
| Field | Value | Description |
|---|---|---|
| Enable | off | on; default: off | Enable/disable SMS forwarding to HTTP |
| Forward SMS-Utilities rules | off | on; default: off | Enable/disable sms-utilities rules forwarding |
| Don't save received message | off | on; default: off | Select whether you want to save forwarded messages or not |
| Include sender's number | off | on; default: off | Enable/disable adding original message sender phone number at the end of message text |
| Mode | default: Everyone | Specifies whether to auto reply to every phone number or just just specified phone numbers. Available options:
|
| Encode message text to Base64 | off | on; default: off | Message text will be encoded to a Base64 string. Enable this to preserve Unicode characters in the message text. |
| HTTPS certificate verification | default: Ignore | Select whether to ignore or verify server certificate. Available options:
|
| Method | default: Get | Choose witch HTTP request method will be used. Available options:
|
| URL | default: none | URL to which message is going to be forwarded |
| Number value name | default: none | Sender phone number code name for query string name/value pair |
| Message value name | default: none | Message code name for query string name/value pair |
| Extra data pair 1 | default: none | Extra html query name/value pair. Enter name to the left field and value to right |
| Extra data pair 2 | default: none | Extra html query name/value pair. Enter name to the left field and value to right |
SMS Forwarding To SMS
The SMS Forwarding To SMS function forwards SMS messages to one or several recipients.
| Field | Value | Description |
|---|---|---|
| Enable | off | on; default: off | Enables/disables SMS forwarding to SMS |
| Forward SMS-Utilities rules | off | on; default: off | Enable/disable sms-utilities rules forwarding |
| Don't save received message | off | on; default: off | Select whether you want to save forwarded messages or not |
| Add sender's number | off | on; default: off | Enable/disable adding original message sender phone number at the end of message text. Only added if total message length is up to 480 characters |
| Mode | default: Everyone | Specifies whether to auto reply to every phone number or just just specified phone numbers. Available options:
|
| Recipients phone numbers | default: none | Number(s) to which received messages will be forwarded to |
SMS Forwarding To Email
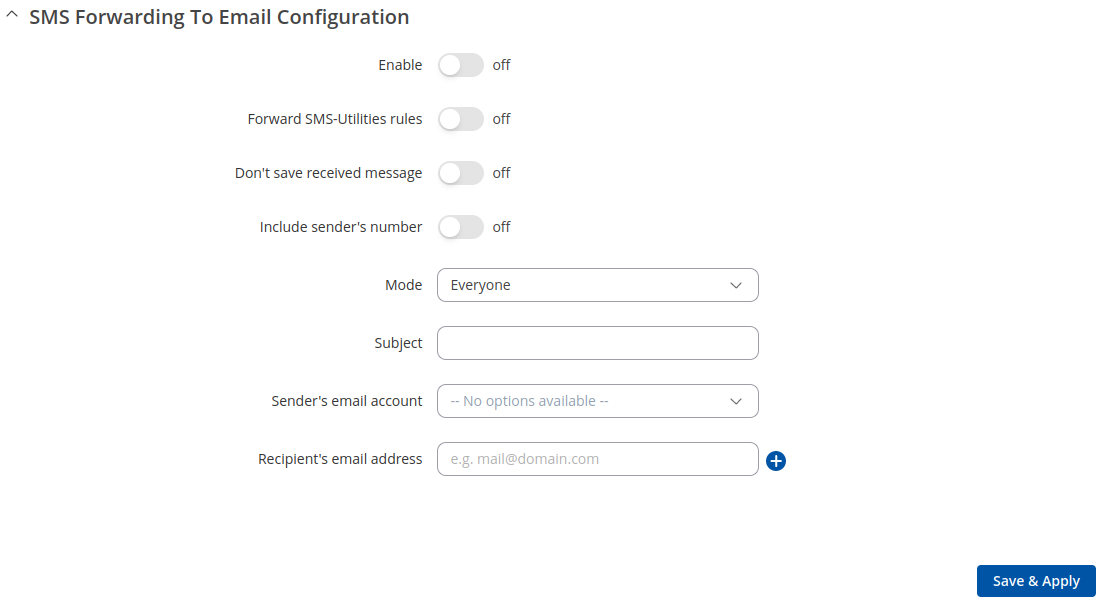
The SMS Forwarding To Email function forwards SMS messages to email.
| Field | Value | Description |
|---|---|---|
| Enable | off | on; default: off | Enables/disables SMS forwarding to Email |
| Forward SMS-Utilities rules | off | on; default: off | Enables/disables sms-utilities rules forwarding |
| Don't save received message | off | on; default: off | Select whether you want to save forwarded messages or not |
| Include sender's number | off | on; default: off | Enable/disable adding sender phone number at the end of email text body |
| Mode | default: Everyone | Specifies whether to auto reply to every phone number or just just specified phone numbers. Available options:
|
| Subject | default: none | Subject of an email. Allowed characters (a-zA-Z0-9!@#$%&*+-/=?^_`{|}~. ) |
| Sender's email account | default: none | Sender's email configuration |
| Recipient's email address | default: none | For whom you want to send an email to. Allowed characters (a-zA-Z0-9._%+-) |
Email To SMS Forwarding
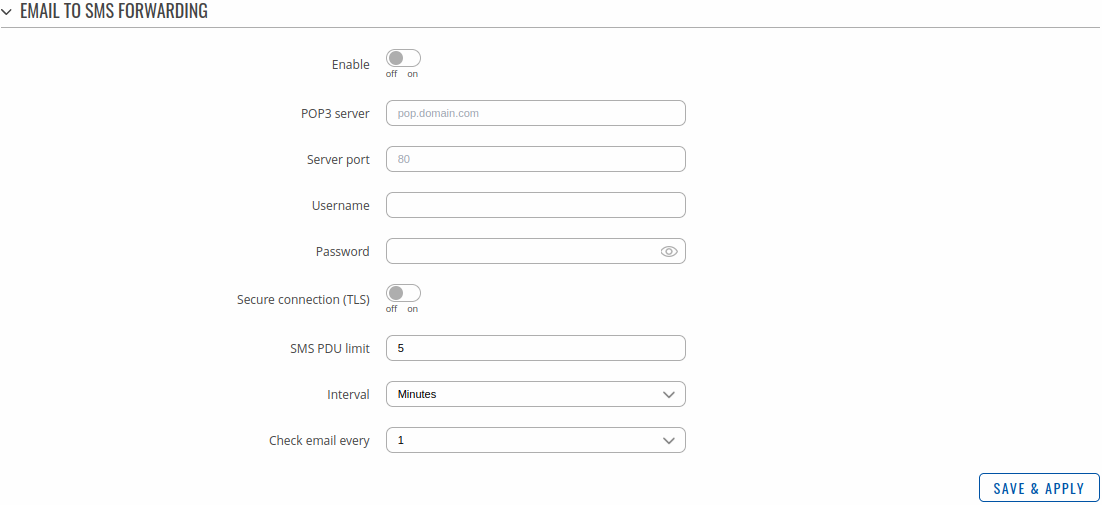
Email to SMS Forwarding is a function that connects to your email account and checks its inbox at the specified frequency. If it finds any new received emails with a specific subject (phone number in email subject), it sends the body of the email as an SMS message(s) to the recipient specified in the email subject field.
Important note: all POP3 server email messages from inbox will be deleted when using this service.
| Field | Value | Description |
|---|---|---|
| Enable | off | on; default: off | Turns Email to SMS Forwarding ON or OFF |
| POP3 server | host | ip; default: none | Email service provider's POP3 server address (can be looked up online) |
| Server port | integer [0..65535]; default: none | Email service provider's POP3 server port (can be looked up online) |
| User name | string; default: none | Email account user name. This is information is used by router in order to atuhenticate itself when connecting to the email client |
| Password | string; default: none | Email account password. This is information is used by router in order to atuhenticate itself when connecting to the email client |
| Secure connection (TLS) | off | on; default: off | Enables/diables secure connection (TLS 1.2 and up). TLS (Transport Layer Security) is a cryptographic protocol designed to provide communications security over a computer network. TLS uses a combination of symmetric cryptography (sigle secret key known to both sender and receiver to encrypt data) and asymmetric cryptography (a public key known to everyone and a private or secret key known only to the recipient of the message) to encrypt data. |
| Verify TLS certificate validity | off | on; default: off | Enables/disables TLS certificate validation. When enabled verifies the validity of the POP3 server certificate |
| SMS PDU limit | integer; default: 5 | Longer email text will be sent in multiple PDUs (Protocol Data Units), each of them is approximately 130 characters. Specify maximum allowed PDU count |
| Check email every | time; default: 1 minute | Email inbox check interval |
| Interval | Minutes | Hours| Days; default: Minutes | Email inbox check interval |
Additional note: you may have noticed that there is no option where you can specify the recipient's phone number. As mentioned earlier, Email to SMS doesn't forward all emails, only the ones that are meant to be forwarded. Only emails with the recipient's phone number in the subject will be forwarded to SMS
Correct phone number format is:
- 00 - number must be preceded by two zeros
- <country_code> - the next following element is the number holder's country code
- <receivers_number> - phone number of the recipient
For example, a valid number would be 0037012345678 (370 is country code and 12345678 is the receiver's phone number, all preceded by 00)
Recommendations note:
- Email to SMS application can't guarantee best results when working with flooded email inbox. It is recommended to have less than 100 emails in the inbox.
- Less emails - better performance.
- In most cases it is best to use dedicated inbox.
SMPP
Short Message Peer-to-Peer (SMPP) is a protocol used for exchanging SMS messages between Short Message Service Centers (SMSC) and/or External Short Messaging Entities (ESME). It supports both IPv4 and IPv6 addresses. The figure below is an example of the SMPP section and the table below provides information on the configuration fields contained in that section:
| Field | Value | Description |
|---|---|---|
| Enable | off | on; default: off | Turns SMPP on or off. |
| User name | string; default: admin | User name used for authentication on the SMPP server. |
| Password | string; default: admin01 | Password used for authentication on the SMPP server. |
| Server port | integer [0..65535]; default: 2775 | SMPP server port. |
| Timeout | integer [1..500.]; default: none | Connection timeout in seconds. |
| Use TLS/SSL | off | on; default: off | Mark to use TLS/SSL for connection. |
| CA file | -interactive button; default: | Upload CA file. |
| Certificate file | -interactive button; default: | Upload certificate file. |
| Key file | -interactive button; default: | Upload key file. |
Call Utilities
Just like SMS Utilities, Call Utilities provide you with the possibility to issue certain commands to the router from your mobile phone. The list of possible rules is of course shorter because you can only make one type of call. Keep that in mind when creating Call Utilities rules because one call will trigger all of the enabled rules at once.
Call Rules
To create a new rule, select an 'Action' and click the 'Add' button. After this, a new configuration window should appear.
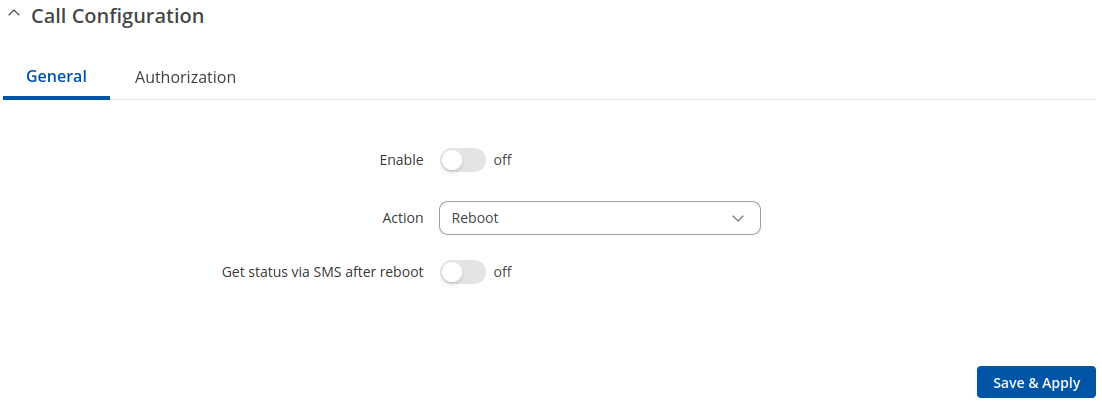
| Field | Value | Description |
|---|---|---|
| Enable | Off | On; default: Off | Turns the rule on or off. |
| Action | Reboot | Get status | Switch mobile data on/off| Switch digital output on/off| Switch WiFi on/off | The action to be performed when a rule is met. |
| Get status via SMS after reboot | Off | On; default: Off | Turn on if you wish to receive an SMS message about the device's status after it is rebooted using the rule (you will not receive messages when it is rebooted using other methods). |
| Message text | -(input field) | Compose the contents of the 'status' message. Use the helpers found below this field if you wish to include more router information. e.g., if you include the code %ss in the text, it will be replaced with the router's current signal strength value when the message is sent to the recipient(s). |
| State | Off | On; default: Off | State of the rule. It can be turned on or off. |
| Write to config | Off | On; default: Off | Permanently save mobile network state to configuration. |
| Active timeout | Off | On; default: Off | Rule active for a specified time. |
| Seconds | interger; default: 5 | Rule active for a specified time, format seconds. |
| Output | Input/Output pin; default: Depends from device model | The output which will be changed. |
| Field | Value | Description |
|---|---|---|
| Allowed number(s) | From all numbers | From group | From single number; default: From all numbers | Phone numbers which are allowed to trigger the rule. |
| Phone group | - | Recipient's phone number users group (configure it here) |
| Caller's phone number | A phone number containing 0-9 and + characters is accepted; default: none | An allowed phone number. Allowable characters: (0-9#*+) |
Incoming Calls
This option specifies the action to be performed on incoming calls. Call utilities rules will keep getting executed while the call is active.
| Field | Value | Description |
|---|---|---|
| Action | Reject | Answer | Ignore; default: Reject | The action to be performed on incoming calls. Call utilities rules will keep getting executed while the call is active. |
| Answer and hangup after time period (s) | integer [0..100]; default: empty | Recipient's phone number users group (configure it here) |
Messages
With the help of the Messages window you can read and send SMS messages.
Read Messages
In the Read Messages section you can read and delete received/stored SMS messages. The layout is simple, there is a list of received SMS messages and you can choose how many entries of that list should be visible at one time with SMS per page drop box in the top left corner of the page and there is a Search field to help you navigate more efficiently through the list of messages in the top right corner of the page.
Send Messages
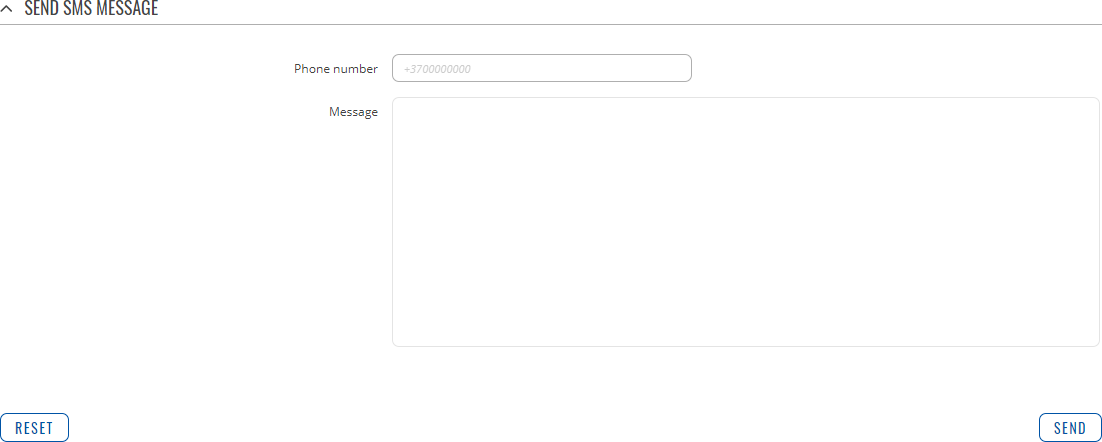
The Send Messages section lets you send SMS messages from the router‘s SIM card.
All you have to do is enter the recipient’s phone number, type in your message and hit the Send button.
Storage
In the Storage tab you can find settings associated with message storage.
| Field | Value | Description |
|---|---|---|
| Save messages to | SIM card | Modem storage; default: SIM card | Specify location where to save messages |
| Memory | - | Information about used/available SIM card memory |
| Leave free space | integer; default: 5 | How much memory (number of messages) should be left free |


