Bridged office network with a separate Guest WiFi
From Teltonika Networks Wiki
Revision as of 16:22, 21 July 2020 by Justinasm (talk | contribs) (Protected "Bridged office network with a separate Guest WiFi" ([Edit=Allow only administrators] (indefinite) [Move=Allow only administrators] (indefinite)))

Main Page > General Information > Configuration Examples > Use cases > Bridged office network with a separate Guest WiFi

Configuration overview and prerequisites

Prerequisites:

  • Two RUTX routers (only the versions, which have WiFi)
  • A Public Static or Public Dynamic IP address
  • An end device to configure the router (PC, Laptop, Tablet, Smartphone)

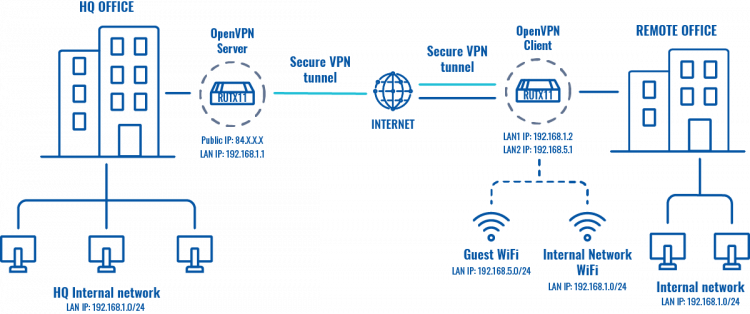
The topology above depicts the OpenVPN scheme. The router with the Public IP address (RUTX) acts as the OpenVPN server and other RUTX acts as client. OpenVPN connects the networks of HQ Office and Remote Office. Remote Office will also have a separate WiFi AP for guests.

When the scheme is realized, remote office workers will be able to reach HQ’s internal network with all internal systems by connecting to the router via LAN port or by connecting to a WiFi AP, which is used for work. All traffic apart guest WiFi is going to travel through VPN tunnel. Guest network traffic will go directly to WAN, it will give visitors access to the Internet connection, but nothing else making your company a lot more secure.

Configuring HQ office router

If you're having trouble finding this page or some of the parameters described here on your device's WebUI, you should turn on "Advanced WebUI" mode. You can do that by clicking the "Advanced" button, located at the top of the WebUI.

Note: You will need to do that in both, HQ and remote office routers.

OpenVPN


Generating TLS Certificates


Refer to the TLS Certificates Wiki guide to generate the necessary certificates for the OpenVPN configuration.

Configuring OpenVPN server


Go to Services → VPN → OpenVPN. There create a new configuration by writing New configuration name (you can type anything you want), selecting role Server and pressing Add button. It should appear after a few seconds. Then press Edit.


Now apply the following configuration:

  1. Enable instance.
  2. Set TUN/TAP to TAP (bridged).
  3. Enable LZO.
  4. Select Authentication: TLS.
  5. Upload TLS Certificates.
  6. Save the changes.

Configuring remote office router

Before you start configuring the remote office router, set a static IP address on the device you are configuring the router with (e.g. 192.168.1.10). You can find instructions on how to do that here:

Ubuntu

Windows

Note: make sure to switch back to automatic DNS and IP address obtaining when you are done configuring the router.

OpenVPN


LAN


Go to Network → LAN and press Edit next to your LAN interface:


Apply the following steps:

  1. Change your LAN IP address to: 192.168.1.2
  2. Disable DHCPv4 and DHCPv6.
  3. Save & Apply the changes.

Configuring OpenVPN client


Go to Services → VPN → OpenVPN. There create a new configuration by writing New configuration name (you can type anything you want), selecting role Client and pressing Add button. It should appear after a few seconds. Then press Edit.


Now apply the following configuration:

  1. Enable instance.
  2. Set TUN/TAP to TAP (bridged).
  3. Enable LZO.
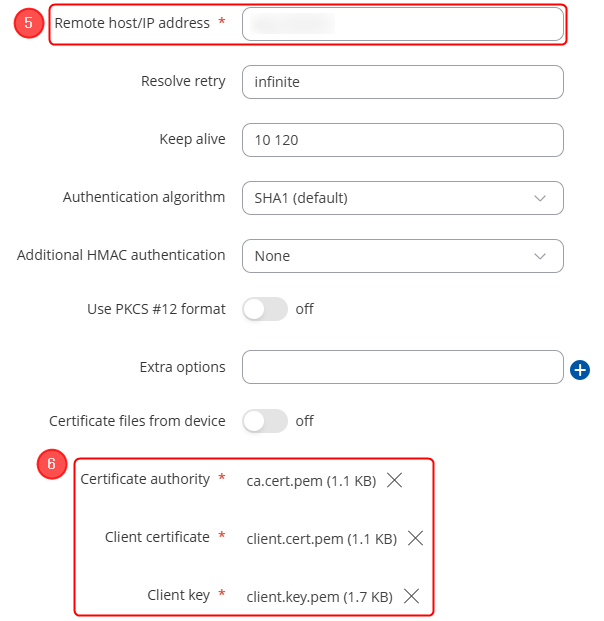
  4. Select Authentication: TLS.
  5. Write Remote host/IP address (RUTX OpenVPN server public IP).
  6. Upload TLS Certificates.
  7. Save the changes.

Guest WiFi


Creating a new WiFi AP


Go to Network → Wireless → SSIDs. There create a new WiFi Access Point by pressing Add button. Then you will be forwarded to the configuration window.


Apply the following steps:

  1. Press on the network list.
  2. Create a new Network for guest WiFi.
  3. Save the changes.

Now go to Network → LAN and press Edit next to your newly created LAN interface:


Now apply the following steps:

  1. Set IPv4 Address to 192.168.5.1.
  2. Enable DHCPv4
  3. Save the changes.

Editing Firewall rules


Navigate to Network → Firewall → General Settings. There create a new Zone rule by pressing Add button. Then you will be forwarded to the configuration window.


Now apply the following steps:

  1. Before proceeding with the next step, first head to Network -> Firewall -> General Settings and Edit the default lan firewall zone, and remove the Guest network from the Covered Networks list
  2. At Covered Networks section select your newly created LAN interface.
  3. Set WAN at Allow Forward To Destination Zones section.
  4. Set WAN at Allow Forward From Destination Zones section.
  5. Save the changes.

Go to Network → Firewall → Traffic Rules. There create a new Forward rule by selecting Add new forward rule, changing the name to GUEST, setting the Source Zone to newzone, Destination zone to lan and pressing Add button. Then you will be forwarded to the configuration window.


Now apply the following steps:

  1. Enable the rule.
  2. Set Protocol to All.
  3. Select Action: Drop.
  4. Save the changes.

Results

Remote office should now be able to access HQ network resources. To verify the connection you can ping remote RUTX (HQ server) LAN IP and if you get a reply, you have successfully connected to HQ‘s internal network. Also, all LAN addresses, that belong to the work network (192.168.1.0/24), should now be leased to LAN devices by HQ router.


In order to check the guest WiFi, you simply need to connect to the newly created WiFi AP, then check whether you have internet connectivity and try to ping OpenVPN server LAN IP - if everything is set up correctly, you should not be able to do that.