Difference between revisions of "Connecting to the office network remotely from your home via VPN (OpenVPN) using RUTX"
From Teltonika Networks Wiki
(Created page with "==Configuration overview and prerequisites== '''Prerequisites''': *One RUTX router of any type *A Public Static or Public Dynamic IP addresses *At least one end device with W...") |
|||
| Line 36: | Line 36: | ||
==Configuring OpenVPN from the server-side== | ==Configuring OpenVPN from the server-side== | ||
| − | + | <table class="nd-othertables_2"> | |
| − | + | <tr> | |
| + | <th width="355;" style="border-bottom: 1px solid white;"></th> | ||
| + | <th rowspan="2" width="790;" style="border-bottom: 1px solid white;">[[File:Ovpn3.png|alt=|right|770x770px]]</th> | ||
| + | </tr> | ||
| + | <tr> | ||
| + | <td style="border-bottom: 1px solid white;"> | ||
| + | Login to the router's WebUI and navigate to the '''Services → VPN → OPENVPN''' page and do the following: | ||
| + | <ol> | ||
| + | <li>Enter a '''custom configuration name'''</li> | ||
| + | <li>Select '''Role: Server'''. | ||
| + | </li> | ||
| + | <li>Click the '''Add''' button.</li> | ||
| + | <li>Click the '''Edit''' button next to the newly created OpenVPN instance.</li> | ||
| + | </ol> | ||
| + | </td> | ||
| + | </tr> | ||
| + | </table> | ||
| + | |||
| + | ---- | ||
| + | |||
| + | <table class="nd-othertables_2"> | ||
| + | <tr> | ||
| + | <th width="355;" style="border-bottom: 1px solid white;"></th> | ||
| + | <th rowspan="2" width="790;" style="border-bottom: 1px solid white;">[[File:Networking_rutx_configuration_examples_l2tp_over_ipsec_windows_10_2_v1.png|770px|right]]</th> | ||
| + | </tr> | ||
| + | <tr> | ||
| + | <td style="border-bottom: 1px solid white"> | ||
| + | <ol> | ||
| + | <li>'''Enable''' OpenVPN instance.</li> | ||
| + | <li>Change '''Authentication''' to: '''TLS''' | ||
| + | </li> | ||
| + | <li>Change '''Encryption''' to: '''AES-256-GCM 256''' | ||
| + | </li></ol> | ||
| + | </td> | ||
| + | </tr> | ||
| + | </table> | ||
Revision as of 08:34, 19 April 2022
Configuration overview and prerequisites
Prerequisites:
- One RUTX router of any type
- A Public Static or Public Dynamic IP addresses
- At least one end device with Windows 10
The topology above depicts the OpenVPN scheme. - The router with the Public IP address (RUTX11) acts as the OpenVPN server and the Windows 10 device acts as a client. OpenVPN connects the networks of RUTX11 and Windows 10 clients.
When the scheme is realized, home workers will be able to reach the corporation’s internal network with all internal systems, allowing working from home to be possible.
Configuring OpenVPN from the client-side
TLS Certificates
- Firstly generate TLS certificates on your Windows Computer, you can find instructions on how to do it here.
- After you've successfully generated TLS certificates you will need to create a .ovpn file for storing client configurations. Simply open any text editor and follow this tutorial.
- Important: in your .ovpn file certificates you will need to copy are:
- In <ca> </ca> paste whole certificate from /easy-rsa/pki/ca.crt
- IN <cert></cert> paste whole certificate from /easy-rsa/pki/issued/"your_client_name".crt
- And in the last section <key></key> paste whole private key from /easy-rsa/pki/private/"your_client_name".key
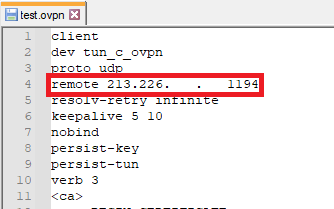
- One more thing to change in your .ovpn file is to change the IP address to your router's public IP address:

- Now you can import your .ovpn file to the OpenVPN client by right-clicking on OpenVPN GUI in the hidden icons tray and navigating to Import > Import File.

Do not connect yet to your vpn client, we still have to configure the server.
Configuring OpenVPN from the server-side
 |
|
|---|---|
|
Login to the router's WebUI and navigate to the Services → VPN → OPENVPN page and do the following:
|
 |
|
|---|---|
|

