Difference between revisions of "Teltonika EYE device pairing and data sender configuration example"
Justas.Cip (talk | contribs) |
Justas.Cip (talk | contribs) |
||
| Line 67: | Line 67: | ||
*'''URL/Host/Connection string''': 192.168.1.211:8080 (server address and port) (6) | *'''URL/Host/Connection string''': 192.168.1.211:8080 (server address and port) (6) | ||
* Leave everything else as default and press '''Save & Apply''' | * Leave everything else as default and press '''Save & Apply''' | ||
| + | |||
| + | [[File:Bluetootheyesensorconfiguration httpdatatoserver v1.png|border|600px|class=tlt-border]] | ||
| + | |||
| + | ===TCP server setup=== | ||
| + | ---- | ||
| + | Since we are using Hercules application as TCP server, the setup is simple: start the application and switch to the TCP server tab. Make sure to listen on the same port(8080 in this example) as set up in data sender configuration (1) and you should see the Bluetooth data incoming (2). | ||
| + | |||
| + | [[File:Bluetootheyesensorconfiguration herculesdata v1.png|border|600px|class=tlt-border]] | ||
Revision as of 13:59, 25 January 2023
Main Page > General Information > Configuration Examples > Hardware application > Teltonika EYE device pairing and data sender configuration exampleThe information in this page is updated in accordance with firmware version 00.07.03.2.
Introduction
In this article, we will explore the usage of Teltonika Eye sensors and beacons with Teltonika Networks devices. The Teltonika Eye sensor is a powerful tool that allows for monitoring and tracking of vehicles and other mobile assets. When paired with Teltonika devices, the sensor can provide a wealth of information such as identification, temperature, humidity and even movement.
Prerequisites
For this use case, we are going to need Teltonika Networks device with Bluetooth support, for example, RUTX11. We are also going to need either a Teltonika EYE sensor or Teltonika EYE beacon.
Connection topology
Connection topology in this case is simple, we are going to send Bluetooth data from either EYE sensor or EYE beacon using Data to server functionality.
Adjusting EYE device Protocol and settings
The Teltonika Eye sensor supports several Bluetooth protocols, including iBeacon and Eddystone. By supporting both Protocols, the Teltonika Eye sensor can be used in a variety of different applications and environments. For more information regarding these settings, please refer to this article: EYE App configuration
Connecting Bluetooth sensors to the device
Follow these steps to pair either EYE sensor or EYE beacon to the device.
- Navigate to Services -> Bluetooth
- Press on the toggle to Enable Bluetooth (1)
- Press Scan (2)
Once the Scan is finished, you should be able to see a list with all Bluetooth devices around. You can identify your EYE device by looking at the MAC address on top of it. To Pair an EYE device to our RUTX11, simply select it (1) and press Pair (2).
If the EYE device paired successfully, you should be able to find it in the Paired Devices list. Press on the Details button to view if the details and protocol are displayed correctly.
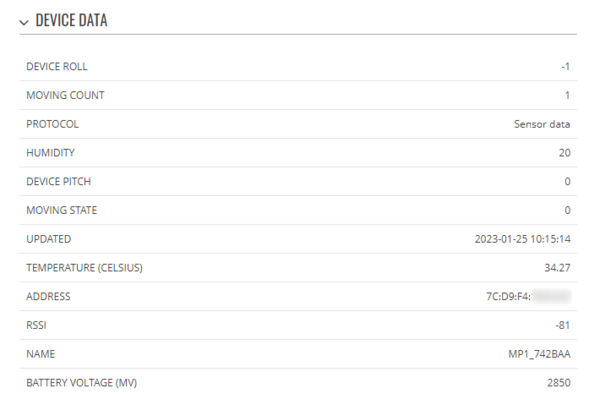
Here is how the information should be displayed if you connect Bluetooth EYE Sensor and press the Details button. You should be able to see information like Humidity, Temperature, Signal Strength, Battery Voltage, etc.
Bluetooth Data to Server via MQTT protocol
In this section, we are going to upload Bluetooth data to server using MQTT Protocol.
Bluetooth Data to Server using HTTP protocol
In this section, we are going to upload Bluetooth data to server using HTTP Protocol. We are going to use a Hercules app as a TCP server to get Bluetooth sensor data from the device.
Data sender setup
Follow these steps to configure Data to server functionality:
- Navigate to Services -> Data to server
- Press Add to add new data sender
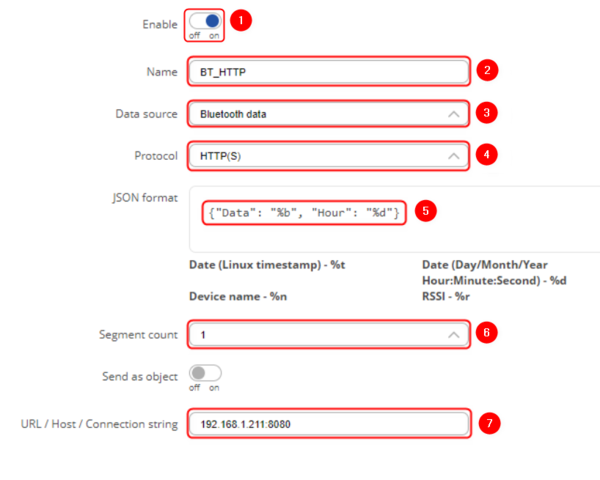
In the new screen, adjust settings accordingly:
- Enable: on
- Name: BT_HTTP (input any preferred name) (1)
- Data source: Bluetooth data (2)
- Protocol: HTTP (3)
- JSON format: {"Data": "%b", "Hour": "%d"} - adjust JSON format according to your needs (4)
- Segment count: 1 (5)
- URL/Host/Connection string: 192.168.1.211:8080 (server address and port) (6)
- Leave everything else as default and press Save & Apply
TCP server setup
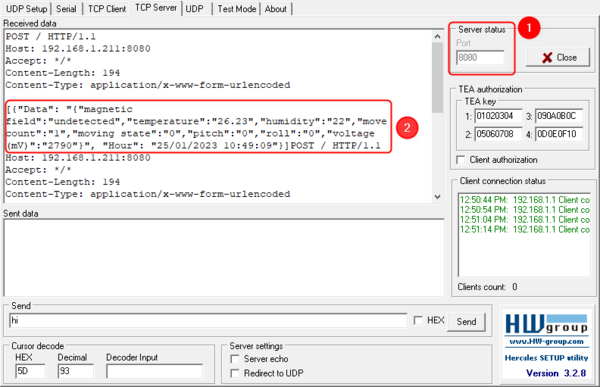
Since we are using Hercules application as TCP server, the setup is simple: start the application and switch to the TCP server tab. Make sure to listen on the same port(8080 in this example) as set up in data sender configuration (1) and you should see the Bluetooth data incoming (2).


