Difference between revisions of "Template:Networking rutx configuration example openvpn bridge use case"
| (33 intermediate revisions by 2 users not shown) | |||
| Line 3: | Line 3: | ||
<th width=325; style="border-bottom: 1px solid white;></th> | <th width=325; style="border-bottom: 1px solid white;></th> | ||
<th width=820; style="border-bottom: 1px solid white;" rowspan=2;> | <th width=820; style="border-bottom: 1px solid white;" rowspan=2;> | ||
| − | [[File: | + | [[File:Networking_rutx_configuration_example_openvpn_bridge_use_case_topology_v2.png|border|class=tlt-border|750px|right]]</th> |
</tr> | </tr> | ||
<tr> | <tr> | ||
| Line 27: | Line 27: | ||
==Configuring HQ office router== | ==Configuring HQ office router== | ||
===OpenVPN=== | ===OpenVPN=== | ||
| + | ---- | ||
| + | ====Generating Static key==== | ||
---- | ---- | ||
| Line 50: | Line 52: | ||
<tr> | <tr> | ||
<th width=355; style="border-bottom: 1px solid white;></th> | <th width=355; style="border-bottom: 1px solid white;></th> | ||
| − | <th width=790; style="border-bottom: 1px solid white;" rowspan=2>[[File: | + | <th width=790; style="border-bottom: 1px solid white;" rowspan=2>[[File:Networking_rutx_configuration_example_openvpn_bridge_use_case_2_v2.png|770px|right]]</th> |
</tr> | </tr> | ||
<tr> | <tr> | ||
<td style="border-bottom: 1px solid white> | <td style="border-bottom: 1px solid white> | ||
| − | Write the following commands to create | + | Write the following commands to create OpenVPN '''Static key''', which will be used for authentication: |
1) cd /etc/easy-rsa | 1) cd /etc/easy-rsa | ||
2) openvpn --genkey --secret static.key | 2) openvpn --genkey --secret static.key | ||
| − | |||
</td> | </td> | ||
</tr> | </tr> | ||
</table> | </table> | ||
| + | ====Extracting the key==== | ||
| + | ---- | ||
| + | =====Linux===== | ||
| + | ---- | ||
| + | |||
| + | If you are using a Linux-based OS, extracting files from the router is simple. Just go to the directory on your PC where you want to relocate the files, right click anywhere and choose the '''Open in Terminal''' option. In the Terminal command line use the '''Secure Copy''' ('''scp''') command to copy the files from the router. The full command should look something like this: | ||
| + | |||
| + | $ scp [email protected]:/etc/easy-rsa/static.key ./ | ||
| + | |||
| + | The '''[email protected]:/etc/easy-rsa/static.key''' specifies the path to where the Static key is located (replace the IP address with your router's LAN IP); the '''./''' denotes that you want to copy the contents to the directory you are in at the moment. | ||
| + | |||
| + | =====Windows===== | ||
---- | ---- | ||
| Line 67: | Line 80: | ||
<tr> | <tr> | ||
<th width=355; style="border-bottom: 1px solid white;></th> | <th width=355; style="border-bottom: 1px solid white;></th> | ||
| − | <th width=790; style="border-bottom: 1px solid white;" rowspan=2>[[File: | + | <th width=790; style="border-bottom: 1px solid white;" rowspan=2>[[File:Winscp login instructions.PNG|770px|right]]</th> |
</tr> | </tr> | ||
<tr> | <tr> | ||
<td style="border-bottom: 1px solid white> | <td style="border-bottom: 1px solid white> | ||
| − | + | If you are using Windows, you can copy files from the router using '''WinSCP''', an Open source freeware SFTP, SCP and FTP client for Windows OS. Use the same login information with WinSCP as with CLI or SSH. | |
| + | |||
| + | '''Please note''': You must select '''SCP''' as File Protocol in WinSCP Session settings. | ||
</td> | </td> | ||
</tr> | </tr> | ||
</table> | </table> | ||
| + | ---- | ||
| + | |||
| + | <table class="nd-othertables_2"> | ||
| + | <tr> | ||
| + | <th width=355; style="border-bottom: 1px solid white;></th> | ||
| + | <th width=790; style="border-bottom: 1px solid white;" rowspan=2>[[File:Winscp interface example.PNG|770px|right]]</th> | ||
| + | </tr> | ||
| + | <tr> | ||
| + | <td style="border-bottom: 1px solid white> | ||
| + | Once you've connected to the router with WinSCP, copying the files should be simple enough: just go to '''/etc/easy-rsa/''', select the Static key file and drag it to directory on your PC where you would like to store it. | ||
| + | </td> | ||
| + | </tr> | ||
| + | </table> | ||
| + | |||
| + | ====Configuring OpenVPN server==== | ||
---- | ---- | ||
| Line 107: | Line 137: | ||
<li>Select '''Authentication: Static key'''.</li> | <li>Select '''Authentication: Static key'''.</li> | ||
<li>Add '''Keep alive''' interval: '''10 120'''.</li> | <li>Add '''Keep alive''' interval: '''10 120'''.</li> | ||
| − | <li>Upload '''Static pre-shared key''' | + | <li>Upload '''Static pre-shared key'''.</li> |
<li>'''Save''' the changes.</li> | <li>'''Save''' the changes.</li> | ||
</ol> | </ol> | ||
| Line 115: | Line 145: | ||
==Configuring remote office router== | ==Configuring remote office router== | ||
| − | === | + | |
| + | Before you start configuring the remote office router, set a static IP address on the device you are configuring the router with (e.g. 192.168.1.10). You can find instructions on how to do that here: | ||
| + | |||
| + | [[Setting_up_a_Static_IP_address_on_a_Ubuntu_16.04_PC|Ubuntu]] | ||
| + | |||
| + | [[Setting up a Static IP address on a Windows 10 PC|Windows]] | ||
| + | |||
| + | <span style="color: red;">'''Note: make sure to switch back to automatic DNS and IP address obtaining when you are done configuring the router.'''</span> | ||
| + | |||
| + | ===LAN=== | ||
---- | ---- | ||
| Line 121: | Line 160: | ||
<tr> | <tr> | ||
<th width=355; style="border-bottom: 1px solid white;></th> | <th width=355; style="border-bottom: 1px solid white;></th> | ||
| − | <th width=790; style="border-bottom: 1px solid white;" rowspan=2>[[File: | + | <th width=790; style="border-bottom: 1px solid white;" rowspan=2>[[File:Networking_rutx_configuration_example_openvpn_bridge_use_case_8_v1.png|770px|right]]</th> |
</tr> | </tr> | ||
<tr> | <tr> | ||
<td style="border-bottom: 1px solid white> | <td style="border-bottom: 1px solid white> | ||
| − | Go to ''' | + | Go to '''Network → LAN''' and press '''Edit''' next to your LAN interface: |
</td> | </td> | ||
</tr> | </tr> | ||
| Line 135: | Line 174: | ||
<tr> | <tr> | ||
<th width=355; style="border-bottom: 1px solid white;></th> | <th width=355; style="border-bottom: 1px solid white;></th> | ||
| − | <th width=790; style="border-bottom: 1px solid white;" rowspan=2>[[File: | + | <th width=790; style="border-bottom: 1px solid white;" rowspan=2>[[File:Networking_rutx_configuration_example_openvpn_bridge_use_case_9_v1.png|770px|right]]</th> |
</tr> | </tr> | ||
<tr> | <tr> | ||
<td style="border-bottom: 1px solid white> | <td style="border-bottom: 1px solid white> | ||
| − | + | Apply the following steps: | |
<ol> | <ol> | ||
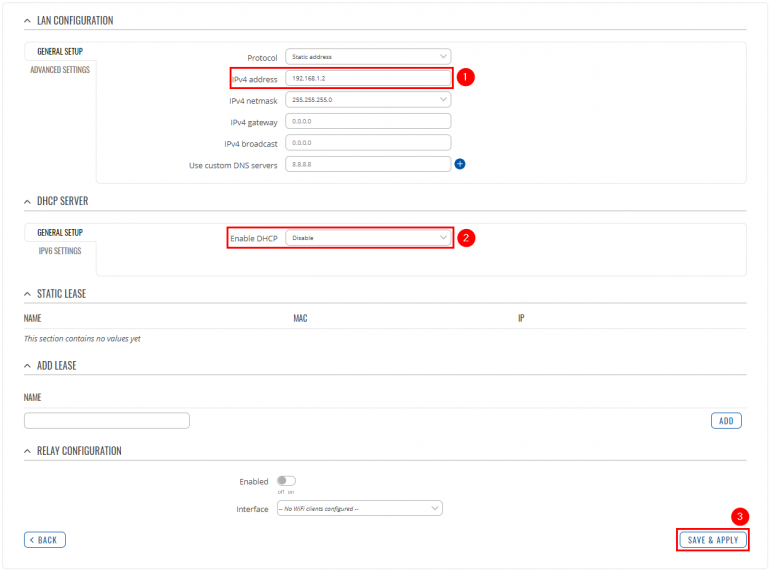
| − | <li>''' | + | <li>Change your '''LAN IP address''' to: '''192.168.1.2</li> |
| − | + | <li>Disable '''DHCP'''.</li> | |
| − | |||
| − | |||
| − | |||
| − | |||
| − | <li> | ||
<li>'''Save''' the changes.</li> | <li>'''Save''' the changes.</li> | ||
</ol> | </ol> | ||
| Line 155: | Line 189: | ||
</table> | </table> | ||
| − | === | + | ===OpenVPN=== |
| + | ---- | ||
| + | ====Configuring OpenVPN client==== | ||
---- | ---- | ||
| Line 161: | Line 197: | ||
<tr> | <tr> | ||
<th width=355; style="border-bottom: 1px solid white;></th> | <th width=355; style="border-bottom: 1px solid white;></th> | ||
| − | <th width=790; style="border-bottom: 1px solid white;" rowspan=2>[[File: | + | <th width=790; style="border-bottom: 1px solid white;" rowspan=2>[[File:Networking_rutx_configuration_example_openvpn_bridge_use_case_6_v1.png|770px|right]]</th> |
</tr> | </tr> | ||
<tr> | <tr> | ||
<td style="border-bottom: 1px solid white> | <td style="border-bottom: 1px solid white> | ||
| − | + | Go to '''Services → VPN → OpenVPN'''. There create a new configuration by selecting role '''Client''', writing '''New configuration name''' and pressing '''Add''' button. It should appear after a few seconds. Then press '''Edit'''. | |
</td> | </td> | ||
</tr> | </tr> | ||
| Line 175: | Line 211: | ||
<tr> | <tr> | ||
<th width=355; style="border-bottom: 1px solid white;></th> | <th width=355; style="border-bottom: 1px solid white;></th> | ||
| − | <th width=790; style="border-bottom: 1px solid white;" rowspan=2>[[File: | + | <th width=790; style="border-bottom: 1px solid white;" rowspan=2>[[File:Networking_rutx_configuration_example_openvpn_bridge_use_case_7_v2.png|770px|right]]</th> |
</tr> | </tr> | ||
<tr> | <tr> | ||
<td style="border-bottom: 1px solid white> | <td style="border-bottom: 1px solid white> | ||
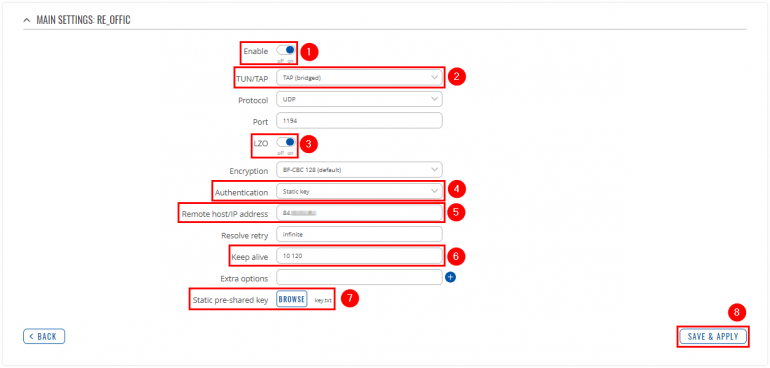
| − | + | Now apply the following configuration: | |
<ol> | <ol> | ||
| − | <li> | + | <li>'''Enable''' instance.</li> |
| − | <li> | + | <li>Set '''TUN/TAP''' to '''TAP (bridged)'''.</li> |
| + | <li>Enable '''LZO'''.</li> | ||
| + | <li>Select '''Authentication: Static key'''.</li> | ||
| + | <li>Write '''Remote host/IP address''' (RUTX OpenVPN server public IP).</li> | ||
| + | <li>Add '''Keep alive''' interval: '''10 120'''.</li> | ||
| + | <li>Upload '''Static pre-shared key'''.</li> | ||
<li>'''Save''' the changes.</li> | <li>'''Save''' the changes.</li> | ||
</ol> | </ol> | ||
Latest revision as of 09:28, 27 January 2023
|
|
Configuration overview and prerequisites
Prerequisites:
- Two RUTX routers
- A Public Static or Public Dynamic IP addresses
- An end device to configure the router (PC, Laptop, Tablet, Smartphone)
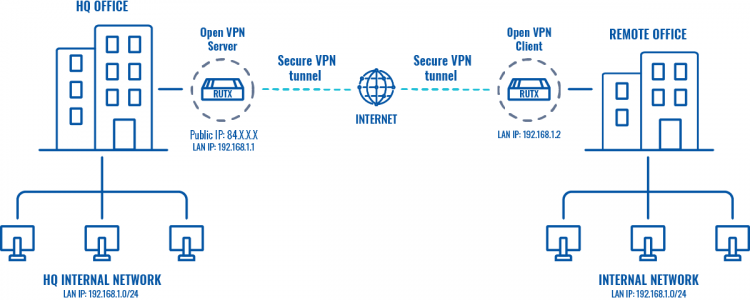
The topology above depicts the OpenVPN scheme. The router with the Public IP address (RUTX) acts as the OpenVPN server and other RUTX acts as client. OpenVPN connects the networks of HQ Office and Remote Office.
When the scheme is realized, remote office workers will be able to reach HQ’s internal network with all internal systems, allowing working from remote office to be possible. All remote office's WAN and LAN traffic is going to travel through VPN tunnel.
Configuring HQ office router
OpenVPN
Generating Static key
|
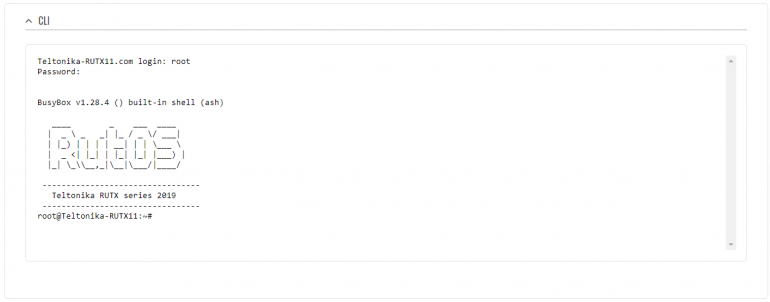
Login to the router's WebUI, navigate to the Services → CLI page and do the following:
|
|
Write the following commands to create OpenVPN Static key, which will be used for authentication: 1) cd /etc/easy-rsa 2) openvpn --genkey --secret static.key |
Extracting the key
Linux
If you are using a Linux-based OS, extracting files from the router is simple. Just go to the directory on your PC where you want to relocate the files, right click anywhere and choose the Open in Terminal option. In the Terminal command line use the Secure Copy (scp) command to copy the files from the router. The full command should look something like this:
$ scp [email protected]:/etc/easy-rsa/static.key ./
The [email protected]:/etc/easy-rsa/static.key specifies the path to where the Static key is located (replace the IP address with your router's LAN IP); the ./ denotes that you want to copy the contents to the directory you are in at the moment.
Windows
|
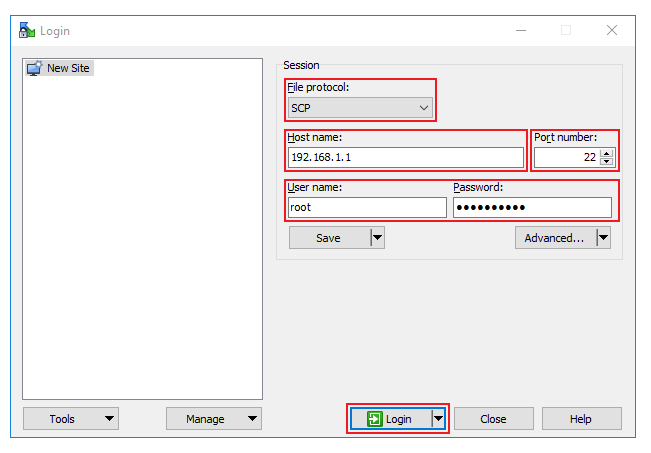
If you are using Windows, you can copy files from the router using WinSCP, an Open source freeware SFTP, SCP and FTP client for Windows OS. Use the same login information with WinSCP as with CLI or SSH. Please note: You must select SCP as File Protocol in WinSCP Session settings. |
|
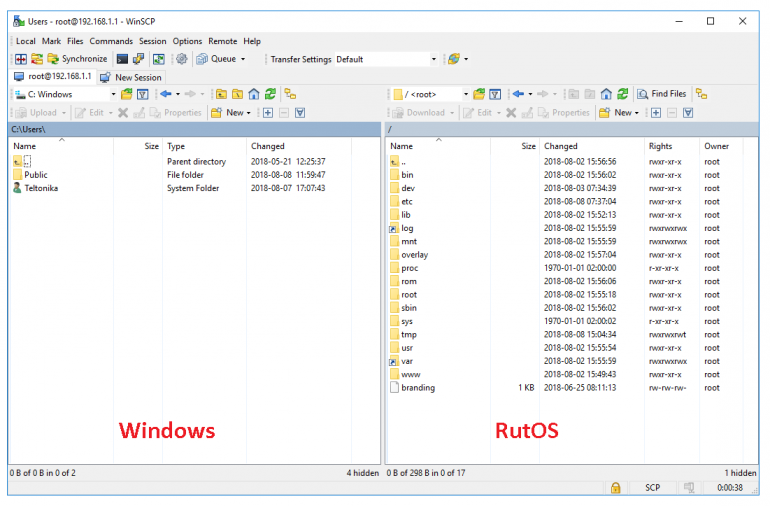
Once you've connected to the router with WinSCP, copying the files should be simple enough: just go to /etc/easy-rsa/, select the Static key file and drag it to directory on your PC where you would like to store it. |
Configuring OpenVPN server
|
Now go to Services → VPN → OpenVPN. There create a new configuration by selecting role Server, writing New configuration name and pressing Add button. It should appear after a few seconds. Then press Edit. |
|
Now apply the following configuration:
|
Configuring remote office router
Before you start configuring the remote office router, set a static IP address on the device you are configuring the router with (e.g. 192.168.1.10). You can find instructions on how to do that here:
Note: make sure to switch back to automatic DNS and IP address obtaining when you are done configuring the router.
LAN
|
Go to Network → LAN and press Edit next to your LAN interface: |
|
Apply the following steps:
|
OpenVPN
Configuring OpenVPN client
|
Go to Services → VPN → OpenVPN. There create a new configuration by selecting role Client, writing New configuration name and pressing Add button. It should appear after a few seconds. Then press Edit. |
|
Now apply the following configuration:
|
Results
|
Remote office should now be able to access HQ network resources. To verify the connection you can ping remote RUTX HQ server LAN IP and if you get a reply, you have successfully connected to HQ‘s internal network. Also, all LAN addresses should now be leased to the LAN devices by HQ router. |
